spring与flex结合
上篇文章提到java与flex结合,这种方法简单,但缺点也很明显,不利于大型项目的开发与管理,然而现在几乎所有J2ee,JAVAEE项目都会用到spring框架,所以spring与flex结合就是一种必然。
令人高兴的是spring组织也早就意识到了这一点,推出了一款spring与flex结合的插件:Spring BlazeDS Integration
下载地址是:http://s3.amazonaws.com/dist.springframework.org/milestone/FLEX/spring-flex-1.5.0.RC1-dist.zip
通过sbi我们可以很轻松的用spring来控制java和flex的配置,而不必在flex的配置文件中配置大量的remoteObject了。
下面开始整合spring和flex:
1.首先新建一个web工程,名称为spring_flex_demo;
2.通过上篇文章我们知道flex通过blazeds可以与java结合,所以这里也离不开它,解压官网下载的blazeds.war到我们的工程web目录下,替换原来的文件内容。
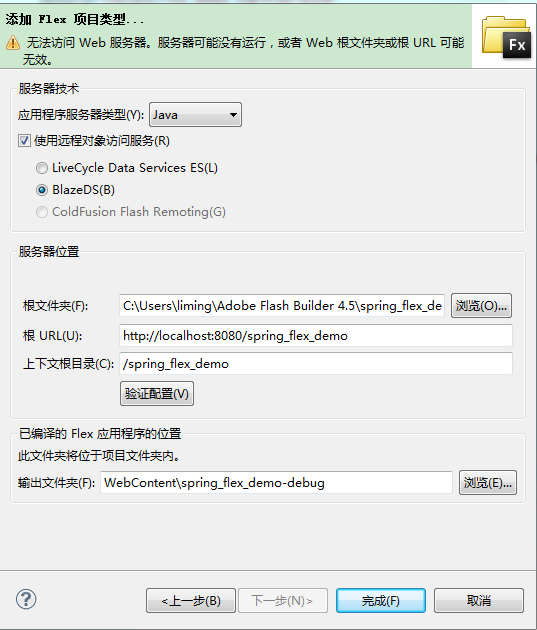
3.右键单击项目选择“添加/修改项目类型”,选择“添加flex项目类型”,然后按我上篇文章,blazeds与java结合的例子配置,配置成功后开始准备整合spring了。
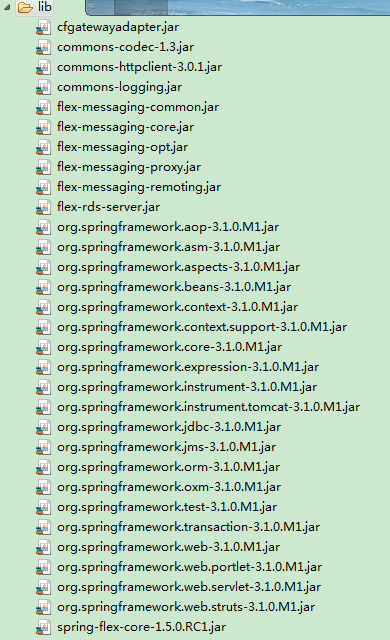
4.拷贝sbi 的jar包到lib目录下,拷贝spring的jar到lib下。
5.下面开始配置spring,首先配置web.xml。
删除原blazeds的内容,添加sbi的配置
  <!-- The front controller of this Spring Web application, responsible for handling all application requests -->
<servlet>
    <servlet-name>Spring MVC Dispatcher Servlet</servlet-name>
    <servlet-class>org.springframework.web.servlet.DispatcherServlet</servlet-class>
    <init-param>
        <param-name>contextConfigLocation</param-name>
        <param-value>/WEB-INF/config/web-application-config.xml</param-value>
    </init-param>
    <load-on-startup>1</load-on-startup>
</servlet>
  <!-- Map all /messagbroker requests to the DispatcherServlet for handling -->
<servlet-mapping>
    <servlet-name>Spring MVC Dispatcher Servlet</servlet-name>
    <url-pattern>/messagebroker/*</url-pattern>
</servlet-mapping>
其实这段话可以在sbi的文档中找到。
6.如果你想用springMVC,则可以配置成下列情况:
<context-param>
    <param-name>contextConfigLocation</param-name>
    <param-value>
        /WEB-INF/spring/*-context.xml
    </param-value>
</context-param>

<listener>
    <listener-class>org.springframework.web.context.ContextLoaderListener</listener-class>
</listener>

<servlet>
    <servlet-name>flex</servlet-name>
    <servlet-class>org.springframework.web.servlet.DispatcherServlet</servlet-class>
    <load-on-startup>1</load-on-startup>
</servlet>

<servlet-mapping>
    <servlet-name>flex</servlet-name>
    <url-pattern>/messagebroker/*</url-pattern>
</servlet-mapping>

<servlet>
    <servlet-name>spring-mvc</servlet-name>
    <servlet-class>org.springframework.web.servlet.DispatcherServlet</servlet-class>
    <load-on-startup>1</load-on-startup>
</servlet>

<servlet-mapping>
    <servlet-name>spring-mvc</servlet-name>
    <url-pattern>/spring/*</url-pattern>
</servlet-mapping>
完整的web.xml
<?xml version="1.0" encoding="UTF-8"?>
<!DOCTYPE web-app PUBLIC "-//Sun Microsystems, Inc.//DTD Web Application 2.3//EN" "http://java.sun.com/dtd/web-app_2_3.dtd">
<web-app>


  <!-- The front controller of this Spring Web application, responsible for handling all application requests -->
<servlet>
    <servlet-name>Spring MVC Dispatcher Servlet</servlet-name>
    <servlet-class>org.springframework.web.servlet.DispatcherServlet</servlet-class>
    <init-param>
        <param-name>contextConfigLocation</param-name>
        <param-value>/WEB-INF/config/web-application-config.xml</param-value>
    </init-param>
    <load-on-startup>1</load-on-startup>
</servlet>
  <!-- Map all /messagbroker requests to the DispatcherServlet for handling -->
<servlet-mapping>
    <servlet-name>Spring MVC Dispatcher Servlet</servlet-name>
    <url-pattern>/messagebroker/*</url-pattern>
</servlet-mapping>

    <welcome-file-list>
        <welcome-file>index.html</welcome-file>
        <welcome-file>index.htm</welcome-file>
    </welcome-file-list>

</web-app>
标红地方可以根据情况自行更改
7.更改spring配置文件:
新建一个web-application-config.xml文件,插入以下内容:
<?xml version="1.0" encoding="UTF-8"?>
<beans xmlns="http://www.springframework.org/schema/beans"
       xmlns:flex="http://www.springframework.org/schema/flex"
       xmlns:xsi="http://www.w3.org/2001/XMLSchema-instance"
       xsi:schemaLocation="
           http://www.springframework.org/schema/beans
           http://www.springframework.org/schema/beans/spring-beans-2.5.xsd
           http://www.springframework.org/schema/flex
           http://www.springframework.org/schema/flex/spring-flex-1.0.xsd">


</beans>
这个配置文件已经添加了对flex标签的支持。
8.添加flex内容:
在web-application-config.xml添加:
<!-- Bootstraps and exposes the BlazeDS MessageBroker -->
<bean id="_messageBroker" class="org.springframework.flex.core.MessageBrokerFactoryBean" >
    <property name="servicesConfigPath" value="WEB-INF/flex/services-config.xml" />
</bean>
再添加
<!-- Maps request paths at /* to the BlazeDS MessageBroker -->
<bean class="org.springframework.web.servlet.handler.SimpleUrlHandlerMapping">
    <property name="mappings">
        <value>
            /*=_messageBroker
        </value>
    </property>
</bean>

<!-- Dispatches requests mapped to a MessageBroker -->
<bean class="org.springframework.flex.servlet.MessageBrokerHandlerAdapter"/>
至此spring配置算是基本完成了
9.下面配置flex,打开WEB-INF/flex/services-config.xml 修改“<channel-definition id="my-amf" class="mx.messaging.channels.AMFChannel">“为
<channel-definition id="my-amf" class="mx.messaging.channels.AMFChannel">
    <endpoint url="http://{server.name}:{server.port}/{context.root}/messagebroker/amf"
        class="flex.messaging.endpoints.AMFEndpoint"/>
    <properties>
        <polling-enabled>false</polling-enabled>
    </properties>
</channel-definition>
大功告成!

