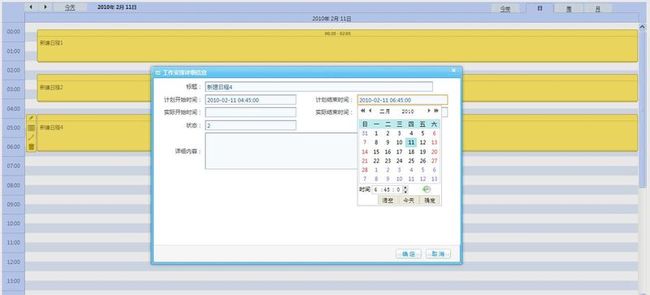
jsp+jquery + struts2 + hibernate + spring +dhtmlxScheduler日程的集成(一)
参看后台部分的:
jsp+jquery + struts2 + hibernate + spring +dhtmlxScheduler日程的集成(二)
1、在http://www.dhtmlx.com/docs/products/dhtmlxScheduler/index.shtml上下载 dhtmlxScheduler。
2、中文化:把sources下的locale_recurring_cn.js放到codebase下。
3、拷贝codebase目录到WebRoot下。 3、在jsp中添加://我采用了jquery的ajax来更新。
因为我需要年视图,所以加入了dhtmlxscheduler_year_view.js。
4、在用户点击年月日或下一个上一个,今天这些按钮时,我要刷新当前的数据,所以我用了两个INPUT来记录当前的视图 (年、月、日、周)和当前所在的日期。
5、读取数据dhtmlxScheduler采用xml文件来生成视图,后台需提供xml文件。
6、让scheduler读取后台传来的xml地址
7、自定义dhtmlxScheduler的处理函数如:增加,删除,编辑,保存等
-------------------------------------------------------------具体的操作:
1、主页面calendar.jsp:
<script type="text/javascript" src="js/jquery.js"></script>//jquery库
<script src="dhtmlxScheduler/dhtmlxscheduler.js" type="text/javascript" charset="utf-8"></script>//dhtmlxscheduler主js
<script src="dhtmlxScheduler/ext/dhtmlxscheduler_year_view.js" type="text/javascript" charset="utf-8"></script>//dhtmlxscheduler年视图js
<link rel="stylesheet" href="dhtmlxScheduler/dhtmlxscheduler.css" type="text/css" charset="utf-8">//dhtmlxscheduler CSS文件
<link rel="stylesheet" href="dhtmlxScheduler/ext/dhtmlxscheduler_ext.css" type="text/css" charset="utf-8">//dhtmlxscheduler CSS文件
<script src="dhtmlxScheduler/locale_cn.js" type="text/javascript" charset="utf-8"></script>//dhtmlxscheduler 本地化文件支持中文
<script type="text/javascript" src="js/base.js"></script>//这两个是我自己增加的,一个是封装一些基本操作的js函数。另外一个是弹出dialog的js文件
<script type="text/javascript" src="js/dialog.js"></script>
//定义一个form,该form定义了查询的所在的日期,例如2010-5-5,另外一个是视图模式(月,年,日,周),这两个参数主要是用于传参的,因为
用户可能查询任意时间和模型,所以必须将这些参数记住,传给后台,然后后台在传回来,用户改变日历日期或者视图模式,calendar.jsp重新跳转,所以
必须记下来,以便和其点击的一致。
<s:form>
<s:hidden name="queryDate"></s:hidden>
<s:hidden name="queryMode"></s:hidden>
</s:form>
//定义区域来放置日历。
<div id="scheduler_here" class="dhx_cal_container" style='width: 100%; height: 100%;'>
<div class="dhx_cal_navline">
<div class="dhx_cal_prev_button">
</div>
<div class="dhx_cal_next_button">
</div>
<div class="dhx_cal_today_button"></div>
<div class="dhx_cal_date"></div>
<div class="dhx_cal_tab" name="day_tab" style="right: 204px;"></div>
<div class="dhx_cal_tab" name="week_tab" style="right: 140px;"></div>
<div class="dhx_cal_tab" name="year_tab" style="right: 280px;"></div>
<div class="dhx_cal_tab" name="month_tab" style="right: 76px;"></div>
</div>
<div class="dhx_cal_header">
</div>
<div class="dhx_cal_data">
</div>
</div>
//有了上边之后,下面我们来处理dhtmlxscheduler的初始化等。
<script type="text/javascript" charset="utf-8">
//初始化
function init()
{
scheduler.config.multi_day = true;
scheduler.config.xml_date="%Y-%m-%d %H:%i";
//初始日期和模式
//后台的日期和模式参数,这里进行解析,并且将根据该模式,来设定日历的数据读取范围 //例如日期为 2010-05-05,模式为月模式,那么现实给用户的应该是2010-05-01至2010-05-30范围的数据
将这些参数传给dhtmlxScheduler的init函数
scheduler.init('scheduler_here', new Date(
parseInt("<%= request.getAttribute("queryDate")%>".substring(0, 4)),
parseInt("<%= request.getAttribute("queryDate")%>".substring(5, 7) ) - 1,
parseInt("<%= request.getAttribute("queryDate")%>".substring(8, 10))),
"<%= request.getAttribute("queryMode")%>");
//自定义dhtmlxScheduler的处理函数,包括增加,改变,删除前提示,编辑保存等。
scheduler.attachEvent("onEventAdded", addEvent);//定义方法
scheduler.attachEvent("onEventChanged", changeEvent);
scheduler.attachEvent("onBeforeEventDelete", deleteEvent);
//scheduler.attachEvent("onEdit", function(){alert('ok');});
var date = "<%= request.getAttribute("queryDate")%>"; //传来的日期参数
var dd = "&queryDate=" + date + "&queryMode=" + "<%= request.getAttribute("queryMode")%>";//生成URL来连接后台Action。
$.ajax(
{
type: "POST",
url: "calendar.action",//后台Action
data:'cmd=filePath' + dd,//参数
//dataType: "json",
success:
function(data)
{
var json= eval("("+data+")");
if(json.result == 'ok')
{
scheduler.load(json.path); //读取成功时,用后台传来的xml文件地址,让dhtmlxScheduler加载 ,后台的代码见(二)。
}
else
{
alert("读取失败!");
}
},
error:
function()
{
alert('无法连接服务器');
}
});
//选择时跳转 ,用户选择了日期,或者改变了模式(年,月,周,日)等都需要重新让当前页刷新并加载新的数据。
scheduler.setCurrentView=function(B,E)
{
if(E == null)
E = "<%= request.getAttribute("queryMode")%>";
var ss = B.getFullYear() + "-" + (B.getMonth() + 1)+ "-" + B.getDate();
var u = "calendar.action?cmd=query&queryDate="+ss+"&queryMode="+E;
window.location.href =u;
}
//打开详细信息,弹出自己的dialog,(不想用其本身提供的窗口,这个和我的数据不对称,舍弃)
scheduler.showLightbox = function(id)
{
var dialog = new Dialog(
{
id:'calendarDialog',
url:'calendar.action?cmd=detail&serial=' + id,//ACTION
title:"工作安排详细信息",
width : '700',
height:'450',
ok : function()
{ //点击详细信息窗口的保存按钮时,检查是否填写了一些信息。
var form = getIFrameDialogDoc('calendarDialog').forms[0];
if(form.title.value == null || form.title.value == '')
{
alertMsg("请填写主题");//填出自己的提示信息
return;
}
//保存自己定义的表单的,利用AJAX的保存。
var d = $(form).serialize()
$.ajax(
{
type: "POST",
url: "calendar.action",
data: d,
//dataType: "json",
success:
function(data)
{
var json= eval("("+data+")");
//alert(json.result);
if(json.result == 'ok')
{
alertMsg('保存成功');
closeDialog('calendarDialog');
var u = "calendar.action?cmd=query&queryDate="+document.getElementsByName("queryDate")[0].value+
"&queryMode="+document.getElementsByName("queryMode")[0].value;
window.location.replace(u);//保存成功后,需要刷新数据
}
else
{
alertMsg(json.text);
}
},
error:
function()
{
alert('error');
}
});
}
});
}
}
//新增处理 ,得到填写的数据,然后利用ajax提交到后台
var addEvent = function addEvent(event_id, e)
{
var text = e.text;
if(text == '')
{
alert("标题不能为空");
return;
}
var B = e.start_date;//alert(dateStart);
var ss = B.getFullYear() + "-" + (B.getMonth() + 1) + "-" + B.getDate() + " " + B.getHours() + ":" + B.getMinutes() + ":" + B.getSeconds();
var B = e.end_date;//alert(dateStart);
var ss1 = B.getFullYear() + "-" + (B.getMonth() + 1) + "-" + B.getDate() + " " + B.getHours() + ":" + B.getMinutes() + ":" + B.getSeconds();
var dd = "cmd=editPost&startDate=" + ss + "&endDate=" + ss1 + "&title=" + e.text;
$.ajax(
{
type: "POST",
url: "calendar.action",
data: dd,
//dataType: "json",
success:function(data)
{
var json= eval("("+data+")");
if(json.result == 'ok')
{
var u = "calendar.action?cmd=query&queryDate="+document.getElementsByName("queryDate")[0].value+
"&queryMode="+document.getElementsByName("queryMode")[0].value;
window.location.replace(u);
}
else
{
alert("添加失败!");
}
//alert(e.id);
},
error:function(){alert('无法连接服务器');}
});
}
//修改处理 得到填写的数据,然后利用ajax提交到后台
changeEvent = function (event_id, e)
{
try
{
var text = e.text;
if(text == '')
{
alert("标题不能为空");
return;
}
var B = e.start_date;//alert(dateStart);
var ss = B.getFullYear() + "-" + (B.getMonth() + 1) + "-" + B.getDate() + " " + B.getHours() + ":" + B.getMinutes() + ":" + B.getSeconds();
var B = e.end_date;//alert(dateStart);
var ss1 = B.getFullYear() + "-" + (B.getMonth() + 1) + "-" + B.getDate() + " " + B.getHours() + ":" + B.getMinutes() + ":" + B.getSeconds();
var dd = "cmd=editPost&startDate=" + ss + "&endDate=" + ss1 + "&serial=" + e.id + "&title=" + e.text;
$.ajax(
{
type: "POST",
url: "calendar.action",
data: dd,
success:function(data){var json= eval("("+data+")");
if(json.result == 'ok')
{
}
else
{
alert("更新失败!");
}},
error:function(){alert('无法连接服务器');}
});
}
catch(e)
{
alert(e);
}
}
//删除 利用ajax提交到后台
deleteEvent = function (event_id, event_object)
{
var dd = "cmd=del&serial=" + event_id ;
$.ajax(
{
type: "POST",
url: "calendar.action",
data: dd,
success:function(data){var json= eval("("+data+")");
if(json.result == 'ok')
{
var u = "calendar.action?cmd=query&queryDate="+document.getElementsByName("queryDate")[0].value+
"&queryMode="+document.getElementsByName("queryMode")[0].value;
window.location.href = u;
}
else
{
alert("删除失败!");
}},
error:function(){alert('无法连接服务器');}
});
}
</script>
//页面的处理基本就这些了,如果在复杂一点的,自己搞吧,我只是抛砖引玉,做简单的说明。
<body onload="init();">//在body中加载init函数。
后台的源代码在下一个中贴。


