在Titanium应用中导入Push通知(iOS篇)
让你的Titanium应用也能实现Push的功能吧。

1)申请证书(.p12文件) http://developer.apple.com/devcenter/ios/index.action
Log into Apple's provisioning portal and create a new appid. Take note of your bundle identifier or appid, use the same one form the last step

When you create your application, you need to configure it and enable push notifications. In your application list, click configure for the app you just created.

Now check the box to enable the notification service and click the configure box next to "Development Push SSL Certificate". Note that usually you setup 2 different certificates - one for development and one for production. This maps directly to your development provisioning profile and distribution provisioning profile.

This will prompt us for a certificate

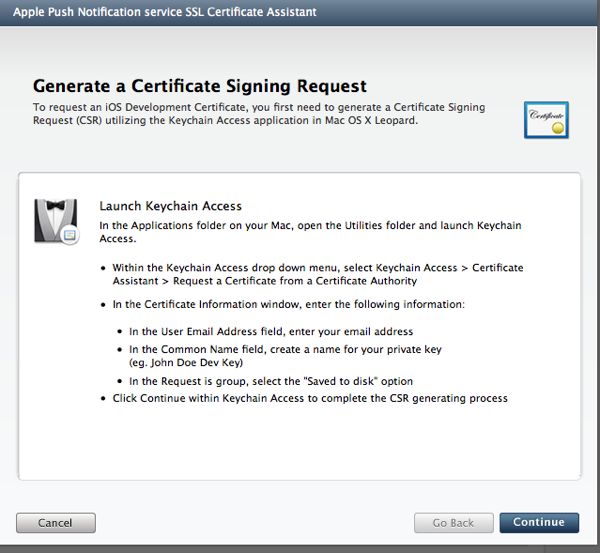
On your machine, open up your keychain and then click "Request a Certificate from a Certificate Authority..."

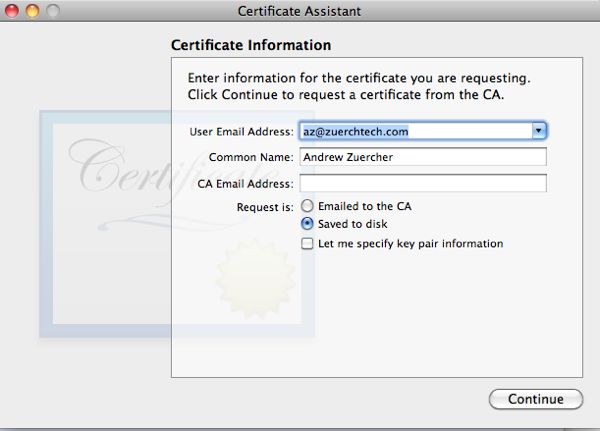
Put in your email address and common name and make sure that you check "Saved to disk"

Now in your browser, select the certificate request we just generated and submit the request. Once its been uploaded, you will see a status of pending, just refresh until the download button appears.

Click the download button for the certificate and once downloaded to your local machine, open it. This will bring up your keychain app with the certificate listed.

Right click the certificate and click "Export Apple Development Push Services: xxxx"

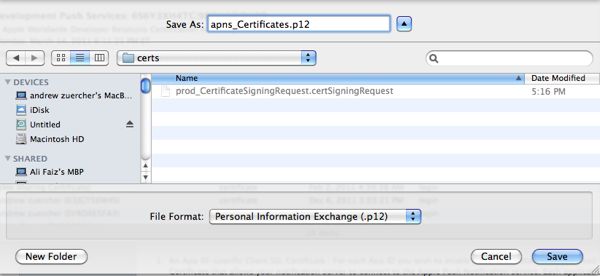
When you export, p12 format will work just fine (the default)

You will be prompted for a passphrase for the p12 file, you should definitely put something in here (urban airship requires this). Make sure that you take note of the passphrase as we'll need that later

2)将证书放在服务器端的任意文件夹下
3)java版服务器为例,需要的Lib:
apns-0.1.5-jar-with-dependencies.jar
slf4j-simple-1.6.1.jar
代码如下
==================================
【服务器端】
PHP的话可以参考apns-php
【客户端】
这里有一篇文章是介绍iPhone Push的。 iPhone的Push(推送通知)功能原理浅析
关于Android版的Push机能
=============================================
在Android 2.2版本FroYo之前, Google的Push机制直接就是利用XMPP协议的extension,也就是在<message>元素下加入自定义的子元素, 但自从FroYo, Android引入了一个新的框架C2DM(Cloud to Device Messaging), 而Google的Pushing 机制变成使用C2DM框架.
相关的介绍: 通过代码及流程图说明Google在Android上的Push机制的实现

1)申请证书(.p12文件) http://developer.apple.com/devcenter/ios/index.action
Log into Apple's provisioning portal and create a new appid. Take note of your bundle identifier or appid, use the same one form the last step

When you create your application, you need to configure it and enable push notifications. In your application list, click configure for the app you just created.
Now check the box to enable the notification service and click the configure box next to "Development Push SSL Certificate". Note that usually you setup 2 different certificates - one for development and one for production. This maps directly to your development provisioning profile and distribution provisioning profile.

This will prompt us for a certificate

On your machine, open up your keychain and then click "Request a Certificate from a Certificate Authority..."

Put in your email address and common name and make sure that you check "Saved to disk"

Now in your browser, select the certificate request we just generated and submit the request. Once its been uploaded, you will see a status of pending, just refresh until the download button appears.

Click the download button for the certificate and once downloaded to your local machine, open it. This will bring up your keychain app with the certificate listed.

Right click the certificate and click "Export Apple Development Push Services: xxxx"

When you export, p12 format will work just fine (the default)

You will be prompted for a passphrase for the p12 file, you should definitely put something in here (urban airship requires this). Make sure that you take note of the passphrase as we'll need that later

2)将证书放在服务器端的任意文件夹下
3)java版服务器为例,需要的Lib:
apns-0.1.5-jar-with-dependencies.jar
slf4j-simple-1.6.1.jar
代码如下
==================================
【服务器端】
ApnsService service = APNS.newService()
  .withCert(CER_PATH, CER_PASS)// CER_PATH是放证书的路劲 CER_PASS是证书的密码
  .withSandboxDestination()// 调试模式
  //.withProductionDestination() // 产品模式(调试和产品模式只能使用一种)
  .build();

String payload = APNS
  .newPayload()
  .sound("default") // 收到Push信息的声音
  .badge(1)        // 桌面图标上表示的数字
  .alertBody("A: This is a message") // 消息 最大 256bytes(包含自定义变量)
  .customField("accountId", "1")      // 自定义变量 (可以任意多个)
  .build();

// device_token is 64 bytes hex letter.
// device_token indicates a unique user.
service.push(<<device_token>>, payload);  // Push Notification。(没有返回值,只能扑捉NetworkIOException来判断异常)
PHP的话可以参考apns-php
【客户端】
Ti.Network.registerForPushNotifications({
    types: [
      Ti.Network.NOTIFICATION_TYPE_BADGE,
      Ti.Network.NOTIFICATION_TYPE_ALERT,
      Ti.Network.NOTIFICATION_TYPE_SOUND
    ],
    success:function(e) {
      Ti.API.debug("Push Notification success: " + JSON.stringify(e));
      var deviceToken = e.deviceToken;
      Ti.API.debug('successfully registered for apple device token with '+ deviceToken);
      Ti.App.Properties.setString(KEY_DEVICE_TOKEN, deviceToken);
    },
    error:function(e) {
      Ti.API.warn("push notifications disabled: "+ JSON.stringify(e));
    },
    callback:function(e) {
      // 处理接收到的消息
      processNotification(e);
    }
});
这里有一篇文章是介绍iPhone Push的。 iPhone的Push(推送通知)功能原理浅析
关于Android版的Push机能
=============================================
在Android 2.2版本FroYo之前, Google的Push机制直接就是利用XMPP协议的extension,也就是在<message>元素下加入自定义的子元素, 但自从FroYo, Android引入了一个新的框架C2DM(Cloud to Device Messaging), 而Google的Pushing 机制变成使用C2DM框架.
相关的介绍: 通过代码及流程图说明Google在Android上的Push机制的实现