Eclipse的组件架构师基于插件的,这就意味着将一组代码组件化为一个单一的组件,然后利用Eclipse框架注册为组件之一,其他组件可以绑定该组件或者调用该组件。
扩展点是插件允许其他插件向公开扩展点的插件提供附加功能的方法。
插件(Plug-in):
Eclipse功能实现的最小单位,包含了Java代码或者其他文件。插件位于plugins目录下,使用清单文件plugin.xml向系统说明如何继承到平台中。
扩展点(Extension point):
本插件为其他插件提供的接口,插件可以自定义扩展点,也可以实现其他插件的扩展点。
扩展(Extension):
对其他插件公开的扩展点进行的实现。
Eclipse扩展机制实践:
以下代码均在文章:http://489291468.iteye.com/blog/1887290 描述工程的基础实践。
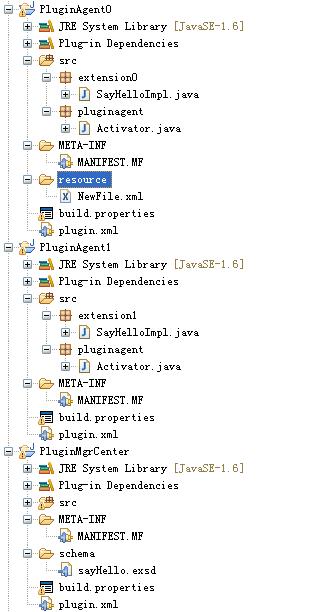
整个工程目录:
PluginMgrCenter Bundle:
创建ExtensionMgr.java文件:
/**
 *
 */
package extensionservice;

import org.eclipse.core.runtime.CoreException;
import org.eclipse.core.runtime.IConfigurationElement;
import org.eclipse.core.runtime.IExtensionRegistry;
import org.eclipse.core.runtime.Platform;

import sayhello.ISayHello;

/**
 * @author Administrator
 *
 */
public class ExtensionMgr
{
	private static final String MY_EXTENSION_POINT_ID = "PluginMgrCenter.sayHello";

	private static ExtensionMgr extensionMgr = new ExtensionMgr();

	public static final ExtensionMgr getExtensionMgr()
	{
		return extensionMgr;
	}

	private boolean flag = false;

	public void execute()
	{
		if (!flag)
		{
			try
			{
				Thread.sleep(10000);
			}
			catch (Exception e)
			{
				e.printStackTrace();
			}

			IExtensionRegistry registry = Platform.getExtensionRegistry();
			evaluate(registry);
			flag = true;
		}

	}

	private void evaluate(IExtensionRegistry registry)
	{

		IConfigurationElement[] config = registry
				.getConfigurationElementsFor(MY_EXTENSION_POINT_ID);
		for (IConfigurationElement e : config)
		{
			try
			{
				System.out.println("bundle : " + e.getNamespaceIdentifier());
				String[] attributes = e.getAttributeNames();
				for (String string : attributes)
				{
					System.out.println("attribute:" + string + ",value is : "
							+ e.getAttribute(string));
				}

				final Object o = e.createExecutableExtension("ISay");
				if (o instanceof ISayHello)
				{
					((ISayHello) o).sayHello();
				}
			}
			catch (CoreException ex)
			{
				System.out.println(ex.getMessage());
			}
		}

	}
}
修改PluginMgrCenter Bundle中Activator.java类中的start()方法,注释掉自动发现加载jar包的代码,添加新起线程查询扩展的代码:
public void start(BundleContext context) throws Exception
	{
		bundleContext = context;
		try
		{
			System.out
					.println("Start to manage Extensin Point (PluginMgrCenter.sayHello)");
			/*
			 * DirectWatcherTask directWatcherTask = new DirectWatcherTask(
			 * bundleContext, "d:\\plugin\\");
			 * ScheduleTimerPool.getInstance().schedule(directWatcherTask,
			 * 10000, 10000);
			 */
			Thread thread = new Thread(new Runnable()
			{
				@Override
				public void run()
				{
					ExtensionMgr.getExtensionMgr().execute();
				}
			});
			thread.start();

		}
		catch (Exception e)
		{
			e.printStackTrace();
		}

	}
新建ISayHello.java类,作为扩展点的接口类。
package sayhello;

public interface ISayHello
{
	public void sayHello();

}
再新建一个抽象类SayUtil.java
package sayhello;

public abstract class SayUtil
{
	public abstract void selfIntroduce();

}
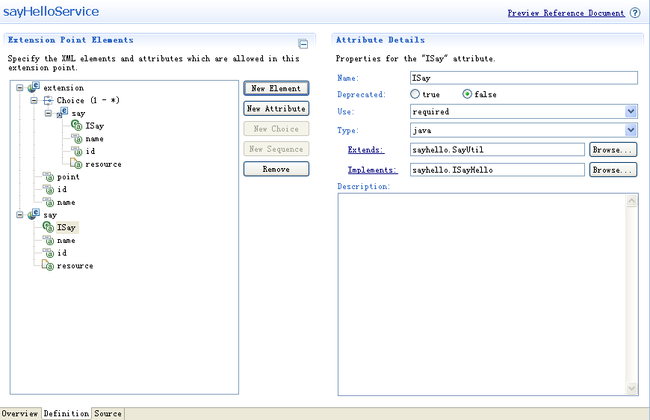
接下来PluginMgrCenter Bundle创建扩展点,创建结果:
点击“sayHello”扩展点,进入plugin.xml编辑界面,定义扩展点相关元素以及属性。
结果如下:
<?xml version='1.0' encoding='UTF-8'?>
<!-- Schema file written by PDE -->
<schema targetNamespace="PluginMgrCenter" xmlns="http://www.w3.org/2001/XMLSchema">
<annotation>
      <appinfo>
         <meta.schema plugin="PluginMgrCenter" id="sayHello" name="sayHelloService"/>
      </appinfo>
      <documentation>
         Say hello after self introduce
      </documentation>
   </annotation>

   <element name="extension">
      <annotation>
         <appinfo>
            <meta.element />
         </appinfo>
      </annotation>
      <complexType>
         <choice minOccurs="1" maxOccurs="unbounded">
            <element ref="say"/>
         </choice>
         <attribute name="point" type="string" use="required">
            <annotation>
               <documentation>

               </documentation>
            </annotation>
         </attribute>
         <attribute name="id" type="string">
            <annotation>
               <documentation>

               </documentation>
            </annotation>
         </attribute>
         <attribute name="name" type="string">
            <annotation>
               <documentation>

               </documentation>
               <appinfo>
                  <meta.attribute translatable="true"/>
               </appinfo>
            </annotation>
         </attribute>
      </complexType>
   </element>

   <element name="say">
      <complexType>
         <attribute name="ISay" type="string" use="required">
            <annotation>
               <documentation>

               </documentation>
               <appinfo>
                  <meta.attribute kind="java" basedOn="sayhello.SayUtil:sayhello.ISayHello"/>
               </appinfo>
            </annotation>
         </attribute>
         <attribute name="name" type="string" use="required">
            <annotation>
               <documentation>

               </documentation>
            </annotation>
         </attribute>
         <attribute name="id" type="string">
            <annotation>
               <documentation>

               </documentation>
            </annotation>
         </attribute>
         <attribute name="resource" type="string">
            <annotation>
               <documentation>

               </documentation>
               <appinfo>
                  <meta.attribute kind="resource"/>
               </appinfo>
            </annotation>
         </attribute>
      </complexType>
   </element>

   <annotation>
      <appinfo>
         <meta.section type="since"/>
      </appinfo>
      <documentation>
         [Enter the first release in which this extension point appears.]
      </documentation>
   </annotation>

   <annotation>
      <appinfo>
         <meta.section type="examples"/>
      </appinfo>
      <documentation>
         [Enter extension point usage example here.]
      </documentation>
   </annotation>

   <annotation>
      <appinfo>
         <meta.section type="apiinfo"/>
      </appinfo>
      <documentation>
         [Enter API information here.]
      </documentation>
   </annotation>

   <annotation>
      <appinfo>
         <meta.section type="implementation"/>
      </appinfo>
      <documentation>
         [Enter information about supplied implementation of this extension point.]
      </documentation>
   </annotation>


</schema>
plugin.xml如下:
<plugin>
   <extension-point id="sayHello" name="sayHelloService" schema="schema/sayHello.exsd"/></plugin>
这样公开扩展点的Bundle实现完成。
接下来搞两个Bundle 来实现PluginMgrCenter Bundle中定义的扩展点。
PluginAgent0:
首先看PluginAgent0 Bundle:

/resouce/NewFile.xml:随便对应一个一个xml文件。用以实现扩展点中的扩展元素“resource”
SayHelloImpl.java:继承ISay接口,泳衣实现扩展点中的扩展元素“ISay”
SayHelloImpl.java代码如下:
/**
 *
 */
package extension0;

import sayhello.ISayHello;
import sayhello.SayUtil;

/**
 * @author Administrator
 *
 */
public class SayHelloImpl extends SayUtil implements ISayHello
{

	@Override
	public void sayHello()
	{
		System.out.println("hi,i am agent0,Hello!");
	}

	@Override
	public void selfIntroduce()
	{
		System.out.println("I am Agent1!");
	}

}
接下来要定义扩展了:
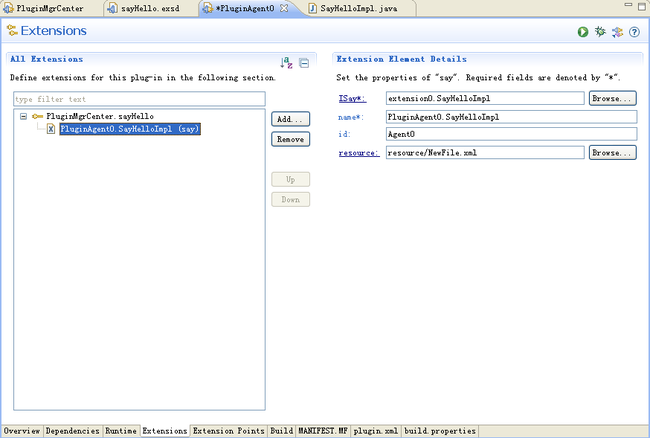
在MANIFEST.MF文件extension标签页中,点击"Add",添加扩展。
在弹出的扩展点对话框中"Extension point filter"的文本框中输入"*sayHello"查找到PluginMgrCenter中定义的扩展点:PluginMgrCenter.sayHello,选中后,点击"Finish"
而后在"All Extensions"框内右键"PluginMgrCenter.sayHello",选择"New"->"say"
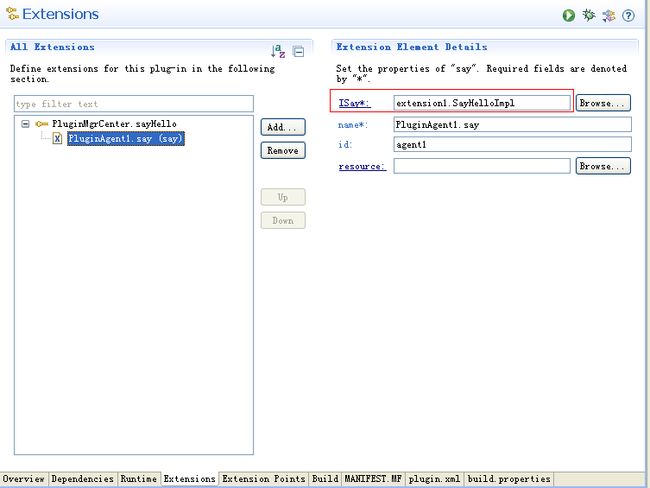
在右侧“Extension Element Details”中填入各个扩展元素的值.
其中:ISay*,表示实现ISay接口的实现类
name*,表示name字符串的值
id*,表示id字符串的值
resource,表示扩展点定义的资源文件。
PluginAgent1:
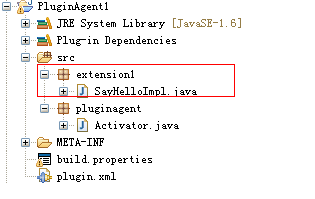
SayHelloImpl.java 实现ISay接口。用以扩展PluginMgrCenter Bundle中定义的扩展点中的“ISay”元素
/**
 *
 */
package extension1;

import sayhello.ISayHello;
import sayhello.SayUtil;

/**
 * @author Administrator
 *
 */
public class SayHelloImpl extends SayUtil implements ISayHello
{

	@Override
	public void sayHello()
	{
		System.out.println("hi,i am agent1,hello!");

	}

	@Override
	public void selfIntroduce()
	{
		// TODO Auto-generated method stub

	}

}
验证:
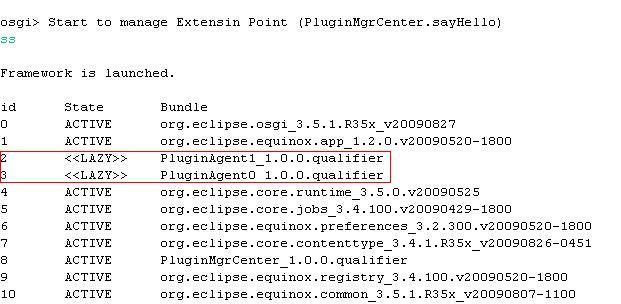
设置PluginAgent1和PluginAgent0 这两个Bundle 默认不启动。
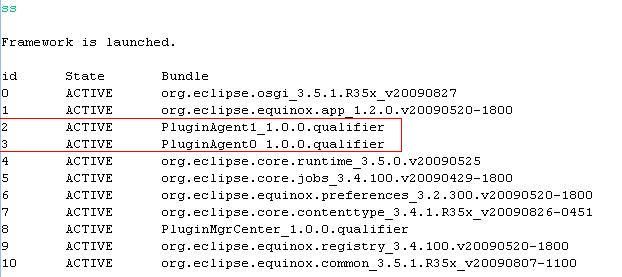
启动工程后,立即执行ss命令,明确PluginAgent0和PluginAgent1这两个Bundle未启动,如下图:
待启动后10s,PluginMgrCenter bundle扫描实现本Bundle扩展点的扩展。并打印出扩展Bundle中扩展元素的值,如下图,其中红色框起来的为PluginAgent1和PluginAgent0中实现扩展点扩展元素“ISay”接口的实现类中sayHello()方法的调用。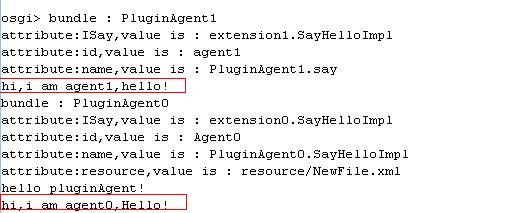
再次执行ss,发现PluginAgent1和PluginAgent0 Bundle已经启动。 