libgdx学习笔记系列(八)地图的生成、加载、绘制
在开始地图之前,先了解下地图的概念。
大家都见过瓷砖吧,有的墙上用瓷砖拼出一幅画,这就是我们地图的概念。用小图拼出大图。
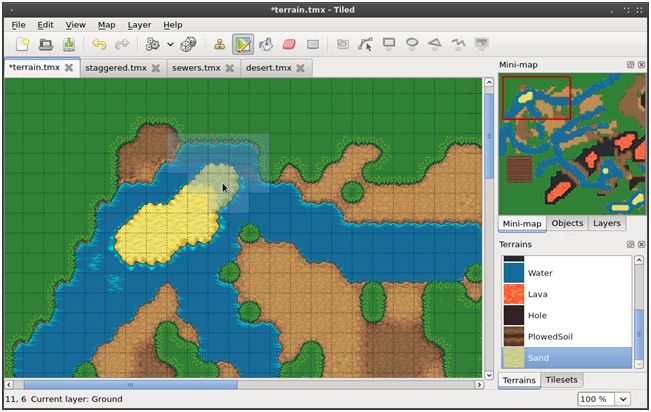
但是这个地图跟拼瓷砖不同的一点是,瓷砖一般就一层,但是地图可以铺多层。
层的概念我们用俩个透明玻璃来形容一下。例如背景图一层,然后物体等等又一层,在一块玻璃上画上蓝天白云,另外一块只画个小兔子。两块叠加。一幅画成了。只不过这幅画是两部分组成的
这里背景图只是为了好看,就跟我们平常看到的游戏背景一样,没有任何作用,就是为了好看。然后另外的那层放物体的则是为了游戏中的交互。
例如:天天酷跑,酷跑中的障碍物等等就算第二层了。
接下来我们看下地图编辑软件的使用。对于我这种不会美工的,这也算是不错的工具了。
但是画出图实在是拿不出手,只好网上找个图片凑合用下(图片资源来自于互联网,仅供学习使用,请勿用作商业用途,否则后果自负。)
官方介绍了两种工具
第一种:http://www.mapeditor.org/ 就是上面的那张图的样子。
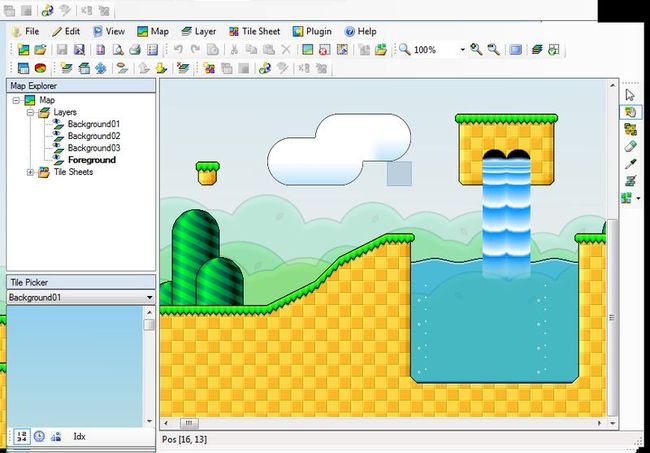
第二种:http://tide.codeplex.com/
第一种工具可以跨平台使用,什么Windows/Linux/Mac OS X统统支持。
第二种就只能在windows平台使用了。
具体用那种看自己需要了。这里为了跨平台,我使用第一种工具简单演示下。
新建一个由20*10块组成的地图,每块像素10*10 用10*10像素是为了方便计算,一会说计算的事情
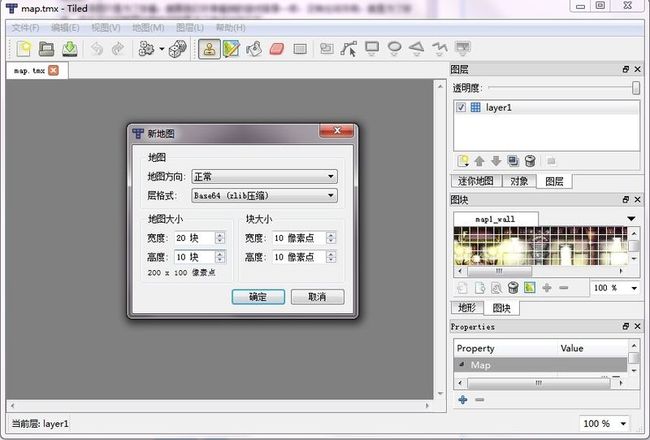
然后选择地图-新图块
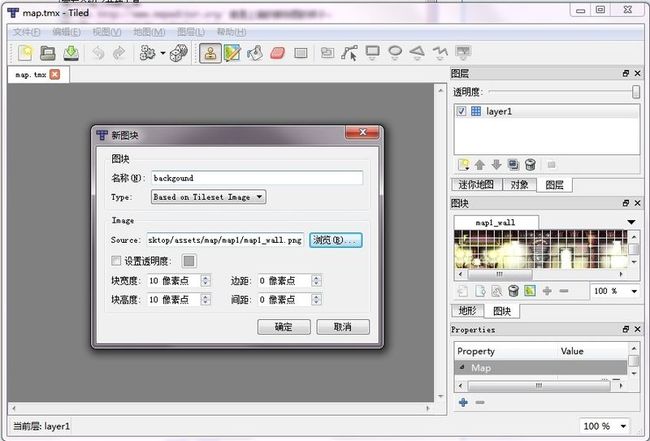
好了,开始玩拼图游戏吧,在右边选择图块范围,然后放到地图上吧,因为我使用的是整张图片,(自己画的实在是惨不忍睹),直接都拖过来
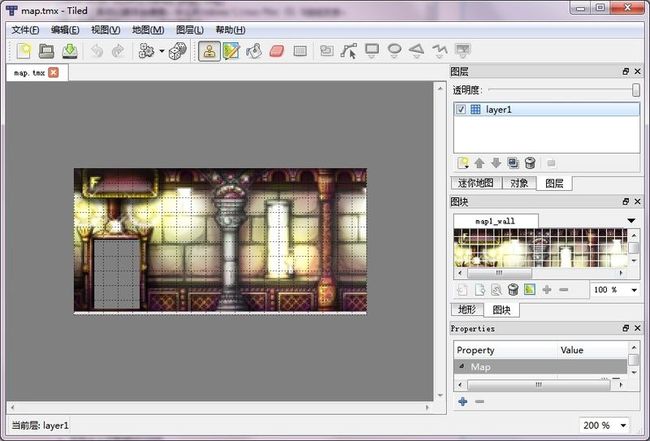
接下来说说计算的事情。如果想要让图片高度正好填满屏幕,我们来计算下。
我设定的世界高度为6f,地图大小为10像素*10个=100。怎么变成6f,100*x=6 x=0.06
也就是说需要缩小。倍率为0.06。一会显示地图的时候我们需要这个数字。
接下来看看生成的地图文件 map.tmx
需要注意的就是
这个图片就是刚才我们选用的地图块的时候,选择的图片。需要拷贝到assets目录下。具体路径是和map.tmx的位置有关。
看下我的路径地址:
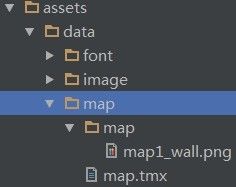
我放到了map目录下的又一级map目录下。map.tmx文件在它的上一级,所以,文件中的地址就是
注意下这个就可以了,一般生成的地图文件都需要修改下。还有图层的名称等,为了不给自己找麻烦就别用中文了。
然后看看如何加载。一种是直接加载,一种是使用资源管理器。
直接加载很简单:
这里为了显得咱专业,使用资源管理器进行加载,记得前面介绍的资源管理器吧。
把它加到资源列表就行了。
很简单不是,然后使用的时候直接get就可以了
如何显示地图呢。先来个地图的渲染
初始化它,这里我们使用正交
看到0.06f了吧,这里我们在渲染的时候缩小它匹配屏幕。
然后显示地图
this.camera。前几篇提到的正交相机。
效果
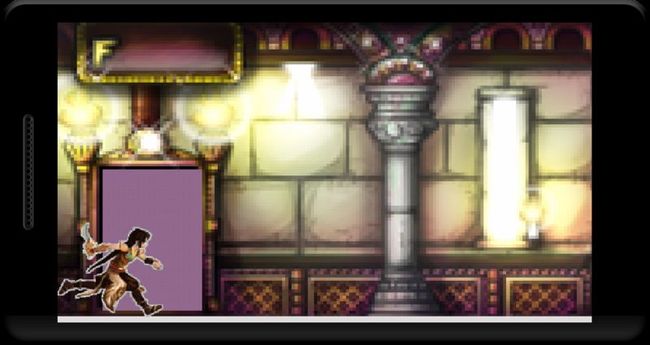
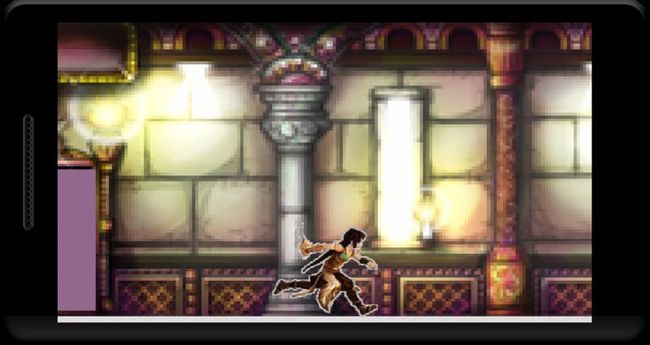
但是这样跑动还是没有人物移动地图倒退的感觉。前面也说过相机来实现地图,演员的移动,缩放等。现在我们试试
修改GirlView类
大家都见过瓷砖吧,有的墙上用瓷砖拼出一幅画,这就是我们地图的概念。用小图拼出大图。

但是这个地图跟拼瓷砖不同的一点是,瓷砖一般就一层,但是地图可以铺多层。
层的概念我们用俩个透明玻璃来形容一下。例如背景图一层,然后物体等等又一层,在一块玻璃上画上蓝天白云,另外一块只画个小兔子。两块叠加。一幅画成了。只不过这幅画是两部分组成的
这里背景图只是为了好看,就跟我们平常看到的游戏背景一样,没有任何作用,就是为了好看。然后另外的那层放物体的则是为了游戏中的交互。
例如:天天酷跑,酷跑中的障碍物等等就算第二层了。
接下来我们看下地图编辑软件的使用。对于我这种不会美工的,这也算是不错的工具了。
但是画出图实在是拿不出手,只好网上找个图片凑合用下(图片资源来自于互联网,仅供学习使用,请勿用作商业用途,否则后果自负。)
官方介绍了两种工具
第一种:http://www.mapeditor.org/ 就是上面的那张图的样子。
第二种:http://tide.codeplex.com/

第一种工具可以跨平台使用,什么Windows/Linux/Mac OS X统统支持。
第二种就只能在windows平台使用了。
具体用那种看自己需要了。这里为了跨平台,我使用第一种工具简单演示下。
新建一个由20*10块组成的地图,每块像素10*10 用10*10像素是为了方便计算,一会说计算的事情

然后选择地图-新图块

好了,开始玩拼图游戏吧,在右边选择图块范围,然后放到地图上吧,因为我使用的是整张图片,(自己画的实在是惨不忍睹),直接都拖过来

接下来说说计算的事情。如果想要让图片高度正好填满屏幕,我们来计算下。
我设定的世界高度为6f,地图大小为10像素*10个=100。怎么变成6f,100*x=6 x=0.06
也就是说需要缩小。倍率为0.06。一会显示地图的时候我们需要这个数字。
接下来看看生成的地图文件 map.tmx
<?xml version="1.0" encoding="UTF-8"?>
<map version="1.0" orientation="orthogonal" width="20" height="10" tilewidth="10" tileheight="10">
 <tileset firstgid="1" name="background" tilewidth="10" tileheight="10">
  <image source="map/map1_wall.png" width="480" height="104"/>
 </tileset>
 <layer name="layer1" width="20" height="10">
  <data encoding="base64" compression="zlib">
   具体base64内容我删除掉了,太多了
  </data>
 </layer>
</map>
需要注意的就是
<image source="map/map1_wall.png"
这个图片就是刚才我们选用的地图块的时候,选择的图片。需要拷贝到assets目录下。具体路径是和map.tmx的位置有关。
看下我的路径地址:

我放到了map目录下的又一级map目录下。map.tmx文件在它的上一级,所以,文件中的地址就是
map/map1_wall.png
注意下这个就可以了,一般生成的地图文件都需要修改下。还有图层的名称等,为了不给自己找麻烦就别用中文了。
然后看看如何加载。一种是直接加载,一种是使用资源管理器。
直接加载很简单:
TiledMap map = new TmxMapLoader().load("data/map/map.tmx");
这里为了显得咱专业,使用资源管理器进行加载,记得前面介绍的资源管理器吧。
把它加到资源列表就行了。
 assetManager.setLoader(TiledMap.class, new TmxMapLoader(new InternalFileHandleResolver()));
        assetManager.load("data/map/map.tmx", TiledMap.class);
很简单不是,然后使用的时候直接get就可以了
TiledMap map = assetManager.get("data/map/map.tmx", TiledMap.class);
如何显示地图呢。先来个地图的渲染
private TiledMapRenderer tiledMapRenderer;
初始化它,这里我们使用正交
tiledMapRenderer = new OrthogonalTiledMapRenderer(map, 0.06f, spriteBatch);
看到0.06f了吧,这里我们在渲染的时候缩小它匹配屏幕。
然后显示地图
 tiledMapRenderer.setView(this.camera);
        tiledMapRenderer.render();
this.camera。前几篇提到的正交相机。
效果

但是这样跑动还是没有人物移动地图倒退的感觉。前面也说过相机来实现地图,演员的移动,缩放等。现在我们试试
修改GirlView类
package com.me.mygdxgame.view;


import com.badlogic.gdx.assets.AssetManager;
import com.badlogic.gdx.assets.loaders.resolvers.InternalFileHandleResolver;
import com.badlogic.gdx.graphics.OrthographicCamera;
import com.badlogic.gdx.graphics.g2d.Animation;
import com.badlogic.gdx.graphics.g2d.SpriteBatch;
import com.badlogic.gdx.graphics.g2d.TextureAtlas;
import com.badlogic.gdx.graphics.g2d.TextureRegion;
import com.badlogic.gdx.maps.tiled.TiledMap;
import com.badlogic.gdx.maps.tiled.TiledMapRenderer;
import com.badlogic.gdx.maps.tiled.TmxMapLoader;
import com.badlogic.gdx.maps.tiled.renderers.OrthogonalTiledMapRenderer;
import com.badlogic.gdx.math.Vector2;
import com.badlogic.gdx.utils.Disposable;
import com.me.mygdxgame.actor.GirlActor;
import com.me.mygdxgame.actor.World;

/**
 * view层
 * 主要负责渲染场景,演员和资源加载
 */
public class GirlView implements Disposable {


    private GirlActor girlsActor;
    //资源管理器专门用来管理资源加载
    private AssetManager assetManager;
    private SpriteBatch spriteBatch;
    private TextureAtlas textureAtlas;
    private TextureRegion[] girlRunFrameLeft;
    private TextureRegion[] girlRunFrameRight;
    private Animation animationRight;
    private Animation animationLeft;
    private TextureRegion currentFrame;
    private boolean isload;
    private OrthographicCamera camera;
    private World world;
    private TiledMap map;
    private TiledMapRenderer tiledMapRenderer;

    /**
     * 构造方法 初始化相关的参数。加载演员资源
     *
     * @param world 游戏世界
     */
    public GirlView(World world) {
        this.world = world;
        assetManager = new AssetManager();
        assetManager.load("data/image/girlRun.atlas", TextureAtlas.class);
        assetManager.setLoader(TiledMap.class, new TmxMapLoader(new InternalFileHandleResolver()));
        assetManager.load("data/map/map.tmx", TiledMap.class);

        girlsActor = world.getGirlActor("girl");
        spriteBatch = new SpriteBatch();
        currentFrame = new TextureRegion();
        girlRunFrameLeft = new TextureRegion[16];
        girlRunFrameRight = new TextureRegion[16];
        this.camera = new OrthographicCamera(world.getWorldWidth(), world.getWorldHeight());
        this.camera.position.set(world.getWorldWidth() / 2, world.getWorldHeight() / 2, 0);
        isload = false;


    }


    /**
     * 演员资源加载
     */

    private void loadAssets() {

        //使用资源管理器加载图片纹理资源
        textureAtlas = assetManager.get("data/image/girlRun.atlas", TextureAtlas.class);
        map = assetManager.get("data/map/map.tmx", TiledMap.class);
        //面朝右边跑动的纹理资源
        for (int i = 0; i < 16; i++) {
            girlRunFrameRight[i] = textureAtlas.findRegion(String.valueOf(i + 1));
        }
        //面朝右边跑动的纹理资源
        for (int i = 0; i < 16; i++) {
            girlRunFrameLeft[i] = new TextureRegion(girlRunFrameRight[i]);
            //把图片进行反转,第一个是x,第二个是y,我们只进行x方向上的反转,如果进行y反转,人物就倒立了。
            girlRunFrameLeft[i].flip(true, false);
        }
        //演员左右跑动的动画
        animationLeft = new Animation(0.06f, girlRunFrameLeft);
        animationRight = new Animation(0.06f, girlRunFrameRight);
        tiledMapRenderer = new OrthogonalTiledMapRenderer(map, 0.06f, spriteBatch);
        isload = true;

    }

    /**
     * 演员显示
     */
    public void render(float deltaTime) {
        camera.update();
        //演员走到正中间的时候移动正交相机
        //往回走的时候重置正交相机位置
        if (girlsActor.getPosition().x > world.getWorldWidth() / 2 - girlsActor.getBounds().getWidth() / 2) {
            this.camera.translate(new Vector2(girlsActor.getVelocity().cpy().x * deltaTime, 0));
        } else if (girlsActor.getPosition().x < world.getWorldWidth() / 2 - girlsActor.getBounds().getWidth() / 2) {
            this.camera.position.set(world.getWorldWidth() / 2, world.getWorldHeight() / 2, 0);
        }

        if (assetManager.update()) {
            if (!isload) {
                loadAssets();
            }
            spriteBatch.setProjectionMatrix(this.camera.combined);
            drawMap();
            spriteBatch.begin();
            drawGirl();
            spriteBatch.end();
        }


    }

    /**
     *  Girl的渲染逻辑
     */
    private void drawGirl() {

        //获取演员的当前状态,是站立还是跑动状态
        switch (girlsActor.getState()) {

            //站立状态
            case IDLE:
                //根据演员的当前面朝方向获取演员的纹理。因为图片中没有站立的,所以我们取第一个为站立图片使用
                currentFrame = girlsActor.isFacingRight() ? girlRunFrameRight[0] : girlRunFrameLeft[0];
                break;

            //跑动状态,当然是获取跑动动画了
            case RUNING:
                currentFrame = girlsActor.isFacingRight()
                        ? animationRight.getKeyFrame(girlsActor.getStateTime(), true)
                        : animationLeft.getKeyFrame(girlsActor.getStateTime(), true);
                break;
            default:
                break;
        }

        spriteBatch.draw(currentFrame
                , girlsActor.getPosition().x
                , girlsActor.getPosition().y
                , girlsActor.getBounds().getWidth()
                , girlsActor.getBounds().getHeight());
    }

    /**
     * 地图渲染
     */
    private void drawMap() {

        tiledMapRenderer.setView(this.camera);
        tiledMapRenderer.render();

    }

    /**
     * 资源回收
     */
    @Override
    public void dispose() {
        map.dispose();
        assetManager.dispose();
        textureAtlas.dispose();
        spriteBatch.dispose();
    }
}
