Java NIO
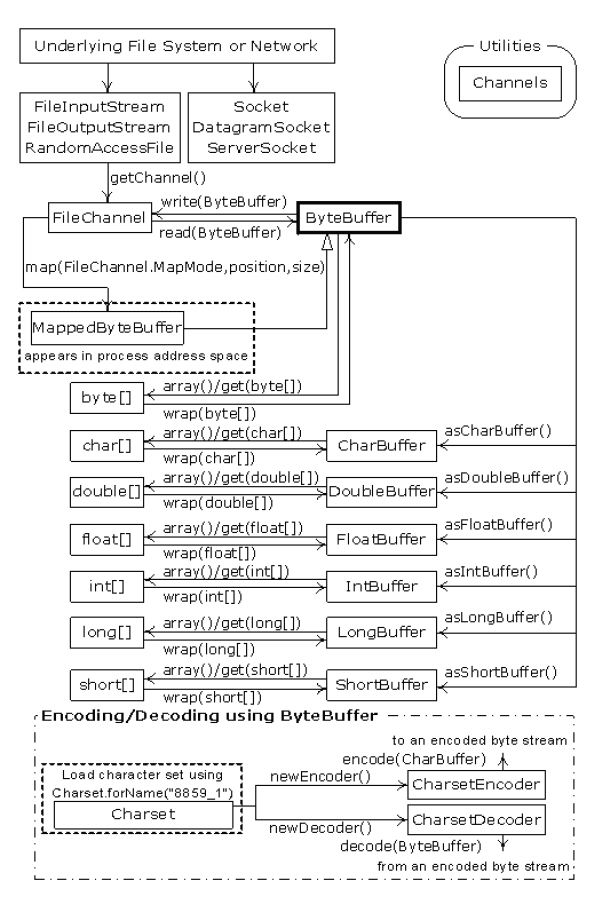
众所周知Mina是一个基于java NIO的网络框架,那么在了解Mina之前,需要先了解下java NIO。jdk1.4中引入了NIO的相关api,主要是针对解决一些高并发高吞吐的IO。API的类图如下(网上找的)

主要的三个概念:
1、Channel
2、Buffer
3、Charset
下面主要介绍下Channel和Buffer,因为这两个是相辅相成的。Charset用来辅助解决字符编码的问题。与Stream不同,Channel是面向Buffer的;Channel只能往Buffer中写数据,或者从Buffer中读数据。另外,Channel是双向的,同一个Channel既可以从Buffer中读取数据,也可以往Buffer中写入数据。而利用Stream,要么创建InputStream 去读取数据,要么创建OutputStream去写入数据。最后也是最重要的一点,Channel的读取和写入是可以异步的,这个是提供高并发和支持高吞吐的关键。
Buffer的三个关键属性
capacity
position
limit
capacity是在Buffer创建的时候指定的,不管Buffer是在读模式或者写模式下,都不会改变。
而position和limit这两个在读模式和写模式下表示的意义是不同的。下面这张图【网上找的】可解释:
在写模式下,数据是从当前position开始写入,最多只能写到capacity位置,这个时候limit指向capacity。每写入一个,position 加一。
在读模式下,数据是从当前position开始读取,最多只能读到limit位置。limit位置为Buffer中已写入数据的最右端。
java.nio.buffer 包下的主要Buffer
ByteBuffer
CharBuffer
DoubleBuffer
FloatBuffer
IntBuffer
LongBuffer
ShortBuffer
MappedByteBuffer 比较特殊,这里暂不介绍。
ByteBuffer可以通过asXXXBuffer转为XXXBuffer。但是在转的时候得注意order和charset问题。
创建Buffer
有两种方式给Buffer创建要使用的内存。一种是直接在jvm的堆上分配。一种是使用jni调用系统api直接在direct memory中。需要了解的是direct memory的分配比jvm的heap memory分配更耗时。allocateDirect更适合分配大块内存并具有较长生命周期的Buffer。
关于Direct Memory(摘自网上)
它并不是虚拟机运行时数据区的一部分,也不是JAVA虚拟机规范中定义的内存区域。在JDK1.4中加入了NIO类,引入了一种基于通道(Channel)于缓冲区(Buffer)的I/O方式,他可以使用Native函数库直接分配堆外内存,然后通过一个存储在JAVA堆里面的DirectByteBuffer对象作为这块内存的引用进行操作。这样能在一些场景中显著提高性能,因为避免了在JAVA堆中和Native堆中来回复制数据。
往Buffer写入数据
putXXX()返回的还是原来的Buffer实例,所以可以使用方法链往buffer中添加数据。
从Buffer读取数据
Buffer的读和写都会改变position,所以在读后再写或者写后再读,都需要重新设置position和limit的值。否则容易出现读取不到数据或者覆盖原有数据等等问题。重新设置position和limit的方法有:
flip() 将limit设置为当前position的位置,再将position置为0
clear() 将limit设置为capacity所在位置,将position设置为0,不要被方法名给误导,其实Buffer中的数据并没有清空。
compact() 把[position,limit]之间的数据copy到0位置,同时将position置为limit-position,再将limit置为capacity,
mark() 再当前position所在位置做个标记
reset() 将position重置到最近一次mark()时的位置
java NIO必要常用的几个Channel:
FileChannel
DatagramChannel
SocketChannel
ServerSocketChannel
先介绍下FileChannel,后面三个网络相关的,后面再介绍:
从上面的图中可以看出,通过FileChanel.open()[since jdk1.7]或者FileInputStream,FileOutputStream,RandomAccessFile的getChannel()方法获取到FileChannel,获得FileChannel后就可以通过ByteBuffer往FileChannel中读取或者写入数据了。
这里值得注意的是与Channel做数据交互的只能是ByteBuffer。下面看一个简单的例子:
需要注意的地方是:在获取FileChannel的时候需要注意对应的模式,FileInpuStream获取的为读模式,不能往读模式的FileChannel中写入数据。同样的,不能从FileOutputStream中读取数据。可以在RandomAccessFile的构造函数的第二个参数中指定读写模式。
FileChannel的相关操作还有很多,关于文件内容块的mapping和空洞问题可google之。
后面介绍下ServerSocketChannel和SocketChannel,这两个主要是针对处理TCP协议的。对应原来的ServerSocket和Socket.
先看一段简单C/S模式中的server端的代码:
简单的解析下上面的代码
1、通过Selector.open()创建一个Selector实例
2、通过ServerSocketChannel.open()创建一个ServerSocketChannel实例
3、设置ServerSocketChannel的相关属性
4、注册ServerSocketChannel实例到Selector实例上,并监听SelectionKey.OP_ACCEPT事件
5、开启一个无限循环,开始轮询Selector上注册事件,一旦有了注册的事件,就开始遍历所有事件并处理
SelectionKey提供了isXXXable()的接口来判断是否监听到了某个事件。

主要的三个概念:
1、Channel
2、Buffer
3、Charset
下面主要介绍下Channel和Buffer,因为这两个是相辅相成的。Charset用来辅助解决字符编码的问题。与Stream不同,Channel是面向Buffer的;Channel只能往Buffer中写数据,或者从Buffer中读数据。另外,Channel是双向的,同一个Channel既可以从Buffer中读取数据,也可以往Buffer中写入数据。而利用Stream,要么创建InputStream 去读取数据,要么创建OutputStream去写入数据。最后也是最重要的一点,Channel的读取和写入是可以异步的,这个是提供高并发和支持高吞吐的关键。
Buffer的三个关键属性
capacity
position
limit
capacity是在Buffer创建的时候指定的,不管Buffer是在读模式或者写模式下,都不会改变。
而position和limit这两个在读模式和写模式下表示的意义是不同的。下面这张图【网上找的】可解释:
在写模式下,数据是从当前position开始写入,最多只能写到capacity位置,这个时候limit指向capacity。每写入一个,position 加一。
在读模式下,数据是从当前position开始读取,最多只能读到limit位置。limit位置为Buffer中已写入数据的最右端。
java.nio.buffer 包下的主要Buffer
ByteBuffer
CharBuffer
DoubleBuffer
FloatBuffer
IntBuffer
LongBuffer
ShortBuffer
MappedByteBuffer 比较特殊,这里暂不介绍。
ByteBuffer可以通过asXXXBuffer转为XXXBuffer。但是在转的时候得注意order和charset问题。
创建Buffer
ByteBuffer buff = ByteBuffer.allocate(1024);
ByteBuffer buffDirect = ByteBuffer.allocateDirect(1024);
有两种方式给Buffer创建要使用的内存。一种是直接在jvm的堆上分配。一种是使用jni调用系统api直接在direct memory中。需要了解的是direct memory的分配比jvm的heap memory分配更耗时。allocateDirect更适合分配大块内存并具有较长生命周期的Buffer。
关于Direct Memory(摘自网上)
引用
它并不是虚拟机运行时数据区的一部分,也不是JAVA虚拟机规范中定义的内存区域。在JDK1.4中加入了NIO类,引入了一种基于通道(Channel)于缓冲区(Buffer)的I/O方式,他可以使用Native函数库直接分配堆外内存,然后通过一个存储在JAVA堆里面的DirectByteBuffer对象作为这块内存的引用进行操作。这样能在一些场景中显著提高性能,因为避免了在JAVA堆中和Native堆中来回复制数据。
往Buffer写入数据
channel.read(buffer); // 从channel中读取数据到buffer中
buffer.putXXX();
putXXX()返回的还是原来的Buffer实例,所以可以使用方法链往buffer中添加数据。
buffer.putInt(1).putFloat(1.2f);
从Buffer读取数据
buffer.getXXX();
Buffer的读和写都会改变position,所以在读后再写或者写后再读,都需要重新设置position和limit的值。否则容易出现读取不到数据或者覆盖原有数据等等问题。重新设置position和limit的方法有:
flip() 将limit设置为当前position的位置,再将position置为0
clear() 将limit设置为capacity所在位置,将position设置为0,不要被方法名给误导,其实Buffer中的数据并没有清空。
compact() 把[position,limit]之间的数据copy到0位置,同时将position置为limit-position,再将limit置为capacity,
mark() 再当前position所在位置做个标记
reset() 将position重置到最近一次mark()时的位置
java NIO必要常用的几个Channel:
FileChannel
DatagramChannel
SocketChannel
ServerSocketChannel
先介绍下FileChannel,后面三个网络相关的,后面再介绍:
从上面的图中可以看出,通过FileChanel.open()[since jdk1.7]或者FileInputStream,FileOutputStream,RandomAccessFile的getChannel()方法获取到FileChannel,获得FileChannel后就可以通过ByteBuffer往FileChannel中读取或者写入数据了。
这里值得注意的是与Channel做数据交互的只能是ByteBuffer。下面看一个简单的例子:
RandomAccessFile rf = null;
try {
	rf = new RandomAccessFile("e:\\test.txt", "rw");
	FileChannel fc = rf.getChannel();

	rf.seek(1024);
	System.out.println("file channel position after random reek : " + fc.position());

	fc.position(512);
	System.out.println("file channel position after channel position : " + fc.position());

	fc.write(ByteBuffer.wrap("hello world".getBytes("UTF-8")));
	fc.force(true);
	System.out.println("file channel position after write data : " + fc.position());
	//在读取数据之前,需要注意channel的当前position
	fc.position(0);
	ByteBuffer buf = ByteBuffer.allocate(1024);
	int len = fc.read(buf);
	while (len != -1){
		System.out.println("read bytes : " + len);

		buf.flip();
		while (buf.hasRemaining()){
			System.out.print(Integer.toHexString(buf.get()));
		}

		buf.clear();
		len = fc.read(buf);
	}
} catch (FileNotFoundException e) {
	e.printStackTrace();
} catch (IOException e) {
	e.printStackTrace();
} finally {
	if (rf != null) {
		try {
			rf.close();
		} catch (IOException e) {
			e.printStackTrace();
		}
	}
}
需要注意的地方是:在获取FileChannel的时候需要注意对应的模式,FileInpuStream获取的为读模式,不能往读模式的FileChannel中写入数据。同样的,不能从FileOutputStream中读取数据。可以在RandomAccessFile的构造函数的第二个参数中指定读写模式。
FileChannel的相关操作还有很多,关于文件内容块的mapping和空洞问题可google之。
后面介绍下ServerSocketChannel和SocketChannel,这两个主要是针对处理TCP协议的。对应原来的ServerSocket和Socket.
先看一段简单C/S模式中的server端的代码:
ServerSocketChannel ssChannel = null;
Selector selector = null;
try {
	selector = Selector.open();
	ssChannel = ServerSocketChannel.open();
	ssChannel.configureBlocking(false);
	ssChannel.socket().bind(new InetSocketAddress("localhost", 8080));
	ssChannel.register(selector, SelectionKey.OP_ACCEPT);

	while (true) {
		int count = selector.select();
		if (count <= 0)
			continue;
		Set<SelectionKey> selectionKeys = selector.selectedKeys();
		Iterator<SelectionKey> iter = selectionKeys.iterator();
		while (iter.hasNext()) {
			SelectionKey key = iter.next();
			iter.remove();

			if (key.isAcceptable()) {
				ServerSocketChannel channel = (ServerSocketChannel) key.channel();
				SocketChannel sChannel = channel.accept();
				sChannel.configureBlocking(false);
				sChannel.register(selector, SelectionKey.OP_READ | SelectionKey.OP_WRITE);
			} else if (key.isReadable()) {

			} else if (key.isWritable()) {

			}
		}
	}

} catch (IOException e) {
	e.printStackTrace();
} finally {
	if (ssChannel != null) {
		try {
			ssChannel.close();
		} catch (IOException e) {
			e.printStackTrace();
		}
	}
	if (selector != null) {
		try {
			selector.close();
		} catch (IOException e) {
			e.printStackTrace();
		}
	}
}
简单的解析下上面的代码
1、通过Selector.open()创建一个Selector实例
2、通过ServerSocketChannel.open()创建一个ServerSocketChannel实例
3、设置ServerSocketChannel的相关属性
4、注册ServerSocketChannel实例到Selector实例上,并监听SelectionKey.OP_ACCEPT事件
5、开启一个无限循环,开始轮询Selector上注册事件,一旦有了注册的事件,就开始遍历所有事件并处理
SelectionKey提供了isXXXable()的接口来判断是否监听到了某个事件。