用Haproxy+OpenStack实现web application auto scaling
这个是根据本文章内容在china openstack user group会议上做的演讲:
http://quake.github.com/slides/cosug-2012/
======分割线======
前面写过 2篇文章介绍过OpenStack,今天介绍一下配合Haproxy实现Web application auto scaling。
在用OpenStack实施云计算之前,要实现应用的水平扩展,通常是用这样的架构:

一台Haproxy将动态请求转发到N台nginx服务器,当流量增加的时候,我们需要手工安装物理的服务器,将它添加到集群中去,然后再手工修改haproxy的配置,让它生效。就算用自动化的安装管理工具,这样扩展一台机器也差不多要3~4小时。
用OpenStack实施云计算之后,整个架构和上图是一样的,但是我们可以通过几十行代码在5分钟内实现auto scaling,来看一下具体的步骤:
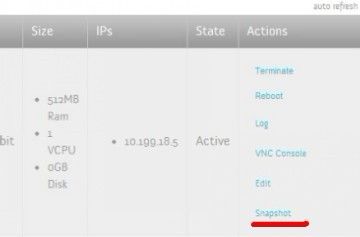
首先,我们先在OpenStack上的一台虚拟机安装好nginx以及其他应用,然后对它做一个snapshot:

记录一下这个snapshot的ID:

接下来写一个脚本,能够用这个snapshot来自动的创建实例,因为我对Ruby比较熟悉,这里用Ruby的 openstack-computegem 来写(OpenStack有多种客户端可以调用API,比如python,php):
当需要扩展一台新的nginx instance时候,只需要执行上面的代码:
差不多30秒左右的时间(视你的镜像大小和网络速度),这台虚拟机就创建好了,我们可以在dashboard看到这台最新的机器:

接下去我们再写一个脚本,自动更新haproxy的配置文件:
执行该代码:
这样就实现了将刚刚创建的 rails201112161042 实例添加到了haproxy集群。
通过不到50行的代码,就实现了auto scaling,是不是很方便?我们还能够更自动化一些,配合监控脚本,设定一个指标,比如说当整个集群的CPU用量达到70%的时候,自动调用create_server,当CPU小于10%的时候,调用delete_server,这样就实现了按需scaling up/down.
http://quake.github.com/slides/cosug-2012/
======分割线======
前面写过 2篇文章介绍过OpenStack,今天介绍一下配合Haproxy实现Web application auto scaling。
在用OpenStack实施云计算之前,要实现应用的水平扩展,通常是用这样的架构:

一台Haproxy将动态请求转发到N台nginx服务器,当流量增加的时候,我们需要手工安装物理的服务器,将它添加到集群中去,然后再手工修改haproxy的配置,让它生效。就算用自动化的安装管理工具,这样扩展一台机器也差不多要3~4小时。
用OpenStack实施云计算之后,整个架构和上图是一样的,但是我们可以通过几十行代码在5分钟内实现auto scaling,来看一下具体的步骤:
首先,我们先在OpenStack上的一台虚拟机安装好nginx以及其他应用,然后对它做一个snapshot:

记录一下这个snapshot的ID:

接下来写一个脚本,能够用这个snapshot来自动的创建实例,因为我对Ruby比较熟悉,这里用Ruby的 openstack-computegem 来写(OpenStack有多种客户端可以调用API,比如python,php):
require 'rubygems'
require 'openstack/compute'

username = 'quake'
api_key = 'password'
auth_url = 'http://10.199.21.210:5000/v2.0/' #OpenStack keystone auth url
image_id = '9' #前面记录的snapshot ID
flavor_id = '1' #你想用的flavor对应的ID,这里用1,就是默认最小的1cpu, 512M内存的规格

cs = OpenStack::Compute::Connection.new(:username => username, :api_key => api_key, :auth_url => auth_url)
image = cs.get_image(image_id)
flavor = cs.get_flavor(flavor_id)
#创建一个新的instance
newserver = cs.create_server(:name => "rails#{Time.now.strftime("%Y%m%d%H%M")}", :imageRef => image.id, :flavorRef => flavor.id)
p "New Server #{newserver.name} created"
#刷新instance的状态,直到它创建成功
while newserver.progress < 100
  p "Server status #{newserver.status}, progress #{newserver.progress}"
  sleep 10
  newserver.refresh
end
p "Server status #{newserver.status}, progress #{newserver.progress}"
p "Done"
当需要扩展一台新的nginx instance时候,只需要执行上面的代码:
# ruby create_new_server.rb
"New Server rails201112161042 created"
"Server status BUILD, progress 0"
"Server status ACTIVE, progress 100"
"Done"
差不多30秒左右的时间(视你的镜像大小和网络速度),这台虚拟机就创建好了,我们可以在dashboard看到这台最新的机器:

接下去我们再写一个脚本,自动更新haproxy的配置文件:
cs = OpenStack::Compute::Connection.new(:username => username, :api_key => api_key, :auth_url => auth_url)
#预先定义一个haproxy template文件,backed server集群部分定义留空,将它拷贝过来
`cp haproxy.cfg.template haproxy.cfg`

File.open('haproxy.cfg', 'a') do |f|
  cs.servers.each do |s|
    server = cs.server(s[:id])
    #如果该实例的镜像等于我们之前做的snapshot,将它的IP加入配置文件
    if server.image['id'] == image_id
      ip = server.addresses.first.address
      p "Found matched server #{server.name} #{ip}, add to haproxy"
      f.puts "        server #{server.name} #{ip}:80 maxconn 512"
    end
  end
end

#覆盖旧的haproxy配置文件,reload haproxy
`cp haproxy.cfg /etc/haproxy.cfg`
p "Reload haproxy"
`/etc/init.d/haproxy reload`
执行该代码:
# ruby update_haproxy.rb
"Found matched server rails201112161042 10.199.18.6, add to haproxy"
"Found matched server rails201112161003 10.199.18.5, add to haproxy"
"Found matched server rails201112160953 10.199.18.4, add to haproxy"
"Found matched server rails201112160924 10.199.18.8, add to haproxy"
"Found matched server rails201112160923 10.199.18.7, add to haproxy"
"Reload haproxy"
这样就实现了将刚刚创建的 rails201112161042 实例添加到了haproxy集群。
通过不到50行的代码,就实现了auto scaling,是不是很方便?我们还能够更自动化一些,配合监控脚本,设定一个指标,比如说当整个集群的CPU用量达到70%的时候,自动调用create_server,当CPU小于10%的时候,调用delete_server,这样就实现了按需scaling up/down.