1) The File class has a deceiving name; you might think it refers to a file, but it doesn’t. In fact, "FilePath" would have been a better name for the class. It can represent either the name of a particular file or the names of a set of files in a directory. If it’s a set of files, you can ask for that set using the list( ) method, which returns an array of String. It makes sense to return an array rather than one of the flexible container classes, because the number of elements is fixed, and if you want a different directory listing, you just create a different File object.
2) The File object can be used in two ways. If you call list( ) with no arguments, you’ll get the full list that the File object contains. However, if you want a restricted list—for example, if you want all of the files with an extension of .Java—then you use a FilenameFilter which is a class that tells how to select the File objects for display.
3) FilenameFilter interface is:
public interface FilenameFilter {
boolean accept(File dir, String name);
}
The accept( ) method must accept a File object representing the directory that a particular file is found in, and a String containing the name of that file. Remember that the list( ) method is calling accept( ) for each of the file names in the directory object to see which one should be included; this is indicated by the boolean result returned by accept( ).
4) listFiles( ) is a variant of File.list( ) that produces an array of File.
5) The File class is more than just a representation for an existing file or directory. You can also use a File object to create a new directory or an entire directory path if it doesn’t exist. You can also look at the characteristics of files (size, last modification date, read/write), see whether a File object represents a file or a directory, and delete a file.
6) renameTo( ) allows you to rename (or move) a file to an entirely new path represented by the argument, which is another File object. This also works with directories of any length.
7) The Java library classes for I/O are divided by input and output. Through inheritance, everything derived from the InputStream or Reader classes has basic methods called read( ) for reading a single byte or an array of bytes. Likewise, everything derived from OutputStream or Writer classes has basic methods called write( ) for writing a single byte or an array of bytes. However, you won’t generally use these methods; they exist so that other classes can use them—these other classes provide a more useful interface. Thus, you’ll rarely create your stream object by using a single class, but instead will layer multiple objects together to provide your desired functionality (this is the Decorator design pattern.)
8) In Java l.o, the library designers started by deciding that all classes that had anything to do with input would be inherited from InputStream, and all classes that were associated with output would be inherited from OutputStream.
9) InputStream’s job is to represent classes that produce input from different sources. These sources can be:
a. An array of bytes.
b. A String object.
c. A file.
d. A "pipe," which works like a physical pipe: You put things in at one end and they come out the other.
e. A sequence of other streams, so you can collect them together into a single stream.
f. Other sources, such as an Internet connection.
Each of these has an associated subclass of InputStream.
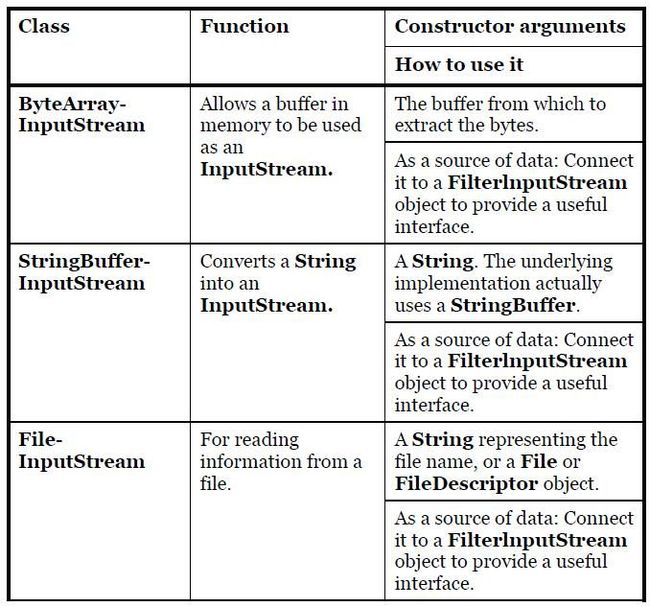

Commented By Sean: For StringBufferInputStream, each char was read once and only the lower 8 bits are used.
10) OutputStream includes the classes that decide where your output will go: an array of bytes (but not a String—presumably, you can create one using the array of bytes), a file, or a "pipe."
11) There is a drawback to Decorator, however. Decorators give you much more flexibility while you’re writing a program (since you can easily mix and match attributes), but they add complexity to your code. The reason that the Java I/O library is awkward to use is that you must create many classes—the "core" I/O type plus all the decorators—in order to get the single I/O object that you want.
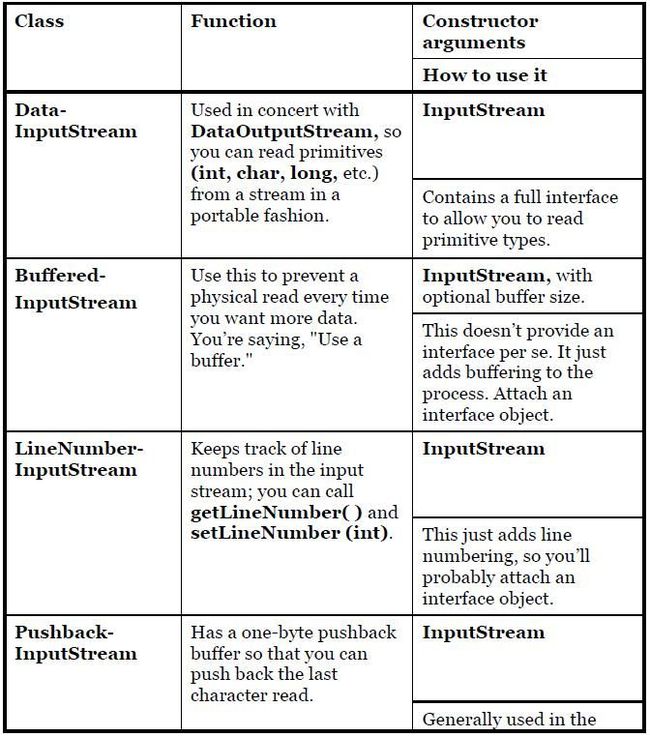
12) The FilterlnputStream classes accomplish two significantly different things. DatalnputStream allows you to read different types of primitive data as well as String objects. (All the methods start with "read," such as readByte( ), readFloat( ), etc.) This, along with its companion DataOutputStream, allows you to move primitive data from one place to another via a stream. These "places" are determined by the input and output stream classes.
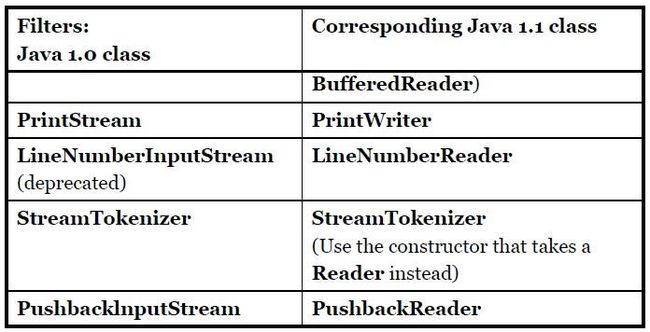
13) The remaining FilterlnputStream classes modify the way an InputStream behaves internally: whether it’s buffered or unbuffered, whether it keeps track of the lines it’s reading (allowing you to ask for line numbers or set the line number), and whether you can push back a single character.
14) You’ll need to buffer your input almost every time, regardless of the I/O device you’re connecting to, so it would have made more sense for the I/O library to have a special case (or simply a method call) for unbuffered input rather than buffered input.
15) The following are the types of FilterInputStream:
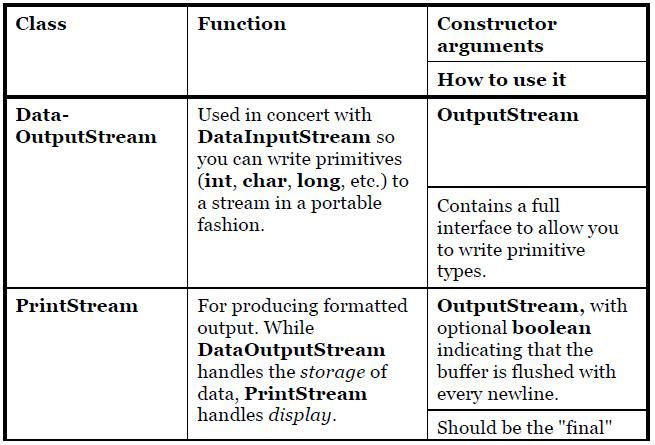
16) DataOutputStream formats each of the primitive types and String objects onto a stream in such a way that any DatalnputStream, on any machine, can read them. All the methods start with "write," such as writeByte( ), writeFloat( ), etc.
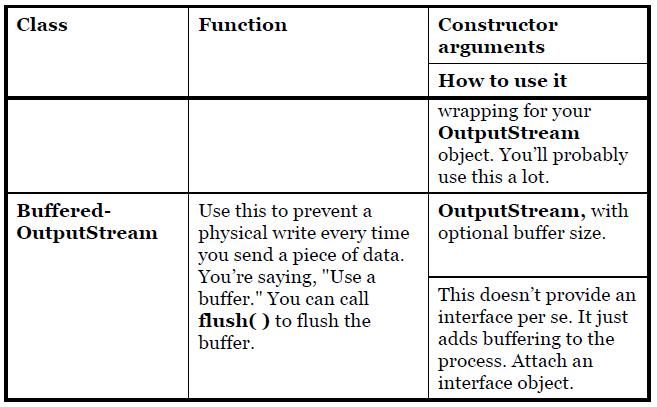
17) The original intent of PrintStream was to print all of the primitive data types and String objects in a viewable format. This is different from DataOutputStream, whose goal is to put data elements on a stream in a way that DatalnputStream can portably reconstruct them. The two important methods in PrintStream are print( ) and println( ), which are overloaded to print all the various types. The difference between print( ) and println( ) is that the latter adds a newline when it’s done. PrintStream can be problematic because it traps all IOExceptions (you must explicitly test the error status with checkError( ), which returns true if an error has occurred). Also, PrintStream doesn’t internationalize properly and doesn’t handle line breaks in a platform-independent way. These problems are solved with PrintWriter.
18) The following are the types of FilterOutputStream:
19) InputStream and OutputStream classes still provide valuable functionality in the form of byte-oriented I/O, whereas the Reader and Writer classes provide Unicode-compliant, character-based I/O. In addition:
a. Java 1.1 added new classes into the InputStream and OutputStream hierarchy, so it’s obvious those hierarchies weren’t being replaced.
b. There are times when you must use classes from the "byte" hierarchy in combination with classes in the "character" hierarchy. To accomplish this, there are "adapter" classes: InputStreamReader converts an InputStream to a Reader, and OutputStreamWriter converts an OutputStream to a Writer.
20) The most important reason for the Reader and Writer hierarchies is for internationalization. The old I/O stream hierarchy supports only 8-bit byte streams and doesn’t handle the 16-bit Unicode characters well. Since Unicode is used for internationalization (and Java’s native char is 16-bit Unicode), the Reader and Writer hierarchies were added to support Unicode in all I/O operations. In addition, the new libraries are designed for faster operations than the old.
21) Almost all of the original Java I/O stream classes have corresponding Reader and Writer classes to provide native Unicode manipulation. However, there are some places where the byte-oriented InputStreams and OutputStreams are the correct solution; in particular, the java.util.zip libraries are byte-oriented rather than char-oriented. So the most sensible approach to take is to try to use the Reader and Writer classes whenever you can. You’ll discover the situations when you have to use the byte-oriented libraries because your code won’t compile.
22) Here is a table that shows the correspondence between the sources and sinks of information (that is, where the data physically comes from or goes to) in the two hierarchies:
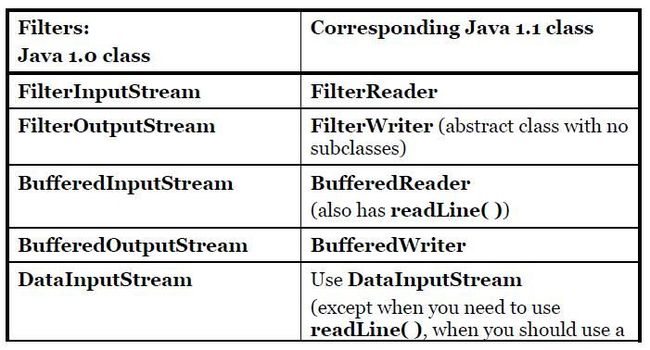
23) For InputStreams and OutputStreams, streams were adapted for particular needs using "decorator" subclasses of FilterInputStream and FilterOutputStream. The Reader and Writer class hierarchies continue the use of this idea—but not exactly.
24) Whenever you want to use readLine( ), you shouldn’t do it with a DataInputStream (this is met with a deprecation message at compile time), but instead use a BufferedReader. Other than this, DataInputStream is still a "preferred" member of the I/O library.
25) RandomAccessFile is used for files containing records of known size so that you can move from one record to another using seek( ), then read or change the records. The records don’t have to be the same size; you just have to determine how big they are and where they are placed in the file. It happens to implement the DataInput and DataOutput interfaces and it doesn’t even use any of the functionality of the existing InputStream or OutputStream classes; it’s a completely separate class, written from scratch, with all of its own (mostly native) methods. The reason for this may be that RandomAccessFile has essentially different behavior than the other I/O types, since you can move forward and backward within a file.
26) A RandomAccessFile works like a DataInputStream pasted together with a DataOutputStream, along with the methods getFilePointer( ) to find out where you are in the file, seek( ) to move to a new point in the file, and length( ) to determine the maximum size of the file. In addition, the constructors require a second argument indicating whether you are just randomly reading ("r") or reading and writing ("rw"). There’s no support for write-only files, which could suggest that RandomAccessFile might have worked well if it were inherited from DataInputStream.
27) To open a file for character input, you use a FileInputReader with a String or a File object as the file name. For speed, you’ll want that file to be buffered so you give the resulting reference to the constructor for a BufferedReader. Since BufferedReader also provides the readLine( ) method, this is your final object and the interface you read from. When readLine( ) returns null, you’re at the end of the file. close( ) is called to close the file.
28) A String object is used to create a StringReader. Then StringReader.read( ) is used to read each character one at a time. Note that read( ) returns the next character as an int and thus it must be cast to a char to print properly. It reaches the end of the file while read() returns -1.
29) A ByteArrayInputStream must be given an array of bytes. To produce this, String has a getBytes( ) method. The resulting ByteArrayInputStream is an appropriate InputStream to hand to DataInputStream. If you read the characters from a DataInputStream one byte at a time using readByte( ), any byte value is a legitimate result, so the return value cannot be used to detect the end of input. Instead, you can use the available( ) method to find out how many more characters are available. Note that available( ) works differently depending on what sort of medium you’re reading from; it’s literally "the number of bytes that can be read without blocking." With a file, this means the whole file, but with a different kind of stream this might not be true, so use it thoughtfully.
30) A FileWriter object writes data to a file. You’ll virtually always want to buffer the output by wrapping it in a BufferedWriter and then it’s decorated as a PrintWriter to provide formatting. If you don’t call close( ) for all your output files, you might discover that the buffers don’t get flushed, so the file will be incomplete.
31) Java SE5 added a helper constructor PrintWriter( String FileName) to PrintWriter so that you don’t have to do all the decoration by hand every time you want to create a text file and write to it. With it you still get buffering.
32) A PrintWriter formats data so that it’s readable by a human. However, to output data for recovery by another stream, you use a DataOutputStream to write the data and a DataInputStream to recover the data. If you use a DataOutputStream to write the data, then Java guarantees that you can accurately recover the data using a DataInputStream— regardless of what different platforms write and read the data.
33) When you are using a DataOutputStream, the only reliable way to write a String so that it can be recovered by a DataInputStream is to use UTF-8 encoding, accomplished by using writeUTF( ) and readUTF( ).
34) UTF-8 encodes ASCII characters in a single byte, and non-ASCII characters in two or three bytes. In addition, the length of the string is stored in the first two bytes of the UTF-8 string. However, writeUTF( ) and readUTF( ) use a special variation of UTF-8 for Java.
35) There are similar methods for reading and writing the primitives. But for any of the reading methods to work correctly, you must know the exact placement of the data item in the stream. So you must either have a fixed format for the data in the file, or extra information must be stored in the file that you parse to determine where the data is located.
36) When using RandomAccessFile, you must know the layout of the file so that you can manipulate it properly. RandomAccessFile has specific methods to read and write primitives and UTF-8 strings.
37) Following the standard I/O model, Java has System.in, System.out, and System.err. System.out is already pre-wrapped as a PrintStream object. System.err is likewise a PrintStream, but System.in is a raw InputStream with no wrapping. This means that although you can use System.out and System.err right away, System.in must be wrapped before you can read from it. You’ll typically read input a line at a time using readLine( ). To do this, wrap System.in in a BufferedReader, which requires you to convert System.in to a Reader using InputStreamReader.
38) The Java System class allows you to redirect the standard input, output, and error I/O streams using simple static method calls:
setIn(InputStream) , setOut(PrintStream) , setErr(PrintStream)
39) To run a program, a command string, which is the same command that you would type to run the program on the console, is passed to the java.lang.ProcessBuilder constructor (which requires it as an array of String objects), and the resulting ProcessBuilder object is started by invoking star() which return a Process object. To capture the standard output stream from the program as it executes, you call Process.getInputStream( ). The program’s errors are captured by calling Process.getErrorStream( ).
40) The Java "new" I/O library, introduced in JDK 1.4 in the java.nio.* packages, has one goal: speed. In fact, the "old" I/O packages have been reimplemented using nio in order to take advantage of this speed increase, so you will benefit even if you don’t explicitly write code with nio.
41) The speed comes from using structures that are closer to the operating system’s way of performing I/O: channels and buffers. You could think of it as a coal mine; the channel is the mine containing the seam of coal (the data), and the buffer is the cart that you send into the mine. The cart comes back full of coal, and you get the coal from the cart. That is, you don’t interact directly with the channel; you interact with the buffer and send the buffer into the channel. The channel either pulls data from the buffer, or puts data into the buffer.
42) The only kind of buffer that communicates directly with a channel is a ByteBuffer—that is, a buffer that holds raw bytes. You create one by telling it how much storage to allocate, and there are methods to put and get data, in either raw byte form or as primitive data types. But there’s no way to put or get an object, or even a String.
43) Three of the classes in the "old" I/O have been modified so that they produce a FileChannel: FileInputStream, FileOutputStream, and, for both reading and writing, RandomAccessFile. (getChannel( ) will produce a FileChannel) Notice that these are the byte manipulation streams, in keeping with the low-level nature of nio. The Reader and Writer character-mode classes do not produce channels, but the java.nio.channels.Channels class has utility methods to produce Readers and Writers from channels.
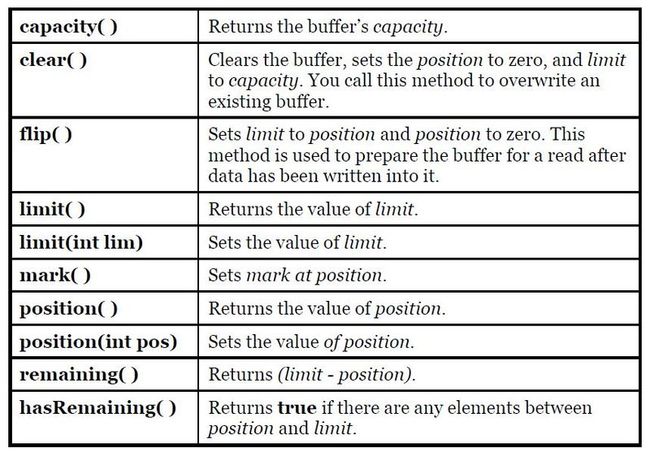
44) A channel is fairly basic: You can hand it a ByteBuffer for reading or writing, and you can lock regions of the file for exclusive access. One way to put bytes into a ByteBuffer is to stuff them in directly using one of the "put" methods, to put one or more bytes, or values of primitive types. You can also "wrap" an existing byte array in a ByteBuffer using the wrap( ) method. When you do this, the underlying array is not copied, but instead is used as the storage for the generated ByteBuffer. We say that the ByteBuffer is "backed by" the array. For read-only access, you must explicitly allocate a ByteBuffer using the static allocate( ) method. It’s also possible to go for even more speed by using allocateDirect( ) instead of allocate( ) to produce a "direct" buffer that may have an even higher coupling with the operating system. Once you call read( ) to tell the FileChannel to store bytes into the ByteBuffer, you must call flip( ) on the buffer to tell it to get ready to have its bytes extracted. And if we were to use the buffer for further read( ) operations, we’d also have to call clear( ) to prepare it for each read( ). When FileChannel.read( ) returns -1, it means that you’ve reached the end of the input. rewind( ) the buffer will make it go back to the beginning of the data once you've extracted data from it. limit() gives the size of the buffer. The array( ) method is "optional," and you can only call it on a buffer that is backed by an array; otherwise, you’ll get an UnsupportedOperationException.
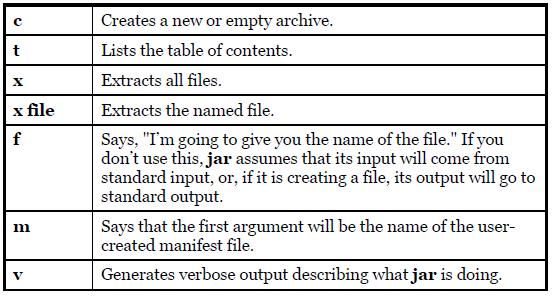
45) Special methods transferTo( ) and transferFrom( ) allow you to connect one channel directly to another.
46) java.nio.CharBuffer has a toString( ) method that says, "Returns a string containing the characters in this buffer." A ByteBuffer can be viewed as a CharBuffer with the asCharBuffer( ) method, but you cann't print a ByteBuffer using System.out.println(buff.asCharBuffer()), unless the source stream was previously written with correct encoding : ByteBuffer.wrap("Some text".getBytes("UTF-16BE")) or with a CharBuffer : buff.asCharBuffer().put("Some text"). Usually you need to decode the buffer using : java.nio.charset.Charset.forName(encoding).decode(buff)) where encoding can be system encoding charset name getting from System.getProperty("file.encoding").
47) After a ByteBuffer is allocated, buffer allocation automatically zeroes the contents. The easiest way to insert primitive values into a ByteBuffer is to get the appropriate "view" on that buffer using asCharBuffer( ), asShortBuffer( ), asIntBuffer( ), asLongBuffer( ), asFloatBuffer( ), asDoubleBuffer( ). And the primitives can be read via getChar(), getShort(), getInt(), getLong(), getFloat(), getDouble().
48) A "view buffer" allows you to look at an underlying ByteBuffer through the window of a particular primitive type. The ByteBuffer is still the actual storage that’s "backing" the view, so any changes you make to the view are reflected in modifications to the data in the ByteBuffer. Once the underlying ByteBuffer is filled with some primitive type via a view buffer, then that ByteBuffer can be written directly to a channel.
49) Different machines may use different byte-ordering approaches to store data. "Big endian" places the most significant byte in the lowest memory address, and "little endian" places the most significant byte in the highest memory address. When storing a quantity that is greater than one byte, like int, float, etc., you may need to consider the byte ordering. A ByteBuffer stores data in big endian form, and data sent over a network always uses big endian order. You can change the endian-ness of a ByteBuffer using order( ) with an argument of ByteOrder.BIG_ENDIAN or ByteOrder.LITTLE_ENDIAN.
50) The following diagram illustrates the relationships between the nio classes, so that you can see how to move and convert data.
51) A Buffer consists of data and four indexes to access and manipulate this data efficiently: mark, position, limit and capacity. There are methods to set and reset these indexes and to query their value.
Methods that insert and extract data from the buffer update these indexes to reflect the changes. You can also call absolute get( ) and put( ) methods that include an index argument, which is the location where the get( ) or put( ) takes place. These methods do not modify the value of the buffer’s position. reset( ) set the value of position to mark. If you print the buffer, only the characters between the position and limit are printed. Thus, if you want to show the entire contents of the buffer, you must set position to the start of the buffer using rewind( ) and the value of mark becomes undefined.
public class BufferToText {
    private static final int BSIZE = 1024;
    public static void main(String[] args) throws Exception {
        FileChannel fc = new FileOutputStream("data2.txt").getChannel();
        fc.write(ByteBuffer.wrap("Some text".getBytes()));
        fc.close();
        fc = new FileInputStream("data2.txt").getChannel();
        ByteBuffer buff = ByteBuffer.allocate(BSIZE);
        fc.read(buff);
        buff.flip();
        // Doesn’t work:
        System.out.println(buff.asCharBuffer());
        // Decode using this system’s default Charset:
        buff.rewind();
        String encoding = System.getProperty("file.encoding");
        System.out.println("Decoded using " + encoding + ": " + Charset.forName(encoding).decode(buff));
        // Or, we could encode with something that will print:
        fc = new FileOutputStream("data2.txt").getChannel();
        fc.write(ByteBuffer.wrap( "Some text".getBytes("UTF-16BE")));
        fc.close();
        // Now try reading again:
        fc = new FileInputStream("data2.txt").getChannel();
        buff.clear();
        fc.read(buff);
        buff.flip();
        System.out.println(buff.asCharBuffer());
        // Use a CharBuffer to write through:
        fc = new FileOutputStream("data2.txt").getChannel();
        buff = ByteBuffer.allocate(24); // More than needed
        buff.asCharBuffer().put("Some text");
        fc.write(buff); // no need to flip before writing
        fc.close();
        // Read and display:
        fc = new FileInputStream("data2.txt").getChannel();
        buff.clear();
        fc.read(buff);
        buff.flip();
        System.out.println(buff.asCharBuffer());
    }
} /* Output:
????
Decoded using Cp1252: Some text
Some text
Some text
*/
52) Memory-mapped files allow you to create and modify files that are too big to bring into memory. With a memory-mapped file, you can pretend that the entire file is in memory and that you can access it by simply treating it as a very large array.
53) To do both writing and reading, we start with a RandomAccessFile, get a channel for that file, and then call map( ) to produce a MappedByteBuffer, which is a particular kind of direct buffer. Note that you must specify the starting point and the length of the region that you want to map in the file; this means that you have the option to map smaller regions of a large file. MappedByteBuffer is inherited from ByteBuffer.
54) The file locks are visible to other operating system processes because Java file locking maps directly to the native operating system locking facility.
55) You get a FileLock on the entire file by calling either tryLock( ) or lock( ) on a FileChannel. (SocketChannel, DatagramChannel, and ServerSocketChannel do not need locking since they are inherently singleprocess entities; you don’t generally share a network socket between two processes.) tryLock( ) is non-blocking. It tries to grab the lock, but if it cannot (when some other process already holds the same lock and it is not shared), it simply returns from the method call. lock( ) blocks until the lock is acquired, or the thread that invoked lock( ) is interrupted, or the channel on which the lock( ) method is called is closed. A lock is released using FileLock.release( ).
56) It is also possible to lock a part of the file by using
tryLock(long position, long end, boolean shared) or lock(long position, long end, boolean shared), which locks the region (end - position). The third argument specifies whether this lock is shared. If a lock is acquired for a region from position to position+size and the file increases beyond position+size, then the section beyond position+size is not locked. The zero-argument locking methods lock the entire file, even if it grows. The type of lock (shared or exclusive) can be queried using FileLock.isShared( ).
57) The Java I/O library contains classes to support reading and writing streams in a compressed format. You wrap these around other I/O classes to provide compression functionality. These classes are not derived from the Reader and Writer classes, but instead are part of the InputStream and OutputStream hierarchies. This is because the compression library works with bytes, not characters. However, you might sometimes be forced to mix the two types of streams.
58) For each file to add to the archive, you must call ZipOutputStream.putNextEntry( ) and pass it a ZipEntry object. The ZipEntry object contains an extensive interface that allows you to get and set all the data available on that particular entry in your Zip file: name, compressed and uncompressed sizes, date, CRC checksum, extra field data, comment, compression method, and whether it’s a directory entry. To extract files, ZipInputStream has a getNextEntry( ) method that returns the next ZipEntry if there is one. As a more succinct alternative, you can read the file using a ZipFile object, which has a method entries( ) to return an Enumeration to the ZipEntries.
59) The Zip format is also used in the JAR (Java ARchive) file format. A JAR file consists of a single file containing a collection of zipped files along with a "manifest" that describes them. (You can create your own manifest file; otherwise, the jar program will do it for you.)
60) jar [options] destination [manifest] inputfile(s)
61) Java’s object serialization allows you to take any object that implements the Serializable interface and turn it into a sequence of bytes that can later be fully restored to regenerate the original object. By itself, object serialization is interesting because it allows you to implement lightweight persistence. The reason it’s called "lightweight" is that you can’t simply define an object using some kind of "persistent" keyword and let the system take care of the details. Instead, you must explicitly serialize and deserialize the objects in your program.
62) Object serialization was added to the language to support two major features. Java’s Remote Method Invocation (RMI) allows objects that live on other machines to behave as if they live on your machine. When messages are sent to remote objects, object serialization is necessary to transport the arguments and return values. Object serialization is also necessary for JavaBeans. When a Bean is used, its state information is generally configured at design time. This state information must be stored and later recovered when the program is started.
63) Serializing an object is quite simple as long as the object implements the Serializable interface (this is a tagging interface and has no methods). All of the wrappers for the primitive types, all of the container classes, and even Class objects can be serialized.
64) To serialize an object, you create some sort of OutputStream object and then wrap it inside an ObjectOutputStream object. At this point you need only call writeObject( ), and your object is serialized and sent to the OutputStream (object serialization is byte-oriented, and thus uses the InputStream and OutputStream hierarchies). To reverse the process, you wrap an InputStream inside an ObjectlnputStream and call readObject( ). What comes back is, as usual, a reference to an upcast Object, so you must downcast to set things straight. You can also write all the primitive data types using the same methods as DataOutputStream (they share the same interface DataOutput).
65) A particularly clever aspect of object serialization is that it not only saves an image of your object, but it also follows all the references contained in your object and saves those objects, and follows all the references in each of those objects, etc. This is sometimes referred to as the "web of objects" that a single object can be connected to, and it includes arrays of references to objects as well as member objects.
66) Even opening the file and reading in the object requires the Class object for that serialized object; the JVM cannot find the .class file(unless it happens to be in the classpath). You’ll get a ClassNotFoundException. The JVM must be able to find the associated .class file.
67) You can control the process of serialization by implementing the Externalizable interface instead of the Serializable interface. The Externalizable interface extends the Serializable interface and adds two methods, writeExternal( ) and readExternal( ), that are automatically called for your object during serialization and deserialization so that you can perform your special operations.
68) This is different from recovering a Serializable object, in which the object is constructed entirely from its stored bits, with no constructor calls. With an Externalizable object, all the normal default construction behavior occurs (including the initializations at the point of field definition), and then readExternal( ) is called. You need to be aware of this—in particular, the fact that all the default construction always takes place—to produce the correct behavior in your Externalizable objects. If you are inheriting from an Externalizable object, you’ll typically call the base-class versions of writeExternal( ) and readExternal( ) to provide proper storage and retrieval of the base-class components. So to make things work correctly, you must not only write the important data from the object during the writeExternal( ) method (there is no default behavior that writes any of the member objects for an Externalizable object), but you must also recover that data in the readExternal( ) method.
69) If you’re working with a Serializable object, however, all serialization happens automatically. To control this, you can turn off serialization on a field-by-field basis using the transient keyword, which says, "Don’t bother saving or restoring this—I’ll take care of it."
70) If you’re not keen on implementing the Externalizable interface, there’s another approach. You can implement the Serializable interface and add (notice I say "add" and not "override" or "implement") methods called writeObject( ) and readObject( ) that will automatically be called when the object is serialized and deserialized, respectively. That is, if you provide these two methods, they will be used instead of the default serialization.
The methods must have these exact signatures:
private void writeObject(ObjectOutputStream stream) throws IOException;
private void readObject(ObjectlnputStream stream) throws IOException, ClassNotFoundException
There’s one other twist. Inside your writeObject( ), you can choose to perform the default writeObject( ) action by calling stream.defaultWriteObject( ). Likewise, inside readObject( ) you can call stream.defaultReadObject( ). If you use the default mechanism to write the non-transient parts of your object, you must call defaultWriteObject( ) as the first operation in writeObject( ), and defaultReadObject( ) as the first operation in readObject( ).
71) As long as you’re serializing everything to a single stream, you’ll recover the same web of objects that you wrote, with no accidental duplication of objects. Of course, you can change the state of your objects in between the time you write the first and the last, but that’s your responsibility; the objects will be written in whatever state they are in (and with whatever connections they have to other objects) at the time you serialize them. The safest thing to do if you want to save the state of a system is to serialize as an "atomic" operation. If you serialize some things, do some other work, and serialize some more, etc., then you will not be storing the system safely. Instead, put all the objects that comprise the state of your system in a single container and simply write that container out in one operation. Then you can restore it with a single method call as well.
72) Even though class Class is Serializable, it doesn’t do what you expect. So if you want to serialize statics, you must do it yourself.
73) The Preferences API is much closer to persistence than it is to object serialization, because it automatically stores and retrieves your information. However, its use is restricted to small and limited data sets—you can only hold primitives and Strings, and the length of each stored String can’t be longer than 8K. As the name suggests, the Preferences API is designed to store and retrieve user preferences and program-configuration settings. Preferences are key-value sets (like Maps) stored in a hierarchy of nodes. Although the node hierarchy can be used to create complicated structures, it’s typical to create a single node named after your class and store the information there.
74) Preferences.userNodeForPackage( ) is used, but you could also choose Preferences.systemNodeForPackage( ); the choice is somewhat arbitrary, but the idea is that "user" is for individual user preferences, and "system" is for general installation configuration. You don’t need to use the current class as the node identifier, but that’s the usual practice. Once you create the node, it’s available for either loading or reading data. keys() returns a String[]. put(), putInt(), etc. are used to put String value, int value etc. and get(), getInt(), etc are used to get String value, int value, etc. The second argument to get( ) is the default value that is produced if there isn’t any entry for that key value.
75) Where is the data stored for Preferences? There’s no local file that appears after the program is run the first time. The Preferences API uses appropriate system resources to accomplish its task, and these will vary depending on the OS. In Windows, the registry is used (since it’s already a hierarchy of nodes with key-value pairs). But the whole point is that the information is magically stored for you so that you don’t have to worry about how it works from one system to another.
76) In Java, it appears that you are supposed to use a File object to determine whether a file exists, because if you open it as a FileOutputStream or FileWriter, it will always get overwritten.


