Spring Quartz 持久化解决方案
Quartz是实现了序列化接口的,包括接口,所以可以使用标准方式序列化到数据库。
而Spring2.5.6在集成Quartz时却未能考虑持久化问题。
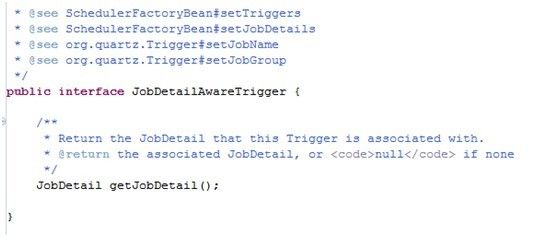
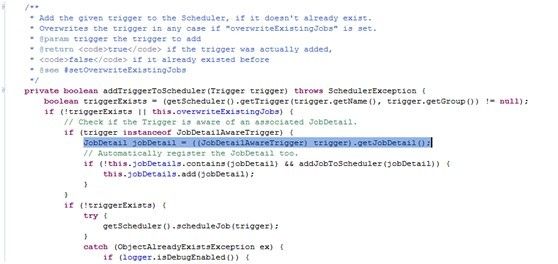
Spring对JobDetail进行了封装,却未实现序列化接口,所以持久化的时候会产生NotSerializable问题,这也是网上一直在那边叫嚣为什么不能持久化到数据库问题,哥今天看了下Spring源码,发现Spring对Quartz持久化的问题.
1. 不知道Spring未来会不会对持久化的支持,不过我们可以有如下解决方案,比如改写
Spring的代码,实现序列化接口.
2. 不使用Spring的Fatory,自己实现任务的初始化.
既然Spring不支持持久化,那么持久化任务还是自己编写实现吧,否则每次都需要打包发布,麻烦,自己编写的类与Quartz完全兼容.
注意:为什么Spring不支持外配置任务,可能也是考虑到这方面问题所以才不提供这些任务的执行化支持.[配置文件配置与数据库配置重复]
直接使用Quartz是支持序列化功能,比如直接使用页面配置Quartz界面,设置任务执行时间等属性。
通过配置实现的是不应该初始化到数据库,否则直接在数据库中配置了。不过也是可以配置的,通过改写JobDetailBean.代码如下:
package org.frame.auth.service;

import java.util.Map;

import org.quartz.Job;
import org.quartz.JobDetail;
import org.quartz.Scheduler;
import org.springframework.beans.factory.BeanNameAware;
import org.springframework.beans.factory.InitializingBean;
import org.springframework.scheduling.quartz.DelegatingJob;
import org.springframework.scheduling.quartz.SchedulerFactoryBean;

public class PersistentJobDetailBean extends JobDetail
implements BeanNameAware, InitializingBean {

	private static final long serialVersionUID = -4389885435844732405L;

	private Class actualJobClass;

	private String beanName;

	/**
	 * Overridden to support any job class, to allow a custom JobFactory
	 * to adapt the given job class to the Quartz Job interface.
	 * @see SchedulerFactoryBean#setJobFactory
	 */
	public void setJobClass(Class jobClass) {
		if (jobClass != null && !Job.class.isAssignableFrom(jobClass)) {
			super.setJobClass(DelegatingJob.class);
			this.actualJobClass = jobClass;
		}
		else {
			super.setJobClass(jobClass);
		}
	}

	/**
	 * Overridden to support any job class, to allow a custom JobFactory
	 * to adapt the given job class to the Quartz Job interface.
	 */
	public Class getJobClass() {
		return (this.actualJobClass != null ? this.actualJobClass : super.getJobClass());
	}

	/**
	 * Register objects in the JobDataMap via a given Map.
	 * <p>These objects will be available to this Job only,
	 * in contrast to objects in the SchedulerContext.
	 * <p>Note: When using persistent Jobs whose JobDetail will be kept in the
	 * database, do not put Spring-managed beans or an ApplicationContext
	 * reference into the JobDataMap but rather into the SchedulerContext.
	 * @param jobDataAsMap Map with String keys and any objects as values
	 * (for example Spring-managed beans)
	 * @see SchedulerFactoryBean#setSchedulerContextAsMap
	 */
	public void setJobDataAsMap(Map jobDataAsMap) {
		getJobDataMap().putAll(jobDataAsMap);
	}

	/**
	 * Set a list of JobListener names for this job, referring to
	 * non-global JobListeners registered with the Scheduler.
	 * <p>A JobListener name always refers to the name returned
	 * by the JobListener implementation.
	 * @see SchedulerFactoryBean#setJobListeners
	 * @see org.quartz.JobListener#getName
	 */
	public void setJobListenerNames(String[] names) {
		for (int i = 0; i < names.length; i++) {
			addJobListener(names[i]);
		}
	}

	public void setBeanName(String beanName) {
		this.beanName = beanName;
	}


	public void afterPropertiesSet() {
		if (getName() == null) {
			setName(this.beanName);
		}
		if (getGroup() == null) {
			setGroup(Scheduler.DEFAULT_GROUP);
		}
	}


}
这里把Spring的ApplicationContext去掉了,因为这个属性没有实现序列化接口。其他配置与原告一致:
<?xml version="1.0" encoding="UTF-8"?>
<!DOCTYPE beans PUBLIC "-//SPRING//DTD BEAN//EN" " http://www.springframework.org/dtd/spring-beans.dtd ">
<beans default-autowire="byName">


   <bean id="dataSource" class="org.springframework.jdbc.datasource.DriverManagerDataSource" destroy-method="close">
        <property name="driverClassName" value="com.mysql.jdbc.Driver"/>

        <property name="url" >
        	<value><![CDATA[jdbc:mysql://localhost:3306/txl?connectTimeout=1000&useUnicode=true&characterEncoding=utf-8]]></value>
        </property>
        <property name="username" value="root"/>
        <property name="password" value=""/>
    </bean>

	<bean id="jobDetail" class = "org.frame.auth.service.PersistentJobDetailBean">
			<property name="jobClass" value="org.frame.auth.service.PersistentJob"></property>
	</bean>

<!--	<bean id="trigger" class="org.springframework.scheduling.quartz.SimpleTriggerBean" >-->
<!--			<property name="jobDetail" ref="jobDetail"></property>-->
<!--			<property name="startDelay" value="1000"></property>-->
<!--			<property name="repeatInterval" value="3000"></property>-->
<!--			<property name="jobDataAsMap">-->
<!--				<map>-->
<!--					<entry key="message" value="this is trigger"></entry>-->
<!--				</map>-->
<!--			</property>-->
<!--	</bean>-->

	<bean id="cronTrigger" class="org.springframework.scheduling.quartz.CronTriggerBean" >
         <property name="jobDetail" ref="jobDetail"/>
         <property name="cronExpression">
             <value>0/10 * * * * ?</value>
         </property>
	</bean>

	<bean id="schedulerFactory" class="org.springframework.scheduling.quartz.SchedulerFactoryBean">
			<property name="dataSource" ref="dataSource"></property>
			<property name="applicationContextSchedulerContextKey"  value="applicationContextKey" />
			<property name="configLocation" value="classpath:quartz.properties"/>
	</bean>

</beans>
org.frame.auth.service.PersistentJob这个类很简单,如下:
package org.frame.auth.service;

import org.quartz.Job;
import org.quartz.JobExecutionContext;
import org.quartz.JobExecutionException;

public class PersistentJob implements Job  {


	@Override
	public void execute(JobExecutionContext context) throws JobExecutionException {
		System.out.println("spring quartz!");
	}

}
有人可能会说,你这种任务调度持久化就没有意义了,是的,一般持久化到数据库的代码如下:
package org.frame.auth.service;

import java.util.Map;

import org.quartz.JobExecutionContext;
import org.quartz.JobExecutionException;
import org.quartz.StatefulJob;

public class PersistentJob implements StatefulJob  {


	@Override
	public void execute(JobExecutionContext context) throws JobExecutionException {
		// TODO Auto-generated method stub
		Map map = context.getJobDetail().getJobDataMap();
		System.out.println("["+context.getJobDetail().getName()+"]"+map.get("message"));
		map.put("message", "updated Message");
	}

}
这样的话,信息message就会持久化到数据库中了.可以建立系统的连锁调度,这根据你的业务需求了.
在Spring中配置的任务通过我这种修改是可以运行,不过每次运行都需要把原先的任务删除,否则会提示任务已经存在,Quartz的优势是就算服务器停止,下次重启能够恢复原先的任务并继续执行.