Chapter 5. Configuring a Step
如在批量域名语言章节中讨论的,一个Step类是指封装了批作业一个独立、顺序阶段并且包含了实际定义和控制批处理时需要所有信息的一个域对象。这种描述必须要含糊一些,因为任何指定Step的内容需要由编写Job的开发人员确定。一个Step可以非常简单,也可以非常复杂,完全由开发人员掌控。一个简单的Step可以将一个文件中的数据载入数据库,且只需少量代码或根本不需代码,具体取决于实际部署。一个复杂的Step可以包括许多在处理中得到应用的复杂的业务规则。
5.1. Chunk-Oriented Processing
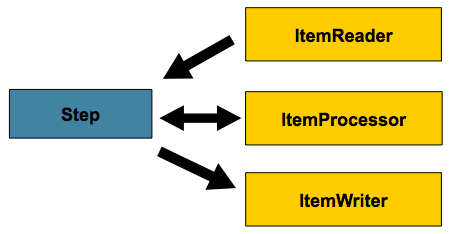
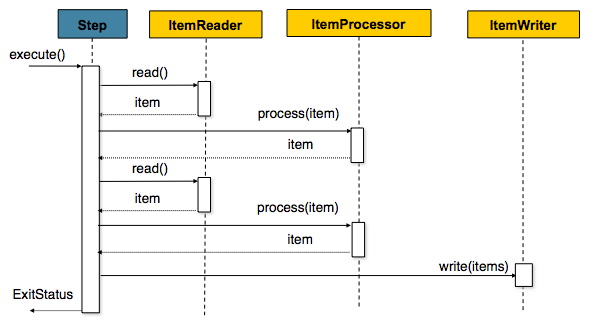
Spring Batch在其最常用的部署方式中使用“面向数据块”的处理方式。面向数据块的处理方式是指在事务边界中一次读取一个数据,创建将被写出的“数据块”。首先从ItemReader中读取一个项目,交给ItemProcessor,然后聚合。当项目数量等于提交时间间隔时,整个数据块通过ItemWriter写出,然后提交事务。
下面给出上文相关概念的一个代码示例:
List items = new Arraylist();
for(int i = 0; i < commitInterval; i++){
    Object item = itemReader.read()
    Object processedItem = itemProcessor.process(item);
    items.add(processedItem);
}
itemWriter.write(items);
5.1.1. Configuring a Step
虽然Step需要的相关性相对较少,但是它是一个非常复杂的类,可以含有很多合作者(类)。为了方便配置,可以使用Spring Batch命名空间。
<job id="sampleJob" job-repository="jobRepository">
    <step id="step1">
        <tasklet transaction-manager="transactionManager">
            <chunk reader="itemReader" writer="itemWriter" commit-interval="10"/>
        </tasklet>
    </step>
</job>
上述配置只描述了创建一个面向项目的step类需要的相关性:
- reader - ItemReader,提供处理项目。
- writer - ItemWriter,对ItemReader提供的项目进行处理。
- transaction-manager - Spring的PlatformTransactionManager(平台事务管理器),可用于在处理过程中发起和提交事务。
- job-repository - JobRepository,可用于在处理过程中(在提交前)周期性地存储StepExecution和ExecutionContext。对于内联<step/>(在一个<job/>中定义),它是<job/>元素的一个属性。对于独立的step,它被定义为<tasklet/>的一个属性。
- commit-interval - 事务被提交前,将被处理的项目数量。
请注意,作业库默认为"jobRepository",事务管理器默认为"transactionManger"。此外,ItemProcessor是可选项,不是必选项,因为项目可以从阅读器直接传输给写入器。
5.1.2. Inheriting from a Parent Step
如果有一组Step有类似的配置,则可以定义一个“母”Step,具体的Step可以从中继承属性。与Java中类的继承一样,“子”Step把自己的元素和属性与母体的元素和属性相结合。子Step将会覆盖任意母Step。
在下面示例中,Step "concreteStep1"从"parentStep"继承。它将由'itemReader', 'itemProcessor', 'itemWriter', startLimit=5, 及allowStartIfComplete=true具体化。此外,commitInterval为'5',原因是它被"concreteStep1"覆盖。
<step id="parentStep">
    <tasklet allow-start-if-complete="true">
        <chunk reader="itemReader" writer="itemWriter" commit-interval="10"/>
    </tasklet>
</step>

<step id="concreteStep1" parent="parentStep">
    <tasklet start-limit="5">
        <chunk processor="itemProcessor" commit-interval="5"/>
    </tasklet>
</step>
作业元素内的Step仍然需要ID属性。原因有二:
- 当StepExecution持续运行时,可以使用ID作为Step的名称。如果相同的独立Step被作业内的多个Step引用,则会出现错误。
- 当创建作业流(将在本章下文中讨论)时,下一个属性应该是作业流中的Step,而不是独立Step。
5.1.2.1. Abstract Step
有时候可能需要定义一个非Step完整配置的母Step。例如,如果Step配置没有涉及读取器、写入器和tasklet属性,则初始化将会失败。如果必须在没有这些属性的情况下对母Step进行定义,则可以使用“抽象”属性。一个“抽象”的Step不会被具体化。它只用于拓展。
在下面示例中,Step类"abstractParentStep"如果不宣布为抽象类,便不会进行具体化。Step "concreteStep2"将有'itemReader', 'itemWriter',且commitInterval=10。
<step id="abstractParentStep" abstract="true">
    <tasklet>
        <chunk commit-interval="10"/>
    </tasklet>
</step>

<step id="concreteStep2" parent="abstractParentStep">
    <tasklet>
        <chunk reader="itemReader" writer="itemWriter"/>
    </tasklet>
</step>
5.1.2.2. Merging Lists
Step的部分可配置元素包括列表,比如<listeners/>元素。如果母和子Step宣布有<listeners/>元素,则子列表将覆盖母列表。为了允许子类向母类定义的列表中添加更多的接听器(listeners),每个列表元素有一个"merge"(合并)属性。如果元素指定merge="true",则子类列表将与母类列表合并,而不是覆盖母类列表。
在下面示例中,Step "concreteStep3"将被创建且带有两个接听器:listenerOne,listenerTwo。
<step id="listenersParentStep" abstract="true">
    <listeners>
        <listener ref="listenerOne"/>
    <listeners>
</step>

<step id="concreteStep3" parent="listenersParentStep">
    <tasklet>
        <chunk reader="itemReader" writer="itemWriter" commit-interval="5"/>
    </tasklet>
    <listeners merge="true">
        <listener ref="listenerTwo"/>
    <listeners>
</step>
5.1.3. The Commit Interval
如上文所述,Step读取并且写入项目,使用提供的PlatformTransactionManager周期性地提交事务。当提交间隔为1时,则它在写入一个项目时便会提交事务。在许多情况下,这很不妥,因为开启和提交一个事务的成本很高。理想情况下,我们希望在一个事务中处理尽可能多的项目,这完全取决于被处理的数据类型及与Step交互的资源情况。因此,我们可以对一次提交所能处理的项目数量进行配置。
<job id="sampleJob">
    <step id="step1">
        <tasklet>
            <chunk reader="itemReader" writer="itemWriter" commit-interval="10"/>
        </tasklet>
    </step>
</job>
在上面示例中,一次事务可以处理10个项目。在处理开始时,一个事务将被开启;每次ItemReader调用读取操作时,计数器都会上升。当数量到达10时,累积项目的列表将被传递给ItemWriter, 事务被提交。
5.1.4. Configuring a Step for Restart
第4章《作业配置和运行》对作业重启进行了讨论。重启操作对Step有许多影响,因此需要专门配置。
5.1.4.1. Setting a StartLimit
在许多时候,我们可能希望控制Step可被启动的次数。例如,有的Step可以使某些资源无效,为了使之能够再次运行必须要手动开启资源,所以需要对该Step进行配置使之只能运行一次。因为不同的Step有不同的要求,所以需要在Step层面上进行配置。只能运行一次的Step可以作为一个作业的一部分,且该作业与可以无限运行的Step完全相同。下面给出运行次数上限配置示例。
<step id="step1">
    <tasklet start-limit="1">
        <chunk reader="itemReader" writer="itemWriter" commit-interval="10"/>
    </tasklet>
</step>
上例中的Step只能运行一次。如果使之再次运行,可以会导致异常。请注意,start-limit(运行上限)默认值为Integer.MAX_VALUE。
5.1.4.2. Restarting a completed step
对于可重启型作业,可能会有一个或多个Step需要持续运行而不管首次运行时是否成功。比如认证型Step或在处理前需要清理资源的Step。 在可重启型作业正常处理期间,状态为'COMPLETED'(表示已经成功完成)的所有Step均将被略过。将allow-start-if-complete设置为"true"可以覆盖这一规则,于是Step可以持续运行。
<step id="step1">
    <tasklet allow-start-if-complete="true">
        <chunk reader="itemReader" writer="itemWriter" commit-interval="10"/>
    </tasklet>
</step>
5.1.4.3. Step Restart Configuration Example
<job id="footballJob" restartable="true">
    <step id="playerload" next="gameLoad">
        <tasklet>
            <chunk reader="playerFileItemReader" writer="playerWriter"
                   commit-interval="10" />
        </tasklet>
    </step>
    <step id="gameLoad" next="playerSummarization">
        <tasklet allow-start-if-complete="true">
            <chunk reader="gameFileItemReader" writer="gameWriter"
                   commit-interval="10"/>
        </tasklet>
    </step>
    <step id="playerSummarization">
        <tasklet start-limit="3">
            <chunk reader="playerSummarizationSource" writer="summaryWriter"
                   commit-interval="10"/>
        </tasklet>
    </step>
</job>
上面配置示例中的作业负责载入并总结足球比赛信息。它包括3个步骤:playerLoad, gameLoad, 及playerSummarization。playerLoad Step负责从平面文件中载入球员信息,gameLoad Step负责从平面文件中载入比赛信息。最后一个Step, playerSummarization,则是根据提供的比赛情况,对每名球员的数据进行总结。我们假设,'playerLoad'载入的文件只能载入一次,但是'gameLoad'可以载入特定目录下的所有比赛,并且当成功载入数据库后将其删除。于是,playerLoad Step不含任何其他配置。它几乎可以被无限启动,并且在完成后将被略过。然而,如果它上次运行之后有其他文件被丢弃,则'gameLoad' Step必须再次运行。它可以将'allow-start-if-complete'设为'true',以便始终处于开启状态。(我们假设,载入比赛的数据库表有一个处理指示器,以保证总结step可以有效找到新的比赛)。总结step是作业中最为重要的一个Step,通过配置将其启动上限设为3。这一点很有帮助,因为如果Step持续失效,则一个新的出口代码将返回给控制作业运行的操作员(操作符)。除非有人工干预,否则不允许其再次启动。
请注意:
该作业仅用于示例,与样本项目中的footballJob不同。
Run 1:
1. playerLoad运行并且成功结束,向'PLAYERS'表添加400名球员。
2. gameLoad运行并且处理了11份文件量的比赛数据,将数据内容载入'GAMES'表。
3. playerSummarization开始处理,在5分钟后失效(故障)。
Run 2:
1. playerLoad已经成功结束所以没有运行,allow-start-if-complete设为'false' (默认)。
2. gameLoad再次运行并且又处理了2份文件,将其内容载入'GAMES'表(处理指示器表明它们还没有被处理)。
3. playerSummarization开始处理所有剩余比赛数据(利用处理指示器进行过滤),30分钟后失败(故障)。
Run 3:
1. playerLoad已经成功结束所以没有运行,allow-start-if-complete设为'false' (默认)。
2. gameLoad再次运行并且又处理了2份文件,将其内容载入'GAMES'表(处理指示器表明它们还没有被处理)。
3. playerSummarization未被开启,作业被立刻取消,因为这是playerSummarization第3次运行且它的上限为2。要么将上限提高,要么将Job作为新的JobInstance(作业实例)运行。
5.1.5. Configuring Skip Logic
许多情况下,当在处理期间遇到错误时,不应导致Step故障,而是将其略过。一般情况下,应该由了解数据内容及其意义的人员做出这一决策。例如,金融数据就不能被略过,因为它涉及需要转账的金额,必须完全准确。另一方面,载入一列供应商时可以略过。即使一个供应商因为格式不对或是缺失重要信息而无法载入,也不会导致问题。一般情况下,这些低质数据仍会被记录,在稍后讨论接听器时将会对此进行分析。
<step id="step1">
   <tasklet>
      <chunk reader="flatFileItemReader" writer="itemWriter"
             commit-interval="10" skip-limit="10">
         <skippable-exception-classes>
            <include class="org.springframework.batch.item.file.FlatFileParseException"/>
         </skippable-exception-classes>
      </chunk>
   </tasklet>
</step>
该例子使用了FlatFileItemReader。在任何时刻产生的FlatFileParseException异常,均会被略过,并且针对略过总次数(10次)进行计数。Step运行时的读取、处理和写入跳跃将被分开计数,上限约束对所有计数均有效。一旦到达跳跃上限,下次发现的异常将导致Step故障。
上面例子存在的一个问题是:除了FlatFileParseException之外,其他异常也会导致Job(作业)故障。在有些情况下,这可能是正确行为。但是在其他情况下,确定哪些异常导致故障进而跳过所有其他异常,实施起来可能更为简单。
<step id="step1">
    <tasklet>
        <chunk reader="flatFileItemReader" writer="itemWriter"
               commit-interval="10" skip-limit="10">
            <skippable-exception-classes>
                <include class="java.lang.Exception"/>
                <exclude class="java.io.FileNotFoundException"/>
            </skippable-exception-classes>
        </chunk>
    </tasklet>
</step>
通过将java.lang.Exception 'including'('包括')为一种可跳过异常类,配置过程表明,所有的Exceptions(异常)是可跳过的。然而,通过将java.io.FileNotFoundException'excluding'('剔除在外'),配置过程对可跳过异常类列表进行了改进,使之包括除了FileNotFoundException之外的所有Exceptions。如果遇到(也就是没有跳过)任一未被包括的异常类,都将产生严重后果。
对遇到的所有异常,其可跳转性由类结构中最亲近的超类决定。所有未被分类的异常将视为'fatal'('致命异常')。<include/>和<exclude/>元素的次序可随意确定。
5.1.6. Configuring Retry Logic
在大部分情况下,我们希望异常要么导致跳转,要么导致Step故障。然而,并不是所有异常均是确定性异常。如果在读取时遇到FlatFileParseException异常,则它会始终为该记录抛出该异常;即使重设ItemReader也没用。然而,对其他异常,比如DeadlockLoserDataAccessException (该异常可表明当前进程企图更新另一进程持有锁定权限的一条记录),等待一会儿稍后再试可能会起作用。此时,应该对重试操作进行配置:
<step id="step1">
   <tasklet>
      <chunk reader="itemReader" writer="itemWriter"
             commit-interval="2" retry-limit="3">
         <retryable-exception-classes>
            <include class="org.springframework.dao.DeadlockLoserDataAccessException"/>
         </retryable-exception-classes>
      </chunk>
   </tasklet>
</step>
Step明确了各项目可被重试的次数限制,以及'可重试'异常列表。重试操作更多内容,请见第9章《重试》。
5.1.7. Controlling Rollback
默认情况下,不管是重试还是跳过,ItemWriter发出的所有异常均将Step控制的事务重新运行(回滚)。如果根据上文描述对跳转进行配置,ItemReader发出的异常则不会导致重新运行。然而,在许多情况下,ItemWriter发出的异常不应导致重新运行,因为没有采取任何操作使事务无效。于是,可以用一列不会导致重新运行的异常对Step进行配置。
<step id="step1">
   <tasklet>
      <chunk reader="itemReader" writer="itemWriter" commit-interval="2"/>
      <no-rollback-exception-classes>
         <include class="org.springframework.batch.item.validator.ValidationException"/>
      </no-rollback-exception-classes>
   </tasklet>
</step>
5.1.7.1. Transactional Readers
ItemReader的一个基本约定就是它只能向前。Step缓存阅读器输入,于是当重新运行时不需要再从阅读器中再次读取项目。然而,有些情况下,读取器在事务资源的顶端,比如JMS队列。此时,因为队列绑定到重新运行的事务上,已经从队列中移出的消息将被重新放回。因此,可以配置Step使其不缓存项目:
<step id="step1">
    <tasklet>
        <chunk reader="itemReader" writer="itemWriter" commit-interval="2"
               is-reader-transactional-queue="true"/>
    </tasklet>
</step>
5.1.8. Transaction Attributes
可以使用事务属性来控制隔离、传播和超时设置。Spring核心文档中有事务属性设置详细内容。
<step id="step1">
    <tasklet>
        <chunk reader="itemReader" writer="itemWriter" commit-interval="2"/>
        <transaction-attributes isolation="DEFAULT"
                                propagation="REQUIRED"
                                timeout="30"/>
    </tasklet>
</step>
5.1.9. Registering ItemStreams with the Step
Step必须在其生命周期的必要时刻处理好ItemStream回叫。(第6.4节“ItemStream”有ItemStream接口详细内容。)如果Step故障并且可能需要重启时,这一步骤就显得极其重要,因为Step通过ItemStream接口才获得了它所需要的关于执行进程之间的持久状态。
如果ItemReader, ItemProcessor或temWriter自已实施ItemStream接口,则它们将被自动注册。其他stream需要单独注册。这种间接相关性的情况比较常见,比如被输入读取器和写入器的代理。Stream可以通过'streams'元素进行Step注册,如下所示:
<step id="step1">
    <tasklet>
        <chunk reader="itemReader" writer="compositeWriter" commit-interval="2">
            <streams>
                <stream ref="fileItemWriter1"/>
                <stream ref="fileItemWriter2"/>
            </streams>
        </chunk>
    </tasklet>
</step>

<beans:bean id="compositeWriter"
            class="org.springframework.batch.item.support.CompositeItemWriter">
    <beans:property name="delegates">
        <beans:list>
            <beans:ref bean="fileItemWriter1" />
            <beans:ref bean="fileItemWriter2" />
        </beans:list>
    </beans:property>
</beans:bean>
在上面的例子中,CompositeItemWriter不是一个ItemStream,但是它的两个代理(delegate)是。因此,两个代理写入器必须明确注册为stream,以便框架可以正确地处理它们。ItemReader不需明确地注册为一个stream,因为它是Step的一个直接属性。现在,Step可以重启,即使发生故障,读取器和写入器的状态也可以正确保留。
5.1.10. Intercepting Step Execution
与作业类似,在Step运行期间可能会有许多事件发生,使用户需要执行某些特定功能。例如,为了写入需要脚注的平面文件,当Step完成时需要通知ItemWriter以编写脚注。Step接听器有多个,从中选择一个即可实现上述操作。
实施StepListener某种拓展的所有类(不包括接口本身,因为它为空),通过接听器元素,均可用于Step。接听器元素在step、tasklet或chunk声明内是合法的。建议在其函数(功能)适用的等级上宣布接听器,如果接听器是多特征接听器(比如StepExecutionListener或ItemReadListener),则在它所适用的最精细的级别上声明(例中的chunk)。
<step id="step1">
    <tasklet>
        <chunk reader="reader" writer="writer" commit-interval="10"/>
        <listeners>
            <listener ref="chunkListener"/>
        </listeners>
    </tasklet>
</step>
如果使用命名空间<step>元素,则自已部署StepListener接口的ItemReader, ItemWriter或ItemProcessor将会使用Step或某个*StepFactoryBean工厂(factory)自动注册。这只适用于直接写入Step的组件:如果接听器嵌套在另一个组件中,则需要显式注册(如上文所述)。
除了StepListener接口外,还提供了注解以解决同样的问题。普通的老式Java对象可能有支持这些注解的方法,并被转换为相应的StepListener类型。还有一种常见情况就是为ItemReader、ItemWriter或Tasklet等chunk组件的个性化部署提供注解。注解由<listener/>元素XML分析程序进行分析,所以你需要做的就是使用XML命名空间及Step注册接听器。
5.1.10.1. StepExecutionListener
StepExecutionListener是Step运行过程最为一般的接听器。它支持Step开始运行、正常结束或故障之后的通知功能。
public interface StepExecutionListener extends StepListener {

    void beforeStep(StepExecution stepExecution);

    ExitStatus afterStep(StepExecution stepExecution);

}
ExitStatus是afterStep的返回类型,目的是为接听器提供机会,以更改Step结束时返回的出口代码。
与该接口对应的注解为:
• @BeforeStep
• @AfterStep
5.1.10.2. ChunkListener
Chunk(数据块)定义为事务范围内处理的项目。每个提交间隔时提交的事务就是在提交'chunk'('数据块')。ChunkListener有助于数据块开始处理前或已经成功结束后执行逻辑操作。
public interface ChunkListener extends StepListener {

    void beforeChunk();

    void afterChunk();

}
beforeChunk方法在事务开启后、ItemReader调用read前调用。相反,afterChunk在数据块已经提交之后才调用(如果有重新运行情况,则不调用)。
与该接口对应的注解为:
• @BeforeChunk
• @AfterChunk
如果没有数据块声明,则可以使用ChunkListener:它是负责调用ChunkListener 的TaskletStep,因此它也适用于非面向项目的tasklet(在tasklet之前及之后调用)。
5.1.10.3. ItemReadListener
上文讨论跳转逻辑时曾提到,它有助于登记跳转记录以便稍后处理。当发生读取错误时,可使用ItemReaderListener实现上述操作。
public interface ItemReadListener<T> extends StepListener {

    void beforeRead();

    void afterRead(T item);

    void onReadError(Exception ex);

}
ItemReader每次调用read前都将调用beforeRead方法。Read每次成功调用后,都会调用afterRead,并且传递被读取的项目。如果读取时发生错误,onReadError方法将被调用。还将提供遇到的异常,以将其记录下来。
与该接口对应的注解为:
• @BeforeRead
• @AfterRead
• @OnReadError
5.1.10.4. ItemProcessListener
与ItemReadListener类似,项目的处理可被'listened'。
public interface ItemProcessListener<T, S> extends StepListener {

    void beforeProcess(T item);

    void afterProcess(T item, S result);

    void onProcessError(T item, Exception e);

}
beforeProcess方法将在ItemProcessor的process前调用,并收到将被处理的项目。afterProcess方法在项目成功处理之后调用。如果在处理期间发生错误,则将调用onProcessError方法。将提供遇到的异常及拟处理的项目,以将其记录下来。
与该接口对应的注解为:
• @BeforeProcess
• @AfterProcess
• @OnProcessError
5.1.10.5. ItemWriteListener
可以使用ItemWriteListener来'接听'项目的写入操作:
  public interface ItemWriteListener<S> extends StepListener {

    void beforeWrite(List<? extends S> items);

    void afterWrite(List<? extends S> items);

    void onWriteError(Exception exception, List<? extends S> items);

}
beforeWrite方法将在ItemWriter的write前调用,并收到将被写入的项目。afterWrite方法在项目成功写入之后调用。如果在写入期间发生错误,则将调用onWriteError方法。将提供遇到的异常及拟写入的项目,以将其记录下来。
与该接口对应的注解为:
• @BeforeWrite
• @AfterWrite
• OnWriteError
5.1.10.6. SkipListener
ItemReadListener、ItemProcessListener和ItemWriteListner均提供错误通知机制,但是无法通知你记录已被跳转。例如,即使一个项目已经被重试并且成功,仍将调用onWriteError。于是,有一个单独的接口可以跟踪被跳转的项目:
public interface SkipListener<T,S> extends StepListener {

    void onSkipInRead(Throwable t);

    void onSkipInProcess(T item, Throwable t);

    void onSkipInWrite(S item, Throwable t);

}
如果在读取期间有项目被跳转,则将调用onSkipInRead。请注意,重新运行操作可能导致相同的项目多次进行被跳转注册。如果在写入期间有项目被跳转,则将调用onSkipInWrite。因为项目已经被成功读取(未被跳转),所以它还将被提供项目本身作为参数。
与该接口对应的注解为:
• @OnSkipInRead
• @OnSkipInWrite
• @OnSkipInProcess
5.1.10.6.1. SkipListeners and Transactions
SkipListener最常见的应用之一就是注销被跳转的项目,以便使用其他批处理甚至是人工处理方法来评估和修复导致跳转的问题。因为许多情况下,初始事务被回转,Spring Batch作了两点保证:
- 每个项目,相关跳转方法只能调用一次(取决于何时发生错误)。
- 事务提交前必须要调用SkipListener。目的是为了保证接听器调用的所有事务资源不会因ItemWriter故障而回转。
5.2. TaskletStep
面向数据块的处理方法不是Step的唯一处理方法。如果Step仅是一个被存储的过程调用,将会如何?你可以将调用部署为一个ItemReader,并在过程结束后返回null。但这有点反常,因为这将需要一个空操作ItemWriter。针对于此 ,Spring Batch提供了TaskletStep。
Tasklet是个只有一个方法的简单接口,TaskletStep将持续调用该方法直到它返回RepeatStatus.FINISHED或者抛出一个异常表明发生故障。对Tasklet的每次调用均包装在事务中。Tasklet开发人员可以调用存储的过程,脚本或者一个简单的SQL更新语句。为了创建一个TaskletStep,<tasklet/>元素的'ref'属性应该引用一个定义了Tasklet对象的bean;<tasklet/>内不应使用任何<chunk/>元素。
<step id="step1">
    <tasklet ref="myTasklet"/>
</step>
Note
如果TaskletStep部署这一接口,则会将tasklet自动注册为一个StepListener。
5.2.1. TaskletAdapter
与ItemReader和ItemWriter接口的其他适配器(适配程序)类似,Tasklet接口包括一种实现,使其可以根据先前的类对自身进行修改,即TaskletAdapter。可以说明它的用处的一个示例就是当前用于对一组记录的标记进行更新的DAO。可以使用TaskletAdapter来调用这个类,且不需为Tasklet接口编写一个适配器(适配程序)。
<bean id="myTasklet" class="org.springframework.batch.core.step.tasklet.MethodInvokingTaskletAdapter">
    <property name="targetObject">
        <bean class="org.mycompany.FooDao"/>
    </property>
    <property name="targetMethod" value="updateFoo" />
</bean>
5.2.2. Example Tasklet Implementation
许多批作业包括的Step必须在主处理开始前完成,以对各种资源进行设置,或者在处理结束之后完成以清除这些资源。比如对于文件处理量很大的作业,文件成功上传至其他地方后往往需要将部分本地文件删除。下面例子来源于Spring Batch样本项目,该例为带有这样一种任务的Tasklet部署。
public class FileDeletingTasklet implements Tasklet, InitializingBean {

    private Resource directory;

    public RepeatStatus execute(StepContribution contribution,
                                ChunkContext chunkContext) throws Exception {
        File dir = directory.getFile();
        Assert.state(dir.isDirectory());

        File[] files = dir.listFiles();
        for (int i = 0; i < files.length; i++) {
            boolean deleted = files[i].delete();
            if (!deleted) {
                throw new UnexpectedJobExecutionException("Could not delete file " +
                                                          files[i].getPath());
            }
        }
        return RepeatStatus.COMPLETED;
    }

    public void setDirectoryResource(Resource directory) {
        this.directory = directory;
    }

    public void afterPropertiesSet() throws Exception {
        Assert.notNull(directory, "directory must be set");
    }
}
上述Tasklet部署中,删除了指定目录下的所有文件。请注意,execute方法只能调用一次。剩余所有工作就是从Step引用Tasklet:
<job id="taskletJob">
    <step id="deleteFilesInDir">
       <tasklet ref="fileDeletingTasklet"/>
    </step>
</job>

<beans:bean id="fileDeletingTasklet"
            class="org.springframework.batch.sample.tasklet.FileDeletingTasklet">
    <beans:property name="directoryResource">
        <beans:bean id="directory"
                    class="org.springframework.core.io.FileSystemResource">
            <beans:constructor-arg value="target/test-outputs/test-dir" />
        </beans:bean>
    </beans:property>
</beans:bean>
5.3. Controlling Step Flow
由于我们可以在一个主体作业内聚集多个Step,于是我们需要能够控制作业如何从一个Step 'flows'(流)到另一个Step。Step故障并不一定表明作业也发生故障。此外,可能有多种'success'(成功)类型可以确定下面应该执行哪个Step。有些Step可能根本无法处理,具体取决于一组Step如何配置。
5.3.1. Sequential Flow
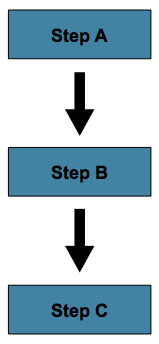
最简单的Step流场景就是在一个作业中,所有Step按顺序执行:
通过Step元素的'next'属性可以实现这一点:
<job id="job">
    <step id="stepA" parent="s1" next="stepB" />
    <step id="stepB" parent="s2" next="stepC"/>
    <step id="stepC" parent="s3" />
</job>
在上面示例中,'step A'将首先运行,因为它是列出的首个Step。如果'step A'正常完成,则'step B'将执行,依此类推。然而,如果'step A'故障,则整个作业也将故障,'step A'将不会运行。
Note
对Spring Batch命名空间,配置中列出的首个Step将始终是作业执行的首个Step。其他Step元素的次序无关紧要,但是第一个Step必须始终在xml中首先出现。
5.3.2. Conditional Flow
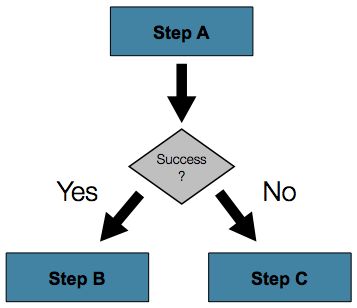
在上面例子中,只有两种可能性:
- Step成功,下一个Step将会执行。
- Step故障,因此作业也将故障。
许多情况下,这便足够。然而,有可能Step发生故障后会触发另一个Step而不是导致作业故障,这种情况将如何处理?
为了处理更为复杂的情况,Spring Batch命名空间支持过渡元素在Step元素内定义。其中一种过渡元素为"next"元素。与"next"属性类似,"next"元素可以通知作业下面该运行哪个Step。然而,与属性不同的是,指定的Step允许任意数量的"next"元素,且在故障时无默认操作。这就是说,如果使用了过渡元素,则Step过渡元素的所有行为必须被明确定义。请注意,一个Step不得既有一个"next"属性又有一个过渡元素。
下一元素指定将要匹配的模式和下面将要运行的Step:
<job id="job">
    <step id="stepA" parent="s1">
        <next on="*" to="stepB" />
        <next on="FAILED" to="stepC" />
    </step>
    <step id="stepB" parent="s2" next="stepC" />
    <step id="stepC" parent="s3" />
</job>
过渡元素的"on"属性使用一种简单的模式匹配机制来匹配Step运行所产生的ExitStatus。模式中只允许使用两种特殊字符:
• "*"表示匹配0个字符或更多字符
• "?"表示只匹配1个字符
例如,"c*t"可以匹配"cat"和"count",但是"c?t"可以匹配"cat"但无法匹配"count"
因为Step过渡元素的数量没有限制,所以如果step的运行产生的ExitStatus没有被元素覆盖,则框架将抛出一个异常,且作业发生故障。框架将自动命令从最明确状态转换为最不明确状态。这就是说,即使上述例子中的元素交换为"stepA","stepC"仍将发生"FAILED" ExitStatus。
5.3.2.1. Batch Status vs. Exit Status
当为条件流配置一个作业时,必须要明白BatchStatus和ExitStatus间的差异。BatchStatus是个列举(接口),它是JobExecution和StepExecution的一种属性,用于框架记录Step或作业的状态。它可取如下数值中的一个:COMPLETED, STARTING, STARTED, STOPPING, STOPPED, FAILED, ABANDONED或UNKNOWN。这些数值大部分可以从字面上看出含义:COMPLETED表示一个Step或作业成功完成时的状态,FAILED表示发生故障时的状态,等等。上述例子包含如下'next'元素:
<next on="FAILED" to="stepB" />
初看上去,似乎'on'属性引用了它所隶属的Step的BatchStatus。然而,它实际上是引用了Step的ExitStatus。如其名称所示,ExitStatus表示Step运行完毕后的状态。更具体地说,上述'next'元素引用了ExitStatus的出口代码。如果用英语表示,则为:“如果出口代码FAILED,则转向stepB。”默认情况下,出口代码始终与Step的BatchStatus相同,这也是上述入口起作用的原因。然而,如果需要不同的退出代码,将会如何?样本项目中的跳转样本作业提供了很好的示例。
<step id="step1" parent="s1">
    <end on="FAILED" />
    <next on="COMPLETED WITH SKIPS" to="errorPrint1" />
    <next on="*" to="step2" />
</step>
上述Step有三种可能性:
- Step故障,进而作业故障。
- Step成功完成。
- Step成功完成,但是出口代码为'COMPLETED WITH SKIPS'。此时,应该运行另一个Step来处理错误。
上述配置将会生效。然而,需要根据已经跳转了部分记录的运行状态来更改退出代码:
public class SkipCheckingListener extends StepExecutionListenerSupport {

    public ExitStatus afterStep(StepExecution stepExecution) {
        String exitCode = stepExecution.getExitStatus().getExitCode();
        if (!exitCode.equals(ExitStatus.FAILED.getExitCode()) &&
              stepExecution.getSkipCount() > 0) {
            return new ExitStatus("COMPLETED WITH SKIPS");
        }
        else {
            return null;
        }
    }

}
以上代码为StepExecutionListener,它首先进行检测以确保Step成功完成,然后检查StepExecution的跳转计数是否大于0。如果两个条件均满足,则返回出口代码为"COMPLETED WITH SKIPS"的新的ExitStatus。
5.3.3. Configuring for Stop
讨论完BatchStatus和ExitStatus后,我们可能想弄清楚如何为作业确定BatchStatus和ExitStatus?因为是根据运行的代码为Step确定这些状态,所以将根据配置情况确定作业的状态。
迄今讨论的所有作业配置最终至少有一个无过渡状态的Step。例如,下述Step执行完后,作业将停止:
<step id="stepC" parent="s3"/>
如果没有为Step定义过渡状态,则作业的状态将会按照如下原则进行定义:
- 如果Step结束时为ExitStatus FAILED,则作业的BatchStatus和ExitStatus均将为FAILED。
- 否则,作业的BatchStatus和ExitStatus均将为COMPLETED。
While this method of terminating a batch job is sufficient for some batch jobs, such as a simple sequential step job, custom defined job-stopping scenarios may be required. For this purpose, Spring Batch provides three transition elements to stop a Job (in addition to the "next" element that we discussed previously). Each of these stopping elements will stop a Job with a particular BatchStatus. It is important to note that the stop transition elements will have no effect on either theBatchStatus or ExitStatus of any Steps in the Job: these elements will only affect the final statuses of the Job. For example, it is possible for every step in a job to have a status of FAILED but the job to have a status of COMPLETED, or vise versa.
5.3.3.1. The 'End' Element
'end'元素可以使作业停止时BatchStatus状态为COMPLETED。结束状态为COMPLETED的作业不得重启(框架将抛出一个异常JobInstanceAlreadyCompleteException)。'end'元素还支持选择性的'exit-code'属性,该属性可用于定制作业的ExitStatus。如果未指定'exit-code'属性,则ExitStatus默认为"COMPLETED",以与BatchStatus匹配。
在下面场景中,如果step2故障,则作业将停止且BatchStatus为COMPLETED,ExitStatus为"COMPLETED",step3将不会运行;否则,运行过程将转到step3。请注意,如果step2故障,则作业将无法重启(因为状态为COMPLETED)。
<step id="step1" parent="s1" next="step2">

<step id="step2" parent="s2">
    <end on="FAILED"/>
    <next on="*" to="step3"/>
</step>

<step id="step3" parent="s3">
5.3.3.2. The 'Fail' Element
'fail'元素可以使作业停止时BatchStatus状态为FAILED。与'end'元素不同的是,'fail'元素将不会阻止作业重启。'fail'元素还支持选择性的'exit-code'属性,该属性可用于定制作业的ExitStatus。如果未指定'exit-code'属性,则ExitStatus默认为" FAILED ",以与BatchStatus匹配。
在下面场景中,如果step2故障,则作业将停止且BatchStatus为FAILED,ExitStatus为" EARLY TERMINATION ",step3将不会运行;否则,运行过程将转到step3。此外,如果step2故障,且作业重启,则运行过程将再次从step2开始。
<step id="step1" parent="s1" next="step2">

<step id="step2" parent="s2">
    <fail on="FAILED" exit-code="EARLY TERMINATION"/>
    <next on="*" to="step3"/>
</step>

<step id="step3" parent="s3">
5.3.3.3. The 'Stop' Element
'stop'元素可以使作业停止时BatchStatus状态为STOPPED。停止作业可以在处理期间获得短暂的休息,以便操作人员在重启作业前采取其他操作。'stop'元素要求'restart'属性向Step明确当作业重启时该从何处开始运行。
在下面场景中,如果step1结束时为COMPLETE,则作业将随后停止。它重启时,将从step2处开始运行。
<step id="step1" parent="s1">
    <stop on="COMPLETED" restart="step2"/>
</step>

<step id="step2" parent="s2"/>
5.3.4. Programmatic Flow Decisions
在有些情况下,除了ExitStatus外,可能还需要更多信息来决定下面执行哪个step。此时,可以使用JobExecutionDecider来辅助决策。
public class MyDecider implements JobExecutionDecider {
    public FlowExecutionStatus decide(JobExecution jobExecution, StepExecution stepExecution) {
        if (someCondition) {
            return "FAILED";
        }
        else {
            return "COMPLETED";
        }
    }
}
In the job configuration, a "decision" tag will specify the decider to use as well as all of the transitions.
<job id="job">
    <step id="step1" parent="s1" next="decision" />

    <decision id="decision" decider="decider">
        <next on="FAILED" to="step2" />
        <next on="COMPLETED" to="step3" />
    </decision>

    <step id="step2" parent="s2" next="step3"/>
    <step id="step3" parent="s3" />
</job>

<beans:bean id="decider" class="com.MyDecider"/>
5.3.5. Split Flows
迄今描述的所有场景涉及的作业均只能以线性方式,一次运行一个Step。除了这种典型方式外,Spring Batch命名空间还支持作业基于'split'元素的并流配置。如下文所示,'split'元素包括一或多个'flow'元素,其中所有流均可定义。'split'元素也可能包含先前讨论的过渡性元素,比如'next'属性或'next'、'end'、'fail'、'pause' 元素。
<split id="split1" next="step4">
    <flow>
        <step id="step1" parent="s1" next="step2"/>
        <step id="step2" parent="s2"/>
    </flow>
    <flow>
        <step id="step3" parent="s3"/>
    </flow>
</split>
<step id="step4" parent="s4"/>
5.3.6. Externalizing Flow Definitions and Dependencies Between Jobs
作业中的部分流可以具体化为一个独立的bean定义,然后进行重用。有3种实现方法,第1种是将流宣布为其他地方定义的流的一个引用:
<job id="job">
    <flow id="job1.flow1" parent="flow1" next="step3"/>
    <step id="step3" parent="s3"/>
</job>

<flow id="flow1">
    <step id="step1" parent="s1" next="step2"/>
    <step id="step2" parent="s2"/>
</flow>
用这种方法定义外部流的效果就是将外部流的Step插入作业中,就好像它们被宣布为inline(内联)。通过这种方法,许多作业可以参照相同的模板流,并将这样的模板集成进不同的逻辑流中。这也是将各个流的集成测试分离出来的一种好方法。
对流具体化的第二种方法是使用FlowStep。FlowStep是Step接口的一种实现,它将处理操作分派给用上文方法定义为带有一个XML<flow/>元素的一个流。也支持在XML中直接创建FlowStep:
<job id="job">
    <step id="job1.flow1" flow="flow1" next="step3"/>
    <step id="step3" parent="s3"/>
</job>

<flow id="flow1">
    <step id="step1" parent="s1" next="step2"/>
    <step id="step2" parent="s2"/>
</flow>
该作业的运行逻辑与上一例子相同,但是存储在作业库中的数据是不同的:Step "job1.flow1"自己获得作业库入口。这有利于监控和报告,还可用于为分区Step提供更多的结构。
流具体化的第三种方法是使用JobStep。JobStep与FlowStep类似,但实际上它是为指定的流中的Step创建并发起单独一次作业运行。比如:
<job id="jobStepJob" restartable="true">
   <step id="jobStepJob.step1">
      <job ref="job" job-launcher="jobLauncher"
          job-parameters-extractor="jobParametersExtractor"/>
   </step>
</job>

<job id="job" restartable="true">...</job>

<bean id="jobParametersExtractor" class="org.spr...DefaultJobParametersExtractor">
   <property name="keys" value="input.file"/>
</bean>
作业参数提取器策略可以确定Step的ExecutionContext如何转化为被运行的作业的JobParameters。如果你在对作业和Step进行监控和汇报时想要更精细的选项,JobStep具有一定作用。通过使用JobStep还可以很好地回答如下问题:“我该如何在作业间创建相关性?”一种较好的方法就是将一个大型系统分割为更小的模块,然后对作业流进行控制。
5.4. Late Binding of Job and Step Attributes
上文XML及平面文件示例均使用了Spring Resource抽象来获得一份文件。这种方法可行的原因是Resource有一个getFile方法,该方法可以返回一个java.io.File。可以使用标准的Spring概念来配置XML及平面文件资源:
<bean id="flatFileItemReader"
      class="org.springframework.batch.item.file.FlatFileItemReader">
    <property name="resource"
              value="file://outputs/20070122.testStream.CustomerReportStep.TEMP.txt" />
</bean>
上述Resource可以从指定的系统文件位置加载文件。请注意,绝对位置必须以双斜线("//")开头。在大部分spring应用中,这种方法足够使用,因为这些应用的名字在编译时是已知的。然而,对批处理情况,可能需要在运行时将文件名作为作业的一个参数进行确定。通过使用'-D'参数,即系统属性,解决这一问题。
<bean id="flatFileItemReader"
      class="org.springframework.batch.item.file.FlatFileItemReader">
    <property name="resource" value="${input.file.name}" />
</bean>
为了使该解决方案起作用,我们只需要一个系统参数(-Dinput.file.name="file://file.txt")。请注意,虽然这里可以使用PropertyPlaceholderConfigurer,但如果系统属性总是被设置,则我们可以不使用它,因为Spring中的ResourceEditor总是会对系统属性进行过滤和占位符替换。
在批设置中,我们往往更喜欢对作业JobParameters的文件名进行参数化并对它们进行访问,而不是通过系统属性参数化。为实现这一目的,Spring Batch支持各种作业和Step属性的后期绑定。
<bean id="flatFileItemReader" scope="step"
      class="org.springframework.batch.item.file.FlatFileItemReader">
    <property name="resource" value="#{jobParameters['input.file.name']}" />
</bean>
可以用相同方式访问JobExecution和StepExecution level ExecutionContext。
<bean id="flatFileItemReader" scope="step"
      class="org.springframework.batch.item.file.FlatFileItemReader">
    <property name="resource" value="#{jobExecutionContext['input.file.name']}" />
</bean>
<bean id="flatFileItemReader" scope="step"
      class="org.springframework.batch.item.file.FlatFileItemReader">
    <property name="resource" value="#{stepExecutionContext['input.file.name']}" />
</bean>
Note:
进行后期绑定的所有Bean必须用scope="step"进行宣布。见5.4.1节获得“Step Scope”详细内容。
如果你使用Spring 3.0 (或以上版本),则step-scoped bean中的表达式使用了Spring Expression语言,这种语言是一种具有多种有趣特性的强大的通用型语言。为了提供反向兼容性,如果Spring Batch检测到存在Spring更老版本,它会使用本地表达语言,该语言在功能上略逊一筹且解析规则略有不同。主要区别就是,上面例子中的映射键不需要在Spring 2.5中引用,但是在Spring 3.0中必须引用。
5.4.1. Step Scope
上面所有后期绑定示例均有一个基于Bean定义进行宣布的"step" scope。
<bean id="flatFileItemReader" scope="step"
      class="org.springframework.batch.item.file.FlatFileItemReader">
    <property name="resource" value="#{jobParameters[input.file.name]}" />
</bean>
为了使用后期绑定,必须使用step scope,因为bean直到step开始时才能被具体化,进而找到属性。由于默认情况下它不是Spring窗口的一部分,必须显式添加scope,添加方法可以使用batch命名空间:
<beans xmlns="http://www.springframework.org/schema/beans"
       xmlns:batch="http://www.springframework.org/schema/batch"
       xmlns:xsi="http://www.w3.org/2001/XMLSchema-instance"
       xsi:schemaLocation="...">
<batch:job .../>
...
</beans>
或者为StepScope显式加入bean定义,二者选其一:
<bean class="org.springframework.batch.core.scope.StepScope" />


