WindowFeature及Activity内置Theme
1. 自定义标题栏
1.1 常规自定义标题栏
requestWindowFeature(Window.FEATURE_CUSTOM_TITLE);
自定义Activity的标题栏(Titlebar)
http://www.189works.com/article-51509-1.html
本文仅用到了Window.FEATURE_CUSTOM_TITLE,
Window还有其他一些feature,比如FEATURE_CONTEXT_MENU,FEATURE_NO_TITLE,FEATURE_LEFT_ICON等。
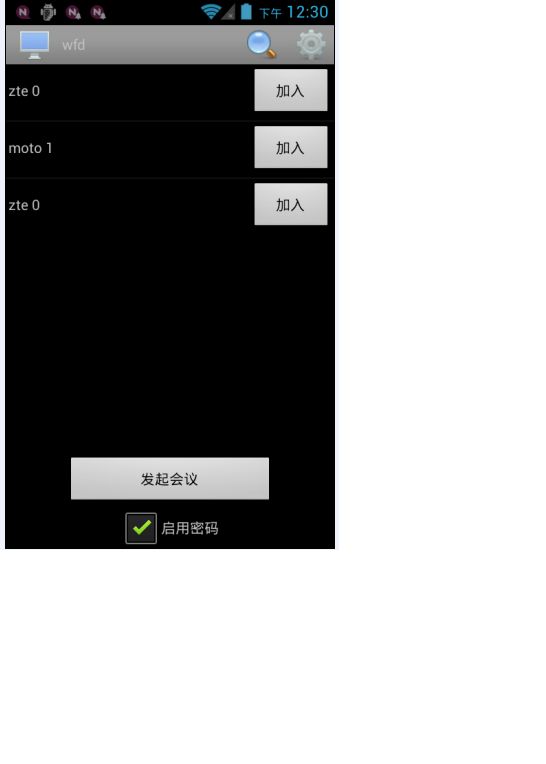
下面是一个来自wfd的完整的例子
wfd中的首页布局文件
<?xml version="1.0" encoding="utf-8"?>
<RelativeLayout xmlns:android="http://schemas.android.com/apk/res/android"
    android:orientation="vertical" android:layout_width="fill_parent"
    android:layout_height="fill_parent">

    <ListView android:id="@android:id/list" android:layout_width="fill_parent"
        android:layout_height="wrap_content" android:drawSelectorOnTop="false">

    </ListView>
    <TextView android:id="@id/android:empty" android:layout_width="fill_parent"
        android:layout_height="wrap_content" android:text="还没有会议刷新看看"
        android:gravity="center_horizontal" />

    <LinearLayout android:layout_width="fill_parent"
        android:layout_height="90dp" android:gravity="center_horizontal"
        android:orientation="vertical" android:layout_alignParentBottom="true">
        <Button android:text="发起会议" android:id="@+id/launch"
            android:layout_width="200dp" android:layout_height="wrap_content"></Button>

        <LinearLayout android:layout_width="fill_parent"
            android:layout_height="wrap_content" android:gravity="center">
            <CheckBox android:id="@+id/use_password" android:text="" android:layout_width="wrap_content"
                android:layout_height="wrap_content"></CheckBox>
            <TextView android:layout_width="wrap_content"
                android:layout_height="wrap_content" android:text="启用密码"></TextView>
        </LinearLayout>
    </LinearLayout>

    <LinearLayout android:id="@+id/home_refresh_bar"
        android:layout_width="wrap_content" android:layout_height="wrap_content"
        android:visibility="invisible" android:layout_centerInParent="true"
        android:gravity="center">
        <ProgressBar android:layout_width="wrap_content"
            android:layout_height="wrap_content"></ProgressBar>
        <TextView android:layout_width="wrap_content"
            android:layout_height="wrap_content" android:text="正在寻找会议室"
            android:paddingLeft="3dp"></TextView>
    </LinearLayout>

    <LinearLayout android:id="@+id/home_join_bar"
        android:layout_width="wrap_content" android:layout_height="wrap_content"
        android:visibility="invisible" android:layout_centerInParent="true"
        android:gravity="center">
        <ProgressBar android:layout_width="wrap_content"
            android:layout_height="wrap_content"></ProgressBar>
        <TextView android:layout_width="wrap_content"
            android:layout_height="wrap_content" android:text="正在加入会议室"
            android:paddingLeft="3dp"></TextView>
    </LinearLayout>
</RelativeLayout>
自定义title的布局
<?xml version="1.0" encoding="utf-8"?>

<!-- 首页title布局 -->
<LinearLayout xmlns:android="http://schemas.android.com/apk/res/android"
    android:orientation="vertical" android:layout_width="fill_parent"
    android:layout_height="fill_parent">

    <LinearLayout android:layout_height="fill_parent"
        android:layout_width="fill_parent" android:orientation="horizontal"
        android:gravity="center_vertical" android:padding="3dp">
        <ImageView android:id="@+id/home_app_icon"
            android:layout_width="wrap_content" android:layout_height="wrap_content"
            android:src="@drawable/icon" android:paddingRight="5dip"></ImageView>

        <TextView android:id="@+id/home_app_name"
            android:layout_width="wrap_content" android:layout_height="wrap_content"
            android:text="@string/app_name"></TextView>

        <LinearLayout android:layout_width="0dip"
            android:layout_height="wrap_content" android:layout_weight="1"
            android:gravity="right" android:layout_gravity="center_vertical">
            <ImageView android:id="@+id/home_refresh"
                android:layout_width="wrap_content" android:layout_height="wrap_content"
                android:src="@drawable/search_32" android:paddingRight="15dp"></ImageView>
            <ImageView android:id="@+id/home_options"
                android:layout_width="wrap_content" android:layout_height="wrap_content"
                android:src="@drawable/gear_32"></ImageView>
        </LinearLayout>
    </LinearLayout>

    <TextView android:background="@drawable/divider"
        android:layout_height="1dip" android:layout_width="fill_parent"></TextView>
</LinearLayout>
java代码
@Override
protected void onCreate(Bundle savedInstanceState) {
    super.onCreate(savedInstanceState);
    requestWindowFeature(Window.FEATURE_CUSTOM_TITLE);
    setContentView(R.layout.home);
    // 设置自定义的title
    getWindow().setFeatureInt(Window.FEATURE_CUSTOM_TITLE,
            R.layout.home_custom_title);

    // 添加一个footview
    // getListView().addFooterView(
    // LayoutInflater.from(this).inflate(R.layout.home_foot, null));

    mAdapter = new MeetingRoomAdapter();
    doAddTestData();
    setListAdapter(mAdapter);

    mRefresh = (ImageView) findViewById(R.id.home_refresh);
    mOptions = (ImageView) findViewById(R.id.home_options);
    mRefreshBar = (LinearLayout) findViewById(R.id.home_refresh_bar);
    mJoinBar = (LinearLayout) findViewById(R.id.home_join_bar);

    mLaunch = (Button) findViewById(R.id.launch);
    mUsePwd = (CheckBox) findViewById(R.id.use_password);

    mUsePwd.setOnCheckedChangeListener(this);
    mRefresh.setOnClickListener(this);
    mOptions.setOnClickListener(this);
    mLaunch.setOnClickListener(this);
效果
1.2 PreferenceActivity的自定义标题栏
PreferenceActivity 自定义title栏出错
http://www.cnblogs.com/slider/archive/2011/11/11/2245149.html
开发WFD过程中也遇到这个"PreferenceActivity 自定义title栏出错"的问题。
经分析,主要原因是因为PreferenceActivity 跟一般Activity不同. PreferenceActivity 的onCreate方法里面执行了setContentView, 而这个方法必须在
requestWindowFeature之后执行。 反映到我们继承自PreferenceActivity 的具体代码中就是, requestWindowFeature(Window.FEATURE_CUSTOM_TITLE)要在super.onCreate(savedInstanceState)前执行
代码如下
public class SettingsActivity extends PreferenceActivity implements
        Preference.OnPreferenceChangeListener {

    public static final String KEY_USERNAME = "username";

    private EditTextPreference mUsername;

    @Override
    protected void onCreate(Bundle savedInstanceState) {
        // 注意, PreferenceActivity
        // 里面需要把这个放在super.onCreate(savedInstanceState)前面!!!
        requestWindowFeature(Window.FEATURE_CUSTOM_TITLE);
        super.onCreate(savedInstanceState);

        addPreferencesFromResource(R.xml.settings);
        getWindow().setFeatureInt(Window.FEATURE_CUSTOM_TITLE,
                R.layout.settings_custom_title);

        mUsername = (EditTextPreference) findPreference(KEY_USERNAME);
        mUsername.setSummary(getUsername());
        mUsername.setText(getUsername());

        mUsername.setOnPreferenceChangeListener(this);
    }

    @Override
    public boolean onPreferenceTreeClick(PreferenceScreen preferenceScreen,
            Preference preference) {

        return super.onPreferenceTreeClick(preferenceScreen, preference);
    }

    private String getUsername() {
        String name = PrefUtil.get(this, PrefUtil.PREF_SETTINGS, KEY_USERNAME,
                Build.MODEL);
        return name;
    }

    @Override
    public boolean onPreferenceChange(Preference preference, Object newValue) {
        if (preference == mUsername) {
            String val = (String) newValue;
            Logger.d("val = " + val);
            if (val != null && !val.equals("") && !val.equals(getUsername())) {
                mUsername.setSummary(val);
                PrefUtil.set(this, PrefUtil.PREF_SETTINGS, KEY_USERNAME,
                        mUsername.getText());
            }
        }

        return false;
    }
}
2. 标题栏进度条
http://qing.weibo.com/2617185797/9bff160533000f4l.html?retcode=6102
最关键的位置就是在setContentView之前添加下面的这行代码
requestWindowFeature(Window.FEATURE_INDETERMINATE_PROGRESS); //设置为圆形旋转进度条
或者
requestWindowFeature(Window.FEATURE_PROGRESS); //设置为水平进度条 注意标题栏的水平进度条最大值是10000,不用自己手动设置
3. Java代码中隐藏标题栏
在Activity.setCurrentView()之前调用此方法
private void hideTitle(){
//TODOAuto-generatedmethodstub
requestWindowFeature(Window.FEATURE_NO_TITLE);
}
4. Java代码中全屏
在Activity.setCurrentView()之前调用此方法
private void hideStatusBar(){
//TODOAuto-generatedmethodstub
// 隐藏标题
requestWindowFeature(Window.FEATURE_NO_TITLE);
// 定义全屏参数
intflag=WindowManager.LayoutParams.FLAG_FULLSCREEN;
// 获得窗口对象
WindowmyWindow=this.getWindow();
// 设置 Flag标识
myWindow.setFlags(flag,flag);
}
5. manifest中全屏
android:theme="@android:style/Theme.NoTitleBar.Fullscreen"
6. manifest中隐藏标题栏
android:theme="@android:style/Theme.NoTitleBar"
7. 半透明风格的Activity
android:theme="@android:style/Theme.Translucent"
或者先编写一个color.xml
<?xmlversion="1.0"encoding="UTF-8"?>
<resources>
<colorname="transparent">#9000</color>
</resources>
再编写一个styles.xml
<?xmlversion="1.0"encoding="utf-8"?>
<resources>
<stylename="Transparent">
  <itemname="android:windowBackground">@color/transparent</item>
  <itemname="android:windowIsTranslucent">true</item>
  <itemname="android:windowAnimationStyle">@+android:style/Animation.Translucent</item>
</style>
</resources>
最后使用这个style
android:theme="@style/transparent"
参考http://blog.csdn.net/yuejingjiahong/article/details/6668265
8. 对话框风格的Activity
android:theme="@android:style/Theme.Dialog"
9. 运行时切换全屏
	/**
	 * 切换全屏和非全屏
	 */
	private void switchFullScreen() {
		if (null != switchFullScreenToast) {
			switchFullScreenToast.cancel();
		}

		if (fullScreen) {
			getWindow().clearFlags(WindowManager.LayoutParams.FLAG_FULLSCREEN);
			switchFullScreenToast = Toast.makeText(this, R.string.exit_full_screen, Toast.LENGTH_SHORT);
			switchFullScreenToast.show();
		} else {
			getWindow().addFlags(WindowManager.LayoutParams.FLAG_FULLSCREEN);
			switchFullScreenToast = Toast.makeText(this, R.string.enter_full_screen, Toast.LENGTH_SHORT);
			switchFullScreenToast.show();
		}
		fullScreen = !fullScreen;
	}
10. 使用自定义style解决自定义title栏高度太小的问题
<?xml version="1.0" encoding="utf-8"?>
<resources>
<style name="TransparentListView" parent="@android:style/Widget.ListView">
  <item name="android:cacheColorHint">@android:color/transparent</item>
 </style>
</resources>
然后使用这个style
<activity android:name=".ui.HomeActivity" android:theme="@style/CmTitleBar"></activity>
