在之前的两篇文章中,我们已经学会了如何如何用Tycho来build plugin和feature。在通常RCP项目当中,仅仅有plugin和feature是不够的,plugin提供着RCP程序中最小的逻辑功能,而feature则把这些功能点包装成一个单独的逻辑单元。但如果一个RCP的程序需要很多的features时怎么办?你可以说我可以feautre里面套feature。但如果客户要求这个RCP的程序需要在windows,linux和Mac oc都有客户端时,feature就已经明显满足不了我们的需求了。这个时候就需要引入RCP中product的概念了。
对于Product,官方的解释是这样的:
Products include all the code and plug-ins needed to run them. This includes a Java runtime environment (JRE) and the Eclipse platform code. The plug-in code, JRE, and Eclipse platform are typically installed with a product-specific installation program. Product providers are free to use any installation tool or program that is appropriate for their needs.
http://help.eclipse.org/luna/index.jsp?topic=/org.eclipse.pde.doc.user/concepts/product.htm
简单点说,product就是一个standalone的可执行程序,他可以包含很多的plugin和feautre,也可以针对于不同的平台定制不同的参数。关于product,feauture和plugin的关系,个人觉得下面的这句话是概括的最好的。
对Product的概念有了一定的了解之后,我们便可以开始创建product项目了:
1. 首先还是 New -> Project -> General -> Project
2. 在接下来的对话框中输入我们的项目名称,这里我们用com.chnic.tycho.mail.product
3. 项目创建完成之后我们需要创建product文件,还是New -> Other -> Plug-in Development -> Product Configuration -> Next
4. 在接下来的对话框中,选中我们刚刚创建的product项目,然后在下面的File Name里输入我们的product文件名,这里我们用Mail.product -> Finish
5. 在Mail.product配置的overview tab界面中,给出相应的信息。值得一提的是,我们需要选择这个product是based on在features上的。其次,ID是必须填写的,因为Tycho会使用ID加上你build的平台后缀组合成一个完成的文件名。其他的配置不多赘述。
6. 在Dependencies tab界面中,把我们之前创建的feature添加进来。
7. 接下来在Configuration tab中,我们需要添加Start Levels。这么做是因为,在传统的PDE build过程中,PDE会自动添加start levels。但是Tycho不会自动添加这些配置,所以就需要我们手动添加。否则Tycho就会在build过程中出错。因为我们这里只是个demo程序,所以不做过多的考虑,直接点击Add Recommanded,使用系统推荐配置即可。
假如你添加完成之后用Tycho build发现还是有start levels的问题,那么试一下切换到overview tab然后用Eclipse Product export wizard来导出你的product,在你导出的文件夹中找到configuration/org.eclipse.equinox.simpleconfigurator/bundles.info这个文件,文件中的每一行是由bundle_name, version, location, startlevel, autostart组成的,筛选出所有autostart是ture的行,然后根据他的startlevel把他们加到你的Mail.product配置文件中来。
至此我们便完成了Product项目的创建,其实这个时候我们的product项目是run不起来的。(除非你在Run Configurations的Plug-ins选项卡里点击Add Required Plug-ins添加所需要的依赖)这是因为我们还缺少一些RCP程序所需要target platform级别的plugin。这些plugin添加到我们的feauture项目当中,因为我们这里主要关注的是Tycho,我们只需build出一个应用程序即可,在此我就不多赘述RCP相关的内容。
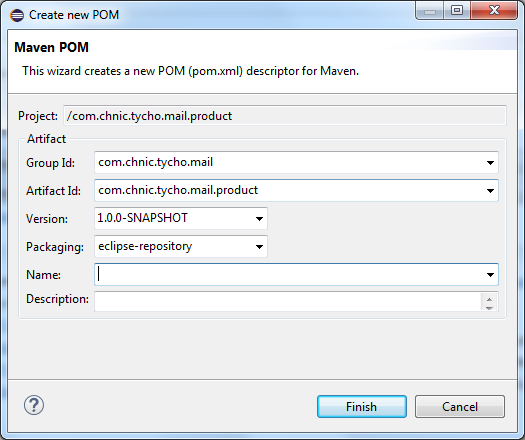
在接下来我们就需要把我们刚创建好的Product项目变成一个支持Tycho的Maven项目。还是右键product项目名,然后把他转换成一个Maven项目,在Maven的配置框中,其他的属性和我们之前介绍的plugin和feature的命名规范类似,唯一不同的一点就是packaging变成了eclipse-repository。
在生成的POM文件中,添加parent属性,让他继承我们之前创建的parent项目。然后添加Tycho product build相关的插件。
<project xmlns="http://maven.apache.org/POM/4.0.0" xmlns:xsi="http://www.w3.org/2001/XMLSchema-instance" xsi:schemaLocation="http://maven.apache.org/POM/4.0.0 http://maven.apache.org/xsd/maven-4.0.0.xsd">
  <modelVersion>4.0.0</modelVersion>
  <parent>
    <groupId>com.chnic.tycho.mail</groupId>
    <artifactId>com.chnic.tycho.mail.parent</artifactId>
    <version>1.0.0-SNAPSHOT</version>
    <relativePath>../com.chnic.tycho.mail.parent/pom.xml</relativePath>
  </parent>

  <artifactId>com.chnic.tycho.mail.product</artifactId>
  <packaging>eclipse-repository</packaging>

  <build>
    <plugins>
      <plugin>
        <groupId>org.eclipse.tycho</groupId>
        <artifactId>tycho-p2-repository-plugin</artifactId>
        <version>${tycho.version}</version>
        <configuration>
          <includeAllDependencies>true</includeAllDependencies>
        </configuration>
      </plugin>
      <plugin>
        <groupId>org.eclipse.tycho</groupId>
        <artifactId>tycho-p2-director-plugin</artifactId>
        <version>${tycho.version}</version>
        <executions>
          <execution>
            <id>materialize-products</id>
            <goals>
              <goal>materialize-products</goal>
            </goals>
          </execution>
          <execution>
            <id>archive-products</id>
            <goals>
              <goal>archive-products</goal>
            </goals>
          </execution>
        </executions>
      </plugin>
    </plugins>
  </build>
</project>
这个时候我们虽然告诉Tycho如何去build这个product项目了,但是我们还没有提供我们build出的程序应当支持那种平台的信息。返回parent项目,修改POM文件,添加target-platform-configuration插件
<project xmlns="http://maven.apache.org/POM/4.0.0" xmlns:xsi="http://www.w3.org/2001/XMLSchema-instance" xsi:schemaLocation="http://maven.apache.org/POM/4.0.0 http://maven.apache.org/xsd/maven-4.0.0.xsd">
  <modelVersion>4.0.0</modelVersion>
  <groupId>com.chnic.tycho.mail</groupId>
  <artifactId>com.chnic.tycho.mail.parent</artifactId>
  <version>1.0.0-SNAPSHOT</version>
  <packaging>pom</packaging>

    <properties>
		<tycho.version>0.22.0</tycho.version>
		<luna-repo.url>http://download.eclipse.org/releases/luna</luna-repo.url>
	</properties>

	<repositories>
		<repository>
			<id>luna</id>
			<url>${luna-repo.url}</url>
			<layout>p2</layout>
		</repository>
	</repositories>

	<build>
		<plugins>
			<plugin>
				<groupId>org.eclipse.tycho</groupId>
				<artifactId>tycho-maven-plugin</artifactId>
				<version>${tycho.version}</version>
				<extensions>true</extensions>
			</plugin>

			<plugin>
				<groupId>org.eclipse.tycho</groupId>
				<artifactId>target-platform-configuration</artifactId>
				<version>${tycho.version}</version>
				<configuration>
					<environments>
						<!-- <environment>
							<os>linux</os>
							<ws>gtk</ws>
							<arch>x86</arch>
						</environment>
						<environment>
							<os>linux</os>
							<ws>gtk</ws>
							<arch>x86_64</arch>
						</environment> -->
						<environment>
							<os>win32</os>
							<ws>win32</ws>
							<arch>x86</arch>
						</environment>
						<!-- <environment>
							<os>win32</os>
							<ws>win32</ws>
							<arch>x86_64</arch>
						</environment>
						<environment>
							<os>macosx</os>
							<ws>cocoa</ws>
							<arch>x86_64</arch>
                        </environment> -->
					</environments>
				</configuration>
			</plugin>
		</plugins>
	</build>
</project>
添加完成之后我们会发现,parent的pom中多了很多的平台信息,因为我们只需要build出来的程序是一个win32.x86的程序,所以在这里我们注释掉其他的平台信息。这个时候你也许会问,我们可以直接build product了么?答案是否定的,因为你的product项目只有一个孤零零的product文件,他最终依赖的仍然是你的feature和plugin。所以我们需要在运行时提供这些依赖。还记得第二篇文章中我们最后提出的问题么?如果一个feature包含非常多的plugin,然后plugin A依赖plugin B,plugin B依赖plugin C的时候,这个时候我们怎么办?难道要按照依赖关系一个一个来构建么?很显然,全部手动是一种反人类的做法。更何况你在build product的时候即便全部手动也不一定能够build成功。这个时候,我们就需要一个聚合器,偏巧我们的Maven也支持这样的做法。
到目前为止,我们已经有了parent, pulgin, feature, product这四个项目,要聚合这四个项目,我们还需要另外的一个项目:com.chnic.tycho.mail.build。最终我们的Mail这个demo的目录结构会是这样:
com.chnic.tycho.mail RCP Project
|
|----com.chnic.tycho.mail.build
|----com.chnic.tycho.mail.feature
|----com.chnic.tycho.mail.parent
|----com.chnic.tycho.mail.plugin
|----com.chnic.tycho.mail.product
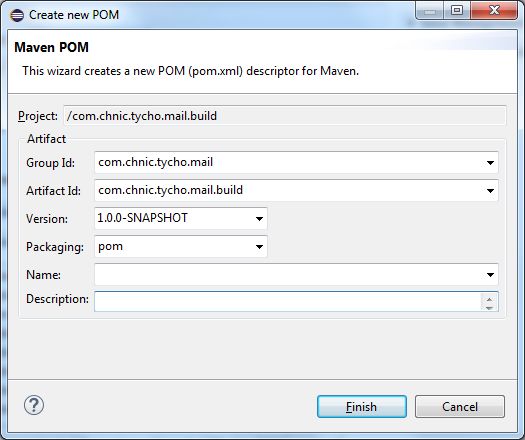
com.chnic.tycho.mail.build依然是一个普通的项目,创建完成之后我们仍然需要把他convert成一个Maven项目。因为他是一个聚合项目,所以packaging的方式依然是pom
转化完成之后,我们依然让build的项目继承parent项目,然后把plugin, feature和product加入build的pom当中,让他们变成build项目的modules。
<project xmlns="http://maven.apache.org/POM/4.0.0" xmlns:xsi="http://www.w3.org/2001/XMLSchema-instance" xsi:schemaLocation="http://maven.apache.org/POM/4.0.0 http://maven.apache.org/xsd/maven-4.0.0.xsd">
  <modelVersion>4.0.0</modelVersion>

  <parent>
    <groupId>com.chnic.tycho.mail</groupId>
    <artifactId>com.chnic.tycho.mail.parent</artifactId>
    <version>1.0.0-SNAPSHOT</version>
    <relativePath>../com.chnic.tycho.mail.parent/pom.xml</relativePath>
  </parent>

  <artifactId>com.chnic.tycho.mail.build</artifactId>
  <packaging>pom</packaging>

  <modules>
  	<module>../com.chnic.tycho.mail.feature</module>
  	<module>../com.chnic.tycho.mail.plugin</module>
  	<module>../com.chnic.tycho.mail.product</module>
  </modules>
</project>
完成之后clean install com.chnic.tycho.mail.build这个项目,控制台上面的信息告诉我们build成功。
[INFO] Reactor Summary:
[INFO]
[INFO] com.chnic.tycho.mail.plugin ........................ SUCCESS [ 1.563 s]
[INFO] com.chnic.tycho.mail.feature ....................... SUCCESS [ 0.186 s]
[INFO] com.chnic.tycho.mail.product ....................... SUCCESS [ 8.189 s]
[INFO] com.chnic.tycho.mail.build ......................... SUCCESS [ 0.063 s]
[INFO] ------------------------------------------------------------------------
[INFO] BUILD SUCCESS
[INFO] ------------------------------------------------------------------------
[INFO] Total time: 25.715 s
[INFO] Finished at: 2015-04-14T15:21:46+08:00
[INFO] Final Memory: 74M/178M
[INFO] ------------------------------------------------------------------------
Build成功之后我们刷新一下product项目,会发现在target/products目录下已经多了Mail-win32.win32.x86.zip这个zip文件。这个文件就是我们这个demo的可执行文件的压缩包。至此,我们也完成了product项目的构建工作。
Demo的代码在此给共享给大家。


