Tomcat与Red5集成
我自己用的是tomcat6.0
首先下载red5-war-1.0-RC1文件,然后解压出来(里面有一个ROOT.war)。
然后把tomcat下的webapps原来的ROOT文件夹修改一个名字(主要是区别于ROOT.war解压出来的ROOT)
然后把ROOT.war Copy 到的tomcat的webapps下。 运行tomcat.
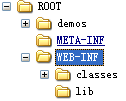
运行tomcat成功之后,会重新生成一个ROOT文件夹,这个就是Red5的服务了。
然后把最新生成的ROOT文件夹下面 WEB-INF/web.xml和lib文件夹Copy到你的项目下(相同路径) 
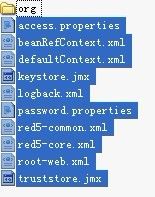
把里面的所有文件Copy到你项目下的同一目录下,修改root-web.xml文件
<beans>

	<!-- ROOT web context -->
	<bean id="web.context.项目名字" class="org.red5.server.Context">
		<property name="scopeResolver" ref="red5.scopeResolver" />
		<property name="clientRegistry" ref="global.clientRegistry" />
		<property name="serviceInvoker" ref="global.serviceInvoker" />
		<property name="mappingStrategy" ref="global.mappingStrategy" />
	</bean>

	<bean id="web.scope.项目名字" class="org.red5.server.WebScope" init-method="register">
		<property name="server" ref="red5.server" />
		<property name="parent" ref="global.scope" />
		<property name="context" ref="web.context.项目名字" />
		<property name="handler" ref="web.handler.项目名字" />
		<property name="contextPath" value="/.项目名字" />
		<property name="virtualHosts" value="*,localhost, localhost:8080, 127.0.0.1:8080" />
	</bean>
	<bean id="web.handler..项目名字"
        		class="com.Server.Application" singleton="true" />
</beans>
然后修改red5-core.xml 创建多个red5服务,端口不能相同
<bean id="rtmpTransport" class="org.red5.server.net.rtmp.RTMPMinaTransport" init-method="start" destroy-method="stop">
		<property name="ioHandler" ref="rtmpMinaIoHandler" />
        <property name="connectors">
            <list>
                <bean class="java.net.InetSocketAddress">
                    <constructor-arg index="0" type="java.lang.String" value="127.0.0.1" />
                    <constructor-arg index="1" type="int" value="1935" /><!--创建多个red5服务,端口不能相同-->
                </bean>
                <!-- You can now add additional ports and ip addresses
                <bean class="java.net.InetSocketAddress">
                    <constructor-arg index="0" type="java.lang.String" value="0.0.0.0" />
                    <constructor-arg index="1" type="int" value="1936" />
                </bean>
                 -->
            </list>
        </property>
		<property name="receiveBufferSize" value="65536" />
		<property name="sendBufferSize" value="271360" />
        <property name="connectionThreads" value="4" />
        <property name="ioThreads" value="16" />
		<!-- This is the interval at which the sessions are polled for stats. If mina monitoring is not
				enabled, polling will not occur. -->
		<property name="jmxPollInterval" value="1000" />
		<property name="tcpNoDelay" value="true" />
	</bean>
注意: tomcat里面添加太多的red5服务,会造成tomcat内存泄露,这么时候就要修改tomcat的启动内存bin/catalina.bat
Win:
set JAVA_OPTS=%JAVA_OPTS% -Xms1024m -Xmx1024m
linux:
JAVA_OPTS="$JAVA_OPTS -Xms1024m -Xmx1024m -XX:PermSize=256M -XX:MaxNewSize=512m -XX:MaxPermSize=512m"
如果要修改webapps下的项目启动的优先级,就在 conf\Catalina\localhost 加上一个 项目名.xml 的文件
文件内容:
<?xml version="1.0" encoding="UTF-8"?>
<!--
  Licensed to the Apache Software Foundation (ASF) under one or more
  contributor license agreements.  See the NOTICE file distributed with
  this work for additional information regarding copyright ownership.
  The ASF licenses this file to You under the Apache License, Version 2.0
  (the "License"); you may not use this file except in compliance with
  the License.  You may obtain a copy of the License at

      http://www.apache.org/licenses/LICENSE-2.0

  Unless required by applicable law or agreed to in writing, software
  distributed under the License is distributed on an "AS IS" BASIS,
  WITHOUT WARRANTIES OR CONDITIONS OF ANY KIND, either express or implied.
  See the License for the specific language governing permissions and
  limitations under the License.
-->
<Context antiResourceLocking="false" privileged="true" />
