Android学习笔记(三)UI布局
一、线性布局-LinearLayout(至上而下布局)
<LinearLayout>
</LinearLayout>
如:
<LinearLayout xmlns:android="http://schemas.android.com/apk/res/android"
    android:orientation="vertical"
    android:layout_width="fill_parent"
    android:layout_height="fill_parent"
    >
其中
android:orientation="vertical"意思为垂直
方向的线性布局,此处的"vertical"可改为"horizontal",意思是水平方向的线性布局。
android:layout_width="fill_parent"意思为这个控件的宽度占满整个屏幕或者父控件,此处的"fill_parent"可改为"wrap_parant",意思是宽度刚好包含住LinearLayout里面的内容。
常用布局控件:
| android:id | 为控件指定相应的ID |
| android:text | 指定控件当中显示的文字,需要注意的是,这里尽量使用strings.xml文件当中的字符串 |
| android:gravity | 控制这个一个控件的位置,比如居中、靠右、底部、上部等 |
| android:textSize | 指定控件当中字体的大小 |
| android:background | 指定该控件所使用的背景色,RGB命名法 |
| android:layout_weight | 数值为几即该控件占满整个屏幕的数值合之几,比如当前Activity中有2个控件,第一个控件是android:layout_weight="2",第二个控件是android:layout_weight="3",则,第一个控件占整个屏幕的3/5。 |
| android:height | 指定控件的高度 |
| android:padding* | 指定控件的内边距,也就是说控件当中的内容,如android:paddingLeft="10dip"、android:paddingRight="10dip"等等。也可以直接android:padding="10dip"意思是说内边距4面距离都为10. |
| android:singleLine | 如果设置为真的话,则将控件的所有内容在同一行当中进行显示 |
二、表格布局-TableLayout
概述:
TableLayout多用于列表的显示
1、把子元素放到行与列中。
2、不显示行、列和单元格的边界线。
3、单元格不能横跨行,类似于html。
用例:
<TableLayout xmlns:android="http://schemas.android.com/apk/res/android"
    android:layout_width="fill_parent"
    android:layout_height="fill_parent"
    android:stretchColumns="1"> //这一条语句的意思是:是设置 TableLayout所有行的第二列为拉伸列。也就是说如果每行都有三列的话,剩余的空间由第二列补齐。为0时则是第一列为拉伸列。目的是为了把父控件填满。

<TableLayout>
       <tableRow>
             <TextView
                 android:text="@string/row1_column1"
                 android:background="#aa0000"    //加上背景色
                 android:padding="3dip"

         />
             <TextView
                 android:text="@string/row1_column1"
                 android:padding="3dip"
                 android:gravity="center_horizontal"   //垂直居中显示
                 android:background="#00aa00"
             / >
             <TextView
                 android:text="@string/row1_column2"
                 android:gravity="right"       //居右显示
                 android:background="#0000aa"
                 android:padding="3dip"

         />
      </TablieRow>
</TableLayout>
以上代码意思为:将屏幕分为3列,一个TableRow就是一行,每一个TextView占一个单元格
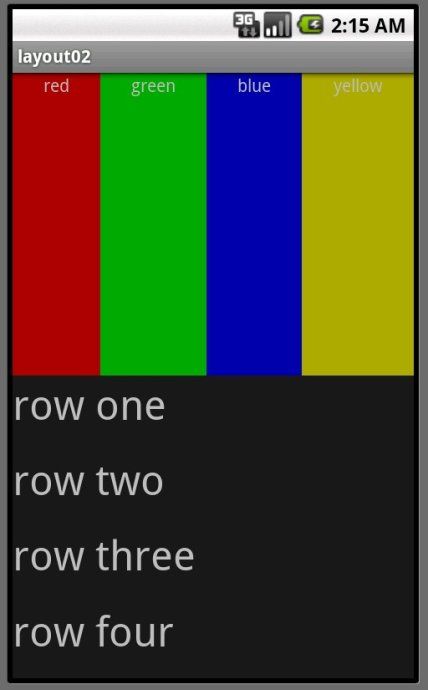
三、嵌套布局
即多个布局嵌套使用。
如要实现以下布局:即多个LinearLayout嵌套
代码如下:
<?xml version="1.0" encoding="utf-8"?>
<LinearLayout xmlns:android="http://schemas.android.com/apk/res/android"
    android:orientation="vertical"  //最外层使用垂直布局
    android:layout_width="fill_parent"
    android:layout_height="fill_parent"
    >
    <LinearLayout
     android:orientation="horizontal"  //第一个嵌套纵向布局
     android:layout_width="fill_parent"
     android:layout_height="fill_parent"
     android:layout_weight="1">  //需要注意的是嵌套的LinearLayout权重都是1,即各自占屏幕的一半。
    </LinearLayout>

    <LinearLayout
     android:orientation="vertical"  //第二个嵌套垂直布局
     android:layout_width="fill_parent"
     android:layout_height="fill_parent"
     android:layout_weight="1">
    </LinearLayout>
</LinearLayout>
四、相对布局-RelativeLayout
概念:
类似于CSS+DIV布局。
一个控件的位置,决定于他和周围控件的关系。
与其他控件的区别:
相对布局是依赖与和周围控件的关系而决定为位置的,如将A控件放在B控件的下方。
相关属性:
第一类:
   android:layout_above 将该控件的底部至于给定ID的控件之上
       android:layout_below 将该控件的顶部至于给定ID的控件之下
       android:layout_toLeftOf 将该控件的右边缘和给定ID的控件的左边缘对齐
       android:layout_toRightOf 将该控件的左边缘和给定ID的控件的右边缘对齐

       android:layout_alignBaseline 该控件的baseline和给定ID的控件的baseline对齐
       android:layout_alignBottom 将该控件的底部边缘与给定ID控件的底部边缘
       android:layout_alignLeft 将该控件的左边缘与给定ID控件的左边缘对齐
       android:layout_alignRight 将该控件的右边缘与给定ID控件的右边缘对齐
       android:layout_alignTop 将给定控件的顶部边缘与给定ID控件的顶部对齐


       android:layout_alignParentBottom 如果该值为true,则将该控件的底部和父控件的底部对齐
       android:layout_alignParentLeft 如果该值为true,则将该控件的左边与父控件的左边对齐
       android:layout_alignParentRight 如果该值为true,则将该控件的右边与父控件的右边对齐
       android:layout_alignParentTop 如果该值为true,则将控件的顶部与父控件的顶部对齐

       android:layout_centerHorizontal 如果值为真,该控件将被至于水平方向的中央
       android:layout_centerInParent 如果值为真,该控件将被至于父控件水平方向和垂直方向的中央
       android:layout_centerVertical 如果值为真,该控件将被至于垂直方向的中央


       通俗的理解 Padding 为内边框,Margin 为外边框

       对应的属性为

       android:layout_marginBottom="25dip"
       android:layout_marginLeft="10dip"
       android:layout_marginTop="10dip"
       android:layout_marginRight="10dip"
       android:paddingLeft="1dip"
       android:paddingTop="1dip"
       android:paddingRight="1dip"
       android:paddingBottom="1dip"

       如果左右上下都是相同的设置则可以直接设置

       android:layout_margin="10dip"
       android:padding="5dip"
