参考GitHub官方教程 老鸟请绕道![]()
一、下载并安装git
GitHub官方推荐msysgit,官方主页,点击download链接,跳转后下载最新版,安装过程不再熬诉
配置git,此时需要打开Git Bash,如果需要在windows 命令行中使用,这需要将Git的bin目录加入环境变量path
用户名和邮箱配置
git config --global user.name "Your Name Here"
# Sets the default name for git to use when you commit
git config --global user.email "[email protected]"
# Sets the default email for git to use when you commit
建议设置的email地址与GitHub账户地址相同
缓存密码
git版本要求1.7.10或 更高,同时需要安装credential helper,GitHub官方的客户端已经包含了此功能,msysgit实现此功能这需要下载credential helper,注意此时适用于使用https连接的情形,如果是SSH连接,请参考文档
二、创建仓库(repository)
我们在GitHub创建一个repo
Repository name就是我们以后的项目名
此时,我们可以在磁盘上创建一个本地库
step 1、Create the README file
工作流:你的本地仓库由 git 维护的三棵“树”组成。第一个是你的 工作目录,它持有实际文件;第二个是 缓存区(Index),它像个缓存区域,临时保存你的改动;最后是 HEAD,指向你最近一次提交后的结果。
#在Repo文件夹下创建helloGit,打开git bash,切换到helloGit目录

#step 1
git init

#Sets up the necessary Git files

#step 2
#Creates a file called "README" in your helloGit directory
step2、提交README
git add README

#git add *  这是git工作流程的第一步,把他们添加到缓冲区
git commit -m "first commit"

#现在,你的改动已经提交到了 HEAD,但是还没到你的远端仓库
step 3、push your commit
此时你的README文件并没有提交到GitHub,我们需要设置一个remote别名后才能提交
#首先查看remote
git remote -v

#首先查看remote
git remote -v

#如果没有则创建
git remote add origin https://github.com/username/helloGit.git

#Creates a remote named "origin" pointing at your GitHub repository

#origin为remote别名,username则修改为你的github用户名,helloGit.git必须匹配此前创建的repo名,此处大小写敏感

#如果添加错误,则可以通过git remote remove alias 删除
git remote remove origin

#把这些改动提交到远程仓库
git push origin master
# Sends your commits in the "master" branch to GitHub
如果git push origin master失败,提示push rejected: error: failed to push some refs,则参考此文解决或查看帮助文档及Google
三、Fork a Repo
首先明白分支的概念,分支是用来将特性开发绝缘开来的。在你创建仓库的时候,master 是“默认的”。在其他分支上进行开发,完成后再将它们合并到主分支上。
更新与合并
#要更新你的本地仓库至最新改动,执行:
#git pull <remote> <branch>  如在Github网站上修改了master分支下的README,本地更新到最新
git pull origin master
#以在你的工作目录中 获取(fetch)并合并(merge)远端的改动。要合并其他分支到你的当前分支(例如 master),执行:
git merge <branch>   #git checkout feature_x 切换到feature_x分支,然后git merge master合并修改的README
#两种情况下,git 都会尝试去自动合并改动。不幸的是,自动合并并非次次都能成#功,并可能导致 冲突(conflicts)。 这时候就需要你修改这些文件来人肉合并这些冲突(conflicts) 了。改完之后,你需要##执行如下命令以将它们标记为合并成功:
git add <filename>
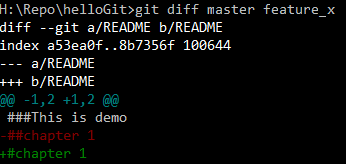
#在合并改动之前,也可以使用如下命令查看:
git diff <source_branch> <target_branch>
标签
在软件发布时创建标签,是被推荐的。这是个旧有概念,在 SVN 中也有。可以执行如下命令以创建一个 叫做 1.0.0 的标签:
git tag 1.0.0 1b2e1d63ff
1b2e1d63ff 是你想要标记的提交 ID 的前 10 位字符。使用如下命令获取提交 ID:
git log
你也可以用该提交 ID 的少一些的前几位,只要它是唯一的。
替换本地改动
假如你做错事(自然,这是不可能的),你可以使用如下命令替换掉本地改动:
git checkout -- <filename>
此命令会使用 HEAD 中的最新内容替换掉你的工作目录中的文件。已添加到缓存区的改动,以及新文件,都不受影响。
假如你想要丢弃你所有的本地改动与提交,可以到服务器上获取最新的版本并将你本地主分支指向到它:
git fetch origin
git reset --hard origin/master
参与开源项目
有时,你会想参与某个项目,或者把某个项目当作你学习的开始,可以使用GitHub的Fork功能
Step 1: Fork the "Spoon-Knife" repository
![]()
Step 2: Clone your fork
点击fork按钮后,此项目会存在你的GitHub的Repo中,如果我们需要它存在本地磁盘,我们可以可以使用
git clone https://github.com/octocat/Spoon-Knife
# Clones your fork of the repository into the current directory in terminal
Step 3: Configure remotes
当一个Repo被clone,它有一个默认的remote别名"origin",可以通过切换到Spoon-Knife目录,然后通过git remote -v 查看,由于它不是原始的Repo,为了跟踪原始的Repo,你需要添加另一个remote别名
cd Spoon-Knife
# Changes the active directory in the prompt to the newly cloned "Spoon-Knife" directory
git remote add upstream https://github.com/yourname/Spoon-Knife.git
# Assigns the original repository to a remote called "upstream"
git fetch upstream
# Pulls in changes not present in your local repository, without modifying your files

