ubuntu11.10安装coreseek 实现全文索引
1、什么是全文检索
全文检索是指以文档的全部文本信息作为检索对象的一种信息检索技术。检索的对象有可能是文章的标题,也有可能是文章的作者,也有可能是文章摘要或内容。
2、Sphinx介绍
说到全文检索就不得不提Sphinx,Sphinx是一个俄国人开发的搜索引擎,它的主要特点是:
一、性能非常出色
150万条记录一两分钟就索引完毕,2-4GB以内的文本检索速度不到0.1秒钟。ferret也望尘莫及,更不要说lucene了。
二、和数据库集成性很好
Sphinx通过配置文件可以自行读取数据库信息做索引,不依赖任何外部的应用程序,并且可以作为一个daemon进程启动,支持分布式检索,并发响应性能很好。因此很多过去使用ferret的人因为并发检索的问题都改用Sphinx了。
三、可以做MySQL的全文检索
MySQL的数据库引擎是可插拔的结构,Sphinx开发了一个SphinxSE数据库引擎,可以在编译MySQL的时候直接编译到MySQL里面去,这样的话,可以在数据库级别支持高性能的全文检索
3、sphinx在当初的时候并不支持中文分词,现在情况已经完全改变了。李沫南为Sphinx开发了中文分词的插件——libmmseg。对于libmmseg,robbin以前也有介绍,不过是用在Ferret里面。
http://www.iteye.com/topic/196451
此外,李沫南还开发了一个支持中文全文检索的Sphinx定制版本——Coreseek,除了支持中文的全文检索外,Coreseek最大的特点是支持使用Python提供自定义的数据源。我们可以简单地理解为:Coreseek = Sphinx + libmmseg + py_datasource。
4、Coreseek的系统组成
参考:(http://blog.csdn.net/beyond_boy/article/details/6462474)
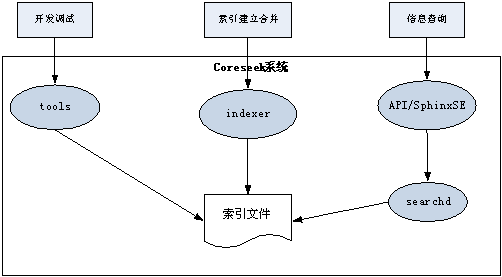
Coreseek整个系统的组成,可用下图来表示。
整个coreseek系统由多个可执行程序和一套api组成。
1. 可执行程序主要由下面这些组成:
a) 索引建立和维护程序(索引程序indexer)
b) 查询服务程序(后台服务程序searchd)
c) 辅助工具程序(search, spelldump等)
2. Api主要由下面两个组成
a) 应用程序api(包括ruby,C/C++, Python, php的程序api)
b) Mysql的sphinxSE引擎接口
5、Coreseek的工作流程
下图简要描述了coreseek的索引建立、查询和合并的主要工作流程。图后面有简要说明。
Coreseek的主要工作流程可以分成三部分:
l 首先建立主索引;
l 而后在主索引基础上进行查询;
l 根据业务需要每隔一段时间,对新增的业务数据建立增量索引,并将增量索引合并到主索引里面。
1. 索引的建立(1-5步)
a) 使用者首先必须建立索引,才能使用coreseek系统进行查询(第一步)
b) 索引程序根据用户请求,读取配置文件,从源数据中读取数据。(第二步)
c) 根据源数据的数据进行分析计算,建立索引(第三步)
d) 将建立的索引写入到索引文件(第四步)
e) 返回索引建立结束的消息(第五步)
2. 根据索引进行查询(6-11步)
a) 使用者调用查询api,输入查询的关键词和条件(第六步)
b) Api将用户的输入,转化成查询的数据包,发送到sphinx查询服务器(第七步)
c) 查询服务器到索引文件中进行查询,得到查询结果(第八步)
d) 返回查询结果给用户(第九步—第十一步)
3. 增量索引的建立和合并(12-22步)
a) 每隔一段时间,当业务数据发生更改的时候,需要将更改的数据合并到索引中,以便在查询中能够查询到更改以后的数据。这需要使用者先发起索引建立的请求,对增量数据建立增量索引(第十二步)
b) 索引程序从源数据中,查询到从上次建立索引到现在这段时间中,产生更新的数据(第十三步)
c) 对这部分更新的数据进行分析计算,建立增量索引(第十四步)
d) 将增量索引写入到增量索引文件中(第十五步)
e) 建立增量索引结束(第十六步)
f) 用户发出指令,对增量索引和主索引进行合并(第十七步)
g) 从增量索引文件读取增量索引的数据(第十八步)
h) 从主索引读取主索引的数据(第十九步)
i) 合并增量索引和主索引(第二十步)
j) 将合并后的索引写入到新的索引文件,用新的索引文件替换主索引(第二十一步)
k) 合并索引结束(第二十二步)

6、文件目录结构
把主要的文件目录结构做一个简单说明。省略了部分编译配置文件和一些说明文件。
|-- csft-3.2.14 coreseek源代码
| |-- api 包括java,ruby,C/C++,php的sphinx访问api接口
| |-- codeblocks code block的项目工程文件
| |-- config 编译环境的配置文件
| |-- contrib 放置第三方扩展的api接口和常用脚本,但目前基本为空
| |-- csft.doc 空置
| |-- csft.pytest python的一个脚本,可以忽略
| |-- doc 用户手册和部分说明文档。对使用和阅读代码有作用,强烈建议阅读。
| |-- example.sql 生成手册和测试里面提到的示例数据库schema的sql脚本
| |-- libexpat vc的工程项目文件
| |-- libstemmer_c vc的工程项目文件
| |-- misc 一些辅助文件,可以忽略
| |-- mysqlse sphinxSE的文件,是mysql的引擎文件,放在编译mysql时候进行编译
| |-- pymmseg mmseg提供出来的python接口
| |-- src coreseek源代码目录。核心代码全部在这里
| |-- test 测试代码
| `-- win windows下的工程配置文件
|-- mmseg-3.2.14 mmseg源代码
| |-- config 编译配置文件
| |-- data 词典文件
| |-- python python接口api代码
| |-- ruby ruby接口api代码
| |-- script python的一部分生成字典的脚本
| |-- src mmseg的源代码目录,核心代码都在这里
`-- testpack 测试配置和数据包
|-- api 测试环境需要的api接口和测试脚本
|-- etc 测试环境配置文件
`-- var 测试环境运行数据
7、Csft/src目录下的文件用途说明
csft-3.2.14/src
|-- indexer.cpp 索引程序index的入口主函数
|-- indextool.cpp 工具程序indextool的入口主函数
|-- llsphinxql.c sphinql的语法分析器Flex
|-- md5.cpp 实现md5算法的代码
|-- md5.h 实现md5算法的代码
|-- py_helper.cpp 跟python语言交互的接口代码
|-- py_helper.h 跟python语言交互的接口代码
|-- py_layer.cpp 跟python语言相关的代码
|-- py_layer.h 跟python语言相关的代码
|-- py_source.cpp 跟python语言相关的代码
|-- py_source.h 跟python语言相关的代码
|-- py_sphinx.c 跟python语言相关的代码
|-- py_sphinx_interface.cpp 跟python语言相关的代码
|-- py_sphinx_interface.h 跟python语言相关的代码
|-- search.cpp 工具程序search的入口主函数
|-- searchd.cpp 查询程序searchd的入口主函数
|-- spelldump.cpp 工具程序spelldump的入口主函数
|-- sphinx.cpp 主要的逻辑代码,索引建立合并和查询主要的逻辑都在这里。
|-- sphinx.h
|-- sphinx_internal.h
|-- sphinxcustomsort.inl 支持用户自定义排序的一个文件,用于支持 @custom 的排序方式
|-- sphinxexcerpt.cpp 产生文本摘要和高亮的代码
|-- sphinxexcerpt.h
|-- sphinxexpr.cpp 跟语法分析器有关的代码
|-- sphinxexpr.h 跟语法分析器有关的代码
|-- sphinxexpr.y 语法分析器yacc的输入文件
|-- sphinxfilter.cpp sphinx过滤器filter的实现代码
|-- sphinxfilter.h
|-- sphinxmetaphone.cpp 实现Metaphone算法的代码,它是一种基于音标的词干组织法。
|-- sphinxql.l sphinxql的语法分析器lex的输入文件
|-- sphinxql.y sphinxql的语法yacc的输入文件
|-- sphinxquery.cpp sphinx查询语句的解析代码,对查询语句进行解析,并生成语法分析树
|-- sphinxquery.h
|-- sphinxquery.y sphinxql的语法yacc的输入文件
|-- sphinxselect.y sphinxql的语法yacc的输入文件
|-- sphinxsort.cpp 排序算法实现代码
|-- sphinxsoundex.cpp 语音编码算法代码
|-- sphinxstd.cpp 一部分通用的代码,如lock锁,Mutex,随机器等封装好的代码。
|-- sphinxstd.h
|-- sphinxstem.h 词干提炼代码的头文件
|-- sphinxstemcz.cpp 捷克语词干的提炼代码
|-- sphinxstemen.cpp 英语的词干提炼代码
|-- sphinxstemru.cpp 俄语的词干提炼代码
|-- sphinxstemru.inl 俄语的词干提炼代码
|-- sphinxtimers.h 计时器代码,这个是用来做sphinx内部性能分析用,看耗时主要在哪部分
|-- sphinxutils.cpp 对配置文件进行解析的代码
|-- sphinxutils.h
|-- sphinxversion.h 定义sphinx版本的宏
|-- tests.cpp 对分词器进行测试的代码
|-- tokenizer_zhcn.cpp 中文分词器的实现代码
|-- tokenizer_zhcn.h 中文分词器的实现代码
|-- yy.cmd 后面这部分yyxxx.xx的文件都是跟语法分析器相关的文件,不再一一分析。
|-- yysphinxexpr.c 跟语法分析器相关的文件
|-- yysphinxexpr.h 跟语法分析器相关的文件
|-- yysphinxql.c 跟语法分析器相关的文件
|-- yysphinxql.h 跟语法分析器相关的文件
|-- yysphinxquery.c 跟语法分析器相关的文件
|-- yysphinxquery.h 跟语法分析器相关的文件
|-- yysphinxselect.c 跟语法分析器相关的文件
`-- yysphinxselect.h 跟语法分析器相关的文件
8、CoreSeek详细安装
参考:http://www.coreseek.cn/products/products-install/
安装前,请查看以下列表对应操作系统页面,安装需要预先安装的软件,以便后续安装测试可正常进行!
m4 >= 1.4.13
autoconf >= 2.65
automake >= 1.11
libtool >= 2.2.6b
##一、基础安装:(此时尚不支持MySQL,完成第二步数据源支持后就支持)
##完成后:提供xml数据源支持,中文检索支持
##
##download http://www.coreseek.cn/uploads/csft/3.2/coreseek-3.2.14.tar.gz
$ tar xzvf coreseek-3.2.14.tar.gz
$ 请点击仔细查看README.txt
##切换到root用户,确保拥有完整的权限来安装软件
$ su root
##或者
$ sudo root bash
$ su -
$ cd coreseek-3.2.14
##中文测试环境检查:
$ locale
##以下为核心项,locale为zh_CN.UTF-8,就可以正常显示和输入中文;locale设置功能由操作系统自身支持,BSD/Linux均可开启;该功能,不是coreseek提供的!!!
##如果不能正常显示中文,则后面的中文测试部分无法正常进行,但不会影响coreseek的实际功能;
LANG=zh_CN.UTF-8
LC_ALL="zh_CN.UTF-8"
##如果显示的不是zh_CN.UTF-8,请参考以下网址进行设置:
##locale设置 http://www.baidu.com/s?wd=linux+locale%C9%E8%D6%C3
##命令行显示中文 http://www.baidu.com/s?wd=linux+%C3%FC%C1%EE%D0%D0%CF%D4%CA%BE%D6%D0%CE%C4
##putty显示中文 http://www.baidu.com/s?wd=putty+%CF%D4%CA%BE%D6%D0%CE%C4
##SecureCRT显示中文 http://www.baidu.com/s?wd=securecrt+%CF%D4%CA%BE%D6%D0%CE%C4
##确保可以正常显示,否则请检查当前环境的locale配置,以及当前环境或者客户端已设置好支持UTF-8中文字符显示
$ cat testpack/var/test/test.xml
##安装coreseek开发的mmseg,为coreseek提供中文分词功能
$ cd mmseg-3.2.14
##ubuntu环境下,需要使用ACLOCAL_FLAGS="-I /usr/share/aclocal" ./bootstrap
$ ./bootstrap
$ ./configure --prefix=/usr/local/mmseg3
$ make && make install
##如果提示libtool: unrecognized option `--tag=CC' ,请查看libtool问题解决方案 http://www.coreseek.cn/products-install/faq/#qa24
##安装完成后,mmseg使用的词典和配置文件,将自动安装到/usr/local/mmseg3/etc中
##中文分词测试,如果显示不正常,请检查当前环境下的locale和UTF-8中文字符显示设置
$ /usr/local/mmseg3/bin/mmseg -d /usr/local/mmseg3/etc src/t1.txt
中文/x 分/x 词/x 测试/x
中国人/x 上海市/x
Word Splite took: 1 ms.
##安装coreseek:
$ cd csft-3.2.14
##执行configure,进行编译配置:
$ sh buildconf.sh
$ ./configure --prefix=/usr/local/coreseek --without-python --without-unixodbc --with-mmseg --with-mmseg-includes=/usr/local/mmseg3/include/mmseg/ --with-mmseg-libs=/usr/local/mmseg3/lib/ --without-mysql
##coreseek4.x/sphinx1.x,请将--without-mysql更改为--with-mysql
$ make && make install
##如果提示mysql问题,可以查看MySQL数据源安装说明 http://www.coreseek.cn/product_install/install_on_bsd_linux/#mysql
##可能遇到的问题:
##如果提示libtool: unrecognized option `--tag=CC' ,请查看libtool问题解决方案 http://www.coreseek.cn/products-install/faq/#qa24
##有的系统下可能出现:expected `;' before ‘CSphTokenizer_UTF8SpaceSeg’,
##或者出现:configure: WARNING: unrecognized options: --with-mmseg, --with-mmseg-includes, --with-mmseg-libs
##是因为你没有进行随后的sh buildconf.sh操作
##生成当前系统对应的编译配置文件
##需要使用以下指令:
$ sh buildconf.sh
## Linux环境下,如遇到pthread问题,请先直接执行以下指令在进行configur:
$ LD_LIBRARY_PATH=$LD_LIBRARY_PATH:/usr/local/lib
$ export LD_LIBRARY_PATH
## 如果出现undefined reference to `libiconv'的类似错误,可以按照如下方法处理:
##方法一:(Linux使用)
## 直接执行:export LIBS="-liconv"
##然后再次configure后,进行编译安装make && make install
## 方法二:
## 首先configure,然后vim src/makefile
## 在其中搜索lexpat,在其后加上 -liconv
## 修改后该行应该为:-lexpat -liconv -L/usr/local/lib
## 然后再次make && make install
## 方法三:
## 首先configure,然后vim config/config.h
## 在其中搜索USE_LIBICONV,将其后的1修改为0
## 然后再次make && make install
##配置测试,测试是否可以正确运行
$ /usr/local/coreseek/bin/indexer -c /usr/local/coreseek/etc/sphinx-min.conf.dist
##以下为正常测试时的提示信息:
Coreseek Fulltext 3.2 [ Sphinx 0.9.9-release (r2117)]
Copyright (c) 2007-2010,
Beijing Choice Software Technologies Inc (http://www.coreseek.com)
using config file '/usr/local/coreseek/etc/sphinx-min.conf.dist'...
total 0 reads, 0.000 sec, 0.0 kb/call avg, 0.0 msec/call avg
total 0 writes, 0.000 sec, 0.0 kb/call avg, 0.0 msec/call avg
##
##csft-4.0版显示:ERROR: nothing to do.
##
##至此,coreseek基础环境可以正常安装,我们可以开始后续的工作啦。
##注意:基础环境仅支持xml数据源;如需要mysql或者python数据源,请继续按照下面的步骤操作!!!
##二、数据源支持:支持MySQL数据源
##完成后:提供mysql数据源支持和xml数据源支持
##系统需要安装相关的基础依赖库,否则无法支持对应的功能
##freebsd6/7/8:
$ pkg_add -r mysql50-client libxml2 expat
##centos5.4/5.5: fedora12/13 : rhel5.5
$ yum install mysql-devel libxml2-devel expat-devel
##debian5 : ubuntu9/10:
$ apt-get install mysql-client libmysqlclient15-dev libxml2-dev libexpat1-dev
##gentoo10:
##安装环境自带了libmysqlclient libxml2 libexpat
##opensuse10/11:
##yast安装 libmysqlclient-devel libxml2 libxml2-devel libexpat-devel
##slackware13.0/13.1:
$ slapt-get --install mysql libxml2 expat
##archlinux-2010:
$ pacman -S libmysqlclient libxml2 expat
##重新编译安装coreseek,以支持mysql数据源和xml数据源
$ cd csft-3.2.14
$ make clean
$ ./configure --prefix=/usr/local/coreseek --without-unixodbc --with-mmseg --with-mmseg-includes=/usr/local/mmseg3/include/mmseg/ --with-mmseg-libs=/usr/local/mmseg3/lib/ --with-mysql
##以上configure参数请正确拷贝,不要遗漏或者随意修改
$ make && make install
##如果出现错误提示:“ERROR: cannot find MySQL include files.......To disable MySQL support, use --without-mysql option.“,可按照如下方法处理:
##请找到头文件mysql.h所在的目录,一般是/usr/local/mysql/include,请替换为实际的
##请找到库文件libmysqlclient.a所在的目录,一般是/usr/local/mysql/lib,请替换为实际的
##configure参数加上:--with-mysql-includes=/usr/local/mysql/include --with-mysql-libs=/usr/local/mysql/lib,执行后,重新编译安装
##三、coreseek中文全文检索测试
$ cd testpack
$ /usr/local/coreseek/bin/indexer -c etc/csft.conf
##以下为正常情况下的提示信息:
Coreseek Fulltext 3.2 [ Sphinx 0.9.9-release (r2117)]
Copyright (c) 2007-2010,
Beijing Choice Software Technologies Inc (http://www.coreseek.com)
using config file 'etc/csft.conf'...
total 0 reads, 0.000 sec, 0.0 kb/call avg, 0.0 msec/call avg
total 0 writes, 0.000 sec, 0.0 kb/call avg, 0.0 msec/call avg
##
##csft-4.0版显示:ERROR: nothing to do.
##
$ /usr/local/coreseek/bin/indexer -c etc/csft.conf --all
##以下为正常索引全部数据时的提示信息:(csft-4.0版类似)
Coreseek Fulltext 3.2 [ Sphinx 0.9.9-release (r2117)]
Copyright (c) 2007-2010,
Beijing Choice Software Technologies Inc (http://www.coreseek.com)
using config file 'etc/csft.conf'...
indexing index 'xml'...
collected 3 docs, 0.0 MB
sorted 0.0 Mhits, 100.0% done
total 3 docs, 7585 bytes
total 0.075 sec, 101043 bytes/sec, 39.96 docs/sec
total 2 reads, 0.000 sec, 5.6 kb/call avg, 0.0 msec/call avg
total 7 writes, 0.000 sec, 3.9 kb/call avg, 0.0 msec/call avg
$ /usr/local/coreseek/bin/indexer -c etc/csft.conf xml
##以下为正常索引指定数据时的提示信息:(csft-4.0版类似)
Coreseek Fulltext 3.2 [ Sphinx 0.9.9-release (r2117)]
Copyright (c) 2007-2010,
Beijing Choice Software Technologies Inc (http://www.coreseek.com)
using config file 'etc/csft.conf'...
indexing index 'xml'...
collected 3 docs, 0.0 MB
sorted 0.0 Mhits, 100.0% done
total 3 docs, 7585 bytes
total 0.069 sec, 109614 bytes/sec, 43.35 docs/sec
total 2 reads, 0.000 sec, 5.6 kb/call avg, 0.0 msec/call avg
total 7 writes, 0.000 sec, 3.9 kb/call avg, 0.0 msec/call avg
$ /usr/local/coreseek/bin/search -c etc/csft.conf
##以下为正常测试搜索时的提示信息:(csft-4.0版类似)
Coreseek Fulltext 3.2 [ Sphinx 0.9.9-release (r2117)]
Copyright (c) 2007-2010,
Beijing Choice Software Technologies Inc (http://www.coreseek.com)
using config file 'etc/csft.conf'...
index 'xml': query '': returned 3 matches of 3 total in 0.093 sec
displaying matches:
1. document=1, weight=1, published=Thu Apr 1 22:20:07 2010, author_id=1
2. document=2, weight=1, published=Thu Apr 1 23:25:48 2010, author_id=1
3. document=3, weight=1, published=Thu Apr 1 12:01:00 2010, author_id=2
words:
$ /usr/local/coreseek/bin/search -c etc/csft.conf -a Twittter和Opera都提供了搜索服务
##以下为正常测试搜索关键词时的提示信息:(csft-4.0版类似)
Coreseek Fulltext 3.2 [ Sphinx 0.9.9-release (r2117)]
Copyright (c) 2007-2010,
Beijing Choice Software Technologies Inc (http://www.coreseek.com)
using config file 'etc/csft.conf'...
index 'xml': query 'Twittter和Opera都提供了搜索服务 ': returned 3 matches of 3 total in 0.038 sec
displaying matches:
1. document=3, weight=24, published=Thu Apr 1 12:01:00 2010, author_id=2
2. document=1, weight=4, published=Thu Apr 1 22:20:07 2010, author_id=1
3. document=2, weight=3, published=Thu Apr 1 23:25:48 2010, author_id=1
words:
1. 'twittter': 1 documents, 3 hits
2. '和': 3 documents, 15 hits
3. 'opera': 1 documents, 25 hits
4. '都': 2 documents, 4 hits
5. '提供': 0 documents, 0 hits
6. '了': 3 documents, 18 hits
7. '搜索': 2 documents, 5 hits
8. '服务': 1 documents, 1 hits
$ /usr/local/coreseek/bin/searchd -c etc/csft.conf
##以下为正常开启搜索服务时的提示信息:(csft-4.0版类似)
Coreseek Fulltext 3.2 [ Sphinx 0.9.9-release (r2117)]
Copyright (c) 2007-2010,
Beijing Choice Software Technologies Inc (http://www.coreseek.com)
using config file 'etc/csft.conf'...
listening on all interfaces, port=9312
##如要停止搜索服务,请使用/usr/local/coreseek/bin/searchd -c etc/csft.conf --stop
##如要已启动服务,要更新索引,请使用/usr/local/coreseek/bin/indexer -c etc/csft.conf --all --rotate
##然后,请参考csft-3.2.14下api目录中的相关文件,使用PHP、Python、Ruby、Java来测试搜索服务;也可以前往< ahref="/products-install/step_by_step/">搜索服务建立三步曲,查看第三步使用PHP测试。
##四、继续
##通过以上步骤,coreseek已经安装测试完成,可以提供正常的xml数据源索引以及提供对应的搜索服务了
##下一步工作,请查看手册,准备好mysql数据信息,以及进行mysql数据源的测试,并在您的应用中调用搜索服务;mysql数据源的配置可参考testpack/etc/csft_mysql.conf文件
##五 然后建立命令快捷方式,方便使用
sudo ln -s /usr/local/coreseek/bin/indexer /usr/local/bin/indexer
sudo ln -s /usr/local/coreseek/bin/indextool /usr/local/bin/indextool
sudo ln -s /usr/local/coreseek/bin/search /usr/local/bin/search
sudo ln -s /usr/local/coreseek/bin/searchd /usr/local/bin/searchd
sudo ln -s /usr/local/coreseek/bin/spelldump /usr/local/bin/spelldump
##六 生成字典文件
cd 到 coreseek-3.2.14/mmseg-3.2.14/data (该路径为你下载下来的coreseek的tar包,解压后的文件夹),在该文件夹内调用命令:/usr/local/mmseg3/bin/mmseg -u unigram.txt,将会在unigram.txt所在目录中产生一个名为unigram.txt.uni的文件,将该文件改名为uni.lib,然后将该重命名后的文件copy到 /usr/local/coreseek文件夹下的一个叫做dict的文件夹内,如果没有该dict文件夹的话,手动的创建一个。这个就是字典文件所在的位置。
##七 在ROR项目中使用sphinx
前面说过,在ROR项目中,有两个gem可以使用,thinking_sphinx和ultrasphinx,这两个文件都是sphinx对ROR项目的接口实现,我们可以通过这两个接口来实现sphinx的全文索引。
a)先说ultrasphinx,这个的配置很简单:
在项目的根下执行 rake ultrasphinx:bootstrap
这个命令会copy一个 default.base文件并重命名为development.base 或者production.base(具体看是在development环境还是在production环境),然后进入到
project/config/ultrasphinx目录,修改这个development.base或是production.base,参考样例:
<% path = '/usr/local/coreseek/' %>
#path 为刚才我们copy字典文件dict的上一层目录
# Indexing options
indexer
{
mem_limit = 256M
# Ultrasphinx-specific key
delta = <%= 1.day + 30.minutes %>
}
# Daemon options
searchd
{
# What interface the search daemon should listen on and where to store its logs
address = 127.0.0.1
port = 3313
seamless_rotate = 1
log = <%= path %>log/searchd.log
query_log = <%= path %>log/query.log #一般放到项目里面一个可写的目录里面
read_timeout = 5
max_children = 300
pid_file = <%= path %>log/searchd.pid
max_matches = 100000
}
# Client options
client
{
# Name of the Aspell dictionary (two letters max)
dictionary_name = ap
# How your application connects to the search daemon (not necessarily the same as above)
server_host = localhost
server_port = 3313
}
# Individual SQL source options
source
{
sql_ranged_throttle = 0
sql_range_step = 5000
sql_query_post =
}
# Index building options
index
{
path = <%= path %>
docinfo = extern # Just leave this alone
morphology = stem_en
stopwords = # <%= path %>/ap-stopwords.txt
min_word_len = 1
# HTML-specific options
html_strip = 0
html_index_attrs =
# Enable these if you need wildcard searching. They will slow down indexing significantly.
# min_infix_len = 1
# enable_star = 1
charset_type = zh_cn.utf-8 #utf-8 or sbcs (Single Byte Character Set)
charset_dictpath = <%= path %>/dict #指定字典文件的字符集
}
运行 rake ultrasphinx:configure 生成配置文件development.conf或者production.conf
运行 rake ultrasphinx:index 生成索引文件
运行 rake ultrasphinx:daemon:start 开启searchd服务
b)现在说thinking_sphinx
thinking_sphinx的配置相对于ultrasphinx更简单
cd到项目目录project/config 编辑 sphinx.yml文件:
development:
address: 127.0.0.1
port: 3313
bin_path: "/usr/local/bin/"
searchd_binary_name: "searchd"
indexer_binary_name: "indexer"
charset_type: zh_cn.utf-8
charset_dictpath: /usr/local/coreseek/dict #指定字典嗯见所在路径
然后在项目的根目录:
rake thinking_sphinx:configure 生成配置文件development.conf或者production.conf
rake thinking_sphinx:index 建立索引文件
rake thinking_sphinx:start 开启searchd服务进程
全文检索是指以文档的全部文本信息作为检索对象的一种信息检索技术。检索的对象有可能是文章的标题,也有可能是文章的作者,也有可能是文章摘要或内容。
2、Sphinx介绍
说到全文检索就不得不提Sphinx,Sphinx是一个俄国人开发的搜索引擎,它的主要特点是:
一、性能非常出色
150万条记录一两分钟就索引完毕,2-4GB以内的文本检索速度不到0.1秒钟。ferret也望尘莫及,更不要说lucene了。
二、和数据库集成性很好
Sphinx通过配置文件可以自行读取数据库信息做索引,不依赖任何外部的应用程序,并且可以作为一个daemon进程启动,支持分布式检索,并发响应性能很好。因此很多过去使用ferret的人因为并发检索的问题都改用Sphinx了。
三、可以做MySQL的全文检索
MySQL的数据库引擎是可插拔的结构,Sphinx开发了一个SphinxSE数据库引擎,可以在编译MySQL的时候直接编译到MySQL里面去,这样的话,可以在数据库级别支持高性能的全文检索
3、sphinx在当初的时候并不支持中文分词,现在情况已经完全改变了。李沫南为Sphinx开发了中文分词的插件——libmmseg。对于libmmseg,robbin以前也有介绍,不过是用在Ferret里面。
http://www.iteye.com/topic/196451
此外,李沫南还开发了一个支持中文全文检索的Sphinx定制版本——Coreseek,除了支持中文的全文检索外,Coreseek最大的特点是支持使用Python提供自定义的数据源。我们可以简单地理解为:Coreseek = Sphinx + libmmseg + py_datasource。
4、Coreseek的系统组成
参考:(http://blog.csdn.net/beyond_boy/article/details/6462474)
Coreseek整个系统的组成,可用下图来表示。
整个coreseek系统由多个可执行程序和一套api组成。
1. 可执行程序主要由下面这些组成:
a) 索引建立和维护程序(索引程序indexer)
b) 查询服务程序(后台服务程序searchd)
c) 辅助工具程序(search, spelldump等)
2. Api主要由下面两个组成
a) 应用程序api(包括ruby,C/C++, Python, php的程序api)
b) Mysql的sphinxSE引擎接口
5、Coreseek的工作流程
下图简要描述了coreseek的索引建立、查询和合并的主要工作流程。图后面有简要说明。
Coreseek的主要工作流程可以分成三部分:
l 首先建立主索引;
l 而后在主索引基础上进行查询;
l 根据业务需要每隔一段时间,对新增的业务数据建立增量索引,并将增量索引合并到主索引里面。
1. 索引的建立(1-5步)
a) 使用者首先必须建立索引,才能使用coreseek系统进行查询(第一步)
b) 索引程序根据用户请求,读取配置文件,从源数据中读取数据。(第二步)
c) 根据源数据的数据进行分析计算,建立索引(第三步)
d) 将建立的索引写入到索引文件(第四步)
e) 返回索引建立结束的消息(第五步)
2. 根据索引进行查询(6-11步)
a) 使用者调用查询api,输入查询的关键词和条件(第六步)
b) Api将用户的输入,转化成查询的数据包,发送到sphinx查询服务器(第七步)
c) 查询服务器到索引文件中进行查询,得到查询结果(第八步)
d) 返回查询结果给用户(第九步—第十一步)
3. 增量索引的建立和合并(12-22步)
a) 每隔一段时间,当业务数据发生更改的时候,需要将更改的数据合并到索引中,以便在查询中能够查询到更改以后的数据。这需要使用者先发起索引建立的请求,对增量数据建立增量索引(第十二步)
b) 索引程序从源数据中,查询到从上次建立索引到现在这段时间中,产生更新的数据(第十三步)
c) 对这部分更新的数据进行分析计算,建立增量索引(第十四步)
d) 将增量索引写入到增量索引文件中(第十五步)
e) 建立增量索引结束(第十六步)
f) 用户发出指令,对增量索引和主索引进行合并(第十七步)
g) 从增量索引文件读取增量索引的数据(第十八步)
h) 从主索引读取主索引的数据(第十九步)
i) 合并增量索引和主索引(第二十步)
j) 将合并后的索引写入到新的索引文件,用新的索引文件替换主索引(第二十一步)
k) 合并索引结束(第二十二步)
6、文件目录结构
把主要的文件目录结构做一个简单说明。省略了部分编译配置文件和一些说明文件。
|-- csft-3.2.14 coreseek源代码
| |-- api 包括java,ruby,C/C++,php的sphinx访问api接口
| |-- codeblocks code block的项目工程文件
| |-- config 编译环境的配置文件
| |-- contrib 放置第三方扩展的api接口和常用脚本,但目前基本为空
| |-- csft.doc 空置
| |-- csft.pytest python的一个脚本,可以忽略
| |-- doc 用户手册和部分说明文档。对使用和阅读代码有作用,强烈建议阅读。
| |-- example.sql 生成手册和测试里面提到的示例数据库schema的sql脚本
| |-- libexpat vc的工程项目文件
| |-- libstemmer_c vc的工程项目文件
| |-- misc 一些辅助文件,可以忽略
| |-- mysqlse sphinxSE的文件,是mysql的引擎文件,放在编译mysql时候进行编译
| |-- pymmseg mmseg提供出来的python接口
| |-- src coreseek源代码目录。核心代码全部在这里
| |-- test 测试代码
| `-- win windows下的工程配置文件
|-- mmseg-3.2.14 mmseg源代码
| |-- config 编译配置文件
| |-- data 词典文件
| |-- python python接口api代码
| |-- ruby ruby接口api代码
| |-- script python的一部分生成字典的脚本
| |-- src mmseg的源代码目录,核心代码都在这里
`-- testpack 测试配置和数据包
|-- api 测试环境需要的api接口和测试脚本
|-- etc 测试环境配置文件
`-- var 测试环境运行数据
7、Csft/src目录下的文件用途说明
csft-3.2.14/src
|-- indexer.cpp 索引程序index的入口主函数
|-- indextool.cpp 工具程序indextool的入口主函数
|-- llsphinxql.c sphinql的语法分析器Flex
|-- md5.cpp 实现md5算法的代码
|-- md5.h 实现md5算法的代码
|-- py_helper.cpp 跟python语言交互的接口代码
|-- py_helper.h 跟python语言交互的接口代码
|-- py_layer.cpp 跟python语言相关的代码
|-- py_layer.h 跟python语言相关的代码
|-- py_source.cpp 跟python语言相关的代码
|-- py_source.h 跟python语言相关的代码
|-- py_sphinx.c 跟python语言相关的代码
|-- py_sphinx_interface.cpp 跟python语言相关的代码
|-- py_sphinx_interface.h 跟python语言相关的代码
|-- search.cpp 工具程序search的入口主函数
|-- searchd.cpp 查询程序searchd的入口主函数
|-- spelldump.cpp 工具程序spelldump的入口主函数
|-- sphinx.cpp 主要的逻辑代码,索引建立合并和查询主要的逻辑都在这里。
|-- sphinx.h
|-- sphinx_internal.h
|-- sphinxcustomsort.inl 支持用户自定义排序的一个文件,用于支持 @custom 的排序方式
|-- sphinxexcerpt.cpp 产生文本摘要和高亮的代码
|-- sphinxexcerpt.h
|-- sphinxexpr.cpp 跟语法分析器有关的代码
|-- sphinxexpr.h 跟语法分析器有关的代码
|-- sphinxexpr.y 语法分析器yacc的输入文件
|-- sphinxfilter.cpp sphinx过滤器filter的实现代码
|-- sphinxfilter.h
|-- sphinxmetaphone.cpp 实现Metaphone算法的代码,它是一种基于音标的词干组织法。
|-- sphinxql.l sphinxql的语法分析器lex的输入文件
|-- sphinxql.y sphinxql的语法yacc的输入文件
|-- sphinxquery.cpp sphinx查询语句的解析代码,对查询语句进行解析,并生成语法分析树
|-- sphinxquery.h
|-- sphinxquery.y sphinxql的语法yacc的输入文件
|-- sphinxselect.y sphinxql的语法yacc的输入文件
|-- sphinxsort.cpp 排序算法实现代码
|-- sphinxsoundex.cpp 语音编码算法代码
|-- sphinxstd.cpp 一部分通用的代码,如lock锁,Mutex,随机器等封装好的代码。
|-- sphinxstd.h
|-- sphinxstem.h 词干提炼代码的头文件
|-- sphinxstemcz.cpp 捷克语词干的提炼代码
|-- sphinxstemen.cpp 英语的词干提炼代码
|-- sphinxstemru.cpp 俄语的词干提炼代码
|-- sphinxstemru.inl 俄语的词干提炼代码
|-- sphinxtimers.h 计时器代码,这个是用来做sphinx内部性能分析用,看耗时主要在哪部分
|-- sphinxutils.cpp 对配置文件进行解析的代码
|-- sphinxutils.h
|-- sphinxversion.h 定义sphinx版本的宏
|-- tests.cpp 对分词器进行测试的代码
|-- tokenizer_zhcn.cpp 中文分词器的实现代码
|-- tokenizer_zhcn.h 中文分词器的实现代码
|-- yy.cmd 后面这部分yyxxx.xx的文件都是跟语法分析器相关的文件,不再一一分析。
|-- yysphinxexpr.c 跟语法分析器相关的文件
|-- yysphinxexpr.h 跟语法分析器相关的文件
|-- yysphinxql.c 跟语法分析器相关的文件
|-- yysphinxql.h 跟语法分析器相关的文件
|-- yysphinxquery.c 跟语法分析器相关的文件
|-- yysphinxquery.h 跟语法分析器相关的文件
|-- yysphinxselect.c 跟语法分析器相关的文件
`-- yysphinxselect.h 跟语法分析器相关的文件
8、CoreSeek详细安装
参考:http://www.coreseek.cn/products/products-install/
安装前,请查看以下列表对应操作系统页面,安装需要预先安装的软件,以便后续安装测试可正常进行!
m4 >= 1.4.13
autoconf >= 2.65
automake >= 1.11
libtool >= 2.2.6b
##一、基础安装:(此时尚不支持MySQL,完成第二步数据源支持后就支持)
##完成后:提供xml数据源支持,中文检索支持
##
##download http://www.coreseek.cn/uploads/csft/3.2/coreseek-3.2.14.tar.gz
$ tar xzvf coreseek-3.2.14.tar.gz
$ 请点击仔细查看README.txt
##切换到root用户,确保拥有完整的权限来安装软件
$ su root
##或者
$ sudo root bash
$ su -
$ cd coreseek-3.2.14
##中文测试环境检查:
$ locale
##以下为核心项,locale为zh_CN.UTF-8,就可以正常显示和输入中文;locale设置功能由操作系统自身支持,BSD/Linux均可开启;该功能,不是coreseek提供的!!!
##如果不能正常显示中文,则后面的中文测试部分无法正常进行,但不会影响coreseek的实际功能;
LANG=zh_CN.UTF-8
LC_ALL="zh_CN.UTF-8"
##如果显示的不是zh_CN.UTF-8,请参考以下网址进行设置:
##locale设置 http://www.baidu.com/s?wd=linux+locale%C9%E8%D6%C3
##命令行显示中文 http://www.baidu.com/s?wd=linux+%C3%FC%C1%EE%D0%D0%CF%D4%CA%BE%D6%D0%CE%C4
##putty显示中文 http://www.baidu.com/s?wd=putty+%CF%D4%CA%BE%D6%D0%CE%C4
##SecureCRT显示中文 http://www.baidu.com/s?wd=securecrt+%CF%D4%CA%BE%D6%D0%CE%C4
##确保可以正常显示,否则请检查当前环境的locale配置,以及当前环境或者客户端已设置好支持UTF-8中文字符显示
$ cat testpack/var/test/test.xml
##安装coreseek开发的mmseg,为coreseek提供中文分词功能
$ cd mmseg-3.2.14
##ubuntu环境下,需要使用ACLOCAL_FLAGS="-I /usr/share/aclocal" ./bootstrap
$ ./bootstrap
$ ./configure --prefix=/usr/local/mmseg3
$ make && make install
##如果提示libtool: unrecognized option `--tag=CC' ,请查看libtool问题解决方案 http://www.coreseek.cn/products-install/faq/#qa24
##安装完成后,mmseg使用的词典和配置文件,将自动安装到/usr/local/mmseg3/etc中
##中文分词测试,如果显示不正常,请检查当前环境下的locale和UTF-8中文字符显示设置
$ /usr/local/mmseg3/bin/mmseg -d /usr/local/mmseg3/etc src/t1.txt
中文/x 分/x 词/x 测试/x
中国人/x 上海市/x
Word Splite took: 1 ms.
##安装coreseek:
$ cd csft-3.2.14
##执行configure,进行编译配置:
$ sh buildconf.sh
$ ./configure --prefix=/usr/local/coreseek --without-python --without-unixodbc --with-mmseg --with-mmseg-includes=/usr/local/mmseg3/include/mmseg/ --with-mmseg-libs=/usr/local/mmseg3/lib/ --without-mysql
##coreseek4.x/sphinx1.x,请将--without-mysql更改为--with-mysql
$ make && make install
##如果提示mysql问题,可以查看MySQL数据源安装说明 http://www.coreseek.cn/product_install/install_on_bsd_linux/#mysql
##可能遇到的问题:
##如果提示libtool: unrecognized option `--tag=CC' ,请查看libtool问题解决方案 http://www.coreseek.cn/products-install/faq/#qa24
##有的系统下可能出现:expected `;' before ‘CSphTokenizer_UTF8SpaceSeg’,
##或者出现:configure: WARNING: unrecognized options: --with-mmseg, --with-mmseg-includes, --with-mmseg-libs
##是因为你没有进行随后的sh buildconf.sh操作
##生成当前系统对应的编译配置文件
##需要使用以下指令:
$ sh buildconf.sh
## Linux环境下,如遇到pthread问题,请先直接执行以下指令在进行configur:
$ LD_LIBRARY_PATH=$LD_LIBRARY_PATH:/usr/local/lib
$ export LD_LIBRARY_PATH
## 如果出现undefined reference to `libiconv'的类似错误,可以按照如下方法处理:
##方法一:(Linux使用)
## 直接执行:export LIBS="-liconv"
##然后再次configure后,进行编译安装make && make install
## 方法二:
## 首先configure,然后vim src/makefile
## 在其中搜索lexpat,在其后加上 -liconv
## 修改后该行应该为:-lexpat -liconv -L/usr/local/lib
## 然后再次make && make install
## 方法三:
## 首先configure,然后vim config/config.h
## 在其中搜索USE_LIBICONV,将其后的1修改为0
## 然后再次make && make install
##配置测试,测试是否可以正确运行
$ /usr/local/coreseek/bin/indexer -c /usr/local/coreseek/etc/sphinx-min.conf.dist
##以下为正常测试时的提示信息:
Coreseek Fulltext 3.2 [ Sphinx 0.9.9-release (r2117)]
Copyright (c) 2007-2010,
Beijing Choice Software Technologies Inc (http://www.coreseek.com)
using config file '/usr/local/coreseek/etc/sphinx-min.conf.dist'...
total 0 reads, 0.000 sec, 0.0 kb/call avg, 0.0 msec/call avg
total 0 writes, 0.000 sec, 0.0 kb/call avg, 0.0 msec/call avg
##
##csft-4.0版显示:ERROR: nothing to do.
##
##至此,coreseek基础环境可以正常安装,我们可以开始后续的工作啦。
##注意:基础环境仅支持xml数据源;如需要mysql或者python数据源,请继续按照下面的步骤操作!!!
##二、数据源支持:支持MySQL数据源
##完成后:提供mysql数据源支持和xml数据源支持
##系统需要安装相关的基础依赖库,否则无法支持对应的功能
##freebsd6/7/8:
$ pkg_add -r mysql50-client libxml2 expat
##centos5.4/5.5: fedora12/13 : rhel5.5
$ yum install mysql-devel libxml2-devel expat-devel
##debian5 : ubuntu9/10:
$ apt-get install mysql-client libmysqlclient15-dev libxml2-dev libexpat1-dev
##gentoo10:
##安装环境自带了libmysqlclient libxml2 libexpat
##opensuse10/11:
##yast安装 libmysqlclient-devel libxml2 libxml2-devel libexpat-devel
##slackware13.0/13.1:
$ slapt-get --install mysql libxml2 expat
##archlinux-2010:
$ pacman -S libmysqlclient libxml2 expat
##重新编译安装coreseek,以支持mysql数据源和xml数据源
$ cd csft-3.2.14
$ make clean
$ ./configure --prefix=/usr/local/coreseek --without-unixodbc --with-mmseg --with-mmseg-includes=/usr/local/mmseg3/include/mmseg/ --with-mmseg-libs=/usr/local/mmseg3/lib/ --with-mysql
##以上configure参数请正确拷贝,不要遗漏或者随意修改
$ make && make install
##如果出现错误提示:“ERROR: cannot find MySQL include files.......To disable MySQL support, use --without-mysql option.“,可按照如下方法处理:
##请找到头文件mysql.h所在的目录,一般是/usr/local/mysql/include,请替换为实际的
##请找到库文件libmysqlclient.a所在的目录,一般是/usr/local/mysql/lib,请替换为实际的
##configure参数加上:--with-mysql-includes=/usr/local/mysql/include --with-mysql-libs=/usr/local/mysql/lib,执行后,重新编译安装
##三、coreseek中文全文检索测试
$ cd testpack
$ /usr/local/coreseek/bin/indexer -c etc/csft.conf
##以下为正常情况下的提示信息:
Coreseek Fulltext 3.2 [ Sphinx 0.9.9-release (r2117)]
Copyright (c) 2007-2010,
Beijing Choice Software Technologies Inc (http://www.coreseek.com)
using config file 'etc/csft.conf'...
total 0 reads, 0.000 sec, 0.0 kb/call avg, 0.0 msec/call avg
total 0 writes, 0.000 sec, 0.0 kb/call avg, 0.0 msec/call avg
##
##csft-4.0版显示:ERROR: nothing to do.
##
$ /usr/local/coreseek/bin/indexer -c etc/csft.conf --all
##以下为正常索引全部数据时的提示信息:(csft-4.0版类似)
Coreseek Fulltext 3.2 [ Sphinx 0.9.9-release (r2117)]
Copyright (c) 2007-2010,
Beijing Choice Software Technologies Inc (http://www.coreseek.com)
using config file 'etc/csft.conf'...
indexing index 'xml'...
collected 3 docs, 0.0 MB
sorted 0.0 Mhits, 100.0% done
total 3 docs, 7585 bytes
total 0.075 sec, 101043 bytes/sec, 39.96 docs/sec
total 2 reads, 0.000 sec, 5.6 kb/call avg, 0.0 msec/call avg
total 7 writes, 0.000 sec, 3.9 kb/call avg, 0.0 msec/call avg
$ /usr/local/coreseek/bin/indexer -c etc/csft.conf xml
##以下为正常索引指定数据时的提示信息:(csft-4.0版类似)
Coreseek Fulltext 3.2 [ Sphinx 0.9.9-release (r2117)]
Copyright (c) 2007-2010,
Beijing Choice Software Technologies Inc (http://www.coreseek.com)
using config file 'etc/csft.conf'...
indexing index 'xml'...
collected 3 docs, 0.0 MB
sorted 0.0 Mhits, 100.0% done
total 3 docs, 7585 bytes
total 0.069 sec, 109614 bytes/sec, 43.35 docs/sec
total 2 reads, 0.000 sec, 5.6 kb/call avg, 0.0 msec/call avg
total 7 writes, 0.000 sec, 3.9 kb/call avg, 0.0 msec/call avg
$ /usr/local/coreseek/bin/search -c etc/csft.conf
##以下为正常测试搜索时的提示信息:(csft-4.0版类似)
Coreseek Fulltext 3.2 [ Sphinx 0.9.9-release (r2117)]
Copyright (c) 2007-2010,
Beijing Choice Software Technologies Inc (http://www.coreseek.com)
using config file 'etc/csft.conf'...
index 'xml': query '': returned 3 matches of 3 total in 0.093 sec
displaying matches:
1. document=1, weight=1, published=Thu Apr 1 22:20:07 2010, author_id=1
2. document=2, weight=1, published=Thu Apr 1 23:25:48 2010, author_id=1
3. document=3, weight=1, published=Thu Apr 1 12:01:00 2010, author_id=2
words:
$ /usr/local/coreseek/bin/search -c etc/csft.conf -a Twittter和Opera都提供了搜索服务
##以下为正常测试搜索关键词时的提示信息:(csft-4.0版类似)
Coreseek Fulltext 3.2 [ Sphinx 0.9.9-release (r2117)]
Copyright (c) 2007-2010,
Beijing Choice Software Technologies Inc (http://www.coreseek.com)
using config file 'etc/csft.conf'...
index 'xml': query 'Twittter和Opera都提供了搜索服务 ': returned 3 matches of 3 total in 0.038 sec
displaying matches:
1. document=3, weight=24, published=Thu Apr 1 12:01:00 2010, author_id=2
2. document=1, weight=4, published=Thu Apr 1 22:20:07 2010, author_id=1
3. document=2, weight=3, published=Thu Apr 1 23:25:48 2010, author_id=1
words:
1. 'twittter': 1 documents, 3 hits
2. '和': 3 documents, 15 hits
3. 'opera': 1 documents, 25 hits
4. '都': 2 documents, 4 hits
5. '提供': 0 documents, 0 hits
6. '了': 3 documents, 18 hits
7. '搜索': 2 documents, 5 hits
8. '服务': 1 documents, 1 hits
$ /usr/local/coreseek/bin/searchd -c etc/csft.conf
##以下为正常开启搜索服务时的提示信息:(csft-4.0版类似)
Coreseek Fulltext 3.2 [ Sphinx 0.9.9-release (r2117)]
Copyright (c) 2007-2010,
Beijing Choice Software Technologies Inc (http://www.coreseek.com)
using config file 'etc/csft.conf'...
listening on all interfaces, port=9312
##如要停止搜索服务,请使用/usr/local/coreseek/bin/searchd -c etc/csft.conf --stop
##如要已启动服务,要更新索引,请使用/usr/local/coreseek/bin/indexer -c etc/csft.conf --all --rotate
##然后,请参考csft-3.2.14下api目录中的相关文件,使用PHP、Python、Ruby、Java来测试搜索服务;也可以前往< ahref="/products-install/step_by_step/">搜索服务建立三步曲,查看第三步使用PHP测试。
##四、继续
##通过以上步骤,coreseek已经安装测试完成,可以提供正常的xml数据源索引以及提供对应的搜索服务了
##下一步工作,请查看手册,准备好mysql数据信息,以及进行mysql数据源的测试,并在您的应用中调用搜索服务;mysql数据源的配置可参考testpack/etc/csft_mysql.conf文件
##五 然后建立命令快捷方式,方便使用
sudo ln -s /usr/local/coreseek/bin/indexer /usr/local/bin/indexer
sudo ln -s /usr/local/coreseek/bin/indextool /usr/local/bin/indextool
sudo ln -s /usr/local/coreseek/bin/search /usr/local/bin/search
sudo ln -s /usr/local/coreseek/bin/searchd /usr/local/bin/searchd
sudo ln -s /usr/local/coreseek/bin/spelldump /usr/local/bin/spelldump
##六 生成字典文件
cd 到 coreseek-3.2.14/mmseg-3.2.14/data (该路径为你下载下来的coreseek的tar包,解压后的文件夹),在该文件夹内调用命令:/usr/local/mmseg3/bin/mmseg -u unigram.txt,将会在unigram.txt所在目录中产生一个名为unigram.txt.uni的文件,将该文件改名为uni.lib,然后将该重命名后的文件copy到 /usr/local/coreseek文件夹下的一个叫做dict的文件夹内,如果没有该dict文件夹的话,手动的创建一个。这个就是字典文件所在的位置。
##七 在ROR项目中使用sphinx
前面说过,在ROR项目中,有两个gem可以使用,thinking_sphinx和ultrasphinx,这两个文件都是sphinx对ROR项目的接口实现,我们可以通过这两个接口来实现sphinx的全文索引。
a)先说ultrasphinx,这个的配置很简单:
在项目的根下执行 rake ultrasphinx:bootstrap
这个命令会copy一个 default.base文件并重命名为development.base 或者production.base(具体看是在development环境还是在production环境),然后进入到
project/config/ultrasphinx目录,修改这个development.base或是production.base,参考样例:
<% path = '/usr/local/coreseek/' %>
#path 为刚才我们copy字典文件dict的上一层目录
# Indexing options
indexer
{
mem_limit = 256M
# Ultrasphinx-specific key
delta = <%= 1.day + 30.minutes %>
}
# Daemon options
searchd
{
# What interface the search daemon should listen on and where to store its logs
address = 127.0.0.1
port = 3313
seamless_rotate = 1
log = <%= path %>log/searchd.log
query_log = <%= path %>log/query.log #一般放到项目里面一个可写的目录里面
read_timeout = 5
max_children = 300
pid_file = <%= path %>log/searchd.pid
max_matches = 100000
}
# Client options
client
{
# Name of the Aspell dictionary (two letters max)
dictionary_name = ap
# How your application connects to the search daemon (not necessarily the same as above)
server_host = localhost
server_port = 3313
}
# Individual SQL source options
source
{
sql_ranged_throttle = 0
sql_range_step = 5000
sql_query_post =
}
# Index building options
index
{
path = <%= path %>
docinfo = extern # Just leave this alone
morphology = stem_en
stopwords = # <%= path %>/ap-stopwords.txt
min_word_len = 1
# HTML-specific options
html_strip = 0
html_index_attrs =
# Enable these if you need wildcard searching. They will slow down indexing significantly.
# min_infix_len = 1
# enable_star = 1
charset_type = zh_cn.utf-8 #utf-8 or sbcs (Single Byte Character Set)
charset_dictpath = <%= path %>/dict #指定字典文件的字符集
}
运行 rake ultrasphinx:configure 生成配置文件development.conf或者production.conf
运行 rake ultrasphinx:index 生成索引文件
运行 rake ultrasphinx:daemon:start 开启searchd服务
b)现在说thinking_sphinx
thinking_sphinx的配置相对于ultrasphinx更简单
cd到项目目录project/config 编辑 sphinx.yml文件:
development:
address: 127.0.0.1
port: 3313
bin_path: "/usr/local/bin/"
searchd_binary_name: "searchd"
indexer_binary_name: "indexer"
charset_type: zh_cn.utf-8
charset_dictpath: /usr/local/coreseek/dict #指定字典嗯见所在路径
然后在项目的根目录:
rake thinking_sphinx:configure 生成配置文件development.conf或者production.conf
rake thinking_sphinx:index 建立索引文件
rake thinking_sphinx:start 开启searchd服务进程