Struts 2 自学之路: 1 准备工作及helloworld
内容简介:
本篇介绍如何在eclipse+myeclipse下搭建出使用struts2开发的环境
以及带领你创建一个小程序(标题的helloword是用来表示第一个小程序)
1 搭建开发和运行环境
java sdk(JDK) 1.5 以上
tomcat 5.5 以上
eclipse 3.2 以上
myeclipse 5.0 以上
struts2 的运行库(jar包) 在http://struts.apache.org/ 可以得到,
我的环境是 jdk 1.5, tomcat 5.5 , eclipse 3.2.1 , myeclipse 5.1GA
2 打开Eclipse选择新建项目,新建一个web project
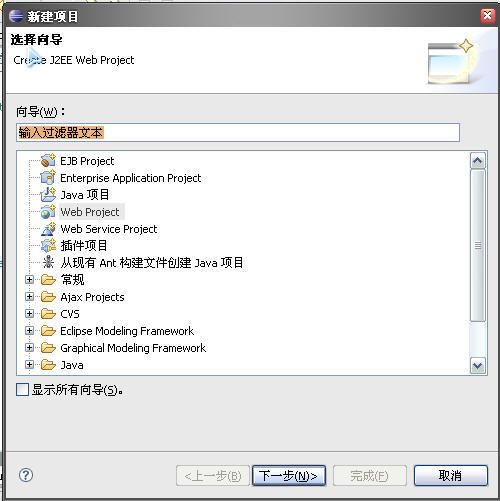
选中Web Project 点下一步打开下面一个窗口
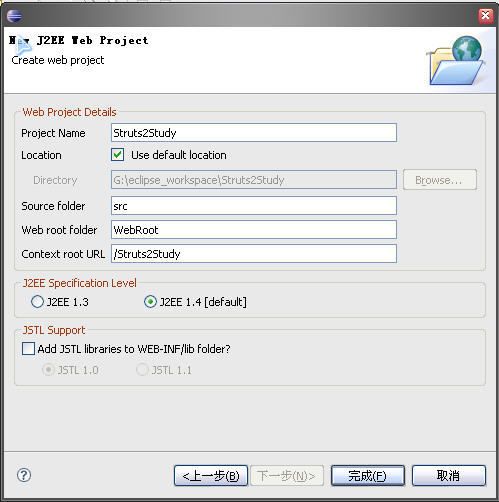
在Project Name 项键入 Struts2Study 点击完成
配置tomcat,按照图中提示进行

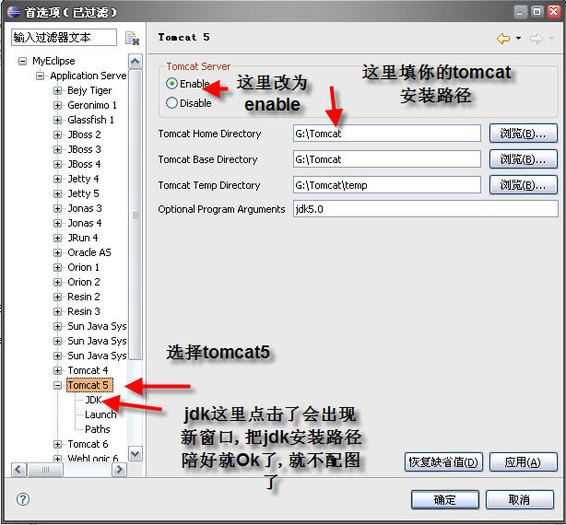
然后布置项目到tomcat,按图提示操作

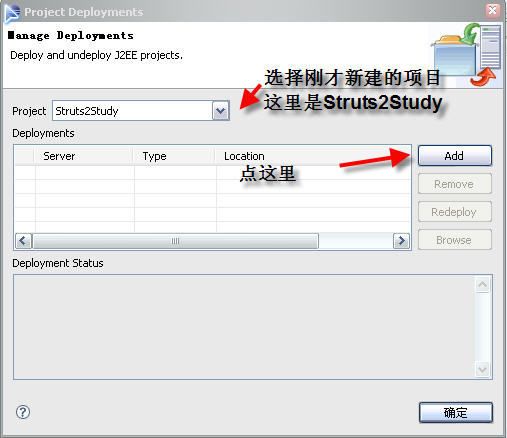
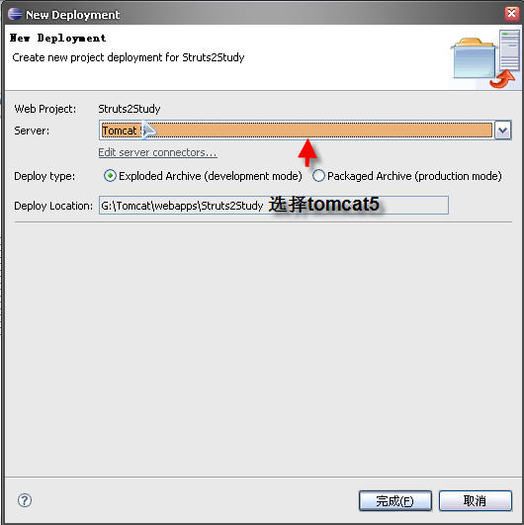
最后回到上面点add按钮那里,这时点完成
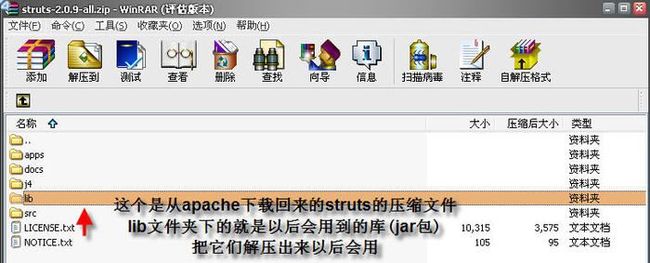
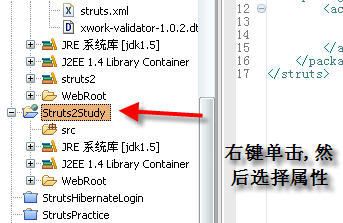
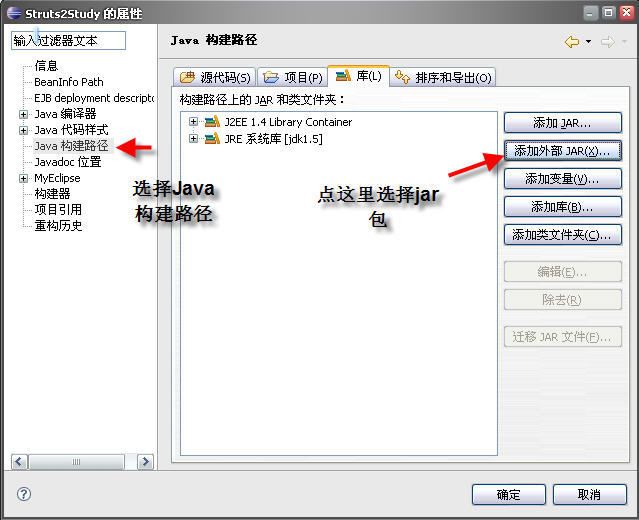
加入struts2的库(jar包)到构建路径
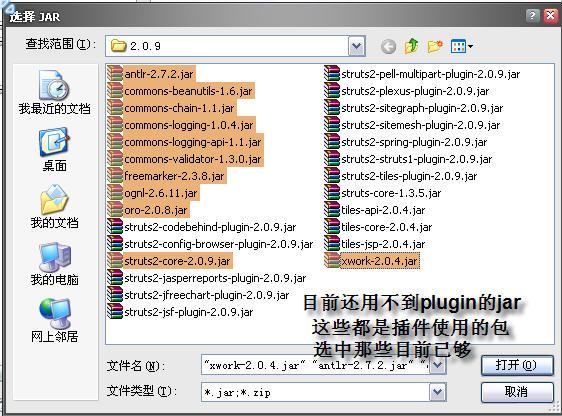
打开web.xml,修改其为以下代码
web.xml 代码
在scr目录下新建struts.xml
一定要在src目录下创建,原因以后会提
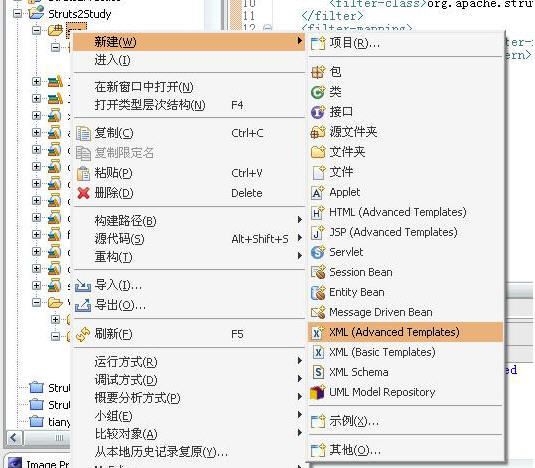
在struts.xml中键入
struts.xml 代码
接下来新建一个jsp为index.jsp
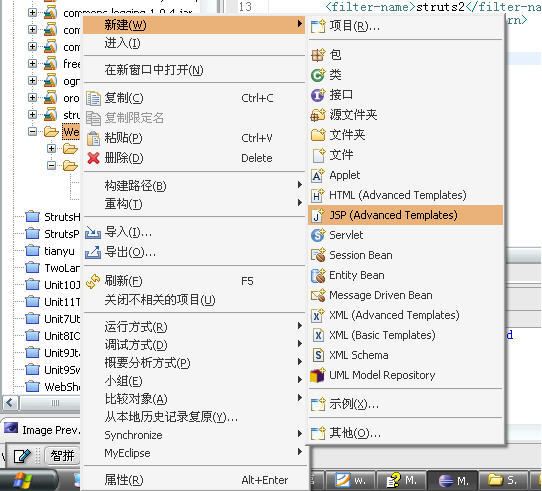
在jsp中编写一个标准的登录表单
index.jsp 代码
接下来我们再新建两个jsp,一个为error.jsp,一个为welcome.jsp
error.jsp内只需要失败的文本,welcome.jsp只需要成功的文本
welcome.jsp 代码
error.jsp 代码
恩,重点来了,接下来就是编写struts2的action和配置struts.xml文件了
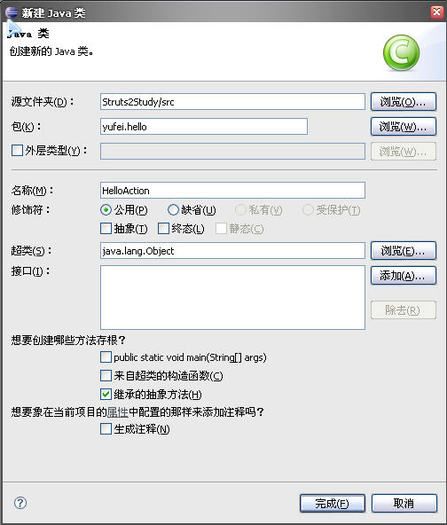
首先我们先建立一个java文件(新建->类)
如下图,包名yufei.hello,类名HelloAction
HelloAction.java 代码
该类就是一个action,Struts 2.0的Action无须实现任何接口或继承任何类型
接下来修改struts.xml
struts.xml 代码
到目前为止,我们的第一个struts2的程序已经写完了,现在我们来启动tomcat来测试我们的程序了
图片中的端口是8888,而tomcat的默认端口是8080,如果你没有修改端口,请使用8080

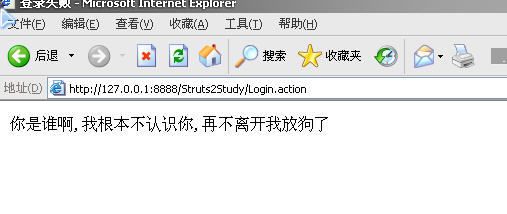
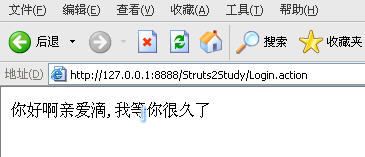
在用户名中输入yufei以外的任何字符串或者不输入都会跳转到error.jsp
这是因为我在execute方法里判断用户名时是yufei,返回的是字符串"success",而在struts.xml里配置的是跳转到welcome.jsp
而此外的所有情况都是返回字符串"error",而在struts.xml里配置的是跳转到error.jsp
此篇文章项目文件在附件中
关于action以及struts.xml的详细说明在以后的文章中
PS:
写这么个简单得不能再简单的文章也居然用了我将近三个小时.....
而且这文章结构还是我都已经想好的情况下现在我对那些在网上写教程的人更加感激了
本篇介绍如何在eclipse+myeclipse下搭建出使用struts2开发的环境
以及带领你创建一个小程序(标题的helloword是用来表示第一个小程序)
1 搭建开发和运行环境
java sdk(JDK) 1.5 以上
tomcat 5.5 以上
eclipse 3.2 以上
myeclipse 5.0 以上
struts2 的运行库(jar包) 在http://struts.apache.org/ 可以得到,
我的环境是 jdk 1.5, tomcat 5.5 , eclipse 3.2.1 , myeclipse 5.1GA
2 打开Eclipse选择新建项目,新建一个web project

选中Web Project 点下一步打开下面一个窗口

在Project Name 项键入 Struts2Study 点击完成
配置tomcat,按照图中提示进行


然后布置项目到tomcat,按图提示操作


最后回到上面点add按钮那里,这时点完成
加入struts2的库(jar包)到构建路径


打开web.xml,修改其为以下代码
web.xml 代码
<?xml version="1.0" encoding="UTF-8"?>
<web-app version="2.4"
	xmlns="http://java.sun.com/xml/ns/j2ee"
	xmlns:xsi="http://www.w3.org/2001/XMLSchema-instance"
	xsi:schemaLocation="http://java.sun.com/xml/ns/j2ee
	http://java.sun.com/xml/ns/j2ee/web-app_2_4.xsd">
    <display-name>Struts 2.0 Hello World</display-name>
    <filter>
        <filter-name>struts2</filter-name>
        <filter-class>org.apache.struts2.dispatcher.FilterDispatcher</filter-class>
    </filter>
    <filter-mapping>
        <filter-name>struts2</filter-name>
        <url-pattern>/*</url-pattern>
    </filter-mapping>
</web-app>
在scr目录下新建struts.xml
一定要在src目录下创建,原因以后会提

在struts.xml中键入
struts.xml 代码
<?xml version="1.0" encoding="GBK"?>
<!DOCTYPE struts PUBLIC
"-//Apache Software Foundation//DTD Struts Configuration 2.0//EN"
"http://struts.apache.org/dtds/struts-2.0.dtd">
<struts>
</struts>
接下来新建一个jsp为index.jsp

在jsp中编写一个标准的登录表单
index.jsp 代码
<%@ page language="java" import="java.util.*" pageEncoding="GB18030"%>

<!DOCTYPE HTML PUBLIC "-//W3C//DTD HTML 4.01 Transitional//EN">
<html>
  <head>
    <title>第一个Struts程序</title>
  </head>

  <body>
	<form action="Login.action" method="post">
    	<table align="center">
    	<caption><h3>用户登录</h3></caption>
    		<tr>
    			<td>用户名:<input type="text" name="username"/></td>
    		</tr>
    		<tr>
    			<td>密  码:<input type="text" name="password"/></td>
    		</tr>
    		<tr align="center">
    			<td colspan="2"><input type="submit" value="登录"/>
    			<input type="reset" value="重填"/></td>
    		</tr>
    	</table>
    </form>
  </body>
</html>
接下来我们再新建两个jsp,一个为error.jsp,一个为welcome.jsp
error.jsp内只需要失败的文本,welcome.jsp只需要成功的文本
welcome.jsp 代码
<%@ page language="java" import="java.util.*" pageEncoding="GB18030"%>

<!DOCTYPE HTML PUBLIC "-//W3C//DTD HTML 4.01 Transitional//EN">
<html>
  <head>
    <title>登录成功</title>
  </head>

  <body>
    你好啊亲爱滴,我等你很久了
  </body>
</html>
error.jsp 代码
<%@ page language="java" import="java.util.*" pageEncoding="GB18030"%>

<!DOCTYPE HTML PUBLIC "-//W3C//DTD HTML 4.01 Transitional//EN">
<html>
  <head>
    <title>登录失败</title>
  </head>

  <body>
    你是谁啊,我根本不认识你,再不离开我放狗了
  </body>
</html>
恩,重点来了,接下来就是编写struts2的action和配置struts.xml文件了
首先我们先建立一个java文件(新建->类)
如下图,包名yufei.hello,类名HelloAction

HelloAction.java 代码
package yufei.hello;

public class HelloAction
	{
	private String username;
	private String password;
	public String getPassword()
		{
		return password;
		}
	public void setPassword(String password)
		{
		this.password = password;
		}
	public String getUsername()
		{
		return username;
		}
	public void setUsername(String username)
		{
		this.username = username;
		}
	public String execute()
		{
		String strReturn = "error";
		if (username.equals("yufei"))
			strReturn = "success";
		return strReturn;
		}
	}
该类就是一个action,Struts 2.0的Action无须实现任何接口或继承任何类型
接下来修改struts.xml
struts.xml 代码
<?xml version="1.0" encoding="GBK"?>
<!DOCTYPE struts PUBLIC
	"-//Apache Software Foundation//DTD Struts Configuration 2.0//EN"
	"http://struts.apache.org/dtds/struts-2.0.dtd">
<struts>
	<!-- 这里是添加的内容 -->
	<package name="yufei.hello" extends="struts-default">
		<action name="Login" class="yufei.hello.HelloAction">
			<result name="error">/error.jsp</result>
			<result name="success">/welcome.jsp</result>
		</action>
	</package>
</struts>
到目前为止,我们的第一个struts2的程序已经写完了,现在我们来启动tomcat来测试我们的程序了
图片中的端口是8888,而tomcat的默认端口是8080,如果你没有修改端口,请使用8080


在用户名中输入yufei以外的任何字符串或者不输入都会跳转到error.jsp
这是因为我在execute方法里判断用户名时是yufei,返回的是字符串"success",而在struts.xml里配置的是跳转到welcome.jsp
而此外的所有情况都是返回字符串"error",而在struts.xml里配置的是跳转到error.jsp
此篇文章项目文件在附件中
关于action以及struts.xml的详细说明在以后的文章中
PS:
写这么个简单得不能再简单的文章也居然用了我将近三个小时.....
而且这文章结构还是我都已经想好的情况下现在我对那些在网上写教程的人更加感激了