jira 4.0.2 的详细安装+破解
准备条件:
环境变量:JAVA_HOME=C:\jdk1.6.0_10(注意jdk版本>=此版本)
第一步:下载jira http://www.atlassian.com/software/jira/downloads/binary/atlassian-jira-enterprise-4.0.2-standalone.zip,解压 to E:/jira
第二步:下载Mysql http://download.mysql.cn/download_file/zip/5.0/mysql-5.0.18-win32.zip 创建数据库:(SID :jiradb,默认用户root,密码:123456)
第三步:下载mysql jdbc驱动,看附件 mysql-connector-java-3.1.14-bin.jar ,复制到 E:\jira\common\lib 目录中
第四步:下载附件jira_crack.rar(108.6 KB),解压出来为:atlassian-jira 文件夹,然后覆盖 E:\jira\atlassian-jira,
第五步:直接复制下面代码覆盖E:\jira\conf\server.xml
第六步:目录 E:\jira\atlassian-jira\WEB-INF\classes\entityengine.xml文件中的 <datasource name="defaultDS" field-type-name="hsql"........</datasource> 用以下代码替换:
第七步:
启动 E:\jira\bin\startup.bat,
登录:http://localhost:8080/
在页面下部有输入授权码的地方:
复制以下代码: 特别注意,复制出来每行前边如果有‘#’,要去掉,每行结束有看不见的空格,要去掉,否则 非法的授权码。
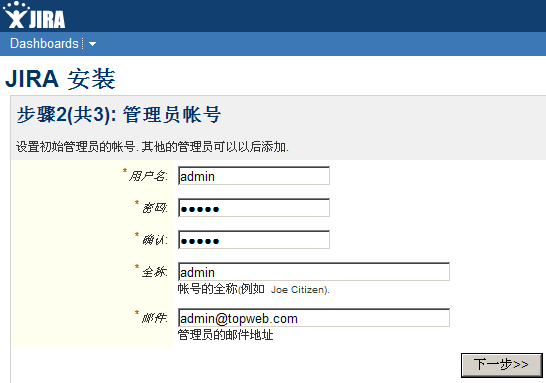
点击 “下一步”,到步骤二
页面如下:

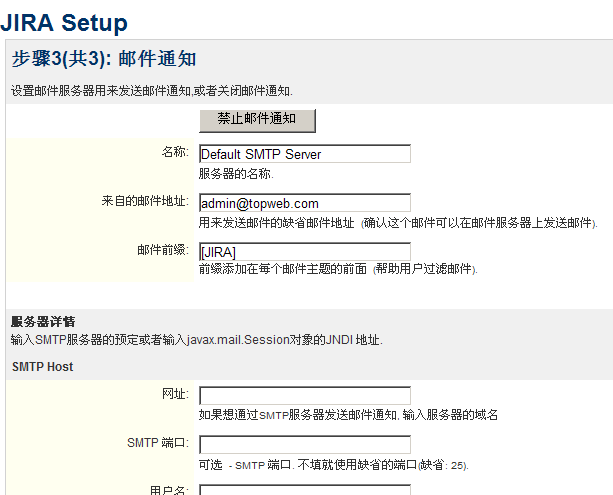
点击:“下一步”,页面如下:

完成,可以登录了。
参考资料: http://www.blogjava.net/haha1903/archive/2009/11/01/300609.html
http://hi.baidu.com/ostech/blog/item/f5b4941a1ab4f60c34fa4159.html
环境变量:JAVA_HOME=C:\jdk1.6.0_10(注意jdk版本>=此版本)
第一步:下载jira http://www.atlassian.com/software/jira/downloads/binary/atlassian-jira-enterprise-4.0.2-standalone.zip,解压 to E:/jira
第二步:下载Mysql http://download.mysql.cn/download_file/zip/5.0/mysql-5.0.18-win32.zip 创建数据库:(SID :jiradb,默认用户root,密码:123456)
第三步:下载mysql jdbc驱动,看附件 mysql-connector-java-3.1.14-bin.jar ,复制到 E:\jira\common\lib 目录中
第四步:下载附件jira_crack.rar(108.6 KB),解压出来为:atlassian-jira 文件夹,然后覆盖 E:\jira\atlassian-jira,
第五步:直接复制下面代码覆盖E:\jira\conf\server.xml
<Server port="8005" shutdown="SHUTDOWN">
<Service name="Catalina">
<Connector port="8080"
maxHttpHeaderSize="8192" maxThreads="150" minSpareThreads="25" maxSpareThreads="75" useBodyEncodingForURI="true"
enableLookups="false" redirectPort="8443" acceptCount="100" connectionTimeout="20000" disableUploadTimeout="true" />
<Engine name="Catalina" defaultHost="localhost">
<Host name="localhost" appBase="webapps" unpackWARs="true" autoDeploy="true">
<Context path="" docBase="${catalina.home}/atlassian-jira" reloadable="false">
<!--Resource name="jdbc/JiraDS" auth="Container" type="javax.sql.DataSource"
username="sa"
password=""
driverClassName="org.hsqldb.jdbcDriver"
url="jdbc:hsqldb:${catalina.home}/database/jiradb"
minEvictableIdleTimeMillis="4000"
timeBetweenEvictionRunsMillis="5000"
maxActive="20" /-->
<Resource name="jdbc/JiraDS" auth="Container" type="javax.sql.DataSource"
username="root"
password="123456"
driverClassName="com.mysql.jdbc.Driver"
url="jdbc:mysql://localhost/jiradb?autoReconnect=true&useUnicode=true&characterEncoding=UTF8"
maxActive="20" />
<!-- NOTE: When a database server reboots or their is a network failure all the connections in the
* connection pool are broken and normally this requires a Application Server reboot. If you include the
* parameter validationQuery="{QUERY FOR YOUR DB HERE} as show below a new connection is created to replace it.
* For more information see http://confluence.atlassian.com/display/JIRA/Surviving+Connection+Closures
*
* validationQuery="Select 1"
-->
<!-- NOTE: If you use a database other than hsqldb:
* delete the minEvictableIdleTimeMillis and timeBetweenEvictionRunsMillis attributes
* change the database type in atlassian-jira/WEB-INF/classes/entityengine.xml
-->
<Resource name="UserTransaction" auth="Container" type="javax.transaction.UserTransaction"
factory="org.objectweb.jotm.UserTransactionFactory" jotm.timeout="60"/>
<Manager pathname=""/>
</Context>
</Host>
<!--
Enable access logging.
This should produce access_log.<date> files in the 'logs' directory.
The output access log lies has the following fields :
IP Request_Id User Timestamp "HTTP_Method URL Protocol_Version" HTTP_Status_Code ResponseSize_in_Bytes RequestTime_In_Millis Referer User_Agent ASESSIONID
eg :
192.168.3.238 1243466536012x12x1 admin [28/May/2009:09:22:17 +1000] "GET /jira/secure/admin/jira/IndexProgress.jspa?taskId=1 HTTP/1.1" 200 24267 1070 "http://carltondraught.sydney.atlassian.com:8090/jira/secure/admin/jira/IndexAdmin.jspa" "Mozilla/5.0 (X11; U; Linux x86_64; en-US; rv:1.9.0.10) Gecko/2009042523 Ubuntu/9.04 (jaunty) Firefox/3.0.10" "C2C99B632EE0F41E90F8EF7A201F6A78"
NOTES:
The RequestId is a millis_since_epoch plus request number plus number of concurrent users
The Request time is in milliseconds
The ASESSIONID is an MD5 hash of the JSESSIONID and hence is safe to publish within logs. A session cannot be reconstructed from it.
See http://tomcat.apache.org/tomcat-5.5-doc/config/valve.html for more information on Tomcat Access Log Valves
-->
<Valve className="org.apache.catalina.valves.AccessLogValve" resolveHosts="false"
pattern="%a %{jira.request.id}r %{jira.request.username}r %t "%m %U%q %H" %s %b %D "%{Referer}i" "%{User-Agent}i" "%{jira.request.assession.id}r""/>
</Engine>
<!-- To run JIRA via HTTPS:
* Uncomment the Connector below
* Execute:
%JAVA_HOME%\bin\keytool -genkey -alias tomcat -keyalg RSA (Windows)
$JAVA_HOME/bin/keytool -genkey -alias tomcat -keyalg RSA (Unix)
with a password value of "changeit" for both the certificate and the keystore itself.
* If you are on JDK1.3 or earlier, download and install JSSE 1.0.2 or later, and put the JAR files into
"$JAVA_HOME/jre/lib/ext"
* Restart and visit https://localhost:8443/
For more info, see http://jakarta.apache.org/tomcat/tomcat-5.5-doc/ssl-howto.html
-->
<!--
<Connector port="8443" maxHttpHeaderSize="8192"
maxThreads="150" minSpareThreads="25" maxSpareThreads="75"
enableLookups="false" disableUploadTimeout="true"
acceptCount="100" scheme="https" secure="true"
clientAuth="false" sslProtocol="TLS" useBodyEncodingForURI="true"/>
-->
<!-- To connect to an external web server (typically Apache) -->
<!-- Define an AJP 1.3 Connector on port 8009 -->
<!--
<Connector port="8009"
enableLookups="false" redirectPort="8443" protocol="AJP/1.3" />
-->
</Service>
<Listener className="org.apache.catalina.mbeans.ServerLifecycleListener" />
<Listener className="org.apache.catalina.mbeans.GlobalResourcesLifecycleListener" />
<Listener className="org.apache.catalina.storeconfig.StoreConfigLifecycleListener"/>
</Server>
第六步:目录 E:\jira\atlassian-jira\WEB-INF\classes\entityengine.xml文件中的 <datasource name="defaultDS" field-type-name="hsql"........</datasource> 用以下代码替换:
<datasource name="defaultDS" field-type-name="mysql"
      helper-class="org.ofbiz.core.entity.GenericHelperDAO"
      check-on-start="true"
      use-foreign-keys="false"
      use-foreign-key-indices="false"
      check-fks-on-start="false"
      check-fk-indices-on-start="false"
      add-missing-on-start="true"
      check-indices-on-start="true">
        <jndi-jdbc jndi-server-name="default" jndi-name="java:comp/env/jdbc/JiraDS"/>
<!-- Orion format: <jndi-jdbc jndi-server-name="default" jndi-name="jdbc/JiraDS"/> -->
<!-- JBoss format: <jndi-jdbc jndi-server-name="default" jndi-name="java:/JiraDS"/> -->
<!-- Weblogic format: <jndi-jdbc jndi-server-name="default" jndi-name="JiraDS"/> -->
    </datasource>
第七步:
启动 E:\jira\bin\startup.bat,
登录:http://localhost:8080/
在页面下部有输入授权码的地方:
复制以下代码: 特别注意,复制出来每行前边如果有‘#’,要去掉,每行结束有看不见的空格,要去掉,否则 非法的授权码。
Description=JIRA\: COMMERCIAL
CreationDate=2009-10-25
[email protected]
jira.LicenseEdition=ENTERPRISE
[email protected]
Evaluation=false
jira.LicenseTypeName=COMMERCIAL
jira.active=true
licenseVersion=2
MaintenanceExpiryDate=2010-10-24
Organisation=haha
jira.NumberOfUsers=-1
ServerID=B6FW-B4KW-J1A3-4DQB
LicenseID=LID
LicenseExpiryDate=2010-10-24
PurchaseDate=2009-10-25
点击 “下一步”,到步骤二
页面如下:

点击:“下一步”,页面如下:

完成,可以登录了。
参考资料: http://www.blogjava.net/haha1903/archive/2009/11/01/300609.html
http://hi.baidu.com/ostech/blog/item/f5b4941a1ab4f60c34fa4159.html