下面使用jMaki中的Yahoo Calendar和Yahoo DataTable 来建立一个迷你Blog首页。这个小程序可以在选择日历的某个日期后,Data Table中只列出这个日期所发表的文章。
jMaki中的Yahoo Calendar和Yahoo DataTable 都是Yahoo UI Library 中的控间, jMaki的作用只是在现有的控件之上作了一些包装(wrapper), 这样,这些Widget可以通过jMaki框架进行通讯,通过很少的代码或者配置就可以完成一个功能丰富的应用程序,也就是通常所说的mashup.
使用NetBeans开发迷你Blog首页的步骤
1. NetBeans 菜单”文件”-”新建项目”.在出现的”新建项目”窗口中,”类别”选择”Web”, 项目选择”Web应用程序”.点击”下一步”
2. 在”新建项目窗口中”, “项目名称”中输入”jMakiCalendarTable”项目. 点击”下一步”
3. 在”框架”窗口中,选择”jMaki Ajax Framework” . 点击”完成”.
4. NetBeans 中出现 jMakiCalendarTable 项目的同时,也会出现在”组件面板”中出现jMaki的Widgets, 包括Dojo, Flickr, Google, Yahoo等中的一些Widgets. 如果没有出现”组件面板”, 选择菜单”窗口”-> “组件面板”.
5. 在netBeans中, 用鼠标直接把”jMaki Yahoo”下的Calendar拖到 jMakiCalendarDemo 项目中的index.jsp文件中. 通常日历会放在左侧栏或者右侧栏中. 这个例子中放在<div class="leftSidebar">中.把“jMaki Yahoo“下的”Data Table”拖到“Main Content Area”下。
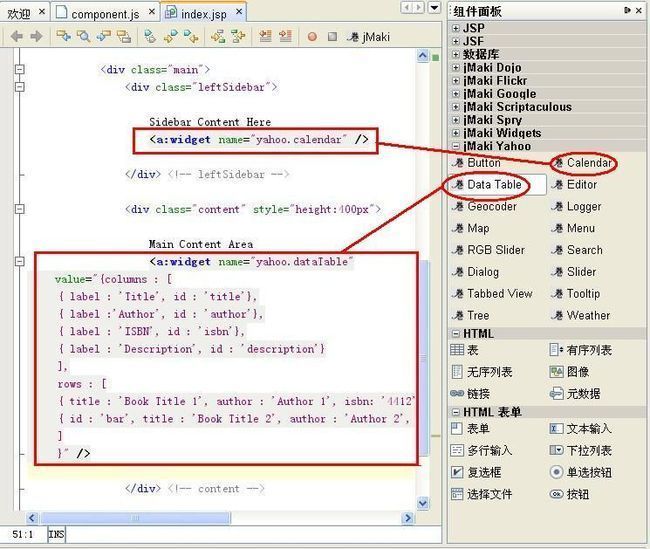
6. 修改index.jsp 中”yahoo.dataTable”的内容
| <a:widget name="yahoo.dataTable" value="{columns : [ { label : 'Post Date', id : 'postdate'}, { label : 'Title', id : 'title'}, { label : 'Author', id : 'author'} ], rows : [ { postdate : '2007/09/07', title : 'NetBeans New and Cool', author : 'Tim Boudreau'}, { postdate : '2007/09/07', title : 'NetBeans Mobility', author : 'Ada Li'}, { postdate : '2007/09/07', title : 'Creating Web 2.0 Rich Internet Applications', author : 'Michael Li'}, { postdate : '2007/09/08', title : 'AJAX and JSF', author : 'Ada Li'}, { postdate : '2007/09/09', title : 'Ruby on Rails in the Enterprise', author : 'Liang Ye'}, { postdate : '2007/09/09', title : 'Beans Binding and the Swing Application Framework', author : 'Joey Shen'} ] }" /> |
7. 初始运行jMakiCalendarTable 结果如下:
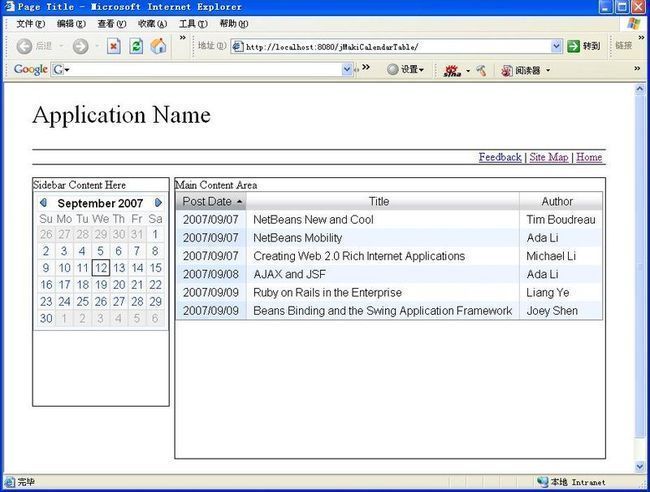
8. 要完成这个迷你Blog首页,要做以下几部分工作
要获得Calendar的日期,根据之前介绍的“发布/订阅机制(publish/subscribe machnism)”, 在index.jsp 的calendar Widget下加入 以下代码<script>代码
 <
div
class
="leftSidebar"
>
<
div
class
="leftSidebar"
>
SidebarContentHere
<
a:widget
name
="yahoo.calendar"
/>
<
div
id
="selected_date"
></
div
>

 <
script
>
...
<
script
>
...

 functionselectCallBack(_req)...{
 vartmp=_req.responseText;
varobj=eval("("+tmp+")");
jmaki.log("tmp"+obj);
jmaki.publish("/table/topic/clear",...{});
jmaki.publish("/table/topic/addRows",obj);
 }
}
functioncalendarListener(item)...{
vartargetDiv=document.getElementById("selected_date");
varselectedDateStr=item.value.getFullYear()
+"/"+(item.value.getMonth()+1)
+"/"+item.value.getDate();
targetDiv.innerHTML=selectedDateStr;
varbackEndUrl="BlogServlet?date="+selectedDateStr;
jmaki.doAjax(...{method:"POST",url:backEndUrl,callback:selectCallBack});
}
jmaki.subscribe("/yahoo/calendar/onSelect",calendarListener);
 </
script
>
</
script
>
</
div
>
<!--
leftSidebar
-->
因为在web/resources/yahoo/calendar/compenent.js中已经发布(publish)了”/yahoo/calendar/onSelect”, 因此在这段JavaScript中可以直接订阅(subscribe)“/yahoo/calendar/onSelect” topic, 这样在选择Calendar的某个日期时,调用函数calendarListener().
函数calendarListener()完成两件事情, 一个是得到Calendar下显示选中的日期,日期格式为“yyyy/mm/dd”,并显示在定义好的<div id="selected_date">中,一个是向服务器端发送AJAX请求, 是用 jmaki.doAjax()函数实现的.
SelectCallBack()函数是AJAX请求返回的回调函数, 得到服务器端返回的信息后, 发布(publish) “"/table/topic/clear"和”/table/topic/addRows”, 并传递了相关参数. 相应地在 yahoo.dataTable 中订阅(subscribe)这些”
topic”
修改dataTable Widget为:
<
a:widget
name
="yahoo.dataTable"
subscribe
="/table/topic"
value
="{columns:[
{label:'PostDate',id:'postdate'},
{label:'Title',id:'title'},
{label:'Author',id:'author'}
],
rows:[]
}"
/>
DataTable中 rows内容为空,下面要把这部分信息放在服务器端的Servlet中,
9. 修改后的index.jsp的源代码如下:
<%
@taglibprefix
=
"
a
"
uri
=
"
http://jmaki/v1.0/jsp
"
%>
<!
DOCTYPEhtmlPUBLIC
"
-//W3C//DTDXHTML1.0Transitional//EN
"
"
http://www.w3.org/TR/xhtml1/DTD/xhtml1-transitional.dtd
"
>
<
html
>
<
head
>
<
linkrel
=
"
stylesheet
"
href
=
"
jmaki-standard.css
"
type
=
"
text/css
"
></
link
>
<
title
>
PageTitle
</
title
>
<
metahttp
-
equiv
=
"
Content-Type
"
content
=
"
text/html;charset=iso-8859-1
"
/>
</
head
>
<
body
>
<
div
class
=
"
outerBorder
"
>
<
div
class
=
"
header
"
>
<
div
class
=
"
banner
"
>
ApplicationName
</
div
>
<
div
class
=
"
subheader
"
>
<
div
>
<
ahref
=
"
mailto:feedback@youraddress
"
>
Feedback
</
a
>
|
<
ahref
=
"
#
"
>
SiteMap
</
a
>
|
<
ahref
=
"
#
"
>
Home
</
a
>
</
div
>
</
div
>
<!--
sub
-
header
-->
</
div
>
<!--
header
-->
<
div
class
=
"
main
"
>
<
div
class
=
"
leftSidebar
"
>
SidebarContentHere
<
a:widgetname
=
"
yahoo.calendar
"
/>
<
divid
=
"
selected_date
"
></
div
>
<
script
>
functionselectCallBack(_req)
...
{
vartmp=_req.responseText;
varobj=eval("("+tmp+")");
jmaki.log("tmp"+obj);
jmaki.publish("/table/topic/clear",...{});
jmaki.publish("/table/topic/addRows",obj);
}
functioncalendarListener(item)
...
{
vartargetDiv=document.getElementById("selected_date");
varselectedDateStr=item.value.getFullYear()
+"/"+(item.value.getMonth()+1)
+"/"+item.value.getDate();
targetDiv.innerHTML=selectedDateStr;
varbackEndUrl="BlogServlet?date="+selectedDateStr;
jmaki.doAjax(...{method:"POST",url:backEndUrl,callback:selectCallBack});
}
jmaki.subscribe(
"
/yahoo/calendar/onSelect
"
,calendarListener);
</
script
>
</
div
>
<!--
leftSidebar
-->
<
div
class
=
"
content
"
style
=
"
height:400px
"
>
MainContentArea
<
a:widgetname
=
"
yahoo.dataTable
"
subscribe
=
"
/table/topic
"
value
=
"
{columns:[
...
{label:'PostDate',id:'postdate'}
,
...
{label:'Title',id:'title'}
,
...
{label:'Author',id:'author'}
],
rows:[]
}
"
/>
</
div
>
<!--
content
-->
</
div
>
<!--
main
-->
</
div
>
<!--
outerborder
-->
</
body
>
</
html
>
10. 新建BlogServlet, 作为服务器端接受,处理信息以及返回信息的类. 鼠标右键盘选择项目"jMakiCalendarTable", 选择"新建"->"Servlet",
类名:BlogServlet
包:com.sun.sdn.demo.jmaki
点击"下一步"
下一个"配置Servlet部署"窗口不做修改, 点击”完成”
修改BlogServlet中protected void processRequest()方法, 内容如下
protected
void
processRequest(HttpServletRequestrequest,HttpServletResponseresponse)
throws
ServletException,IOException
...
{
String[][]blogList=...{
...{"2007/09/07","NetBeansNewandCool","TimBoudreau"},
...{"2007/09/07","NetBeansMobility","AdaLi"},
...{"2007/09/07","CreatingWeb2.0RichInternetApplications","MichaelLi"},
...{"2007/09/08","AJAXandJSF","AdaLi"},
border-right: #808080 1px solid; border-top: #808080 1px solid; display: none; border-left: #808080 1p
分享到:


评论