Android深入探究笔记之二 -- 打开一个新的 Activity 并传递参数与如何响应控件的点击事件 .
一:说明
从用户的角度,我希望完成这样的事情:
用户在主界面点击一个写有 “打开新的窗口” 字样的按钮,手机屏幕显示出一个新的窗口,并在这个窗口上显示 “我是另一个窗口”。
二:问题。上面的需求可以简化成这两个问题:
1. 如何响应用户的点击事件?
2. 如何打开另一个窗口(Activity)?
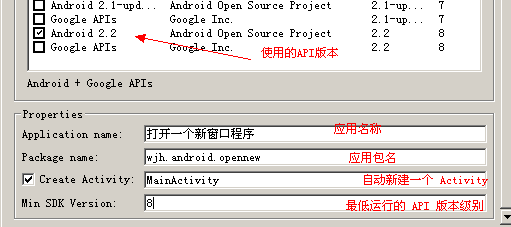
三:新建项目,如图:
四:修改布局文件:
layout/main.xml
- <?xml version="1.0" encoding="utf-8"?>
- <LinearLayout xmlns:android="http://schemas.android.com/apk/res/android"
- android:orientation="vertical"
- android:layout_width="fill_parent"
- android:layout_height="fill_parent"
- >
- <Button
- android:layout_width="wrap_content"
- android:layout_height="wrap_content"
- android:text="打开新窗口 1"/>
- <Button
- android:layout_width="wrap_content"
- android:layout_height="wrap_content"
- android:text="打开新窗口 2"/>
- </LinearLayout>
上面这样写并不好,因为我们直接将字符串 “打开新窗口 1” 和 “打开新窗口 2” 放在了布局文件里。
本来这好像没什么。但是上一篇文章里我已经写到了,android 提供了一种资源管理的机制,我们可以将 “打开新窗口 1” 和 “打开新窗口 2“ 这样的字符串资源交给系统来管理,编译环境会为这些资源生成一个唯一的 ID,编程人员只需要通过这个 ID,就能引用这个资源。
因此,这里最好的做法是,将 “打开新窗口 1” 和 “打开新窗口 2” 添加到 values/strings.xml 中,这个过程可以理解为 “向操作系统注册需要它管理的资源”,因为这里我们要注册的是字符串资源,因此,我们使用一个 <string> 标签来完成注册:
- <?xml version="1.0" encoding="utf-8"?>
- <resources>
- <string name="app_name">打开一个新窗口程序</string>
- <string name="button1">打开新窗口 1</string>
- <string name="button2">打开新窗口 2</string>
- </resources>
嗯,好啦!如果我是读者朋友们,我看到这篇文章,一定会骂人的!没有怀疑精神的程序员,不是优秀的程序员!
我们的怀疑是,这样做是做明显增加了开发者的负担。嗯,android 的框架设计师是否在一个月黑风高的晚上被驴踢过?
很幸运不是的。android 的设计者既然在开发者和资源间假设了一个隔离层,这个层肯定是要做事情的。
还是我前文所说,最了解操作系统的肯定是操作系统本身。操作系统不需要询问任何人,不需要编程者额外关注,就已经知道自己到底处在什么样的语言环境中,知道自己的分辨率大小,知道内存是否紧张等等。在本例中,我们可以在项目下新建一个目录,values-en,然后在这里面同样注册这样几个字符串:
- <?xml version="1.0" encoding="utf-8"?>
- <resources>
- <string name="app_name">Open new window</string>
- <string name="button1">open new 1</string>
- <string name="button2">open new 2</string>
- </resources>
用户在使用本程序之前,假死将语言环境调成 “英语” 环境,那么,显示在按钮上的文字就由“打开新窗口 1” 和 “打开新窗口 2” 变成了 “open new 1” 和 “open new 2” 。没有再比这更聪明的做法了。
注册的字符串,会在 R 文件中的 string 内部类里面生成静态常量,如:
- public static final class string {
- public static final int app_name=0x7f040000;
- public static final int button1=0x7f040001;
- public static final int button2=0x7f040002;
- }
按照上一篇中说的,我们如果要获取对应的字符串,表达式应该这样写:@string/button1 、 @string/button2。
于是修改 main.xml 内容为:
- <?xml version="1.0" encoding="utf-8"?>
- <LinearLayout xmlns:android="http://schemas.android.com/apk/res/android"
- android:orientation="vertical"
- android:layout_width="fill_parent"
- android:layout_height="fill_parent"
- >
- <Button
- android:layout_width="wrap_content"
- android:layout_height="wrap_content"
- android:text="@string/button1"/>
- <Button
- android:layout_width="wrap_content"
- android:layout_height="wrap_content"
- android:text="@string/button2"/>
- </LinearLayout>
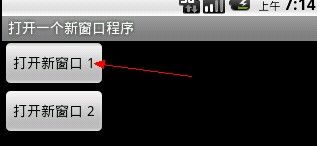
五:界面效果如图:
六:如何响应按钮的点击行为?
在说出结论之前,我们想想在 html 中,我们是如何为一个按钮添加点击事件的?
是的,两种方式:
一:
<input type="button" value="打开新窗口 1" onclick="add()" />
当用户在浏览器中点击 “打开新窗口 1” 按钮时,就会调用 "add()" 这个 JS 函数,函数的签名可能是这样:
function add() {
//
}
二:
<input type="button" value="打开新窗口 2" id="btn_add"/>
一般的做法是在页面的加载时间里,动态为 id 为 btn_add 的按钮绑定事件处理:
window.onload=function(){ // 在页面加载的时候执行,也可以理解为,在页面 “创建” 时执行,与 Activity 的 onCreate 类似
var btn_add = document.getElemenetById("btn_add"); // 首先从上下文获取目标控件。相当于在 Activity 里调用 findViewById。
btn_add.onclick = function() {
//
}
}
第一种的方式明显简单明了。第二种就稍显鸡飞狗跳了,有时候,光是 “从上下文获取目标控件” 就要写超过5行代码。
但是,我们看到的推荐的做法都是第二种,从设计上来讲,第二种做法利于开发人员的分工,减少了维护成本,使前台工程师更加专注,并使 JS 代码从标签中分离,实现表现和行为相分离 ... ...
我讨厌上纲上线。
android 中控件的事件处理机制也是类似的。
例如,我们可以为按钮直接写一个点击事件,此为方式一 :
<Button onClick="add" />
在控件所在的 Activity 中,定义一个方法 ,方法必须接收一个唯一的参数:View -- 你不能再天马行空的自己传几个参数过去。
- public void add(View view) {
- }
本例中,修改按钮一的配置为:
- <Button
- android:layout_width="wrap_content"
- android:layout_height="wrap_content"
- android:text="@string/button1"
- android:onClick="openNew"
- />
因此,main.xml 被绑定到了默认的启动窗口 -- MainActivity 上,因此需要在 MainActivity 中添加,openView(View view) 方法,此方法若不存在,或签名错误,应用程序将抛出异常,并强制结束。
添加了 openView 方法的 MainActivity 代码清单:
- package wjh.android.opennew;
- import android.app.Activity;
- import android.os.Bundle;
- import android.view.View;
- import android.widget.Button;
- import android.widget.Toast;
- public class MainActivity extends Activity {
- /** Called when the activity is first created. */
- @Override
- public void onCreate(Bundle savedInstanceState) {
- super.onCreate(savedInstanceState);
- setContentView(R.layout.main);
- }
- /**
- * 处理按钮一的点击事件
- * @param view 触发本次事件的控件
- */
- public void openNew(View view) {
- /*
- * 任何可显示的控件,都是 View 的子类。
- * 我们确定触发此事件的就是一个 Button,因此可以强转。
- */
- Button button = (Button) view;
- /* 获取到 Button 上显示的文本 */
- String text = (String) button.getText();
- /*
- * Toast 可以在窗体上显示一个提示框。
- * 第三个个参数表示提示框在窗体上显示的时间长度。
- * Toast.LENGTH_LONG : 显示较长的时间,该常量是一个值为 1 的 int 值,因此可以直接写为 1 。
- * Toast.LENGTH_SHORT: 较短的,该常量是一个值为 0 的 int 值,因此此处可以直接写为 0 。
- */
- Toast.makeText(this, text, Toast.LENGTH_SHORT).show(); // 一个经常犯的错误是忘了调用 show 方法
- }
- }
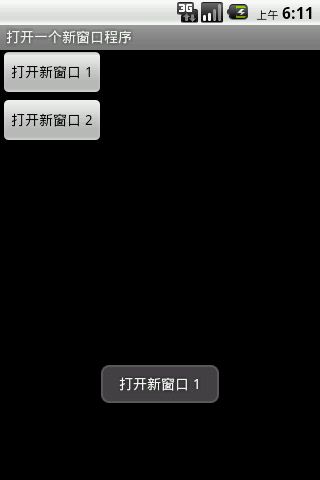
重新部署 并运行程序,点击 “打开新窗口 1” 按钮后,效果如图所示:
这是第一种方式,另一种方式是在程序中获取要添加点击事件的按钮,再为其注册点击事件的监听对象:
首先第一个问题是程序中要如何获取到目标控件呢?回想上文所说的 html 中的处理方式:
<input type="button" value="打开新窗口 2" id="addB"/>
程序员为这个 buttton 添加了一个 id ,这样能使我们在 JS 中十分方便的定位到此控件:getElementById
我很肯定的告诉各位,在 Activity 里面也有一个类型 JS 中根据控件 ID 获取控件的方法:findViewById
因此,当务之急是如何给 Button 添加一个 id 属性呢,借助 IDE ,我们找到了一个可能是我们需要的属性:“android:id”
可是,为这个属性赋值有点说道,它不能直接这样:android:id="button2"。因为 Android 的资源定位机制是基于 R 这个索引文件的,因此,若要在程序中直接访问到 Button,必须想办法将这个 id 属性添加到 R 文件中,并且使它指向 Button。
因此要用到一个重要的表达式:@+id/button2 。
因为前一篇中说道 @ 是代表 R 文件的,而 @+id 翻译过来就是:向 R 文件的 id 内部类新增... ... 。新增什么呢?就是 “/” 后的 button2。保存配置之后,再点击 R 文件查看,发现其内部多了一个 id 内部类,id 内部类里面有多了一个常量:button2。实际上,这个常量,就是指向我们配置处的 Button 的索引。因此,我们代码里就可以通过 findViewById(R.id.button2) 来获取到此控件。
因此首先我们为本例中的一个按钮添加一个 id 属性:
- <?xml version="1.0" encoding="utf-8"?>
- <LinearLayout xmlns:android="http://schemas.android.com/apk/res/android"
- android:orientation="vertical"
- android:layout_width="fill_parent"
- android:layout_height="fill_parent"
- >
- <!-- 按钮1 使用 android:onClick 绑定点击事件 -->
- <Button
- android:layout_width="wrap_content"
- android:layout_height="wrap_content"
- android:text="@string/button1"
- android:onClick="openNew"/>
- <!-- 按钮2 添加了android:id 属性 -->
- <Button android:id="@+id/button2"
- android:layout_width="wrap_content"
- android:layout_height="wrap_content"
- android:text="@string/button2"/>
- </LinearLayout>
然后在 MainActivity 里,获取这个按钮,并为其注册监听对象 :
- package wjh.android.opennew;
- import android.app.Activity;
- import android.os.Bundle;
- import android.view.View;
- import android.widget.Button;
- import android.widget.Toast;
- public class MainActivity extends Activity {
- @Override
- public void onCreate(Bundle savedInstanceState) {
- super.onCreate(savedInstanceState);
- setContentView(R.layout.main);
- Button button = (Button) findViewById(R.id.button2);
- /* 为 Button 注册点击事件监听对象,采用了匿名内部类的方式。 */
- button.setOnClickListener(new View.OnClickListener() {
- @Override
- public void onClick(View v) {
- Button button = (Button) v;
- String text = (String) button.getText();
- /* MainActivity.this 因为要接收当前上下文对象,其实就是当前的 Activity。
- * 因此在内部类里要访问外部类属性,采用 MainActivity.this 这种方式 */
- Toast.makeText(MainActivity.this, text, Toast.LENGTH_SHORT).show();
- }
- });
- }
- /**
- * 处理按钮一的点击事件
- * @param view 触发本次事件的控件
- */
- public void openNew(View view) {
- /*
- * 任何可显示的控件,都是 View 的子类。
- * 我们确定触发此事件的就是一个 Button,因此可以强转。
- */
- Button button = (Button) view;
- /* 获取到 Button 上显示的文本 */
- String text = (String) button.getText();
- /*
- * Toast 可以在窗体上显示一个提示框。
- * 第三个个参数表示提示框在窗体上显示的时间长度。
- * Toast.LENGTH_LONG : 显示较长的时间,该常量是一个值为 1 的 int 值,因此可以直接写为 1 。
- * Toast.LENGTH_SHORT: 较短的,该常量是一个值为 0 的 int 值,因此此处可以直接写为 0 。
- */
- Toast.makeText(this, text, Toast.LENGTH_SHORT).show(); // 一个经常犯的错误是忘了调用 show 方法
- }
- }
重新部署后,点击 “打开新窗口 2” 后的效果与按钮1类似,不再贴图。
七:解决如何响应按钮点击事件这个问题后,剩下的唯一问题就是如何打开新的窗口。
其实所谓新的窗口就是一个新的 Activity。不管那么多,先将这个 Activity 建好再说:
public class OtherActivity extends Activity
然后依照上一篇的说法,像在 struts 中要使用其提供的组件一样,需要在功能清单文件中注册或者说声明这个控件:
- <?xml version="1.0" encoding="utf-8"?>
- <manifest xmlns:android="http://schemas.android.com/apk/res/android"
- package="wjh.android.opennew"
- android:versionCode="1"
- android:versionName="1.0">
- <application android:icon="@drawable/icon" android:label="@string/app_name">
- <activity android:name=".MainActivity"
- android:label="@string/app_name">
- <intent-filter>
- <action android:name="android.intent.action.MAIN" />
- <category android:name="android.intent.category.LAUNCHER" />
- </intent-filter>
- </activity>
- <!-- 最新声明的 Activity -->
- <activity android:name=".OtherActivity" />
- </application>
- <uses-sdk android:minSdkVersion="8" />
- </manifest>
因为我将这个 Activity 新建在了应用所在包底下,即 manifest 标签的 package 属性指定的包下,所以才写成:
android:name=".OtherActivity",这种情况,前面的 "." 可以省略 ,若所建的类在其子包底下,则应写为 ".subpackage.OtherActiivty" 。若你实在纠结,或者你所建的 Activity 所在的类不与应用包名发生任何关系,例如,你的 Activity 在一个叫 “aa.bb.cc” 的包下也是可以的,这里就写类的完整名称就好 ,如:
<activity android:name="aa.bb.cc.OtherActivity" />
这样是没有问题的。所以我认为 Android 这个属性名称取得不好(它有很多属性名都挺抽象、且够长),你说这个属性直接叫 class 或者叫 type 多好。一个创新意识太过兴盛且无条件予以鼓励的公司,做出来的东西就这些毛病。
回头看 MainActivity 是如何让显示出界面的呢?是因为这句代码:
setContentView(R.layout.main);
R.layout.main 指向了 layout /main.xml 界面文件,若我们将他改成 R.layout.other, 那么所显的界面自然就是 layout/other.xml 界面文件定义的界面内容了。因此,为了让 OtherActivity 显示出不同的内容,我们在 layout 文件夹下新建一个界面文件:选择 layout 文件夹,点击右键,选择弹出菜单的 New --> Android XML File
在出现的界面里的 File 栏键入文件的名字,other.xml。并且在下面一行文件类型栏选择 “Layout”,如图:
other.xml 的内容为:
- <?xml version="1.0" encoding="utf-8"?>
- <LinearLayout
- xmlns:android="http://schemas.android.com/apk/res/android"
- android:layout_width="wrap_content"
- android:layout_height="wrap_content">
- <TextView
- android:layout_width="fill_parent"
- android:layout_height="wrap_content"
- android:text="你好。。。"/>
- <!-- 这个字符串可以添加到 strings.xml 文件中,此处为了直观所以才直接这样写 -->
- </LinearLayout>
修改 OtherActivity 代码,参照 MainActivity,不难写出如下代码:
- package wjh.android.opennew;
- import wjh.android.opennew.R;
- import wjh.android.opennew.R.layout;
- import android.app.Activity;
- import android.os.Bundle;
- public class OtherActivity extends Activity {
- @Override
- protected void onCreate(Bundle savedInstanceState) {
- super.onCreate(savedInstanceState);
- setContentView(R.layout.other);
- }
- }
那么,如何激活这个 Activity 呢? 因为 Android 系统同一时间只允许一个 Activity 处于激活状态,因此只要这个 Actiivty 被激活了,那么原来的 Activity 自然就被拖出去 KO 了(实际上是暂停或停止 -- 大多数情况下,都不会被立即销毁)。
方式一 为:
Intent intent = new Intent(this, OtherActivity.class); //this 即当前 Activity
startActivity(intent);
于是我们在 “打开新窗口 1” 的 openNew 方法类修改其代码为:
- /**
- * 处理按钮1的点击事件
- * @param view 触发本次事件的控件
- */
- public void openNew(View view) {
- Intent intent = new Intent(this, OtherActivity.class);
- startActivity(intent);
- }
重新部署程序到模拟器,点击 “打开新窗口 1”:
点击后界面成功被切换,出现如图所示界面:
方式二:使用隐式意图。
简单的交代一下隐式意图的概念。
方式一使用的 Intent intent = new Intent(this, OtherActivity.class); 称之为显式意图,就是程序预先确切的知道 Intent 要达到的目标位置。
隐式意图处理想法的情况,就是,程序不确定(或者是故意形成这种不确定性,已使得程序可配)Intent 最终将对应到哪一个具体组件。
上一篇中我很详细的说到了这种设计理念。可以体会到 Android 的设计者,其对于 Android 的基本设计理念就是鼓励减少组件之间的耦合。
例如,本例中 Android 是如何让 MainActivity 成为主窗体的?有千千万万个程序要在这个平台运行,它不可能预测到,每个程序的主窗体是谁?于是他使用了隐式意图。规定,意欲设定为主窗体的 Activity 请设置意图的过滤模式为指定的模式,就是 action 为android.intent.action.MAIN,category 为 android.intent.category.LAUNCHER。我自然会在你程序启动的时候,嚣张的遍历你所有注册过的组件,然后去匹配这两个值,定位具体的 Activity 。
这是一个典型的、并且非常成功和优雅的的应用示例。
本例中,我们也可以体验一下这种激活 Activity 的方式:
1. 复制 OtherActivity 到 OtherActivity2。
然后需要注册这个 Activity,由于需要支持可以使用隐式意图来激活它,还需要定义 intent-filter:
- <!-- 隐式意图 Activity -->
- <activity android:name=".OtherActivity2">
- <intent-filter>
- <action android:name="wjh.android.action.otheractivity" />
- </intent-filter>
- </activity>
简单起见,我们规定,只要一个 Intent 的 action 匹配了:wjh.android.action.otheractivity
就允许它使用我。因此,此处只定义了 action 的匹配模式。貌似是正确的,也确实,按常理,是无论如何也没有问题的。
于是,我们在 "打开新窗口 2" 的按钮点击事件里添加代码:
- /* 为 Button 注册点击事件监听对象,采用了匿名内部类的方式。 */
- button.setOnClickListener(new View.OnClickListener() {
- @Override
- public void onClick(View v) {
- Intent intent = new Intent();
- intent.setAction("wjh.android.action.otheractivity");
- startActivity(intent);
- }
- });
好,运行。——报错:
(如何查看异常信息,Window -- Show View -- Other -- Android -- LogCat)
No Activity found to handle Intent { act=wjh.android.action.otheractivity }
说没有找到这样一个 Activity,可是我明明在声明 Activity 的时候,在意图过滤器里面定义了动作名称的啊,没写错吧。当时我是纠结了好一阵子。原来是这样的:
Android把所有传给 startActivity() 的隐式意图当作他们包含至少一个类别:"android.intent.category.DEFAULT"
也就是说,本例startActivity() 被推送的 Intent 除了将去匹配 action 为 wjh.android.action.otheractivity 这一个特征外,还将去匹配类别为:android.intent.category.DEFAULT,由于本例中,我们为 OtherActivity2 并没有设置类别(category) 的匹配,因此最终,startActivity() 开始的意图没有找到任何匹配项,将抛出异常,程序被迫中止。
既然知道这一点了,我们一定要铭记于心。于是修改 XML 配置为:
- <!-- 隐式意图 Activity -->
- <activity android:name=".OtherActivity2">
- <intent-filter>
- <action android:name="wjh.android.action.otheractivity" />
- <category android:name="android.intent.category.DEFAULT" />
- </intent-filter>
- </activity>
然后再部署应用,运行,点击 “打开新窗口 2” 按钮,程序正常运行。
八:到此为止。文章开头的需求已经全部完成。
最终的代码清单为:
- <?xml version="1.0" encoding="utf-8"?>
- <manifest xmlns:android="http://schemas.android.com/apk/res/android"
- package="wjh.android.opennew"
- android:versionCode="1"
- android:versionName="1.0">
- <application android:icon="@drawable/icon" android:label="@string/app_name">
- <activity android:name=".MainActivity"
- android:label="@string/app_name">
- <intent-filter>
- <action android:name="android.intent.action.MAIN" />
- <category android:name="android.intent.category.LAUNCHER" />
- </intent-filter>
- </activity>
- <!-- 最新声明的 Activity -->
- <activity android:name=".OtherActivity" />
- <!-- 隐式意图 Activity -->
- <activity android:name=".OtherActivity2">
- <intent-filter>
- <action android:name="wjh.android.action.otheractivity" />
- <category android:name="android.intent.category.DEFAULT" />
- </intent-filter>
- </activity>
- </application>
- <uses-sdk android:minSdkVersion="8" />
- </manifest>
九:顺便将 Activity 之间传递参数的方式也记录一下:
看了一下当时写的笔记,挺全的,因此直接复制笔记:
--------------------------------------------------------------------------------------------------------
7. 怎样给新的 Activity 传递参数
* 也需要通过意图来实现。因为意图本身就有 “携带数据” 的功能
* 因此只要将数据保存在意图中就可以了
可以调用 Intent 的 putXXXExtra 方法
Intent 提供了多种的重载后的 putExtra 方法。可以接收各种各样的单个参数
* Acticity 只需要调用 getExtras() 就可以获取到上一个 Acticity 传过来的参数集合
getExtras().get(String key) 可以获取具体参数的值
* 也可以很方便的通过 getXXXExtra方法来获取指定的单个参数值
如:getStringExtra、getIntExtra、getFloatExtra ...
示例代码:
MainActivity 传参并打开 OtherActicity
- Intent intent = new Intent(MainActivity.this, OtherActivity.class);
- intent.putExtra("name", "wjh");
- intent.putExtra("age", 21);
- startActivity(intent);
OtherActicity 读取参数并显示在 TextView 上
- Intent intent = getIntent(); // 获取 Intent
- String name = intent.getStringExtra("name"); // 获取 String 值
- int age = intent.getIntExtra("age", 0); // 获取 int 值
- TextView textView =(TextView) findViewById(R.id.params); // 用于显示参数值的 TextView
- textView.setText("name: " + name + ", age:" +age); // 显示参数
8. 使用 Bundle 对象,批量给 Acticity 传递数据
MainActivity 传参
- Bundle bundle = new Bundle();
- bundle.putString("name", "wjh");
- bundle.putInt("age", 21);
- // 将 Bundle 存放进 Intent
- intent.putExtras(bundle);
OtherActicity 读取参数
- Intent intent = getIntent();
- String name = intent.getExtras().getString("name");
- int age = intent.getExtras().getInt("age", 0);
9. Other Activity 返回数据
* 如果希望得到新被打开的 Acticity 的返回值。那么需要使用
startActivityForResult(Intent intent, int requestCode) 来激活打开 Acticity 的意图
* @param Intent : 要激活的意图
* @param requestCode : 用作标识此次请求, 区分其它请求(打开一个 Acticity 就类似于浏览器请求了一个新页面)
* 如:
Intent intent = new Intent(MainActivity.this, OtherActivity.class);
startActivityForResult(intent, 100);
10. 实验上一知识点
* 既然是得到新打开的 Acticity 的返回值。那么此 Acticity 应该已经被关闭。
* 如何关闭 Activity
调用 Activity 的 finish 方法
android.app.Activity.finish()
* 如何设置返回结果 (返回值)
Acticity 的 setResult 方法可以设置返回值
android.app.Activity.setResult(int resultCode, Intent data)
* @param resultCode 结果码, 用作标识此返回结果
* @param data 用意图做为返回参数的容器 (intent.putExtra)
android.app.Activity.setResult(int resultCode)
* @param resultCode 结果码, 用作标识此返回结果
* Main Acticity 如何获取返回数据
* 重写 Acticity 的 onActivityResult
* onActivityResult 会在 Activity 接收到参数的时候返回
public void onActivityResult(int requestCode, int resultCode, Intent data)
* 代码示例:
MainActicity 打开 OtherActicity 并请求返回值。
- button.setOnClickListener(new View.OnClickListener() {
- public void onClick(View v) {
- Intent intent = new Intent(MainActivity.this, OtherActivity.class);
- startActivityForResult(intent, 100);
- }
- }
- /**
- * 处理 Activity 收到到请求数据结果
- */
- public void onActivityResult(int requestCode, int resultCode, Intent data) {
- // 用 Toast 打印返回结果
- Toast.makeText(this, data.getStringExtra("result"), 1).show();
- super.onActivityResult(requestCode, resultCode, data);
- }
- package wjh.android.opennew;
- import wjh.android.opennew.R;
- import wjh.android.opennew.R.layout;
- import android.app.Activity;
- import android.os.Bundle;
- public class OtherActivity2 extends Activity {
- @Override
- protected void onCreate(Bundle savedInstanceState) {
- super.onCreate(savedInstanceState);
- setContentView(R.layout.other);
- }
- }
- package wjh.android.opennew;
- import wjh.android.opennew.R;
- import wjh.android.opennew.R.layout;
- import android.app.Activity;
- import android.os.Bundle;
- public class OtherActivity extends Activity {
- @Override
- protected void onCreate(Bundle savedInstanceState) {
- super.onCreate(savedInstanceState);
- setContentView(R.layout.other);
- }
- }
- package wjh.android.opennew;
- import android.app.Activity;
- import android.content.Intent;
- import android.os.Bundle;
- import android.view.View;
- import android.widget.Button;
- public class MainActivity extends Activity {
- @Override
- public void onCreate(Bundle savedInstanceState) {
- super.onCreate(savedInstanceState);
- setContentView(R.layout.main);
- Button button = (Button) findViewById(R.id.button2);
- /* 为 Button 注册点击事件监听对象,采用了匿名内部类的方式。 */
- button.setOnClickListener(new View.OnClickListener() {
- @Override
- public void onClick(View v) {
- Intent intent = new Intent();
- intent.setAction("wjh.android.action.otheractivity");
- startActivity(intent);
- }
- });
- }
- /**
- * 处理按钮1的点击事件
- * @param view 触发本次事件的控件
- */
- public void openNew(View view) {
- Intent intent = new Intent(this, OtherActivity.class);
- startActivity(intent);
- }
- }
- <?xml version="1.0" encoding="utf-8"?>
- <LinearLayout
- xmlns:android="http://schemas.android.com/apk/res/android"
- android:layout_width="wrap_content"
- android:layout_height="wrap_content">
- <TextView
- android:layout_width="fill_parent"
- android:layout_height="wrap_content"
- android:text="你好。。。"/>
- <!-- 这个字符串可以添加到 strings.xml 文件中,此处为了直观所以才直接这样写 -->
- </LinearLayout>
- <?xml version="1.0" encoding="utf-8"?>
- <LinearLayout xmlns:android="http://schemas.android.com/apk/res/android"
- android:orientation="vertical"
- android:layout_width="fill_parent"
- android:layout_height="fill_parent"
- >
- <!-- 按钮1 使用 android:onClick 绑定点击事件 -->
- <Button
- android:layout_width="wrap_content"
- android:layout_height="wrap_content"
- android:text="@string/button1"
- android:onClick="openNew"/>
- <!-- 按钮2 添加了android:id 属性 -->
- <Button android:id="@+id/button2"
- android:layout_width="wrap_content"
- android:layout_height="wrap_content"
- android:text="@string/button2"/>
- </LinearLayout>
- <?xml version="1.0" encoding="utf-8"?>
- <resources>
- <string name="app_name">打开一个新窗口程序</string>
- <string name="button1">打开新窗口 1</string>
- <string name="button2">打开新窗口 2</string>
- </resources>


