Nginx Upstream Keepalive 分析
1.实现原理
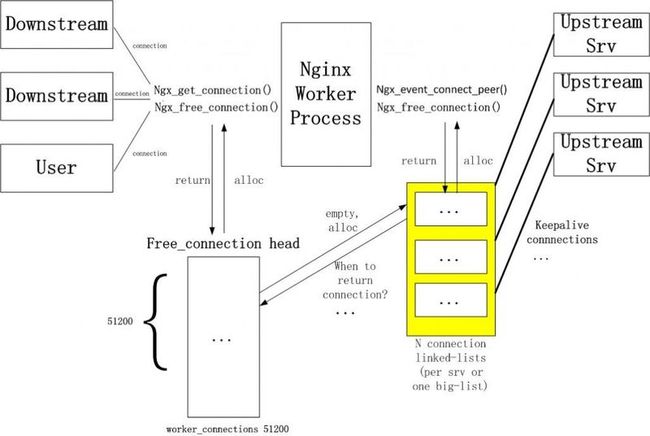
Nginx 1.1.14版本以前upstream连接建立和获取的机制如下图所示,Nginx会在一开始创建connection pool(进程间不共享,可以避免锁),提供给所有向前/后的连接。
如果要实现upstream长连接,则每个进程需要另外一个connection pool,里面都是长连接。一旦与后端服务器建立连接,则在当前请求连接结束之后不会立即关闭连接,而是把用完的连接保存在一个keepalive connection pool里面,以后每次需要建立向后连接的时候,只需要从这个连接池里面找,如果找到合适的连接的话,就可以直接来用这个连接,不需要重新创建socket或者发起connect()。这样既省下建立连接时在握手的时间消耗,又可以避免TCP连接的slow start。如果在keepalive连接池找不到合适的连接,那就按照原来的步骤重新建立连接。假设连接查找时间可以忽略不计,那么这种方法肯定是有益而无害的(当然,需要少量额外的内存)。
2.相关配置
Nginx Upstream长连接由upstream模式下的keepalive指令控制,并指定可用于长连接的连接数,配置样例如下:
upstream http_backend {
server 127.0.0.1:8080;
keepalive 16;
}
server {
...
location /http/ {
proxy_pass http://http_backend;
proxy_http_version 1.1;
proxy_set_header Connection "";
...
}
}
目前Nginx只支持反向代理到upstream下配置的server,不支持直接由proxy_pass指令配置的server,更不支持proxy_pass参数中包含变量的情况。此外,为支持长连接,需要配置使用HTTP1.1协议(虽然HTTP 1.0可通过设置Connection请求头为“keep-alive”来实现长连接,但这并不推荐)。
此外,由于HTTPPROXY模块默认会将反向代理请求的connection头部设置成Close,因此这里也需要清除connection头部(清除头部即不发送该头部,在HTTP 1.0中默认为长连接)。
3.现实细节
3.1. 数据结构
Nginx upstream keepalive的具体实现在文件src/http/modules/ngx_http_upstream_keepalive_module.c中,该文件中包含以下三个数据结构:
typedef struct {
//最大缓存连接个数,由keepalive参数指定(keepaliveconnection)
ngx_uint_t max_cached;
ngx_uint_t single; /* unsigned:1 */
//长连接队列,其中cache为缓存连接池,free为空闲连接池。初始化时根据keepalive
//指令的参数初始化free队列,后续有连接过来从free队列
//取连接,请求处理结束后将长连接缓存到cache队列,连接被断开(或超时)再从cache
//队列放入free队列
ngx_queue_t cache;
ngx_queue_t free;
ngx_http_upstream_init_pt original_init_upstream;
ngx_http_upstream_init_peer_pt original_init_peer;
}ngx_http_upstream_keepalive_srv_conf_t;
typedef struct {
ngx_http_upstream_keepalive_srv_conf_t *conf;
ngx_http_upstream_t *upstream;
void *data;
//保存原始获取peer和释放peer的钩子,它们通常是ngx_http_upstream_get_round_robin_peer和ngx_http_upstream_free_round_robin_peer,nginx负载均衡默认是使用轮询算法
ngx_event_get_peer_pt original_get_peer;
ngx_event_free_peer_pt original_free_peer;
#if (NGX_HTTP_SSL)
ngx_event_set_peer_session_pt original_set_session;
ngx_event_save_peer_session_pt original_save_session;
#endif
ngx_uint_t failed; /* unsigned:1 */
}ngx_http_upstream_keepalive_peer_data_t;
typedef struct {
ngx_http_upstream_keepalive_srv_conf_t *conf;
ngx_queue_t queue;
ngx_connection_t *connection;
//缓存连接池中保存的后端服务器的地址,后续就是根据相同的socket地址来找出
//对应的连接,并使用该连接
socklen_t socklen;
u_charsockaddr[NGX_SOCKADDRLEN];
}ngx_http_upstream_keepalive_cache_t;
3.2. 初始化操作
该模块中只有keepalive一个指令。在nginx解析配置文件遇到upstream模式下的keepalive时,会执行ngx_http_upstream_keepalive函数:
static char *
ngx_http_upstream_keepalive(ngx_conf_t*cf, ngx_command_t *cmd, void *conf)
{
……
//获取upstream模块的server conf
uscf =ngx_http_conf_get_module_srv_conf(cf, ngx_http_upstream_module);
kcf = ngx_http_conf_upstream_srv_conf(uscf,
ngx_http_upstream_keepalive_module);
//保存原来的初始化upstream的钩子,并设置新的钩子
kcf->original_init_upstream =uscf->peer.init_upstream
? uscf->peer.init_upstream
:ngx_http_upstream_init_round_robin;
uscf->peer.init_upstream =ngx_http_upstream_init_keepalive;
//设置指令配置的最大缓存连接数
/* read options */
value = cf->args->elts;
n = ngx_atoi(value[1].data, value[1].len);
kcf->max_cached = n;
……
return NGX_CONF_ERROR;
}
在upstream模块初始化main conf时,就会根据设置的钩子进行upstream的初始化,该操作是在ngx_http_upstream_init_main_conf函数中执行的:
static char *
ngx_http_upstream_init_main_conf(ngx_conf_t*cf, void *conf)
{
ngx_http_upstream_main_conf_t *umcf = conf;
……
uscfp = umcf->upstreams.elts;
//遍历upstream数组。upstream的来源包括显性的配置upstream模式(ngx_http_upstream)
//和隐性的proxy_pass指令(ngx_http_proxy_pass),upstream的添加是通过
//ngx_http_upstream_add函数,需要注意的是proxy_pass指令携带变量参数时不会添加
//upstream
for (i = 0; i <umcf->upstreams.nelts; i++) {
//取钩子,并执行钩子。若该upstream来源于包含keepalive指令的upsteam模式,
//则钩子为前面设置的ngx_http_upstream_init_keepalive;其他情况均为空,则会
//使用ngx_http_upstream_init_round_robin
init = uscfp[i]->peer.init_upstream? uscfp[i]->peer.init_upstream:
ngx_http_upstream_init_round_robin;
if (init(cf, uscfp[i]) != NGX_OK) {
return NGX_CONF_ERROR;
}
}
}
再来看upstreamkeepalive初始化函数ngx_http_upstream_init_keepalive:
static ngx_int_t
ngx_http_upstream_init_keepalive(ngx_conf_t*cf,
ngx_http_upstream_srv_conf_t *us)
{
……
kcf = ngx_http_conf_upstream_srv_conf(us,
ngx_http_upstream_keepalive_module);
//先执行原始初始化upstream函数(即ngx_http_upstream_init_round_robin),该函数
//会根据配置的后端地址解析成socket地址,用于连接后端。并设置us->peer.init钩子
//为ngx_http_upstream_init_round_robin_peer
if (kcf->original_init_upstream(cf, us) != NGX_OK) {
return NGX_ERROR;
}
//保存原钩子,并用keepalive的钩子覆盖旧钩子,初始化后端请求的时候会调用这个
//新钩子
kcf->original_init_peer =us->peer.init;
us->peer.init =ngx_http_upstream_init_keepalive_peer;
/*申请缓存项,并添加到free队列中,后续用从free队列里面取*/
cached = ngx_pcalloc(cf->pool,
sizeof(ngx_http_upstream_keepalive_cache_t)* kcf->max_cached);
if (cached == NULL) {
return NGX_ERROR;
}
ngx_queue_init(&kcf->cache);
ngx_queue_init(&kcf->free);
for (i = 0; i < kcf->max_cached; i++){
ngx_queue_insert_head(&kcf->free, &cached[i].queue);
cached[i].conf = kcf;
}
return NGX_OK;
}
至此,与upstreamkeepalive相关的初始化操作已经全部完毕,接下来反向代理如何使用keepalive连接。
3.3. 连接的建立/获取
在nginx收到HTTP请求时,准备将这个请求转发给后端之前,先要与后端建立TCP连接,这些准备操作是在ngx_http_upstream_init_request函数中:
static void
ngx_http_upstream_init_request(ngx_http_request_t*r)
{
……
//不需要解析地址的情况,包括配置upstream模式下的静态server,静态proxy_pass
//指令,即初始化过程中已经能将地址解析好的情况(静态IP后端或者可通过
//gethostbyname获取到地址的域名后端)
if (u->resolved == NULL) {
uscf = u->conf->upstream;
} else {
//需要解析地址,并且已经解析完毕的情况(已经有socket地址),直接连接后端
if (u->resolved->sockaddr) {
if(ngx_http_upstream_create_round_robin_peer(r, u->resolved)
!= NGX_OK)
{
ngx_http_upstream_finalize_request(r, u,
NGX_HTTP_INTERNAL_SERVER_ERROR);
return;
}
ngx_http_upstream_connect(r, u);
return;
}
//需要解析地址,但socket地址还未解析
host = &u->resolved->host;
umcf = ngx_http_get_module_main_conf(r,ngx_http_upstream_module);
//先找当前访问的host是否在配置的upstream数组中
uscfp = umcf->upstreams.elts;
for (i = 0; i <umcf->upstreams.nelts; i++) {
uscf = uscfp[i];
if (uscf->host.len ==host->len
&& ((uscf->port == 0&& u->resolved->no_port)
|| uscf->port ==u->resolved->port)
&&ngx_memcmp(uscf->host.data, host->data, host->len) == 0)
{
goto found;
}
}
if (u->resolved->port == 0) {
ngx_log_error(NGX_LOG_ERR,r->connection->log, 0,
"no port inupstream \"%V\"", host);
ngx_http_upstream_finalize_request(r,u,
NGX_HTTP_INTERNAL_SERVER_ERROR);
return;
}
temp.name = *host;
//开始进行域名解析
ctx =ngx_resolve_start(clcf->resolver, &temp);
if (ctx == NULL) {
ngx_http_upstream_finalize_request(r, u,
NGX_HTTP_INTERNAL_SERVER_ERROR);
return;
}
if (ctx == NGX_NO_RESOLVER) {
ngx_log_error(NGX_LOG_ERR,r->connection->log, 0,
"no resolverdefined to resolve %V", host);
ngx_http_upstream_finalize_request(r, u, NGX_HTTP_BAD_GATEWAY);
return;
}
ctx->name = *host;
ctx->type = NGX_RESOLVE_A;
//设置DNS解析钩子,解析DNS成功后会执行
ctx->handler =ngx_http_upstream_resolve_handler;
ctx->data = r;
ctx->timeout =clcf->resolver_timeout;
u->resolved->ctx = ctx;
//开始处理DNS解析域名
if (ngx_resolve_name(ctx) != NGX_OK) {
u->resolved->ctx = NULL;
ngx_http_upstream_finalize_request(r, u,
NGX_HTTP_INTERNAL_SERVER_ERROR);
return;
}
return;
}
found:
//调用peer.init初始化对端,若访问请求为配置了keepalive指令的upstream列表中的
//server,该钩子并初始化成ngx_http_upstream_init_keepalive_peer,否则是ngx_http_upstream_init_round_robin_peer。根据上述的代码,可以知道只有不需要解析地址或者能找到upstream的情况才会走到这里
if (uscf->peer.init(r, uscf) != NGX_OK){
ngx_http_upstream_finalize_request(r,u,
NGX_HTTP_INTERNAL_SERVER_ERROR);
return;
}
ngx_http_upstream_connect(r, u);
}
可以看出,在不需要解析地址的情况下,初始化peer完毕后(uscf->peer.init)就开始连接后端(ngx_http_upstream_connect),先来看下初始化keepalive peer函数(ngx_http_upstream_init_keepalive_peer):
static ngx_int_t ngx_http_upstream_init_keepalive_peer(ngx_http_request_t*r,
ngx_http_upstream_srv_conf_t *us)
{
……
kcf = ngx_http_conf_upstream_srv_conf(us,
ngx_http_upstream_keepalive_module);
kp = ngx_palloc(r->pool,sizeof(ngx_http_upstream_keepalive_peer_data_t));
if (kp == NULL) {
return NGX_ERROR;
}
//先执行原始的初始化peer函数,即ngx_http_upstream_init_round_robin_peer。该
//函数内部处理一些与负载均衡相关的操作并分别设置以下四个钩子:
// r->upstream->peer.get和r->upstream->peer.free
// r->upstream->peer.set_session和r->upstream->peer.save_session
if (kcf->original_init_peer(r, us) !=NGX_OK) {
return NGX_ERROR;
}
// keepalive模块则保存上述原始钩子,并使用新的各类钩子覆盖旧钩子
kp->conf = kcf;
kp->upstream = r->upstream;
kp->data = r->upstream->peer.data;
kp->original_get_peer =r->upstream->peer.get;
kp->original_free_peer =r->upstream->peer.free;
r->upstream->peer.data = kp;
r->upstream->peer.get =ngx_http_upstream_get_keepalive_peer;
r->upstream->peer.free =ngx_http_upstream_free_keepalive_peer;
#if(NGX_HTTP_SSL)
kp->original_set_session =r->upstream->peer.set_session;
kp->original_save_session =r->upstream->peer.save_session;
r->upstream->peer.set_session =ngx_http_upstream_keepalive_set_session;
r->upstream->peer.save_session =ngx_http_upstream_keepalive_save_session;
#endif
return NGX_OK;
}
在连接后端的函数(ngx_http_upstream_connect)中,会调用ngx_event_connect_peer去建立TCP连接:
ngx_int_t ngx_event_connect_peer(ngx_peer_connection_t*pc)
{
int rc;
ngx_int_t event;
ngx_err_t err;
ngx_uint_t level;
ngx_socket_t s;
ngx_event_t *rev, *wev;
ngx_connection_t *c;
//调用pc->get钩子。如前面所述,若是keepalive upstream,则该钩子是
//ngx_http_upstream_get_keepalive_peer,此时如果存在缓存长连接该函数调用返回的是
//NGX_DONE,直接返回上层调用而不会继续往下执行获取新的连接并创建socket,
//如果不存在缓存的长连接,则会返回NGX_OK.
//若是非keepalive upstream,该钩子是ngx_http_upstream_get_round_robin_peer。
rc = pc->get(pc, pc->data);
if (rc != NGX_OK) {
return rc;
}
// 非keepalive upstream或者keepalive upstream为找到缓存连接,则创建socket
s = ngx_socket(pc->sockaddr->sa_family,SOCK_STREAM, 0);
ngx_log_debug1(NGX_LOG_DEBUG_EVENT,pc->log, 0, "socket %d", s);
if (s == -1) {
ngx_log_error(NGX_LOG_ALERT,pc->log, ngx_socket_errno,
ngx_socket_n "failed");
return NGX_ERROR;
}
c = ngx_get_connection(s, pc->log);
……
}
下面看下keepaliveupstream是如何保存缓存连接并当后续使用时如何获取的,这是就是在ngx_http_upstream_get_keepalive_peer函数中完成:
static ngx_int_t
ngx_http_upstream_get_keepalive_peer(ngx_peer_connection_t*pc, void *data)
{
……
/* single pool ofcached connections,只要cache非空,直接从cache里面取,并返回NGX_DONE*/
if (kp->conf->single &&!ngx_queue_empty(&kp->conf->cache)) {
q =ngx_queue_head(&kp->conf->cache);
item = ngx_queue_data(q,ngx_http_upstream_keepalive_cache_t, queue);
c = item->connection;
ngx_queue_remove(q);
ngx_queue_insert_head(&kp->conf->free, q);
……
pc->connection = c;
pc->cached = 1;
return NGX_DONE;
}
//先调用原始getpeer钩子(ngx_http_upstream_get_round_robin_peer)选择后端
rc = kp->original_get_peer(pc,kp->data);
if (kp->conf->single || rc != NGX_OK){
return rc;
}
/* search cache for suitable connection */
//根据socket地址查找连接cache池,找到直接返回NGX_DONE,上层调用就不会获取新的连接
cache = &kp->conf->cache;
for (q = ngx_queue_head(cache);
q != ngx_queue_sentinel(cache);
q = ngx_queue_next(q))
{
item = ngx_queue_data(q,ngx_http_upstream_keepalive_cache_t, queue);
c = item->connection;
if (ngx_memn2cmp((u_char *)&item->sockaddr, (u_char *) pc->sockaddr,
item->socklen,pc->socklen)
== 0)
{
ngx_queue_remove(q);
ngx_queue_insert_head(&kp->conf->free, q);
……
pc->connection = c;
pc->cached = 1;
return NGX_DONE;
}
}
return NGX_OK;
}
上述分析了不需要进行解析地址的情况下如何使用keepalive的,当访问的地址需要进行域名解析的情况下(比如proxy_pass中存在变量,变量的值为一个域名,任何静态域名均会在初始化时候被解析),是无法使用keepalive连接的,请看nginx在解析域名成功后是怎么处理的(即ngx_http_upstream_init_request函数中设置ctx->handler = ngx_http_upstream_resolve_handler):
static void ngx_http_upstream_resolve_handler(ngx_resolver_ctx_t*ctx)
{
……
//创建轮询后端,设置获取peer和释放peer的钩子等(与ngx_http_upstream_init_round_robin_peer的功能有点类似)
if (ngx_http_upstream_create_round_robin_peer(r,ur) != NGX_OK){
ngx_http_upstream_finalize_request(r,u,
NGX_HTTP_INTERNAL_SERVER_ERROR);
return;
}
ngx_resolve_name_done(ctx);
ur->ctx= NULL;
//直接开始连接后端,注意该函数中的获取后端的钩子是上述调用中设置的ngx_http_upstream_get_round_robin_peer而不会是ngx_http_upstream_get_keepalive_peer
ngx_http_upstream_connect(r, u);
}
经过上面分析,若想支持任何域名请求都使用keepalive,则需要修改上述函数,需要在这个函数里面调用ngx_http_upstream_init_keepalive_peer改变获取/释放连接的接口,然后由于当前nginxkeepalive实现完全依赖于在upstream模式下配置,需要upstream server conf的支持,因此直接调用该初始化函数是无法实现的。
3.4. 连接的关闭/释放
在一个HTTP请求处理完毕后,通常会调用ngx_http_upstream_finalize_request结束请求,并调用释放peer的操作:
static void ngx_http_upstream_finalize_request(ngx_http_request_t*r,
ngx_http_upstream_t *u, ngx_int_t rc)
{
……
u->finalize_request(r, rc);
//如果有设置peer.free钩子,则调用释放peer
//非keepalive的情况下该钩子是ngx_http_upstream_free_round_robin_peer
// keepalive的情况下该钩子是ngx_http_upstream_free_keepalive_peer,该钩子会将连接
//缓存到长连接cache池,并将u->peer.connection设置成空,防止下面代码关闭连接。
if (u->peer.free) {
u->peer.free(&u->peer,u->peer.data, 0);
}
//若与对端的连接为关闭(或未被缓存起来),则关闭连接
if (u->peer.connection) {
#if(NGX_HTTP_SSL)
if (u->peer.connection->ssl) {
u->peer.connection->ssl->no_wait_shutdown= 1;
(void)ngx_ssl_shutdown(u->peer.connection);
}
#endif
if (u->peer.connection->pool) {
ngx_destroy_pool(u->peer.connection->pool);
}
ngx_close_connection(u->peer.connection);
}
//关闭连接后置空
u->peer.connection = NULL;
……
}
接着分析设置keepalive情况下的free peer的函数,即ngx_http_upstream_free_keepalive_peer:
static void ngx_http_upstream_free_keepalive_peer(ngx_peer_connection_t*pc, void *data,
ngx_uint_t state)
{
……
//通常设置keepalive后连接都是由后端web服务发起的,因此需要添加读事件
if (ngx_handle_read_event(c->read, 0) !=NGX_OK) {
goto invalid;
}
//如果free队列中可用cache items为空,则从cache队列取一个最近最少使用item,
//将该item对应的那个连接关闭,该item用于保存当前需要释放的连接
if(ngx_queue_empty(&kp->conf->free)) {
q =ngx_queue_last(&kp->conf->cache);
ngx_queue_remove(q);
item = ngx_queue_data(q,ngx_http_upstream_keepalive_cache_t, queue);
ngx_http_upstream_keepalive_close(item->connection);
} else {
//free队列不空则直接从队列头取一个item用于保存当前连接
q= ngx_queue_head(&kp->conf->free);
ngx_queue_remove(q);
item = ngx_queue_data(q,ngx_http_upstream_keepalive_cache_t, queue);
}
//缓存当前连接,将item插入cache队列,然后将pc->connection置空,防止上层调用
//ngx_http_upstream_finalize_request关闭该连接(详见该函数)
item->connection = c;
ngx_queue_insert_head(&kp->conf->cache, q);
pc->connection = NULL;
if (c->read->timer_set) {
ngx_del_timer(c->read);
}
if (c->write->timer_set) {
ngx_del_timer(c->write);
}
//设置连接读写钩子。写钩子是一个假钩子(keepalive连接不会由客户端主动关闭)
//读钩子处理关闭keepalive连接的操作(接收到来自后端web服务器的FIN分节)
c->write->handler =ngx_http_upstream_keepalive_dummy_handler;
c->read->handler =ngx_http_upstream_keepalive_close_handler;
……
//保存socket地址相关信息,后续就是通过查找相同的socket地址来复用该连接
item->socklen = pc->socklen;
ngx_memcpy(&item->sockaddr,pc->sockaddr, pc->socklen);
……
}
分析完ngx_http_upstream_free_keepalive_peer函数后,在回过头去看ngx_http_upstream_get_keepalive_peer就更能理解是如何复用keepalive连接的,free操作将当前连接缓存到cache队列中,并保存该连接对应后端的socket地址,get操作根据想要连接后端的socket地址,遍历查找cache队列,如果找到就使用先前缓存的长连接,未找到就重新建立新的连接。
当free操作发现当前所有cache item用完时(即缓存连接达到上限),会关闭最近未被使用的那个连接,用来缓存新的连接。Nginx官方推荐keepalive的连接数应该配置的尽可能小,以免出现被缓存的连接太多而造成新的连接请求过来时无法获取连接的情况(一个worker进程的总连接池是有限的)。
3.5. 实现总结
nginx upstream keepalive实现主要通过当解析到upstream模式下的keepalive命令时,为该upstream改变初始化钩子(ngx_http_upstream_init_keepalive),而在初始化upstream时又再次改变初始化对端的钩子(ngx_http_upstream_init_keepalive_peer),在初始化对端时,再一次改变获取对端和释放对端的钩子(ngx_http_upstream_get_keepalive_peer和ngx_http_upstream_free_keepalive_peer)。在获取对端时,会先查找所访问的对端是否已经在cache池内(通过对端的socket地址),如果在cache池内则直接使用cache的连接,否则需要建立新的连接;在释放对端连接时,不直接释放连接,而是将连接保存在cache池中,同时使用对端的socket地址标识该对端,方便后续获取时查找。
可以看到,nginxupstream keepalive在缓存连接(free操作)和获取缓存的连接(get操作)时,只是查找匹配后端服务器的地址,而对前端没有任何感知。这就会造成一个问题,当用户1访问某站点后,会建立一个TCP连接,在后端web服务器没有关闭该连接之前,用户2同样访问该站点时,则不用建立TCP连接即可直接访问,也就是说nginx与后端的keepalive连接对前端来说是共享的,这就造成一个性能问题,当几万个用户同时访问同一站点时,这几万个用户与nginx建立了几万条TCP连接,而nginx与后端服务器确有可能只有一条连接,这一条连接需要服务前端的几万个用户,这就大大的影响了系统的性能!
可以在释放对端连接时添加前端IP地址(获取其他标识信息)来标识前端,在获取连接遍历连接cache池时增加前端IP地址查找匹配,这样方能携带前端标识,避免多个前端共用一个后端连接从而影响性能的问题。
4.参考文档
http://bollaxu.iteye.com/blog/900424
http://nginx.org/en/docs/http/ngx_http_upstream_module.html#keepalive

