下面来自百度百科
HornetQ是一个支持集群和多种协议,可嵌入、高性能的异步消息系统。HornetQ完全支持JMS,HornetQ不但支持JMS1.1 API同时也定义属于自己的消息API,这可以最大限度的提升HornetQ的性能和灵活性。在不久的将来更多的协议将被HornetQ支持。[1]
HornetQ拥有超高的性能,HornetQ在持久化消息方面的性能可以轻易的超于其它常见的非持久化消息引擎的性能。当然,HornetQ的非持久化消息的性能会表现的更好!
HornetQ完全使用POJO,纯POJO的设计让HornetQ可以尽可能少的依赖第三方的包。从设计模式来说,HornetQ这样的设计入侵性也最小。HornetQ既可以独立运行,也可以与其它Java应用程序服务器集成使用。
HornetQ拥有完善的错误处理机制,HornetQ提供服务器复制和故障自动转移功能,该功能可以消除消息丢失或多个重复信息导致服务器出错。
HornetQ提供了灵活的集群功能,通过创建HornetQ集群,您可以享受到到消息的负载均衡带来的性能提升。您也可以通过集群,组成一个全球性的消息网络。您也可以灵活的配置消息路由。
HornetQ拥有强大的管理功能。HornetQ提供了大量的管理API和监控服务器。它可以无缝的与应用程序服务器整合,并共同工作在一个HA环境中。
应用场景
首先HornetQ是一种消息服务中间件,高效可靠的消息传递机制进行平台无关的数据交流,并基于数据通信来进行分布式系统的集成。通过提供消息传递和消息排队模型,它可以在分布式环境下扩展进程间的通信。 本文档主要涉及到HornetQ的JMS功能的使用,HornetQ的JMS只是对HornetQ 的一种封装,适配了java的JMS协议。
如何集成到项目
HornetQ目前大致有三种方式:standalone, embedded, Integrated with JBoss as。
我个人倾向于 standalone方式,因为:
1) 可以有更多的资源供HornetQ单独使用
2) 管理的话只需要关注HornetQ这一个产品的问题就行,而无需引入其他的复杂度。
3) 原项目中也是把消息中间件作为一个单独的模块部署,对原来的流程可以做到无缝承接。
目前我只是关注了HornetQ standalone这一模式,其他的暂且没有 深入。
使用HornetQ服务端很简单,直接运行% HornetQ _HOME%/bin下的bat/sh就可以启动(优化问题暂时没有考虑)
客户端推荐用HornetQ的client和Spring做集成,spring的配置文件内容大致如下所示:
<?xml version="1.0" encoding="UTF-8"?>
<beans xmlns="http://www.springframework.org/schema/beans"
xmlns:xsi="http://www.w3.org/2001/XMLSchema-instance"
xsi:schemaLocation="http://www.springframework.org/schema/beans
http://www.springframework.org/schema/beans/spring-beans-3.0.xsd">
<bean id="listener" class="org.hornetq.jms.example.ExampleListener"/>
<bean id="listenerContainer" class="org.springframework.jms.listener.DefaultMessageListenerContainer">
<property name="connectionFactory" ref="ConnectionFactory"/>
<property name="destination" ref="/queue/exampleQueue"/>
<property name="messageListener" ref="listener"/>
</bean>
<bean id="queueTarget" class="org.springframework.jndi.JndiObjectTargetSource">
<property name="jndiName">
<value>queue/testQueue</value>
</property>
<property name="jndiTemplate">
<ref local="jndiTemplate"/>
</property>
</bean>
<bean id="jndiTemplate" class="org.springframework.jndi.JndiTemplate">
<property name="environment">
<props>
<prop key="java.naming.factory.initial">org.jnp.interfaces.NamingContextFactory</prop>
<prop key="java.naming.provider.url">jnp://localhost:1099</prop>
<prop key="java.naming.factory.url.pkgs">org.jboss.naming:org.jnp.interfaces</prop>
</props>
</property>
</bean>
</beans>
因为HornetQ的client主要是以JNDI和服务端进行连接,所以以上我们都是通过Spring提供的JMS模板类和JNDI模板类来对HornetQ的client进行配置与管理。
使用步骤
具体示例主要是以本地main方法为主,用spring来管理的话也很简单.
首先加入HornetQ客户端必须使用到的HornetQ 工程的jar包

除了jboss-client.jar ,其他的都可以在HornetQ的下载包里找到,jboss-client.jar需要单独的下载JBoss AS,我下载的是JBoss AS7,jboss-client.jar的目录为% JBoss AS7_HOME%/bin/client
JMS Queue
1) Queue Provider
publicstaticvoid main(String[] args) throws Exception{
//初始化JNDI
Properties properties = new Properties();
properties.put("java.naming.factory.initial",
"org.jnp.interfaces.NamingContextFactory");
properties.put("java.naming.factory.url.pkgs",
"org.jboss.naming:org.jnp.interfaces");
properties.put("java.naming.provider.url", "jnp://localhost:1099");
InitialContext ic = new InitialContext(properties);
//建立ConnectionFactory
ConnectionFactory cf = (ConnectionFactory) ic
.lookup("/ConnectionFactory");
//建立到Queue连接
Queue orderQueue = (Queue) ic.lookup("queue/ExpiryQueue");
//通过Queue建立Connection
Connection connection = cf.createConnection();
//通过Connection建立session
Session session = connection.createSession(false,
Session.AUTO_ACKNOWLEDGE);
//建立JMS生产者
MessageProducer producer = session.createProducer(orderQueue);
//这一步必须,启动connection
connection.start();
TextMessage message = session.createTextMessage("First hornetq");
producer.send(message);
System.out.println("send success");
2) Queue Consumer
//初始化JNDI
Properties properties = new Properties();
properties.put("java.naming.factory.initial",
"org.jnp.interfaces.NamingContextFactory");
properties.put("java.naming.factory.url.pkgs",
"org.jboss.naming:org.jnp.interfaces");
properties.put("java.naming.provider.url", "jnp://localhost:1099");
InitialContext ic = new InitialContext(properties);
ConnectionFactory cf = (ConnectionFactory) ic
.lookup("/ConnectionFactory");
Queue orderQueue = (Queue) ic.lookup("queue/ExpiryQueue");
Connection connection = cf.createConnection();
Session session = connection.createSession(false,
Session.AUTO_ACKNOWLEDGE);
MessageConsumer consumer = session.createConsumer(orderQueue);
connection.start();
上面建立连接的部分的注释参考Queue Provider
/* Message message = consumer.receive();*/
consumer.setMessageListener(new MessageListener() {
@Override
publicvoid onMessage(Message message) {
if(message instanceof TextMessage) {
TextMessage textMessage = (TextMessage)message;
String text;
try {
text = textMessage.getText();
System.out.println("Get Text message" + text);
} catch (JMSException e) {
e.printStackTrace();
}
}else {
System.out.println("Get message" + message);
}
}
});
Thread.sleep(30000);
以上可以看到Consumer有二种方式
一种是调用receive,这样会阻塞,直到有消息为止,第二种是注册一个回调函数,实现MessageListener接口,这一种是异步的。
1)Topic Provider
publicstaticvoid main(String[] args) throws Exception{
Properties properties = new Properties();
properties.put("java.naming.factory.initial",
"org.jnp.interfaces.NamingContextFactory");
properties.put("java.naming.factory.url.pkgs",
"org.jboss.naming:org.jnp.interfaces");
properties.put("java.naming.provider.url", "jnp://localhost:1099");
InitialContext initialContext = new InitialContext(properties);
// Step 2. perform a lookup on the topic
// Topic topic = (Topic)initialContext.lookup("/topic/exampleTopic");
// Step 3. perform a lookup on the Connection Factory
ConnectionFactory cf = (ConnectionFactory)initialContext.lookup("/ConnectionFactory");
// Step 4. Create a JMS Connection
Connection connection = cf.createConnection();
// Step 11. Start the Connection
connection.start();
// Step 5. Create a JMS Session
Session session = connection.createSession(false, Session.AUTO_ACKNOWLEDGE);
// Topic topic = session.l("/topic/exampleTopic");
Topic topic = (Topic)initialContext.lookup("/topic/exampleTopic2");
// Step 6. Create a Message Producer
MessageProducer producer = session.createProducer(topic);
// Step 9. Create a Text Message
TextMessage message = session.createTextMessage("This is a text message");
System.out.println("Sent message: " + message.getText());
// Step 10. Send the Message
producer.send(message);
System.out.println("Topic send success");
}
Topic的Provider和Queue的Provider基本类似,只是一个是获得Queue,另外一个是获得Topic
2)Topic Consumer
publicstaticvoid main(String[] args) throws Exception{
Properties properties = new Properties();
properties.put("java.naming.factory.initial",
"org.jnp.interfaces.NamingContextFactory");
properties.put("java.naming.factory.url.pkgs",
"org.jboss.naming:org.jnp.interfaces");
properties.put("java.naming.provider.url", "jnp://localhost:1099");
InitialContext initialContext = new InitialContext(properties);
// Step 2. perform a lookup on the topic
Topic topic = (Topic)initialContext.lookup("/topic/exampleTopic2");
// Step 3. perform a lookup on the Connection Factory
ConnectionFactory cf = (ConnectionFactory)initialContext.lookup("/ConnectionFactory");
// Step 4. Create a JMS Connection
Connection connection = cf.createConnection();
// Step 5. Create a JMS Session
Session session = connection.createSession(false, Session.AUTO_ACKNOWLEDGE);
// Step 7. Create a JMS Message Consumer
MessageConsumer messageConsumer1 = session.createConsumer(topic);
// Step 8. Create a JMS Message Consumer
MessageConsumer messageConsumer2 = session.createConsumer(topic);
// Step 11. Start the Connection
connection.start();
// Step 12. Receive the message
TextMessage messageReceived = (TextMessage)messageConsumer1.receive();
System.out.println("Consumer 1 Received message: " + messageReceived.getText());
// Step 13. Receive the message
messageReceived = (TextMessage)messageConsumer2.receive();
System.out.println("Consumer 2 Received message: " + messageReceived.getText());
}
Topic 模式的测试必须是consumer先启动,然后provider再启动,consumer才能获得消息。这是由于Topic的特性而决定的。
后记:到目前为止,我还没有找到方法像ActiveMQ那样动态的创建Queue或者Topic的,ActiveMQ中,如果向服务端发送请求,如果服务端没有这个Queue或者Topic,那么服务端会自动创建一个,但是HornetQ中没有这个功能,必须在配置文件中配置想要的Queue或者Topic, HornetQ服务端会热加载配置文件。
如果直接启动的话,HornetQ默认加载%HornetQ_HOME%\config\stand-alone\non-clustered\ hornetq-jms.xml
具体配置如下:
<queue name="DLQ">
<entry name="/queue/DLQ"/>
</queue>
<queue name="ExpiryQueue">
<entry name="/queue/ExpiryQueue"/>
</queue>
<topic name="exampleTopic">
<entry name="/topic/exampleTopic"/>
</topic>
<topic name="exampleTopic2">
<entry name="/topic/exampleTopic2"/>
</topic>
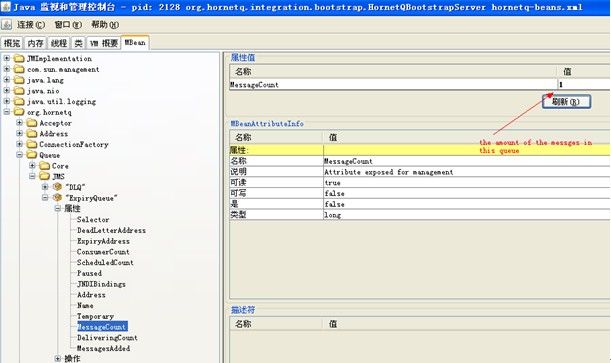
HornetQ本身并没有提供想ActiveMQ那样的网页管理界面,它必须和JBoss asapplication server集成,或者自己写程序调用它提供的接口,但这样无形提高了工作量。
有个简单变通的方法,因为HornetQ里面集成了JMX,所以可以通过jdk的工具jconsole来查看里面的一些信息,和操作里面的一些属性,达到管理的目的


