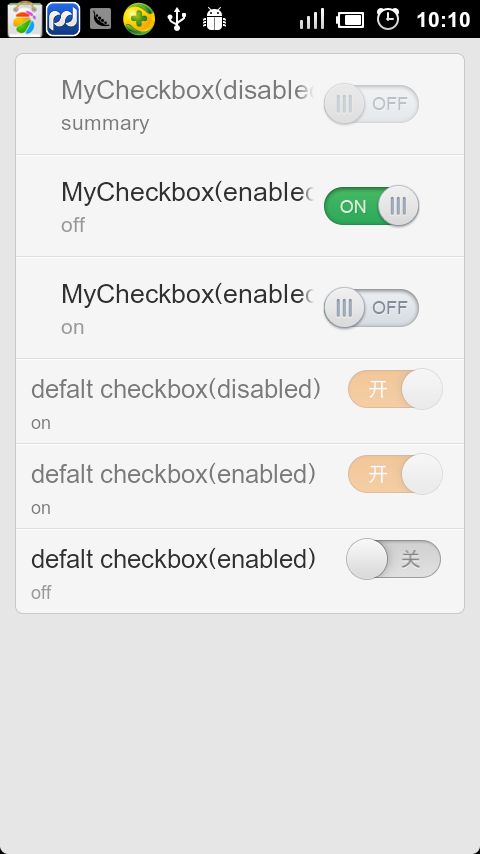
自定义RadioButton&CheckBox样式的实现
http://hi.baidu.com/ljlkings/blog/item/a7945124de875c038a82a1b4.html
Android 自定义RadioButton的样式
我们知道Android控件里的button,listview可以用xml的样式自定义成自己希望的漂亮样式。
最近用到RadioButton,利用xml修改android:background="@drawable/button_drawable",其中button_drawable为自己定义的.xml文件(res/drawable文件下),但是不成功,到网上查找,也没有正确的说法,我就开始自己尝试,最后做好了。
其实方法很简单,同样在res/drawable新建radiobutton.xml如下
1 check和checknull分别为选中和位选中的图片。
1 然后在你的布局文件中,RadioButton 布局
1 设置android:button = "@drawable/radiobutton",就可以了!
前后图片对比如下:

RadioButton修改样式
Android 自定义CheckBox 样式
http://www.pocketdigi.com/20110623/347.html
1,新建Android XML文件,类型选Drawable,根结点选selector,在这定义具体的样式。
2,应用到Checkbox与Button不同,并不是设置Background属性,而是设置style属性,所以我们要写一个style。
在style.xml写一个style,
3,应用到Checkbox:
新浪搜索界面 用到 自定义RadioButton
http://www.eoeandroid.com/thread-53703-1-1.html
风格化的 Toggle Buttons
http://blog.csdn.net/billpig/article/details/6634481
事实上,可以使用ToggleButton来模仿CheckBox:
bg_toggle.xml:
让CheckBox的选择框显示在右边

只要注意android:button和android:drawableRight就行了:

Android 自定义RadioButton的样式
我们知道Android控件里的button,listview可以用xml的样式自定义成自己希望的漂亮样式。
最近用到RadioButton,利用xml修改android:background="@drawable/button_drawable",其中button_drawable为自己定义的.xml文件(res/drawable文件下),但是不成功,到网上查找,也没有正确的说法,我就开始自己尝试,最后做好了。
其实方法很简单,同样在res/drawable新建radiobutton.xml如下
<selector xmlns:android="http://schemas.android.com/apk/res/android">
       <item
            android:state_enabled="true"
             android:state_checked="true"
            android:drawable="@drawable/check" />
       <item
             android:state_enabled="true"
             android:state_checked="false"
             android:drawable="@drawable/checknull" />
   </selector>
1 check和checknull分别为选中和位选中的图片。
1 然后在你的布局文件中,RadioButton 布局
1 设置android:button = "@drawable/radiobutton",就可以了!
前后图片对比如下:

RadioButton修改样式
<?xml version="1.0" encoding="utf-8"?>
<resources>
<style name="CustomTheme" parent="android:Theme">
   <item name="android:radioButtonStyle">@style/RadioButton</item>
</style>
<style name="RadioButton" parent="@android:style/Widget.CompoundButton.RadioButton">
   <item name="android:button">@drawable/radio</item>
</style>
</resources>
<?xml version="1.0" encoding="utf-8"?>
    <selector xmlns:android="http://schemas.android.com/apk/res/android">
    <item android:state_checked="true" android:state_window_focused="false"
        android:drawable="@drawable/radio_hover" />
    <item android:state_checked="false" android:state_window_focused="false"
        android:drawable="@drawable/radio_normal" />
    <item android:state_checked="true" android:state_pressed="true"
        android:drawable="@drawable/radio_active" />
    <item android:state_checked="false" android:state_pressed="true"
        android:drawable="@drawable/radio_active" />
    <item android:state_checked="true" android:state_focused="true"
        android:drawable="@drawable/radio_hover" />
    <item android:state_checked="false" android:state_focused="true"
        android:drawable="@drawable/radio_normal_off" />
    <item android:state_checked="false" android:drawable="@drawable/radio_normal" />
    <item android:state_checked="true" android:drawable="@drawable/radio_hover" />
    </selector>
Android 自定义CheckBox 样式
http://www.pocketdigi.com/20110623/347.html
1,新建Android XML文件,类型选Drawable,根结点选selector,在这定义具体的样式。
<?xml version="1.0" encoding="UTF-8"?>
<selector xmlns:android="http://schemas.android.com/apk/res/android">
	<item android:state_checked="true" android:state_pressed="true"
		android:drawable="@drawable/focused" />
	<item android:state_checked="false" android:state_pressed="true"
		android:drawable="@drawable/normal" />
	<item android:state_checked="false" android:drawable="@drawable/normal" />
	<item android:state_checked="true" android:drawable="@drawable/focused" />
</selector>
2,应用到Checkbox与Button不同,并不是设置Background属性,而是设置style属性,所以我们要写一个style。
在style.xml写一个style,
<style name="MyCheckBox" parent="@android:style/Widget.CompoundButton.CheckBox">
<item name="android:button">@drawable/checkbox</item>
</style>
3,应用到Checkbox:
<CheckBox android:layout_width="wrap_content"
android:layout_height="wrap_content"
style="@style/MyCheckBox"
/>
新浪搜索界面 用到 自定义RadioButton
http://www.eoeandroid.com/thread-53703-1-1.html
风格化的 Toggle Buttons
http://blog.csdn.net/billpig/article/details/6634481
事实上,可以使用ToggleButton来模仿CheckBox:
<ToggleButton android:layout_width="wrap_content"
        android:layout_height="wrap_content"
        android:background="@drawable/bg_toggle"/>
bg_toggle.xml:
<selector xmlns:android="http://schemas.android.com/apk/res/android">
    <item android:state_checked="true" android:drawable="@drawable/toggle_me_on" />
    <item android:drawable="@drawable/toggle_me_off" />
</selector>
让CheckBox的选择框显示在右边

只要注意android:button和android:drawableRight就行了:
<style name="style_checkbox">
        <item name="android:layout_width">wrap_content</item>
		<item name="android:layout_height">wrap_content</item>
		<item name="android:paddingRight">25dp</item>
		<item name="android:paddingTop">5dp</item>
		<item name="android:paddingBottom">5dp</item>
		<item name="android:textColor">@color/white</item>
		<item name="android:textSize">@dimen/font_middle</item>
		<item name="android:textStyle">italic</item>
		<item name="android:singleLine">true</item>
		<item name="android:button">@null</item>
		<item name="android:drawableRight">@drawable/mycheckbox</item>
		<item name="android:drawablePadding">5dp</item>
		<item name="android:background">@android:color/transparent</item>
    </style>
