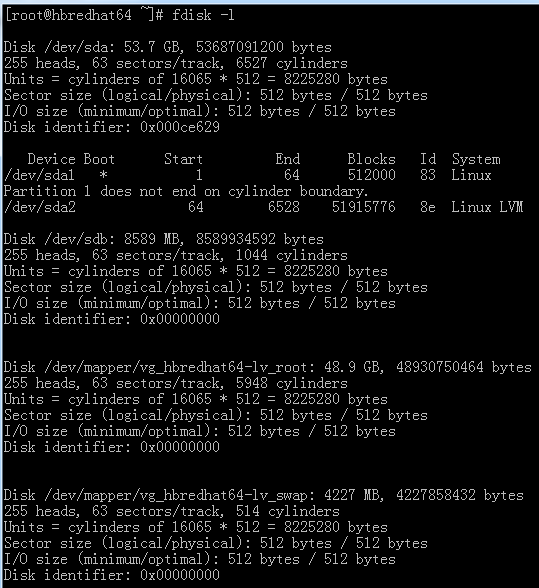
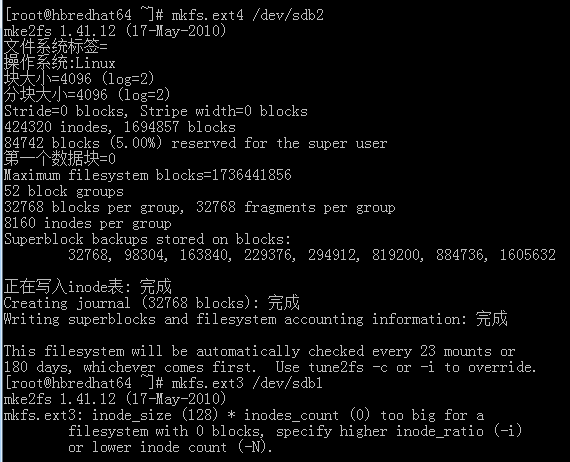
使用虚拟机添加一块硬盘,下面给添加的硬盘分盘和格式化
1、知道了新添加的硬盘在/dev/sdb文件下,给/dev/sdb文件分区
//sdb 中的b表示第二块磁盘
[root@localhost ~]# fdisk /dev/sdb
Device contains neither a valid DOS partition table, nor Sun, SGI or OSF disklabel
Building a new DOS disklabel with disk identifier 0x4fe1e9d4.
Changes will remain in memory only, until you decide to write them.
After that, of course, the previous content won't be recoverable.
Warning: invalid flag 0x0000 of partition table 4 will be corrected by w(rite)
WARNING: DOS-compatible mode is deprecated. It's strongly recommended to
switch off the mode (command 'c') and change display units to
sectors (command 'u').
#添加一个分区
Command (m for help): n
Command action
e extended(逻辑分区)
p primary partition (1-4)(主分区)
p(选择主分区)
Partition number (1-4): 1(选择第1块主分区)
#该硬盘一共有1044个块
First cylinder (1-1044, default 1): 1(从第1个块开始)
Last cylinder, +cylinders or +size{K,M,G} (1-1044, default 1044): 522(到第522个块结束)
Command (m for help): p(打印分区结果)
Disk /dev/sdb: 8589 MB, 8589934592 bytes
255 heads, 63 sectors/track, 1044 cylinders
Units = cylinders of 16065 * 512 = 8225280 bytes
Sector size (logical/physical): 512 bytes / 512 bytes
I/O size (minimum/optimal): 512 bytes / 512 bytes
Disk identifier: 0x4fe1e9d4
Device Boot Start End Blocks Id System
/dev/sdb1 1 522 4192933+ 83 Linux
#添加一个分区
Command (m for help): n
Command action
e extended(逻辑分区)
p primary partition (1-4)(主分区)
p(选择主分区)
Partition number (1-4): 2(选择第2个主分区)
#该硬盘一共有1044个块
First cylinder (523-1044, default 523): 523(从第523个块开始)
Last cylinder, +cylinders or +size{K,M,G} (523-1044, default 1044): 1044(到第1044个块结束)
Command (m for help): p
Disk /dev/sdb: 8589 MB, 8589934592 bytes
255 heads, 63 sectors/track, 1044 cylinders
Units = cylinders of 16065 * 512 = 8225280 bytes
Sector size (logical/physical): 512 bytes / 512 bytes
I/O size (minimum/optimal): 512 bytes / 512 bytes
Disk identifier: 0x4fe1e9d4
Device Boot Start End Blocks Id System
/dev/sdb1 1 522 4192933+ 83 Linux
/dev/sdb2 523 1044 4192965 83 Linux
## 这里两个分区已经分好了,接下来得把这两个分区写入硬盘,用w
Command (m for help): w
The partition table has been altered!
Calling ioctl() to re-read partition table.
Syncing disks.
2、下面的工作就是对该硬盘进行格式,我这里是格式化成ext3
#这里注意后面的名称是/dev/sdb1 ,1表示第一个分区
[root@localhost ~]# mkfs.ext3 /dev/sdb1
mke2fs 1.41.12 (17-May-2010)
文件系统标签=
操作系统:Linux
块大小=4096 (log=2)
分块大小=4096 (log=2)
Stride=0 blocks, Stripe width=0 blocks
262144 inodes, 1048233 blocks
52411 blocks (5.00%) reserved for the super user
第一个数据块=0
Maximum filesystem blocks=1073741824
32 block groups
32768 blocks per group, 32768 fragments per group
8192 inodes per group
Superblock backups stored on blocks:
32768, 98304, 163840, 229376, 294912, 819200, 884736
正在写入inode表: 完成
Creating journal (16384 blocks): 完成
Writing superblocks and filesystem accounting information: 完成
This filesystem will be automatically checked every 30 mounts or
180 days, whichever comes first. Use tune2fs -c or -i to override.
#这里注意后面的名称是/dev/sdb2 ,2表示第一个分区
[root@localhost ~]# mkfs.ext3 /dev/sdb2
mke2fs 1.41.12 (17-May-2010)
文件系统标签=
操作系统:Linux
块大小=4096 (log=2)
分块大小=4096 (log=2)
Stride=0 blocks, Stripe width=0 blocks
262144 inodes, 1048241 blocks
52412 blocks (5.00%) reserved for the super user
第一个数据块=0
Maximum filesystem blocks=1073741824
32 block groups
32768 blocks per group, 32768 fragments per group
8192 inodes per group
Superblock backups stored on blocks:
32768, 98304, 163840, 229376, 294912, 819200, 884736
正在写入inode表: 完成
Creating journal (16384 blocks): 完成
Writing superblocks and filesystem accounting information: 完成
This filesystem will be automatically checked every 21 mounts or
180 days, whichever comes first. Use tune2fs -c or -i to override.
格式化两种方式
#查看系统的硬盘
[root@localhost ~]# fdisk -l
Disk /dev/sda: 42.9 GB, 42949672960 bytes
255 heads, 63 sectors/track, 5221 cylinders
Units = cylinders of 16065 * 512 = 8225280 bytes
Sector size (logical/physical): 512 bytes / 512 bytes
I/O size (minimum/optimal): 512 bytes / 512 bytes
Disk identifier: 0x00034afb
Device Boot Start End Blocks Id System
/dev/sda1 * 1 64 512000 83 Linux
Partition 1 does not end on cylinder boundary.
/dev/sda2 64 5222 41430016 8e Linux LVM
Disk /dev/sdb: 8589 MB, 8589934592 bytes
255 heads, 63 sectors/track, 1044 cylinders
Units = cylinders of 16065 * 512 = 8225280 bytes
Sector size (logical/physical): 512 bytes / 512 bytes
I/O size (minimum/optimal): 512 bytes / 512 bytes
Disk identifier: 0x4fe1e9d4
Device Boot Start End Blocks Id System
/dev/sdb1 1 522 4192933+ 83 Linux
/dev/sdb2 523 1044 4192965 83 Linux
Disk /dev/mapper/VolGroup-lv_root: 38.2 GB, 38159777792 bytes
255 heads, 63 sectors/track, 4639 cylinders
Units = cylinders of 16065 * 512 = 8225280 bytes
Sector size (logical/physical): 512 bytes / 512 bytes
I/O size (minimum/optimal): 512 bytes / 512 bytes
Disk identifier: 0x00000000
Disk /dev/mapper/VolGroup-lv_swap: 4261 MB, 4261412864 bytes
255 heads, 63 sectors/track, 518 cylinders
Units = cylinders of 16065 * 512 = 8225280 bytes
Sector size (logical/physical): 512 bytes / 512 bytes
I/O size (minimum/optimal): 512 bytes / 512 bytes
Disk identifier: 0x00000000
3、创建目录,让新添加的分区挂载到对应的目录上
[root@localhost ~]# mkdir /hard1
[root@localhost ~]# mkdir /hard2
[root@localhost ~]# cd /
[root@localhost /]# ls
0 cgroup hard1 lib misc opt sbin sys var
bin dev hard2 lost+found mnt proc selinux tmp
boot etc home media net root srv usr
[root@localhost /]# mount /dev/sdb1 /hard1
[root@localhost /]# mount /dev/sdb2 /hard2
[root@localhost /]# df -h
文件系统 容量 已用 可用 已用%% 挂载点
/dev/mapper/VolGroup-lv_root
35G 2.7G 31G 8% /
/dev/sda1 485M 36M 425M 8% /boot
tmpfs 947M 0 947M 0% /dev/shm
/dev/sdb1 4.0G 73M 3.7G 2% /hard1
/dev/sdb2 4.0G 73M 3.7G 2% /hard2
[root@localhost /]#
下面的内容是在网上摘抄的
转移数据
其实一直做到这里都还只是准备工作,如果根分区下的数据不转移到这个虚拟硬盘中的话,还是会提示空间不足。下面是将/usr全部转移到虚拟硬盘中的过程(参考Linux人生的《Linux系统精华之一——挂载》),同样也可以转移其他目录:
1、将/usr中的全部数据拷贝到data1(可以用mv一个一个拷贝,也可以用tar压缩之后一次拷贝,具体参见这两个命令的man)
2、清空usr目录:
# rm -r /usr
# mkdir /usr
3、卸载刚才挂上的虚拟硬盘,重新将它挂载到usr目录:
# umount /dev/sdb1 /data1
# mount /dev/sdb1 /usr
4、# vi /etc/fstab ## 用vi修改/etc/fstab,使系统启动就可以自动挂载
(点击“i”进入插入模式对文本内容进行修改,改好后点“Esc”,输入冒号“:”进入命令行模式,输入wq保存退出,具体操作可以参考vi常用指令)
在内容中加上一行:
/dev/sdb1 /usr ext3 defaults 1 2
4、Ok,重新启动之后,可以查看现在的硬盘使用情况了:
# df -h
文件系统 容量 已用 可用 已用% 挂载点
/dev/sda2 3.6G 1.3G 2.4G 35% /
udev 125M 124K 125M 1% /dev
/dev/sdb1 4.0G 2.3G 1.6G 60% /usr
根分区的“已用%”从99%降到了35%,哈哈,大功告成,可以继续做其他的事情了。不过这次添加的虚拟硬盘还是比较小,完全可以在添加的时候设得大一点的。美中不足。


