Oracle 10g & ASM Install For Redhat Enterprise Linux AS 4
一、系统调整
1.检查操作系统rpm包安装情况
binutils-2.15.92.0.2-13.EL4
compat-db-4.1.25-9
compat-libstdc++-296-2.96-132.7.2
control-center-2.8.0-12
gcc-3.4.3-22.1.EL4
gcc-c++-3.4.3-22.1.EL44
glibc-2.3.4-2.9
glibc-common-2.3.4-2.9
gnome-libs-1.4.1.2.90-44.1
libstdc++-3.4.3-22.1
libstdc++-devel-3.4.3-22.1
make-3.80-5
pdksh-5.2.14-30
sysstat-5.0.5-1
xscreensaver-4.18-5.rhel4.2
setarch-1.6-1
注:
检测——rpm–qamake
安装——rpm–Uvhmake-3.80-5.i386.rpm
2.配置Linux内核参数
1)打开/etc/sysctl.conf,添加以下参数:
kernel.shmall=2097152
kernel.shmmax=2147483648
kernel.shmmni=4096
kernel.sem=25032000100128
fs.file-max=65536
net.ipv4.ip_local_port_range=102465000
net.core.rmem_default=262144
net.core.rmem_max=262144
net.core.wmem_default=262144
net.core.wmem_max=262144
2)运行下面命令,使参数生效:
#/sbin/sysctl-p
3.在/etc/security/limits.conf文件中添加如下信息
* soft nproc 2047
* hard nproc 16384
* soft nofile 1024
* hard nofile 65536
4.在/etc/pam.d/login文件中加入下列行
sessionrequired/lib/security/pam_limits.so
5.建用户组与用户
#groupaddoinstall
#groupadddba
#useradd-m-u501-goinstall-Gdbaoracle
#passwdoracle
6.创建文件夹并设置属主
#mkdir/oracle
#chown-Roracle:dba/oracle
7.在/home/oracle/.bash_profile文件中加入如下内容,增加环境变量
exportORACLE_BASE=/oracle
exportORACLE_HOME=$ORACLE_BASE/product/10.2.0/db_1
exportORACLE_SID=ora10gdb
exportORACLE_TERM=xterm
PATH=/usr/sbin:$PATH;exportPATH
PATH=$ORACLE_HOME/bin:$PATH;exportPATH
if[$USER="oracle"];then
if[$SHELL="/bin/ksh"];then
ulimit-p16384
ulimit-n65536
else
ulimit-u16384-n65536
fi
fi
二、安装Oracle软件
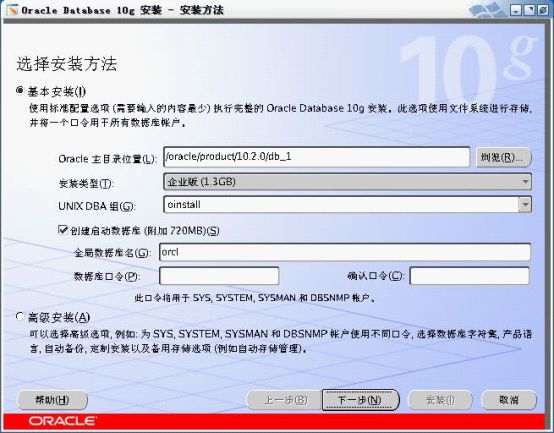
1.#/media/cdrom/runInstaller,GUI启动后,选择“高级安装”,下一步。
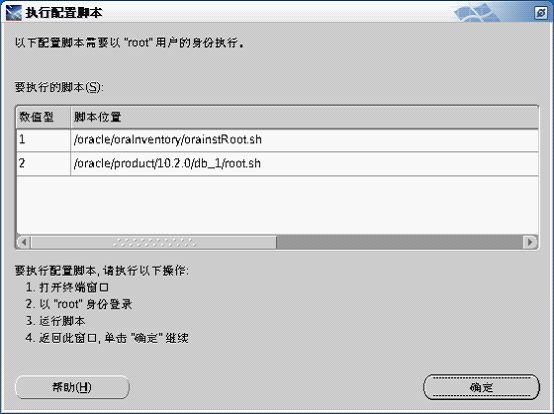
2.安装100%时,会弹出对话框,要求运行两个脚本。

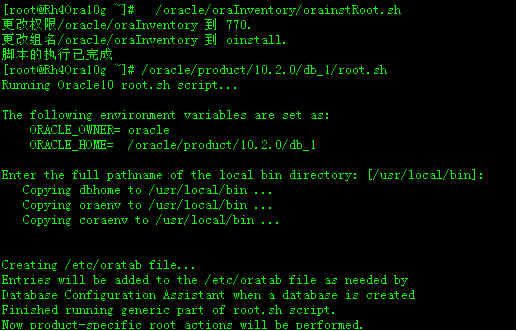
3.以root用户登陆Linux系统,按要求运行脚本,中间localbin路径直接回车,运行完后,点对话框的“确定”。
4.安装完成
三、自动存储ASM配置
1.安装OracleASMLib需要的安装包
oracleasm-2.6.9-78.EL-debuginfo-2.0.5-1.el4.i686.rpm
oracleasm-support-2.1.1-1.el4.i386.rpm
oracleasm-2.6.9-78.EL-2.0.5-1.el4.i686.rpm
oracleasmlib-2.0.2-1.i386.rpm
oracleasm-2.6.9-78.ELsmp-2.0.5-1.el4.i686.rpm
oracleasm-2.6.9-78.ELhugemem-2.0.5-1.el4.i686.rpm
oracleasm-2.6.9-78.ELxenU-2.0.5-1.el4.i686.rpm
下载地址:
http://www.oracle.com/technology/software/tech/linux/asmlib/rhel4.html
2. 配置ASMLib
# /etc/init.d/oracleasm configure
Configuring the Oracle ASM library driver.
This will configure the on-boot properties of the Oracle ASM library
driver. The following questions will determine whether the driver is
loaded on boot and what permissions it will have. The current values
will be shown in brackets ('[]'). Hitting <ENTER> without typing an
answer will keep that current value. Ctrl-C will abort.
Default user to own the driver interface []: oracle
Default group to own the driver interface []: dba
Start Oracle ASM library driver on boot (y/n) [n]: y
Scan for Oracle ASM disks on boot (y/n) [y]: y
Writing Oracle ASM library driver configuration: done
Initializing the Oracle ASMLib driver: [ OK ]
Scanning the system for Oracle ASMLib disks: [ OK ]
3. 创建ASM磁盘
说明:createdisk 是针对分区,不是针对磁盘,即:先应将磁盘分区
1) 对硬盘进行分区操作
# fdisk -l
Disk /dev/sda: 10.7 GB, 10737418240 bytes
255 heads, 63 sectors/track, 1305 cylinders
Units = cylinders of 16065 * 512 = 8225280 bytes
Device BootStartEndBlocksId System
/dev/sda1* 1 1310439183 Linux
……
Disk /dev/sdb: 1073 MB, 1073741824 bytes
255 heads, 63 sectors/track, 130 cylinders
Units = cylinders of 16065 * 512 = 8225280 bytes
Device BootStartEndBlocksId System
Disk /dev/sdc: 1073 MB, 1073741824 bytes
255 heads, 63 sectors/track, 130 cylinders
Units = cylinders of 16065 * 512 = 8225280 bytes
Device BootStartEndBlocksId System
# fdisk /dev/sdb
Command (m for help): m
Command action
atoggle a bootable flag
bedit bsd disklabel
ctoggle the dos compatibility flag
ddelete a partition
llist known partition types
mprint this menu
nadd a new partition
ocreate a new empty DOS partition table
pprint the partition table
qquit without saving changes
screate a new empty Sun disklabel
tchange a partition's system id
uchange display/entry units
vverify the partition table
wwrite table to disk and exit
xextra functionality (experts only)
Command (m for help): n
Command action
eextended
pprimary partition (1-4)
p
Partition number (1-4): 1
First cylinder (1-130, default 1):
Using default value 1
Last cylinder or +size or +sizeM or +sizeK (1-130, default 130):
Using default value 130
Command (m for help): w
The partition table has been altered!
Calling ioctl() to re-read partition table.
Syncing disks.
# fdisk -l
Disk /dev/sda: 10.7 GB, 10737418240 bytes
255 heads, 63 sectors/track, 1305 cylinders
Units = cylinders of 16065 * 512 = 8225280 bytes
Device BootStartEndBlocksId System
/dev/sda1* 1 1310439183 Linux
……
Disk /dev/sdb: 1073 MB, 1073741824 bytes
255 heads, 63 sectors/track, 130 cylinders
Units = cylinders of 16065 * 512 = 8225280 bytes
Device BootStartEndBlocksId System
/dev/sdb11130 1044193+ 83 Linux
Disk /dev/sdc: 1073 MB, 1073741824 bytes
255 heads, 63 sectors/track, 130 cylinders
Units = cylinders of 16065 * 512 = 8225280 bytes
Device BootStartEndBlocksId System
2) 将分区加入到ASM磁盘中
# oracleasm createdisk ASMVOL1 /dev/sdb1
Writing disk header: done
Instantiating disk: done
# oracleasm createdisk ASMVOL2 /dev/sdc1
Writing disk header: done
Instantiating disk: done
3) 查看ASM磁盘信息
# oracleasm listdisks
ASMVOL1
ASMVOL2
注:
删除ASM磁盘——#/etc/init.d/oracleasmdeletediskVOL4
RAC环境中某节点添加新ASM磁盘,其它节点运行scandisk来获取这种变化——#/etc/init.d/oracleasmscandisks
四、建立数据库
$dbca
1.启动数据库新建界面,“下一步”。
2.保持默认,至存储选项时,选择“自动存储管理(ASM)”,点“下一步”。

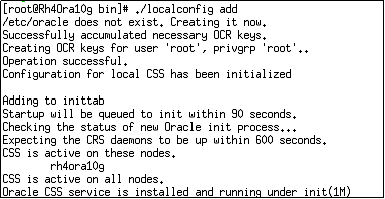
3.弹出警告对话框,要求启动CSS。
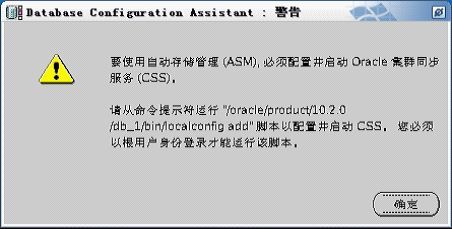
4.按要求以root身份登陆Linux系统,运行命令完成后回到对话框点“确定”。
5.输入ASM实例口令,并确认,“下一步”。

6.数据库开始创建ASM实例,并启动。
7.ASM实例完成后,准备创建并加载ASM磁盘组。点击“新建”。

8.此处为磁盘组命名,选择冗余方案,选择欲加入磁盘组的分区后点“确定”。

9.磁盘组加载完成后,开始建立数据库。
10.数据库建立完成。
11.数据库建立完成后,进行用户与密码管理。
五、ASMdatabase简单管理
1.开机启动:
1)启动监听
$lsnrctlstart
2)启动ASM实例
$exportORACLE_SID=+ASM
$sqlplus/assysdba
注:CSS必需已启动,可用crsctlcheckcss命令查看
SQL>startup
3)启动数据库
$exportORACLE_SID=ctais
$sqlplus/assysdba
SQL>startup
2.关机停止:
1)关闭数据库
$exportORACLE_SID=ctais
$sqlplus/assysdba
SQL>shutdownimmediate
2)关闭ASM实例
$exportORACLE_SID=+ASM
$sqlplus/assysdba
SQL>shutdownimmediate