在websphere上安装动态高速缓存监控器
这一节探讨如何安装和配置动态高速缓存。这包括五个基本步骤:
- 在 WebSphere Portal 服务器上启用 servlet 高速缓存。
- 安装动态高速缓存监控器。
- 配置 Workplace Web Content Management 高速缓存策略。
- 安装 ESI。
- 启用 Edge 组件。
下面详细描述这些步骤。
在 WebSphere Portal 服务器上启用 servlet 高速缓存
需要这个操作是因为 Web Content Management 是一个 servlet。要实现这一操作,转至 WebSphere Admin Console 并选择 Servers - Application Servers - WebSphere_Portal。然后单击 Enable servlet caching。(要使设置生效需要重新启动服务器,但是这一步可以留到完成了下面描述的所有步骤后再执行。)
动态高速缓存监控器是一个可安装的 Web 应用程序,用于显示 servlet 高速缓存实例的简单缓存统计信息、缓存条目和缓存策略信息。默认情况下高速缓存监控器并未安装在 WebSphere Application Server 上。但是,可以手动地安装它。
- 找到 CacheMonitor.ear 文件。该文件通常位于 [WAS HOME](服务器 1 主目录)的 installableApps 目录下,例如,C:\Program Files\WebSphere\AppServer\installableApps。
- 从 WebSphere Application Server 主管理控制台,选择 Applications - Install New Application。选择 Local Path 并使用 Browse 按钮找到高速缓存监控器安装文件。单击 Next 按钮开始安装。
- 将连续出现三个设置屏幕(标题为 Preparing for application installation、Application Security Warnings 和 Provide options to perform the installation)。接受这三个屏幕上显示的默认设置。
- 接下来,必须将高速缓存监控器映射到虚拟主机。在我们的例子中,使用的是 default_host。(门户主机名称和端口可以用来访问高速缓存监控器应用程序。)将 Web 模块映射到被监控的服务器(例如,WebSphere_Portal 和 server1)。
- 现在必须设置到 UI 的安全性访问。在这个例子中,访问权限将授予每一个人。然而,在生产环境中,可能希望将这一权限限制到 Administrator 组。
- 最后一步是单击 Finish(在 Summary 屏幕上)、Save to Master Configuration(在 Installing 屏幕上)和 Save(在 Save in Master Configuration 屏幕上)。
- 重新启动 WebSphere Portal 服务器。
配置 Workplace Web Content Management 高速缓存策略
高速缓存策略作为 XML 文件(cachespec.xml)保存在 Web Content Management 安装子目录中,例如:<was_root></was_root>\installedApps\<server_name></server_name>\ilwwcm_war.ear\ilwwcm.ear\WEB_INF\
要缓存除搜索结果、个性化和声音邮件策略页面外的所有内容,在 cachespec.xml 中设置下列代码:
<!---->
<!---->
<cache></cache>
   <cache-entry></cache-entry>
      <class></class>servlet
      <name></name>com.presence.connect.ConnectServlet.class
      <property name="store-cookies">false</property>
      <property name="save-attributes">true</property>
      <property name="consume-subfragments">true</property>
      <cache-id></cache-id>
         <component id="" type="pathinfo">
            <required></required>true
            <not-value></not-value>/Intranet/Search+Results
            <not-value></not-value>/Intranet/Tools/Personalize/
            <not-value></not-value>/Intranet/Home/IT/Procedures/Voice+
              Mail+Policy
         </component>
         <timeout></timeout>3000
|
其中:
- com.presence.connect.ConnectServlet.class 是 Web Content Management 的容器类。这一设置将缓存除声明排除的内容之外的所有内容。
- exclusion 值(在 <not-value></not-value>中)必须在策略值的开始处包含一个正斜线(/)。否则,主页将出现不可预知的错误(error 500 - Server caught unhandled exception from servlet [WCM Framework]: OutputStream already obtained)。
- 在策略值的结尾添加一个正斜线(/),来指示是否包含路径的子路径或仅仅包含这一级别的组件。例如:<not-value></not-value>/Intranet/Tools/Personalize/。
此外,可以使用下列策略。如果高速缓存解决方案只需要存储部分站点(或其他的站点框架),那么这是非常有用的:
<!---->
<!---->
<cache></cache>
   <cache-entry></cache-entry>
      <class></class>servlet
      <name></name>/connect/Intranet/Home/
      <property name="store-cookies">false</property>
      <property name="save-attributes">true</property>
      <property name="consume-subfragments">true
      <cache-id></cache-id>
         <component id="" type="pathinfo">
            <required></required>true
            <not-value></not-value>/Intranet/Search+Results
            <not-value></not-value>/Intranet/Tools/Personalize/
            <not-value></not-value>/Intranet/Home/IT/Procedures/Voice+Mail+
              Policy
         </component>
         <timeout></timeout>3000


</property> |
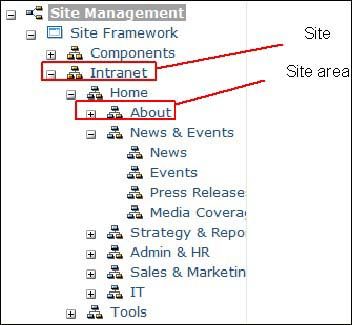
其中 <name></name>的值必须为下面的格式:/connect/[SITE]/[HOMEPAGE]/。
图 6 显示了一个站点框架和站点区域的例子:
图 6. 站点框架和站点区域

有关站点和站点区域的更多信息,请参见 IBM Web Content Management 信息中心,或者 IBM 红皮书 “IBM Workplace Web Content Management”。
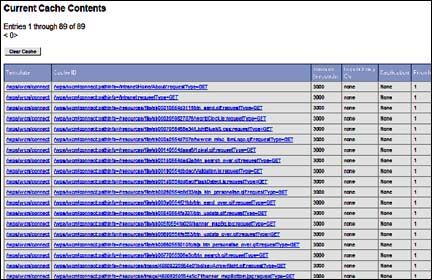
在页面被访问时,动态高速缓存持续缓存页面片段,而且可以通过高速缓存监控器浏览缓存的片段。使用下面的 URL 访问高速缓存监控器:http://[portal_hostname]:[portal_port]/cachemonitor(例如,http://wp51vm.ibm.com:9081/cachemonitor/)。当请求一个页面时,将出现如图 7 中所示的缓存内容:
图 7. 当前高速缓存内容

每一个片段都可以独立地手动刷新(即使其失效),整个缓存也可以这样。
当启用 Edge 组件时(参见下面的部分),Edge 组件能够缓存图片和 JSP 页面之类的内容,它们通常安装在前线的 Web 服务器上。首先必须安装 DynaCacheEsi.ear 文件,这样就可以通过高速缓存监控器管理 Edge 组件和统计信息。
与高速缓存监控器一样,DynaCacheEsi.ear 文件通常位于 [WAS HOME](server1 主目录)的 installableApps 目录下,例如,C:\Program Files\WebSphere\AppServer\installableApps。
- 从 WebSphere Application Server 主管理控制台,选择 Applications - Install New Application。选择 Local Path 并使用 Browse 按钮找到高速缓存监控器安装文件。单击 Next 按钮开始安装。
- 将连续出现三个设置屏幕(Preparing for application installation、Application Security Warnings 和 Provide options to perform the installation)。接受这三个屏幕上显示的默认设置。
- 接下来,映射 DynaCacheEsi.ear 应用程序到虚拟主机。在这个例子中,使用的是 default_host。然后将 Web 模块映射到要监视的服务器。
- 依次单击 Finish、Save to Master Configuration 和 Save,分别在 Summary 屏幕、Installing 屏幕和 Save in Master Configuration 屏幕上。
接下来,必须在 WebSphere Application Server plugin-cfg.xml 文件中启用 ESI 组件,并且必须修改 Web Content Management 缓存策略以使用 Edge 组件。在我们的例子中,将使用 Edge 组件(通常安装在前线的 Web 服务器上)缓存内容(如图片和 JSP 页面)的片段。要启用这个组件,必须在 plugin-cfg.xml 文件中启用 Edge 组件,该文件位于 [WAS_HOME]\config\cells 文件夹中。
当安装 WebSphere Application Server 插件时,服务器自动生成 plugin-cfg.xml 文件,Edge 属性的默认设置如下:
<property value="true" name="EsiEnable"></property>
此外,还要设置下列属性:
 <property value="1024" name="esiMaxCacheSize"></property>
 <property value="true" name="esiInvalidationMonitor"></property>
其中:
- esiMaxCacheSize 是以 1K 字节为单位的高速缓存最大容量。默认的最大容量是 1 MB。如果缓存已满,那么从缓存中移除的第一个条目是距到期日期最近的缓存条目。
- esiInvalidationMonitor 指定 ESI 处理程序是否应该从应用服务器接收失效,默认情况下设置为 false。
例如,plugin-cfg.xml 应该具有如下条目:
<!---->
<config vhostmatchingcompat="false" responsechunksize="64" refreshinterval="60" ignorednsfailures="false" iispluginpriority="High" iisdisablenagle="false" chunkedresponse="false" appserverportpreference="HostHeader" acceptallcontent="false" asdisablenagle="false"></config>
   <log name="C:/PROGRA~1/WEBSPH~1/APPSER~
     1/logs/http_plugin.log" loglevel="Error"></log>
   <property value="true" name="ESIEnable"></property>
   <property value="1024" name="ESIMaxCacheSize"></property>
   <property value="false" name="ESIInvalidationMonitor"></property>
   <virtualhostgroup name="default_host"></virtualhostgroup>
.
.
|
添加 EdgeCacheable 属性到 cachspec.xml 文件中,如下所示,表示片段必须在 Edge 服务器上缓存:
<!---->
<!---->

<cache></cache>
   <cache-entry></cache-entry>
      <class></class>servlet
      <name></name>com.presence.connect.ConnectServlet.class<
        /name>
      <property name="store-cookies">false</property>
      <property name="save-attributes">true</property>
      <property name="consume-subfragments">true<
        /property>
      <cache-id></cache-id>
         <component id="" type="pathinfo">
         <required></required>true
            <not-value></not-value>/Intranet/Search+Results
         <not-value></not-value>/Intranet/Tools/Personalize/
         <not-value></not-value>/Intranet/Home/IT/Procedures/Voice+Mail+
           Policy
         </component>
         <timeout></timeout>3000
         <property name="EdgeCacheable">true</property>


</property> |
|
本文探讨了如何设置多个 IBM Workplace Web Content Management 高速缓存选项,从 Web Content Management 自己的高速缓存解决方案(pre-rendering,高速缓存)到动态高速缓存服务。这将帮助提供高性能和可伸缩的 Web 站点。
原文: http://www.ibm.com/developerworks/cn/workplace/dynamic-cache-wcm/