学习笔记44(ASP.NET调用V3版本的Google Maps API)
英文原文:Google Maps API V3 for ASP.NET
译文出处:青藤园
译文作者:王国峰
译文链接:ASP.NET中使用Google Maps API V3【译】
简介
Google Maps为我们提供了一种非常灵活的方式来使用它的地图服务。我们可以在Web应用程序中通过调用Google Maps API来为我们的用户提供方位信息、地理位置信息以及其他类型的东西。尽管已经有很多文章介绍了Google Maps API的使用方法,但这次我要介绍的是最新V3版本的Google Maps API。在这篇文章中,我们将会看到一些使用Google Maps的常见技术。为了能更好的理解下面的示例代码,你需要了解Javascript和C#的基本知识。
你的第一个Google Maps
在Google Maps API的早期版本中,我们需要将自己的web应用程序注册至Google,从而获取一个API Key。然而随着新版本的发布,Google Maps的注册机制已经被淘汰了,但是最近Google又提出了一些使用地图的限制,你可以通过下面的链接获取Google Maps API的使用方法和一些使用条款:http://code.google.com/apis/maps/documentation/javascript/usage.html#usage_limits。现在我们就开始在自己的网站下创建一个Google Maps地图示例,下面的一行代码是用来连接Google Maps API服务的:
- <scripttype="text/javascript"src="http://maps.googleapis.com/maps/api/js?sensor=false">
- </script>
然后你可以用下面的代码来创建一个简单的地图:
- functionInitializeMap()
- {
- varlatlng=newgoogle.maps.LatLng(-34.397,150.644);
- varmyOptions={
- zoom:8,
- center:latlng,
- mapTypeId:google.maps.MapTypeId.ROADMAP
- };
- varmap=newgoogle.maps.Map(document.getElementById("map"),myOptions);
- }
- window.onload=InitializeMap;

Google Maps 设置选项
在上面的例子中,我们使用了一个Map类,并设置了一个HTML ID作为参数。现在我们来更深入一点,一起来看看下面的地图选项:
- Codefunctioninitialize(){
- varlatlng=newgoogle.maps.LatLng(-34.397,150.644);
- varoptions=
- {
- zoom:3,
- center:newgoogle.maps.LatLng(37.09,-95.71),
- mapTypeId:google.maps.MapTypeId.ROADMAP,
- mapTypeControl:true,
- mapTypeControlOptions:
- {
- style:google.maps.MapTypeControlStyle.DROPDOWN_MENU,
- poistion:google.maps.ControlPosition.TOP_RIGHT,
- mapTypeIds:[google.maps.MapTypeId.ROADMAP,
- google.maps.MapTypeId.TERRAIN,
- google.maps.MapTypeId.HYBRID,
- google.maps.MapTypeId.SATELLITE]
- },
- navigationControl:true,
- navigationControlOptions:
- {
- style:google.maps.NavigationControlStyle.ZOOM_PAN
- },
- scaleControl:true,
- disableDoubleClickZoom:truefalse,
- streetViewControl:true,
- draggableCursor:'move'
- };
- varmap=newgoogle.maps.Map(document.getElementById("map"),options);
- }
- window.onload=initialize;
上面的例子中,我们应用了地图的所有属性,你可以根据需要来选择使用它们。

Map类的属性说明如下表所示
| 属性 | 类 | ||||||||||||||
MapTypeControl:true/false |
mapTypeControlOptions
|
||||||||||||||
navigationControl:true/false |
navigationControlOptions
|
||||||||||||||
scaleControl:true/false |
scaleControlOptions: 和navigationControl有一样的属性(position, style) 方法也一样. |
||||||||||||||
disableDoubleClickZoom: true/false |
|
||||||||||||||
scrollwheel: true/false |
|
||||||||||||||
draggable: true/false |
|
||||||||||||||
streetViewControl: true/false |
|
Map Maker(地图标记)
Maker类提供了这样一个选项,为用户指定的位置显示一个标记,在我们的应用中地图标记是十分常用的,下面的代码将告诉大家如何创建一个简单的地图标记:
- varmarker=newgoogle.maps.Marker
- (
- {
- position:newgoogle.maps.LatLng(-34.397,150.644),
- map:map,
- title:'Clickme'
- }
- );

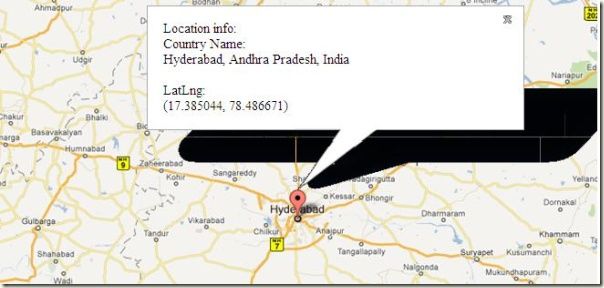
Info Window(信息窗口)
我们已经在地图上某个位置加了标记,也为标记添加onclick了事件,点击可以弹出一个窗口来显示该地点的详细信息。我们可以按照下面的代码来创建信息窗口:
- varinfowindow=newgoogle.maps.InfoWindow({
- content:'Locationinfo:
- CountryName:
- LatLng:'
- });
- google.maps.event.addListener(marker,'click',function(){
- //打开窗口
- infowindow.open(map,marker);
- });
将它们结合起来的代码如下:
- Codevarmap;
- functioninitialize(){
- varlatlng=newgoogle.maps.LatLng(-34.397,150.644);
- varmyOptions={
- zoom:8,
- center:latlng,
- mapTypeId:google.maps.MapTypeId.ROADMAP
- };
- map=newgoogle.maps.Map(document.getElementById("map"),myOptions);
- varmarker=newgoogle.maps.Marker
- (
- {
- position:newgoogle.maps.LatLng(-34.397,150.644),
- map:map,
- title:'Clickme'
- }
- );
- varinfowindow=newgoogle.maps.InfoWindow({
- content:'Locationinfo:
- CountryName:
- LatLng:'
- });
- google.maps.event.addListener(marker,'click',function(){
- //CallingtheopenmethodoftheinfoWindow
- infowindow.open(map,marker);
- });
- }
- window.onload=initialize;
利用上面的代码,我们将会在页面上创建一张地图,然后定位用户所在的区域,在这个区域加上标记,并且弹出一个显示位置信息的窗口。
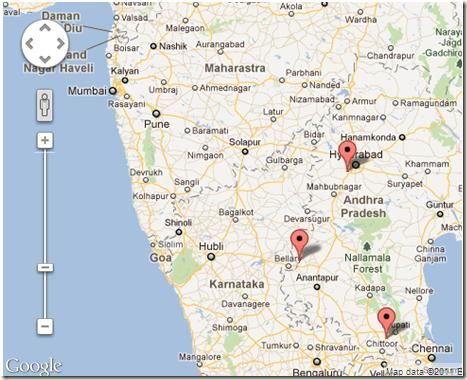
Multiple Makers(多标记)
有些时候,我们可以要在地图上处理多个标记,那么我们就可以用下面代码来实现:
- Codefunctionmarkicons(){
- InitializeMap();
- varltlng=[];
- ltlng.push(newgoogle.maps.LatLng(40.756,-73.986));
- ltlng.push(newgoogle.maps.LatLng(37.775,-122.419));
- ltlng.push(newgoogle.maps.LatLng(47.620,-122.347));
- ltlng.push(newgoogle.maps.LatLng(-22.933,-43.184));
- for(vari=0;i<=ltlng.length;i++){
- marker=newgoogle.maps.Marker({
- map:map,
- position:ltlng[i]
- });
- (function(i,marker){
- google.maps.event.addListener(marker,'click',function(){
- if(!infowindow){
- infowindow=newgoogle.maps.InfoWindow();
- }
- infowindow.setContent("Message"+i);
- infowindow.open(map,marker);
- });
- })(i,marker);
- }
- }
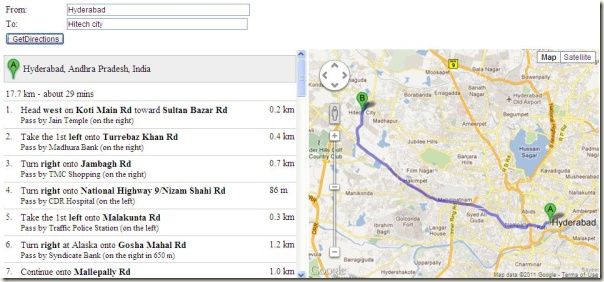
路线说明
一个最有用的特性之一是Google Maps API可以为任何指定的位置提供详细的路线说明,实现代码如下:
- CodevardirectionsDisplay;
- vardirectionsService=newgoogle.maps.DirectionsService();
- functionInitializeMap(){
- directionsDisplay=newgoogle.maps.DirectionsRenderer();
- varlatlng=newgoogle.maps.LatLng(-34.397,150.644);
- varmyOptions=
- {
- zoom:8,
- center:latlng,
- mapTypeId:google.maps.MapTypeId.ROADMAP
- };
- varmap=newgoogle.maps.Map(document.getElementById("map"),myOptions);
- directionsDisplay.setMap(map);
- directionsDisplay.setPanel(document.getElementById('directionpanel'));
- varcontrol=document.getElementById('control');
- control.style.display='block';
- }
- calcRoute(){
- varstart=document.getElementById('startvalue').value;
- varend=document.getElementById('endvalue').value;
- varrequest={
- origin:start,
- destination:end,
- travelMode:google.maps.DirectionsTravelMode.DRIVING
- };
- directionsService.route(request,(response,status){
- if(status==google.maps.DirectionsStatus.OK){
- directionsDisplay.setDirections(response);
- }
- });
- }
- functionwindow.onload=InitializeMap;
Layers
Google Maps API为你提供了多层的选项,其中有一个是自行车层。通过自行车层,可以为一些特别的位置显示自行车路线。下面的代码是让你在地图上添加自行车层:
- Codevarmap
- functionInitializeMap(){
- varlatlng=newgoogle.maps.LatLng(-34.397,150.644);
- varmyOptions={
- zoom:8,
- center:latlng,
- mapTypeId:google.maps.MapTypeId.ROADMAP
- };
- map=newgoogle.maps.Map(document.getElementById("map"),myOptions);
- }
- window.onload=InitializeMap;
- varbikeLayer=newgoogle.maps.BicyclingLayer();
- bikeLayer.setMap(map);
Geocoding
到目前为止,我们已经学习创建Google地图的基本思想,同时也学习了如何显示位置相关的信息。下面我们来看看用户是如何来计算位置的,Geocoding可以计算出指定区域的经度和纬度,下面的代码就告诉你如何利用API计算某个位置的经度和纬度的:
- Codegeocoder.geocode({'address':address},function(results,status){
- if(status==google.maps.GeocoderStatus.OK){
- map.setCenter(results[0].geometry.location);
- varmarker=newgoogle.maps.Marker({
- map:map,
- position:results[0].geometry.
- });
- }
- else{
- alert("Geocodewasnotsuccessfulforthefollowingreason:"+status);
- }
- });
Geocoding C#
同样我们可以利用C#代码来计算位置:
- CodepublicstaticCoordinateGetCoordinates(stringregion)
- {
- using(varclient=newWebClient())
- {
- stringuri="http://maps.google.com/maps/geo?q='"+region+
- "'&output=csv&key=ABQIAAAAzr2EBOXUKnm_jVnk0OJI7xSosDVG8KKPE1"+
- "-m51RBrvYughuyMxQ-i1QfUnH94QxWIa6N4U6MouMmBA";
- string[]geocodeInfo=client.DownloadString(uri).Split(',');
- returnnewpublicstructCoordinate
- {
- privatedoublelat;
- private
Reverse Geocoding
顾名思义,这个是Geocoding的反操作,我们可以根据经度和纬度来找出该位置的名称。代码如下:
- Codevarmap;
- vargeocoder;
- functionInitializeMap(){
- varlatlng=newgoogle.maps.LatLng(-34.397,150.644);
- myOptions=
- {
- zoom:8,
- center:latlng,
- mapTypeId:google.maps.MapTypeId.ROADMAP,
- disableDefaultUI:true
- };
- map=newgoogle.maps.Map(document"),myOptions);
- }
- functionFindLocaiton(){
- geocoder=newgoogle.maps.Geocoder();
- InitializeMap();
- varaddress=document.getElementById("addressinput").value;
- geocoder.geocode({'address':address},function(results,
Reverse Geocoding in C#
同样用C#也可以实现Reverse Geocoding操作:
- CodestaticstringbaseUri=
- "http://maps.googleapis.com/maps/api/geocode/xml?latlng={0},{1}&sensor=falsestringlocation=string.Empty;
- publicstaticvoidRetrieveFormatedAddress(stringlat,stringlng)
- {
- requestUri=string.Format(baseUri,lat,lng);
- using(WebClientwc=newWebClient())
- {
- stringinxmlElm.Descendants()where
- elm.Name=="status
总结
在这篇文章,我尝试将V3版本的Google Maps API中的最基本和最常用的功能解说清楚。希望这篇文章能帮你顺利完成任务。然后,API中还有很多我没有讨论到的,我将尝试在今后的文章中来讨论。当然希望能得到大家的点评和反馈。
源码下载:http://files.cnblogs.com/sxwgf/GMAP.zip
原文:http://www.cnblogs.com/jz1108/archive/2011/10/21/2220574.html