jdk源码解析之——java.util源码详解

java.util的util自然指的就是utility(实用),就是说,这个包中定义的class和interface为我们提供了一些实用的工具可以辅助我们的开发。

那么这个包中最主要的以及最重要的就是collection框架,就是我们不管开发什么项目都会用到的”类集”。我们用类集来存放和提取数据,使我们的开发高效有序。

我们不太去赘述用法,而是通过源码来了解collection框架的基本实现,来使得我们更了解用法。


首先,我们来了解一下collection这个框架。

我们常常使用的集合,其实是分为两大类的:Collection<E>Map<K,V>


Collection<E>:

Collection 层次结构 中的根接口。Collection 表示一组对象,这些对象也称为 collection 的元素。

一些 collection 允许有重复的元素(如:List),而另一些则不允许(如:Set)。一些 collection 是有序的(如:SortedSet),而另一些则是无序的(如:ArrayList)。

Collection是没有构造函数的,它只是一个提供了通用方法的interface。

Collection<E>又根据是否有重复值分为两大类Set<E>与List<E>。Set<E>与List<E>同样是interface


Map<K,V>:

将键映射到值的对象。一个映射不能包含重复的键;每个键最多只能映射到一个值。

                           jdk源码解析之——java.util源码详解


下面,我们就从源码角度去看看collection的实现。(推荐使用IDE查看源代码,如:eclipse中的outline,对查看代码帮助很大)


一、List<E>:

List<E>接口的实现子类主要有两个:ArrayList<E>和LinkedList<E>。即List有顺序实现和链式实现。(写到这就默默想到,当时数据结构课上学习的C++STL很是类似)。

  (1)ArrayList<E>

    实现:通过成员变量和构造函数

Java代码   收藏代码
  1. private static final int DEFAULT_CAPACITY = 10;  
  2. private transient Object[] elementData;   //ArrayList维护的Object数组  
  3. private int size;  
  4. //指定初始长度的构造函数  
  5. public ArrayList(int initialCapacity) {  
  6.     super();  
  7.     if (initialCapacity < 0)  
  8.         throw new IllegalArgumentException("Illegal Capacity: "+  
  9.                                            initialCapacity);  
  10.     this.elementData = new Object[initialCapacity];  
  11. }  
  12. //不带参数的构造函数  
  13. public ArrayList() {  
  14.     super();  
  15.     this.elementData = EMPTY_ELEMENTDATA;  
  16. }  
  17. //指定使用Collection初始化的构造函数  
  18. public ArrayList(Collection<? extends E> c) {  
  19.     elementData = c.toArray();  
  20.     size = elementData.length;  
  21.     if (elementData.getClass() != Object[].class)  
  22.         elementData = Arrays.copyOf(elementData, size, Object[].class);  
  23. }  

   ArrayList是由Object数组实现的,并且默认的长度是“DEFAULT_CAPACITY = 10”。当使用不带参数的构造函数时,底层默认是长度为10的Object[]。

   这时候就有一个问题了,当向ArrayList里面添加元素,使得Object数组不够用怎么办?

Java代码   收藏代码
  1. private void grow(int minCapacity) {  
  2.     // overflow-conscious code  
  3.     int oldCapacity = elementData.length;  
  4.     int newCapacity = oldCapacity + (oldCapacity >> 1);  
  5.     if (newCapacity - minCapacity < 0)  
  6.         newCapacity = minCapacity;  
  7.     if (newCapacity - MAX_ARRAY_SIZE > 0)  
  8.         newCapacity = hugeCapacity(minCapacity);  
  9.     // minCapacity is usually close to size, so this is a win:  
  10.     elementData = Arrays.copyOf(elementData, newCapacity);  
  11. }  
  12. private static int hugeCapacity(int minCapacity) {  
  13.     if (minCapacity < 0// overflow  
  14.         throw new OutOfMemoryError();  
  15.     return (minCapacity > MAX_ARRAY_SIZE) ?  
  16.         Integer.MAX_VALUE :  
  17.         MAX_ARRAY_SIZE;  
  18. }  

   ArrayList在使用add方法时,会首先检查是否越界,如果越界,最终会使用grow方法。获得一个新长度的Object数组,将原数组拷贝到当中,再add新元素。

   获得新长度的算法是:

Java代码   收藏代码
  1. int newCapacity = oldCapacity + (oldCapacity >> 1);  //根据原数组的长度来确定新数组的长度  

   看完ArrayList的实现,我们就不去看ArrayList的基本操作add()与remove()了,无非是一些数组的移位、拷贝操作。

    总结:

     1)ArrayList使用数组实现的,本质上,ArrayList是对象引用的一个变长数组。

     2)因此ArrayList又称为顺序表,正是因为是用数组实现的,对于随机存取比较方便;而插入和删除操作,需要移动大量的元素,缺点。


  (2)LinkedList<E>

   实现:链式表,顾名思义,是通过引用实现的,因此必然存在数据节点,以及对数据节点的引用。

Java代码   收藏代码
  1. /*LinkedList的内部类,数据节点Node<E>*/  
  2.   
  3. private static class Node<E> {  
  4.         E item;  
  5.         Node<E> next;   //对后一个节点的引用  
  6.         Node<E> prev;   //对前一个节点的引用  
  7.   
  8.         Node(Node<E> prev, E element, Node<E> next) {  
  9.             this.item = element;  
  10.             this.next = next;  
  11.             this.prev = prev;  
  12.         }  
  13.     }  

  操作:LinkedList实现比较容易,操作的实现也就是引用的变化,不再赘述。

   总结:

    关于 ArrayList 与 LinkedList 的比较分析:

(a)ArrayList 底层采用数组实现,LinkedList 底层采用双向链表实现。

(b)当执行插入或者删除操作时,采用 LinkedList 比较好。

(c)当执行搜索操作时,采用 ArrayList 比较好。


二、Map<K,V>

  我们先看Map再看Set。Map使用两个基本操作:get( )和put( )

  Map最常用的实现子类时HashMap<K,V>

  实现:

   首先,我们看到的是:


Java代码   收藏代码
  1. transient Entry<K,V>[] table = (Entry<K,V>[]) EMPTY_TABLE;    //存放元素的“数组”  
    数组中存放的是Entry<K,V>

    Map中所有的键值都存放到了一个个的Entry中。相当于一个Bean。


Java代码   收藏代码
  1. static class Entry<K,V> implements Map.Entry<K,V> {  
  2.         final K key;  
  3.         V value;  
  4.         Entry<K,V> next;  
  5.         int hash;  
  6. }  
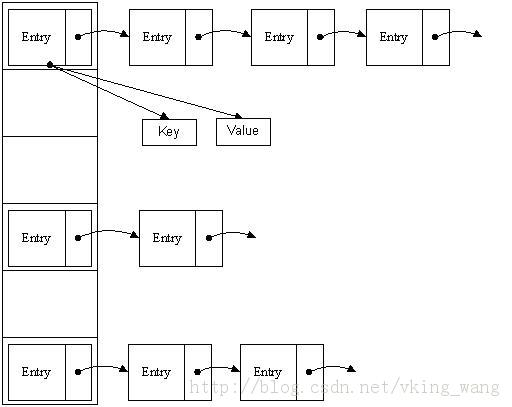
   很类似与LinkedList,但是很奇怪,为什么要把节点放到数组中呢?为什么有了引用"Entry<K,V> next"还需要数组呢?为什么有个特殊的变量"int hash"呢?


   显然,HashMap的实现是数组与LinkedList的“结合”。(也就是数组与链表相结合的)


   看下面的代码:能够基本了解这种数据结构。


Java代码   收藏代码
  1. void addEntry(int hash, K key, V value, int bucketIndex) {  
  2.     if ((size >= threshold) && (null != table[bucketIndex])) {  
  3.         resize(2 * table.length);          //重新设置数组的大小  
  4.         hash = (null != key) ? hash(key) : 0;  //得到新的hash值  
  5.         bucketIndex = indexFor(hash, table.length);  //得到新的索引  
  6.     }  
  7.   
  8.     createEntry(hash, key, value, bucketIndex);    //构建新的Entry  
  9. }  
  10. void createEntry(int hash, K key, V value, int bucketIndex) {  
  11.     Entry<K,V> e = table[bucketIndex];  
  12.     table[bucketIndex] = new Entry<>(hash, key, value, e);  
  13.     size++;  
  14. }  
    当addEntry时,可能会重新修改数组的大小,再将Entry存放到数组中。可是是怎么存放的呢? 
Java代码   收藏代码
  1. Entry<K,V> e = table[bucketIndex];   //取出原来的Entry  
  2. table[bucketIndex] = new Entry<>(hash, key, value, e); //将原来的Entry被引用到新的Entry的next,再讲新的Entry放到数组里面。  

   1、先取出原来的Entry

   2、将原来的Entry被引用到新的Entry的next,再讲新的Entry放到数组里面

  于是图形如下:(盗用一下网上用的很多的这张图片:"拉链法"。来源:图片上有水印)

  
   jdk源码解析之——java.util源码详解


     现在只是知道的大致的数据结构是像上面那样的,但是HashMap如何通过一个“数组”来实现存取操作的呢?


   操作:

     put()操作:


Java代码   收藏代码
  1. int hash = hash(key);  
  2. int i = indexFor(hash, table.length);  
  3. //put时,得到索引  
  4.   
  5. static int indexFor(int h, int length) {  
  6.     return h & (length-1);   //HashMap存取时,都需要计算当前key应该对应Entry[]数组哪个元素,即计算数组下标  
  7. }  
     当向 HashMap 中 put 一对键值时,它会根据 key 的 hashCode 值计算出一个位置,该位置就是此对象准备往数组中存放的位置。(如果Key相同,会覆盖成新的Value)


   具体操作:

   如果该位置没有对象存在,就将此对象直接放进数组当中;如果该位置已经有对象存在了,则顺着此存在的对象的链开始寻找(Entry 类有一个 Entry 类型的 next 成员变量,指向了该对象的下一个对象),如果此链上有对象的话,再去使用 equals 方法进行比较,如果对此链上的某个对象的 equals 方法比较为 false,则将该对象放到数组当中,然后将数组中该位置以前存在的那个对象链接到此对象的后面。

   get()操作类似,不再去解释了。


   我们再回过去看一下构造函数

   这是jdk1.6之前的实现:

Java代码   收藏代码
  1. public HashMap(int initialCapacity, float loadFactor) {  
  2.         .....  
  3.         // Find a power of 2 >= initialCapacity  
  4.         int capacity = 1;  
  5.         while (capacity < initialCapacity)  
  6.             capacity <<= 1;  
  7.         this.loadFactor = loadFactor;  
  8.         threshold = (int)(capacity * loadFactor);  
  9.         table = new Entry[capacity];  
  10.         init();  
  11.     }  
   jdk1.7:(与1.6类似)
Java代码   收藏代码
  1. public HashMap(int initialCapacity, float loadFactor) {  
  2.         //........  
  3.         //........  
  4.         this.loadFactor = loadFactor;   //获得负载因子(根据负载因子的大小决定负载的能力)  
  5.         //装填因子 = key的个数 / 散列表的长度  
  6.         threshold = initialCapacity;   //threshold是再散列时的大小(capacity * load factor)  
  7.         init();  
  8.     }  


   负载因子loadFactor的理解为:HashMap中的数据量/HashMap的总容量(initialCapacity),当loadFactor达到指定值或者0.75时候,HashMap的总容量自动扩展一倍,以此类推。

   下面就是总容量扩容的实现


Java代码   收藏代码
  1. void resize(int newCapacity) {  
  2.         Entry[] oldTable = table;  
  3.         int oldCapacity = oldTable.length;  
  4.         //...  
  5.         Entry[] newTable = new Entry[newCapacity];  
  6.         transfer(newTable, initHashSeedAsNeeded(newCapacity));  
  7.         table = newTable;  
  8.         threshold = (int)Math.min(newCapacity * loadFactor, MAXIMUM_CAPACITY + 1);  
  9.     }  
  10.   
  11.     void transfer(Entry[] newTable, boolean rehash) {  
  12.         int newCapacity = newTable.length;  
  13.         for (Entry<K,V> e : table) {  
  14.             while(null != e) {  
  15.                 Entry<K,V> next = e.next;  
  16.                 if (rehash) {  
  17.                     e.hash = null == e.key ? 0 : hash(e.key);  
  18.                 }  
  19.                 int i = indexFor(e.hash, newCapacity);  
  20.                 e.next = newTable[i];  
  21.                 newTable[i] = e;  
  22.                 e = next;  
  23.             }  
  24.         }  
  25.     }  


三、Set<E>

   最后我们看一下Set<E>的常用子类HashSet<E>的实现。

   实现:还是先看构造函数和成员变量:

Java代码   收藏代码
  1. private transient HashMap<E,Object> map;  
  2. public HashSet() {  
  3.         map = new HashMap<>();  
  4.     }  
    一目了然,原来HashSet使用HashMap来实现的,所以我们要先说Map再说Set。


   HashSet用HashMap来实现,将元素存放在Map的Key中,因此Map中存放的元素是不可以重复的。而Value当中存放的是默认的Object。

   相应的HashSet也给出了一个可以修改装载能力的构造函数:

Java代码   收藏代码
  1. public HashSet(int initialCapacity, float loadFactor) {  
  2.         map = new HashMap<>(initialCapacity, loadFactor);  
  3.     }  
    最后是HashSet的操作:
Java代码   收藏代码
  1. public boolean add(E e) {  
  2.         return map.put(e, PRESENT)==null;  
  3.     }  
  4.   
  5. public boolean remove(Object o) {  
  6.         return map.remove(o)==PRESENT;  
  7.     }  
    实现也因此比较简单。

    那么Collection框架就介绍到这里了。


你可能感兴趣的:(java)