Couchbase学习笔记(5)——服务器连接管理
一、配置客户端
1、编程方式配置
通过ClientConfiguration对象以编程的方式配置
var config = new ClientConfiguration{
  Servers = new List<Uri>
  {
    new Uri("http://192.168.56.101:8091/pools"),
    new Uri("http://192.168.56.102:8091/pools"),
    new Uri("http://192.168.56.103:8091/pools"),
    new Uri("http://192.168.56.104:8091/pools"),
  },
  UseSsl = true,
  BucketConfigs = new Dictionary<string, BucketConfiguration>
  {
    {"default", new BucketConfiguration
    {
      BucketName = "default",
      UseSsl = false,
      Password = "",
      PoolConfiguration = new PoolConfiguration
      {
        MaxSize = 10,
        MinSize = 5
      }
    }}
  }};
using (var cluster = new Cluster(config)){
  IBucket bucket = null;
  try
  {
    bucket = cluster.OpenBucket();
    //use the bucket here
  }
  finally
  {
    if (bucket != null)
    {
      cluster.CloseBucket(bucket);
    }
  }
}}
2、配置文件配置
用App.config 或者Web.config文件:
<?xml version="1.0" encoding="utf-8" ?><configuration>
  <configSections>
    <sectionGroup name="couchbaseClients">
      <section name="couchbase"
               type="Couchbase.Configuration.Client.Providers.CouchbaseClientSection, Couchbase.NetClient"/>
    </sectionGroup>
  </configSections>
  <couchbaseClients>
    <couchbase useSsl="false">
      <servers>
        <add uri="http://192.168.56.101:8091/pools"></add>
        <add uri="http://192.168.56.102:8091/pools"></add>
        <add uri="http://192.168.56.103:8091/pools"></add>
        <add uri="http://192.168.56.104:8091/pools"></add>
      </servers>
      <buckets>
        <add name="default" useSsl="false" password="">
          <connectionPool name="custom" maxSize="10" minSize="5"></connectionPool>
        </add>
      </buckets>
    </couchbase>
  </couchbaseClients>
    <startup>
        <supportedRuntime version="v4.0" sku=".NETFramework,Version=v4.5.1" />
    </startup></configuration>
与编程方式是一样的,只不过更方便而已~
使用时可以这样:
using (var cluster = new Cluster("couchbaseClients/couchbase"))
{
  using (var bucket = cluster.OpenBucket())
  {
    //use the bucket here
  }
}
二、连接存贮桶
当你创建一个clientconfiguration后,你可以通过集群类 Cluster连接到集群的一个节点
var config = new ClientConfiguration
  {
    Servers = new List<Uri>
    {
      new Uri("http://192.168.56.101:8091/pools"),
      new Uri("http://192.168.56.102:8091/pools"),
      new Uri("http://192.168.56.103:8091/pools"),
      new Uri("http://192.168.56.104:8091/pools"),
    }
  };
using (var cluster = new Cluster(config))
  {
      using (var bucket = cluster.OpenBucket())
      {
          //use bucket here
      }
  }
就是这么简单~
三、关闭连接
使用完及时关闭连接是提高性能的一大招式,关闭也是这么的任性和简单
using (var cluster = new Cluster(config))
  {
      IBucket bucket = null;
      try
      {
          bucket = cluster.OpenBucket();
          //use the bucket here      }
      finally
      {
          if (bucket != null)
          {
              cluster.CloseBucket(bucket);
          }
      }
  }
四、配置SSL
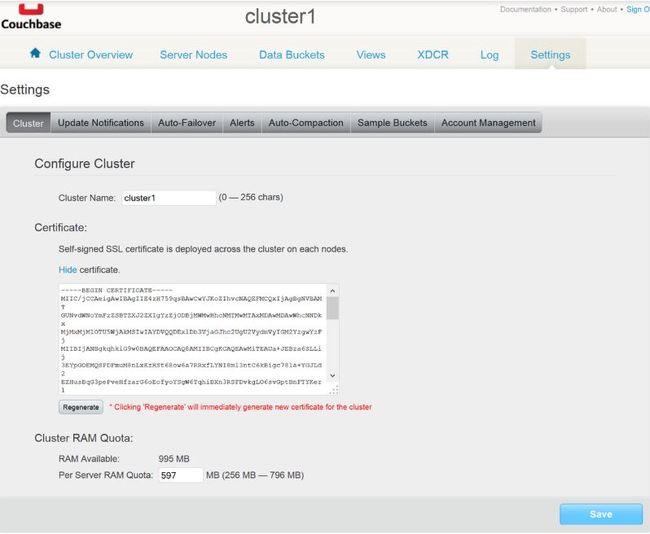
Couchbase服务器的核心特征之一就是支持客户端和集群之间的传输数据加密。是通过安全套接字层(SSL)加密的。您可以使用SSL来保证您的应用程序和集群之间传输数据的安全。为了使用SSL,你需要安装一个从Couchbase服务器获得的SSL证书,然后配置客户端SSL证书。
获取并安装SSL证书:
1、打开Couchbase管理界面,单击Settings > Cluster,在打开的界面里边单击show按钮显示证书,复制证书内容并以扩展名.crt保存到你的应用服务器上面
2、当你拥有应用服务器证书后,你需要将它导入到本地计算机证书存储。在Windows中,您可以通过使用证书MMC管理单元,certlm。
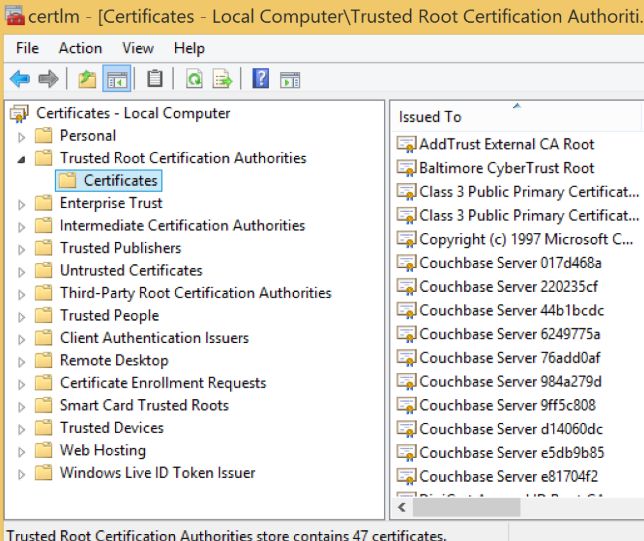
3、在受信任的根证书节点下,用鼠标右键单击Certificates > Import
4、按照向导导入你存储在磁盘上的证书
配置客户端:
当在你的应用程序服务器上已经成功安装了SSL证书,为了启用客户端的SSL,你需要将clientconfiguration或bucketconfiguration的属性UseSsl设为True。当然了,你也可以用配置文件来配置~