使用ICEFaces+Facelets开发Web程序
我的<<JSF起步>>介绍了JSF1.2的基本生命周期等基础知识,并结合JSP技术描述了如何开发一个登录画面,我的<<使用Facelets开发JSF程序>>进一步描述了JSF世界里比较先进的Facelets技术。不过作为开发当今世界普遍需要的web2.0技术,光有JSF基础Framework和Facelets技术是远远不够的,比如我们需要Ajax技术异步提交请求,部分刷新页面,达到良好的用户界面效果,我们也需要服务器能够以事件方式通知用户,而不需要用户去主动查询。通常,掌握web2.0开发技术需要程序要熟练掌握JavaScript、Ajax、Comet(或者类似技术)、Java等技术。ICEfaces是一个很好的解决方案,让你只需熟练掌握Java语言即可,用于页面上Ajax通信的JavaScript完全由ICEfaces实现,并且提供了丰富的tag,远远超过jsf标准tag的数目,大大提高了程序员的开发效率。
本文将介绍如何使用ICEFaces+Facelets技术开发一个登录界面。我的这个演示程序我的英语学习网站的一部分,因此比起前面两篇文章的例子要复杂不少。我将至少创建四个页面,一个Welecom页面,通过Welcome页面点击登录按钮,将进入Logon页面,登录要求输入用户名、密码、验证码。如果登录成功则进入Home页面。如果出现系统异常则进入Error页面。如果用户名或者密码或者验证码不正确,将在登录页面出现红色提示。如果一个用户ID24小时内登录失败超过5次,将被拒绝登录。
由于该例子涉及大量的代码和逻辑,不可能一一描述,目的只是教会不熟悉的人基本的思路和工具的运用,少走弯路。
创建EnFreebird工程
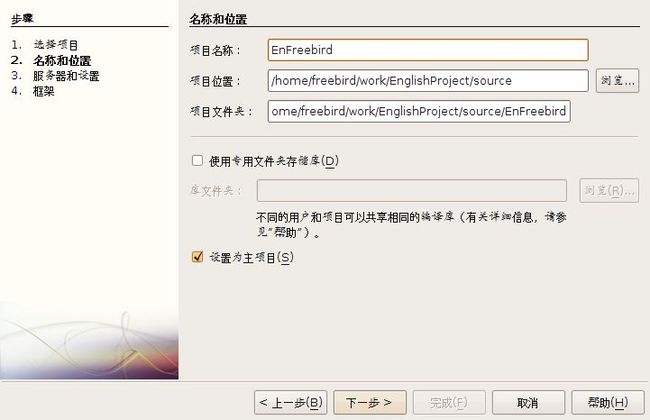
启动NetBeans6.7,然后创建Web工程EnFreebird
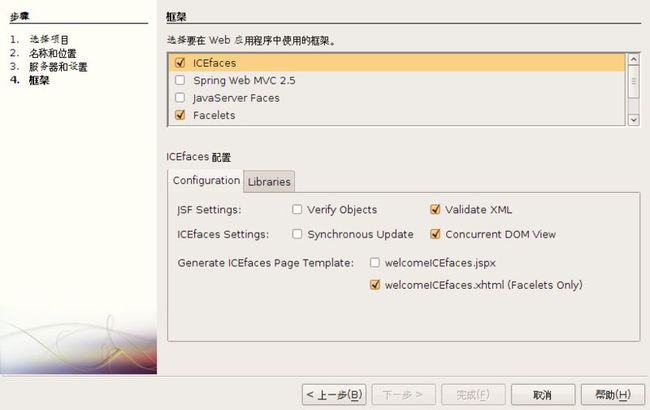
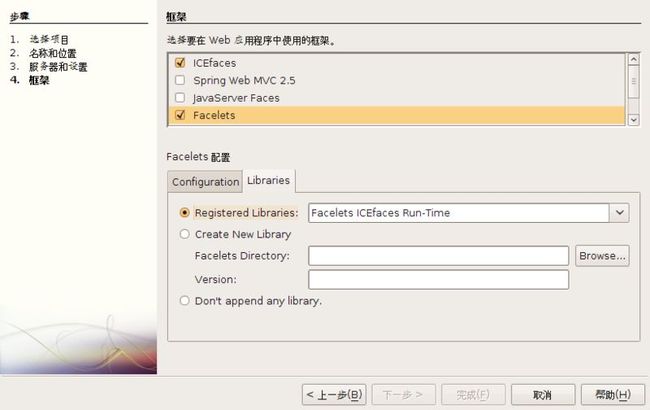
选择下一步,选择GlassFishv2.1作为服务器,然后点击下一步,选择ICEfaces和Facelets,配置如下:
最后,点击完成。
创建Layout模板
将向导自动创建的template.xhtml模板文件重命名为Layout.xhtml。并修改内容如下:
<?xml version='1.0' encoding='UTF-8' ?>
<!DOCTYPE html PUBLIC "-//W3C//DTD XHTML 1.0 Transitional//EN" "http://www.w3.org/TR/xhtml1/DTD/xhtml1-transitional.dtd">
<html xmlns="http://www.w3.org/1999/xhtml"
xmlns:ui="http://java.sun.com/jsf/facelets">
<head>
<style type="text/css">
body {
font-family:Verdana;
font-size:14px;
margin:0;
}
#container {
margin:0 auto;
width:100%;
}
#header {
height:100px;
background:#9c6;
margin-bottom:5px;
}
#mainContent {
height:500px;
background:#ffa;
margin-bottom:5px;
}
#footer {
height:60px;
background:#9c6;
}
</style>
<meta http-equiv="Content-Type" content="text/html; charset=gb2312" />
<title><ui:insert name="title" /></title>
<meta name="Keywords" content="标准之路,www.aa25.cn,网页标准布局,DIV+CSS" />
<meta name="" content="标准之路,www.aa25.cn,网页标准布局,DIV+CSS" />
<meta name="author" content="×××,有问题请到www.68css.cn网站留言" />
<meta name="Description" content="本套网页标准布局模板是由标准之路(www.aa25.cn)制作完成,如果您要转载,请保留版权" />
</head>
<body>
<div id="container">
<div id="header">
<ui:insert name="header">Default Header</ui:insert>
</div>
<div id="mainContent">
<ui:insert name="body">Default Body</ui:insert>
</div>
<div id="footer">
<ui:insert name="footer">Default Footer</ui:insert>
</div>
</div>
</body>
</html>
Layout.xhtml创建了上、中、下分割的页面布局,其他页面将用它为模板,加上自己的内容。
创建Welcome页面
创建Welcome.xhtml页面,并修改内容如下:
<?xml version='1.0' encoding='UTF-8' ?>
<!DOCTYPE composition PUBLIC "-//W3C//DTD XHTML 1.0 Transitional//EN" "http://www.w3.org/TR/xhtml1/DTD/xhtml1-transitional.dtd">
<ui:composition xmlns="http://www.w3.org/1999/xhtml"
xmlns:ui="http://java.sun.com/jsf/facelets"
xmlns:ice="http://www.icesoft.com/icefaces/component"
template="./layout.xhtml">
<ui:define name="title">
欢迎使用免费的英语学习网站
</ui:define>
<ui:define name="header">
<center style="position:relative;top:20px">
EnglishFreebird--自由鸟的英语学习站点
</center>
</ui:define>
<ui:define name="body">
本系统作者陈抒在学习英语时,深感当前的英语学习软件的优势和缺陷,决定开发一套贴心的英语学习系统。因为作者喜欢使用freebird这个网名,因此该 系统被命名为EnglishFreebird。该系统将会极大的提高您的英语学习效率,帮助您科学记忆单词、词组、句子和练习听力,更重要的是,您可以制 定自己的学习计划。本系统坚持对普通用户免费。
</div>
</ui:define>
<ui:define name="footer">
<ice:form>
<ice:commandLink id="RegisterCommandLink" value="注册" style="position:relative;left:-250px"/>
<ice:commandLink id="LogonCommandLink" value="登录" style="position:relative;left:0px"/>
<ice:commandLink id="HelpCommandLink" value="帮助" style="position:relative;left:250px"/>
</ice:form>
</ui:define>
</ui:composition>
现在将Welcome.jsp页面内容修改如下:
<%@page contentType="text/html" pageEncoding="UTF-8"%>
<jsp:forward page="Welcome.jsf"/>
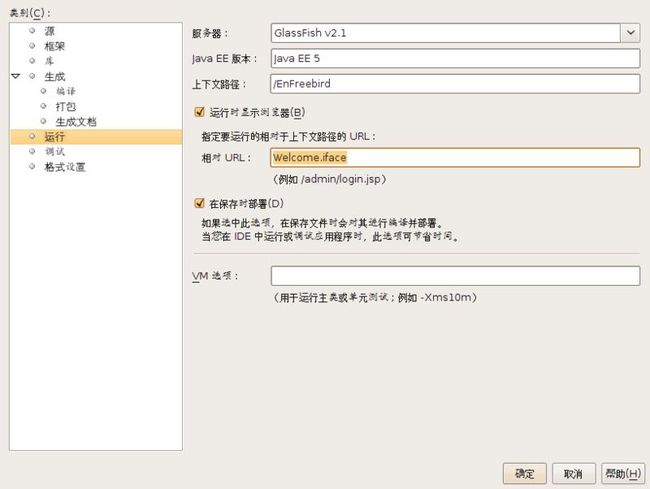
右键选择工程,点击属性后,弹出对话框,选择运行一项,然后设置相对URL为Welcome.iface。
运行该项目,画面如下:
现在Welcome的页面内容结合Layout模板被分成了三部分,但是文字还没有居中对齐,我们还需要设置CSS风格。修改后的页面如下:
<?xml version='1.0' encoding='UTF-8' ?>
<!DOCTYPE composition PUBLIC "-//W3C//DTD XHTML 1.0 Transitional//EN" "http://www.w3.org/TR/xhtml1/DTD/xhtml1-transitional.dtd">
<ui:composition xmlns="http://www.w3.org/1999/xhtml"
xmlns:ui="http://java.sun.com/jsf/facelets"
xmlns:ice="http://www.icesoft.com/icefaces/component"
template="./layout.xhtml">
<ui:define name="title">
欢迎使用免费的英语学习网站
</ui:define>
<ui:define name="header">
<center style="position:relative;top:20px">
<h1>EnglishFreebird--自由鸟的英语学习站点</h1>
</center>
</ui:define>
<ui:define name="body">
<center>
<div style="width:400px;position:relative;top:100px">
<h2>
本系统作者陈抒在学习英语时,深感当前的英语学习软件的优势和缺陷,决定开发一套贴心的英语学习系统。因为作者喜欢使用freebird这个网名,因此该 系统被命名为EnglishFreebird。该系统将会极大的提高您的英语学习效率,帮助您科学记忆单词、词组、句子和练习听力,更重要的是,您可以制 定自己的学习计划。本系统坚持对普通用户免费。
</h2>
</div>
</center>
</ui:define>
<ui:define name="footer">
<ice:form>
<center>
<ice:commandLink id="RegisterCommandLink" value="注册" style="position:relative;left:-250px"/>
<ice:commandLink id="LogonCommandLink" value="登录" style="position:relative;left:0px"/>
<ice:commandLink id="HelpCommandLink" value="帮助" style="position:relative;left:250px"/>
</center>
</ice:form>
</ui:define>
</ui:composition>
显示效果如下:
现在,我们来创建managed bean来响应注册、登录和帮助三个按钮的点击事件。右键点击工程,选择新建->其他,在弹出的对话框中如下选择:
点击下一步后,设置类名为Welcome,包名为Freebird.View,所有managed bean都放在Freebird.View包中,所有业务逻辑类将会放在Freebird.Business包中,帮助类将放在Freebird.Helper包中。
这样,向导在faces-config.xml文件中添加如下配置:
<managed-bean>
<managed-bean-name>Welcome</managed-bean-name>
<managed-bean-class>Freebird.View.Welcome</managed-bean-class>
<managed-bean-scope>request</managed-bean-scope>
</managed-bean>
在Welcome.java文件中增加方法如下:
public void clickLogonCommandLink(ActionEvent event){
NavigateHelper.navigate(null,"logon");
}
NavigateHelper类位于Freebird.Helper包中,负责处理导航规则,navigate方法实现如下:
//you must add navigation rule in faces-configure file
//it means the current page if fromUrlID is null
public static void navigate(String fromUrlID,String caseString){
FacesContext context = FacesContext.getCurrentInstance();
context.getApplication().getNavigationHandler().handleNavigation(context, fromUrlID, caseString);
}
然后,我们要在faces-config.xml文件中添加导航规则,规定当case为logon的时候,由Welcome页面跳转到Logon页面,我们同时要创建一个Logon.xhtml文件,注意选择Layout.xhtml文件为模板,并且选择
root tag为ui:composition,否则新创建的xhtml文件不会出现在faces-config.xml的页面流视图中。faces-config.xml文件配置如下:
<navigation-rule>
<from-view-id>/Welcome.xhtml</from-view-id>
<navigation-case>
<from-outcome>logon</from-outcome>
<to-view-id>/Logon.xhtml</to-view-id>
</navigation-case>
<navigation-case>
<from-outcome>help</from-outcome>
<to-view-id>/Help.xhtml</to-view-id>
</navigation-case>
<navigation-case>
<from-outcome>register</from-outcome>
<to-view-id>/Register.xhtml</to-view-id>
</navigation-case>
</navigation-rule>
当from-coutcome为logon的时候,跳转到Logon.xhtml页面,其他不再赘述。Welcome.xhtml文件里面要做如下修改:
<ice:commandLink id="LogonCommandLink" actionListener="#{Welcome.clickLogonCommandLink}" value="登录" style="position:relative;left:0px"/>
这里不如WoodStock项目的是,无法通过点击红色部分直接跳转到方法clickLogonCommandLink的代码实现,NetBeans还需 要改进。现在我们已经实现了点击登录链接,跳转到登录页面的功能。下面,我们继续完善登录页面。帮助和注册的链接功能实现以后再讲。
完善Logon页面
前面只是用向导产生了一个Logon.xhtml文件,本节将完成页面设计。在Web页目录下面创建image目录,然后将需要的图片拷贝到下面,以后图片路径使用image/2.jpg格式。下面是Logon.xhtml内容:
<?xml version='1.0' encoding='UTF-8' ?>
<!DOCTYPE composition PUBLIC "-//W3C//DTD XHTML 1.0 Transitional//EN" "http://www.w3.org/TR/xhtml1/DTD/xhtml1-transitional.dtd">
<ui:composition xmlns="http://www.w3.org/1999/xhtml"
xmlns:ui="http://java.sun.com/jsf/facelets"
xmlns:ice="http://www.icesoft.com/icefaces/component"
template="./Layout.xhtml">
<ui:define name="title">
欢迎登录
</ui:define>
<ui:define name="header">
<center style="position:relative;top:20px">
<h1>EnglishFreebird--自由鸟的英语学习站点</h1>
</center>
</ui:define>
<ui:define name="body">
<div id="LogonLeft" style="float:left;width:450px;height:500px;background:#cf9;">
<ice:form id="logonForm">
<ice:outputLabel id="userNameOutputLabel" style="position:relative; left: 41px; top: 110px; width: 72px; height: 24px" value="用户名:"/>
<ice:inputText id="UserNameInputText"
style="position:relative;left:65;top:110;"/>
<ice:outputLabel id="passwordOutputLabel" style="position:relative; left:-194px; top: 160px; width: 72px; height: 24px" value="密码:"/>
<ice:inputSecret id="PasswordInputSecret" redisplay="true"
style="position:relative; left: 116px; top: 130px; width: 192px; height: 24px" value="******"/>
<ice:outputLabel id="authenImageOutputLabel" style="position: relative; left: -158px; top: 190px; width: 72px; height: 24px" value="验证码:"/>
<ice:inputText id="authenImageInputText" style="position: relative; left: -128px; top: 190px; width: 80px; height: 24px"/>
<ice:graphicImage height="24" id="authenImageGraphicImage" style="position: relative; left: -116px; top: 198px" value="#{Logon.imageURL}" width="72"/>
<ice:commandButton id="authenImageRefreshButton"
style="position: relative;left: -110px; top: 198px;" image="image/1.gif"/>
<ice:commandButton id="logonButton"
style="position: absolute; left: 100px; top: 430px; width: 72px; height: 24px" value="登录"/>
<ice:commandButton id="clearButton"
style="height: 24px; left: 190px; top: 250px; position: relative; width: 72px" value="清空"/>
<ice:outputLabel id="errorMessageOutputLabel" style="left: -200px; top: 308px; position: relative; width: 480px;color:red"/>
</ice:form>
</div>
<div id="LogonRight">
<ice:graphicImage id="rightImage" value="image/2.jpg"
style="position:absolute;left:452px;top:124px;height:500;width:950"/>
</div>
</ui:define>
<ui:define name="footer">
<ice:form>
<center>
<ice:commandLink id="RegisterCommandLink" value="注册" style="position:relative;left:-250px"/>
<ice:commandLink id="HelpCommandLink" value="帮助" style="position:relative;left:250px"/>
</center>
</ice:form>
</ui:define>
</ui:composition>
运行后程序界面如下:
注意,验证码图片没有显示,因为我们还没有实现随机生成验证码图片的功能。
拦截页面初始化
在实现Logon页面逻辑之前,我们需要考虑一个经常遇到的问题,当页面加载的时候(可能是通过浏览器输入网址加载,页可能是通过其他链接加载),程序通常需要做一些初始化工作,比如随机图片的生成等工作。WoodStock框架已经提供了init回调方法,但在facelets框架中,要靠我们自己了。利用manged bean的配置属性,我们可以创建一个setInit方法,然后让页面每次加载的时候由jsf框架自动调用并初始化,参数无关紧要。
现在,我们首先创建Logon类用作manged bean。然后增加setInit方法:
/*
* To change this template, choose Tools | Templates
* and open the template in the editor.
*/
package Freebird.View;
/**
*
* @author freebird
*/
public class Logon {
/** Creates a new instance of Logon */
public Logon() {
}
public void setInit(String str){
int i =0;//题换成真实的初始化代码,str的值在下面配置成initialization,并不重要。
}
}
配置faces-config.xml文件如下:
<managed-bean>
<managed-bean-name>Logon</managed-bean-name>
<managed-bean-class>Freebird.View.Logon</managed-bean-class>
<managed-bean-scope>request</managed-bean-scope>
<managed-property>
<property-name>init</property-name>
<value>initialization</value>
</managed-property>
</managed-bean>
这是一个最简单的方法,比较正式的方法应该是生命周期的事件侦听吧。这里,我就偷懒了。
实现Logon逻辑
生成验证图片
首先,要实现验证图片的生成,在Logon类中添加如下代码:
private String imageURL;
private void generateImage() throws Exception {
String imageFolderPath = FacesHelper.getWebFolderPath()+ "/AuthenImgs/";
ImageCreator creator = new ImageCreator();
String random = creator.getContent();
String imageFileName = random + ".jpg";
creator.creatImage(imageFolderPath, imageFileName, random);
this.imageURL = "AuthenImgs/" + imageFileName;
}
generateImage产生随机的图片,保存到web根目录的AuthenImgs子目录下面,如果没有子目录则会自动创建。图片的相对路径会保存到imageURL成员变量中。别忘了在setInit方法中调用generateImage方法:public void setInit(String str){
try {
generateImage();
} catch (Exception ex) {
ExceptionHelper.jumpToErrorPage(ex, SessionHelper.getWebSession());
}
}
ExceptionHelper是我的辅助类,作用是拦截异常,并跳转到Error.xhtml页面,显示异常消息。
增加一个get方法用来填写ice:graphicImage的value属性。
public String getImageURL(){
return imageURL;
}
然后添加刷新验证图片按钮的事件函数,同样也只是调用generateImage方法:
public void clickAuthenImageRefreshButton(ActionEvent event){
try {
generateImage();
} catch (Exception ex) {
ExceptionHelper.jumpToErrorPage(ex, SessionHelper.getWebSession());
}
}
在Logon.xhtml文件中增加actionListener="#{Logon.clickAuthenImageRefreshButton}"
绑定输入tag
由于绑定比get/set更加方便,所以我尽量使用绑定,只是在遇到bug的时候,才想别的办法(ICEfaces也有bug的)。现在我们来帮定用户名输入的tag,在Logon类中添加如下代码:
private HtmlInputText userNameInputText = new HtmlInputText();
public HtmlInputText getUserNameInputText() {
return userNameInputText;
}
public void setUserNameInputText(HtmlInputText hit) {
this.userNameInputText = hit;
}
在Logon.xhtml文件中添加代码(红色部分):binding="#{Logon.userNameInputText}"
同样的道理,可以绑定其他的输入tag,注意,这里的HtmlInputText属于包import com.icesoft.faces.component.ext。
在WoodStock项目中,向导会帮我们自动完成绑定需要的代码,但是在Faclets+ICEfaces组合中,我们需要自己完成,最麻烦的就是你需要搞清楚你需要绑定的类名是什么?
输入长度验证
没有智能提示某个tag的属性,所以需要参考下面的文档来查找:http://www.icefaces.org/docs/v1_8_0/tld/index.html。为ice:inputText id="UserNameInputText" tag添加下面这个属性:
maxlength="20".最多允许输入20个字符,我准备一个<ice:outputLabel id="errorMessageOutputLabel",用于专门显示各种出错信息。
实现登录逻辑
关于如何添加事件我不再叙说,直接看后台代码吧:
public String clickLogonButton() {
try {
String rand = imageURL.substring(11, 15);
if (!checkAuthenImage(rand)) {
errorMessageOutputLabel.setValue(ExceptionHelper.getLocaleMessage(ExceptionHelper.VALIDATE_IMAGE_CODE));
return "";
}
String userID = userNameInputText.getValue().toString();
String password = passwordInputSecret.getValue().toString();
User user = UserManager.logon(userID, password);
SessionHelper.getWebSession().setUser(user);
return "true";
} catch (LogonException ex) {
errorMessageOutputLabel.setValue(ex.getLocalizedMessage());
return "";
} catch (Exception ex) {
ExceptionHelper.jumpToErrorPage(ex, SessionHelper.getWebSession());
return "false";
} finally {
try {
generateImage();
} catch (Exception ex) {
ExceptionHelper.jumpToErrorPage(ex, SessionHelper.getWebSession());
return "false";
}
}
}
首先判断验证码,然后判断用户名和密码是否为正确,UserManager.logon内部封装了验证逻辑,如果登录正确,则创建User对象,并放入Session中,否则跑出LogonException异常,如果出现系统异常会转向Error页面。UserManger.logon内部判断24小时内有没有超过5此登录错误,如果有则该用户id不允许再次登录。一般的错误信息都输出到errorMessageOutputLabel对应的tag中。
注意在faces-config.xml中添加如下配置:
<navigation-rule>
<from-view-id>/Logon.xhtml</from-view-id>
<navigation-case>
<from-outcome>true</from-outcome>
<to-view-id>/Home.xhtml</to-view-id>
</navigation-case>
<navigation-case>
<from-outcome>false</from-outcome>
<to-view-id>/Error.xhtml</to-view-id>
</navigation-case>
</navigation-rule>
实现清空按钮
public String clickClearButton() {
try {
userNameInputText.setValue("");
generateImage();
passwordInputSecret.setValue("");
authenImageInputText.setValue("");
} catch (Exception ex) {
ExceptionHelper.jumpToErrorPage(ex, SessionHelper.getWebSession());
} finally {
return null;
}
}
最后在创建Home.xhtml和Error.xhtml即可。
登录验证
除了Welcome,Error和Logon页面以外,其他的页面都需要登录后才能访问,在每个页面的manged bean的setInit方法内部检查看起来很合适,可是向Logon页面跳转的时候总是出错,sendRedirect不行,NavigationHandler.handleNavigation也不行。所以我采取了侦听生命周期的方法。
首先创建一个类UserChecker,代码如下:
/*
* To change this template, choose Tools | Templates
* and open the template in the editor.
*/
package Freebird.Helper;
import javax.faces.application.NavigationHandler;
import javax.faces.context.FacesContext;
import javax.faces.event.PhaseEvent;
import javax.faces.event.PhaseId;
import javax.faces.event.PhaseListener;
/**
*
* @author freebird
*/
public class UserChecker implements PhaseListener {
public void afterPhase(PhaseEvent event) {
FacesContext context = event.getFacesContext();
String viewID = context.getViewRoot().getViewId();
if ((viewID.indexOf("Welcome.xhtml") == -1) && (viewID.indexOf("Logon.xhtml") == -1)
&& (viewID.indexOf("Error.xhtml") == -1) ) {
if (SessionHelper.getWebSession().getUser() == null) {
NavigationHandler handler = context.getApplication().getNavigationHandler();
handler.handleNavigation(context, null, "logon");
}
}
}
public void beforePhase(PhaseEvent event) {
}
public PhaseId getPhaseId() {
return PhaseId.RESTORE_VIEW;
}
}
getPhaseId方法返回的RESTORE_VIEW告诉框架,我要侦听的是第一个生命周期。如果不是那三个页面,则都要跳转到logon指定的页面。在faces-config.xml文件中,进行如下配置:
<lifecycle>
<phase-listener>
Freebird.Helper.UserChecker
</phase-listener>
</lifecycle>
<navigation-rule>
<from-view-id>*</from-view-id>
<navigation-case>
<from-outcome>logon</from-outcome>
<to-view-id>/Logon.xhtml</to-view-id>
</navigation-case>
</navigation-rule>
大功告成。
JavaScript发起的Ajax调用
ICEFaces也允许从页面的JavaScript函数直接发起Ajax调用,具体可以使用下面两个函数:
iceSubmit(form,component,event)
iceSubmitPartial(form,component,event)
在icefaces世界,部分提交指的是form中某个tag失去焦点的时候,就会将自身的信息提交到服务器上。比如我们要写一个登陆Form,用户输入用户名后,按tab键切换到密码输入框的时候,如果用户名的 tag设置了属性partialSubmit="true",那么此时输入的用户名就会被提交到服务器上。如果我们对用户名的输入已经设置了校验规则,如果违反该规则,则icefaces就会在提示出错。
Tips
1)通常,我们不需要为icefaces的tag指定id,这样可以避免不小心id重复导致的奇怪错误,icefaces会自动产生id
2)可能是一个bug
在ice:dataTable内部的一列中如果使用了 ice:selectBooleanCheckbox 请注意 如果想要点击Checkbox的时候发生提交需要设置partialSubmit="true",这时候value属性的setter将在valueChange事件之后调用,所以这时候的setter已经用处不大了。下面是一个例子:
<ice:dataTable style="height: 250px" columnWidths="10%,90%"
value="#{StandardWordsLibraryManagePage.sampleSentences}" var="currentSentence" width="100%">
<ice:column id="selectColumn">
<ice:selectBooleanCheckbox valueChangeListener="#{currentSentence.clickCheckbox}" partialSubmit="true" value="#{currentSentence.relative}"/>
<f:facet name="header">
<ice:outputText id="wordOutputText" value="选择"/>
</f:facet>
</ice:column>
<ice:column id="sentenceColumn">
<ice:outputText value="#{currentSentence.value}"/>
<f:facet name="header">
<ice:outputText id="explanationOutputText" value="句子"/>
</f:facet>
</ice:column>
</ice:dataTable>
<ice:commandButton actionListener="#{StandardWordsLibraryManagePage.clickQueryCommandButton}" value="查询"/>
当点击查询按钮的时候,valueChange事件居然也会先被触发,之后才是查询按钮的clickQueryCommandButton被激发,这真是一件很奇怪的事情,暂且认为这是一个bug。
当我把partialSubmit改为immediate后,一切就正常了。
3)partialSubmit设为true后,默认的类型转换动作人仍然会发生,而是用immdediate则会跳过。当转换失败时,使用partialSubmit的页面则很可能不正常,比如我用过ice:selectManyMenu tag,他的value应该是List或者String[],结果我用成了String,所以总是出错。这时要注意NetBeans output窗口的出错提示,并是用自己的ID,才能知道究竟是哪一个tag出错。目前icefaces对于转换出错,只能报一个位置信息,具体是什么错误却不明确,这是以后需要改进的地方。
4)有时候,ICEfaces的一些tag的disable属性无效,比如设置为true,但是还是能够看到。可以使用div将该tag包起来,然后用style="display:none"来隐藏。这个时候只能依靠javascript来控制了。
5)ice:outputMedia提供了一个使用windows media player,flash,realtime播放视频(音频)的方式,但是目前功能并不够多,还需要我们扩展。下面的JavaScript函数用于停止播放 :
function fnStopMedia(event){
var p=document.getElementById("form1:tabsetss:0:m1");
p.controls.stop();
}
ice:outputMedia的id是m1,由于我使用了比较复杂的页面布局,所以ice就会在m1前面加上一些,最后变成了"form1:tabsetss:0:m1",这个id其实就是html的tag <embed的id。
原文链接: http://blog.csdn.net/sheismylife/article/details/4533396


