在CodeIgniter框架中使用RESTful服务
CodeIgniter是php中目前优秀的框架之一,功能十分强大,但我们往往会忽视它在webservice方面的一些强大功能。在本文中,将会介绍如何使用CodeIgniter框架,为你的web应用程序建立RESTful API服务,并演示如何让创建的API和其他RESTful风格的webservices,比如Facebook或者Twitter进行交互。
第一部分 搭建RESTful服务
步骤1 下载并设置DEMO
我们提供了相关的基础框架示例程序下载,以方便本文的接下来的讨论。下载地址在:http://github.com/philsturgeon/codeigniter-restserver,如下图,只需要点download sources即可:
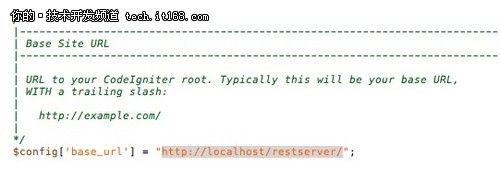
下载后,解压打开后,你会发现示例程序中已经整合好codeigniter,为了让其运行起来,我们修改application/config/config.php文件,设置好base_url为当前应用的虚拟目录,比如我们把示例程序命名为resetserver,则config.php文件设置为如下图所示:
步骤2 分析URL
接下来,我们来分析一下在示例程序中的example_api控制器中的一些URL,结合RESTful讲解其含义,首先在浏览器中,运行http://localhost/restserver,将会看到如下界面:
这里有五个示例,其中每个示例的链接都是以RESETful的形式给出的,下面我们分析其含义。注意这些都是由application/controller/example_api.php这个控制器产生的,我们分析下这些相关的URL,如下图:
其中,可以看到这种形式很象CodeIgniter中的MVC架构的链接,但要注意到,传统的CodeIgniter中的有点不同,在链接的最后一部分,我们称为Resource资源。有一点RESTful知识的朋友可能知道,在RESTful中,把要操作的对象都叫资源,而且对资源是通过HTTP方式进行相关操作,比如增加,删除,编辑和查询。我们来进一步看下图的链接结构,如图:
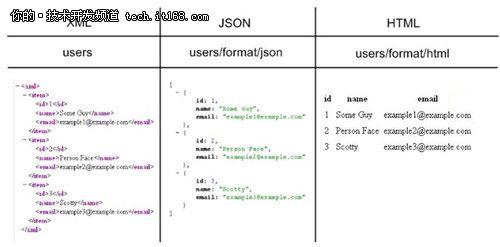
这里,进一步列出了请求URL的格式,跟着Resource后的是参数名以及其值,还有就是返回数据的显示格式,上图是指定了用json的格式返回。比如下图指定了三类返回的数据格式:
由于我们这里要把要提供的服务设计成RESETful的webservices方式供用户调用,所以这里我们设计了多种数据结果集返回的形式,有XML,JSON,HTML,CSV等方式。
步骤3 分析example_api.php
接下来,我们打开application/controllers/example_api.php文件,仔细分析其代码。
首先,在CodeIgniter中,我们要继承CodeIgniter框架本身的REST_Controller.php(这个文件位于libraries目录中),如下所示:
<?php
require(APPPATH'.libraries/REST_Controller.php');

class Example_api extends REST_Controller {

}
?>
接着我们看其中两个获得资源的方法,分别是user_get()和users_get(),其中user_get()是根据用户id去获得某个用户的信息,而users_get()则获得多个用户的信息,代码框架如下:
<?php
require(APPPATH'.libraries/REST_Controller.php');

class Example_api extends REST_Controller {

    function user_get()
    {
        // 获得一个用户的信息
    }

    function users_get()
    {
        //获得多个用户的信息
    }
}
?>
接着我们复习下在RESTful架构中的四类关于资源的操作。
GET:使用GET去获得一个已经存在的资源的信息。通常我们在浏览器中输入url其实即发出了一个GET的请求。
POST:使用POST去更新一个已经存在的资源。比如表单中的提交数据行为,都属于POST类型。
PUT:使用HTTP的报文头的PUT,可以去新建一种资源,目前不是所有浏览器支持,所以本文不作讨论。
DELETE:使用DELETE去删除一种资源,同样目前不是所有浏览器都支持。
现在我们可以根据四种HTTP RESTful语义去形成如下框架:
<?php
require(APPPATH'.libraries/REST_Controller.php');

class Example_api extends REST_Controller {

    function user_get()
    {
    // 获得一个用户的信息
    }

    function user_put()
    {
        // 创建一个新用户
    }

    function user_post()
    {
        //更新用户信息
    }

    function user_delete()
    {
        //删除用户信息
    }
}
?>
接下来我们充分利用CodeIgniter框架自身的REST_Controller的优势,完善为如下代码:
 <?php
require(APPPATH'.libraries/REST_Controller.php');

class Example_api extends REST_Controller {

    function user_get()
    {
        $data = array('returned: '. $this->get('id'));
        $this->response($data);
    }

    function user_post()
    {
        $data = array('returned: '. $this->post('id'));
        $this->response($data);
    }

    function user_put()
    {
        $data = array('returned: '. $this->put('id'));
        $this->response($data;
    }

    function user_delete()
    {
        $data = array('returned: '. $this->delete('id'));
        $this->response($data);
    }
}
?>
以上代码中包含了如下几个片段,下面逐一讲解:
$this->get() —— 其中,使用这个从形如index.php/example_api/user?id=1或者如index.php/example_api/user/id/1的连接中获得资源,比如这里就获得其id的值,然后在数组中返回该id对应的数值。
$this->post() —— 其实是CodeIgniter中调用了其框架的$this->input->post()方法,进行提交操作,并且利用了XSS保护特性。
$this->put() —— 取curl中提交的或者HTTP协议头的PUT参数的内容。
$this->delete() —— 取curl中提交的或者HTTP协议头的delete参数的内容。
$this->response() —— 个方法中,主要是将处理的数据返回给浏览器,你可以指定一个HTTP状态码去表示该次返回结果的状态,比如在数据库中找不到某个记录,可以使用如$this->response(array(‘error’ => ‘User not found.’)去返回结果。
步骤4 与现有应用整合
在下载的示例程序中,我们刚才讲解了重要的部分,接下来讲解如何将下载程序中的关键类与现有的应用整合。下载的应用中,结构如下图:
其实只需要把rest.php和libraries目录下的REST_Controller.php复制到你的应用中的相应位置即可。这里假设要从你的应用的后端实体模型中进行相关操作,并将操作发布成RESTful的webservice,因此修改代码如下:
<?php
require(APPPATH.'/libraries/REST_Controller.php');

class Api extends REST_Controller
{
    function user_get()
    {
        if(!$this->get('id'))
        {
            $this->response(NULL, 400);
        }

        $user = $this->user_model->get( $this->get('id') );

        if($user)
        {
            $this->response($user, 200); // 200 being the HTTP response code
        }

        else
        {
            $this->response(NULL, 404);
        }
    }

    function user_post()
    {
        $result = $this->user_model->update( $this->post('id'), array(
            'name' => $this->post('name'),
            'email' => $this->post('email')
        ));

        if($result === FALSE)
        {
            $this->response(array('status' => 'failed'));
        }

        else
        {
            $this->response(array('status' => 'success'));
        }

    }

    function users_get()
    {
        $users = $this->user_model->get_all();

        if($users)
        {
            $this->response($users, 200);
        }

        else
        {
            $this->response(NULL, 404);
        }
    }
}
?>
以上的代码段其实之前都已经介绍过,只不过这次在每个方法中,读取的是后端数据库中的实体类而已。
步骤5 保护RESTful API
为了保护RESTful API,可以在application/config/rest.php中设置安全保护级别,如下所示:
其中保护级别有如下设置:
None:任何人都可以访问这个API
BASIC:这个设置中,只提供基本的验证方式,适合在内部网络使用
Digest:使用用户名和密码进行验证,比如:$config['rest_valid_logins'] = array('admin' => '1234');
第二部分 调用RESTful服务
接下来,我们讲解如何调用RESTful服务,因为RESTful服务是通过HTTP协议进行发布服务,因此有多种方法进行调用。
1) 通过file_get_contents()调用
可以通过PHP中最简单的file_get_contents()去调用RESTful,比如:
要注意的是,要是访问一个受密码保护的RESTful的话,需要用如下形式访问:
2)使用cUrl访问RESTful
使用php中的cUrl去访问RESTful服务时最方便稳定的,下面的代码指导如何使用cUrl去设置HTTP协议头,去更新一个指定用户的信息,如下代码所示:
    function native_curl($new_name, $new_email)
    {
        $username = 'admin';
        $password = '1234';

        // Alternative JSON version
        // $url = 'http://twitter.com/statuses/update.json';
        // Set up and execute the curl process
        $curl_handle = curl_init();
        curl_setopt($curl_handle, CURLOPT_URL, 'http://localhost/restserver/index.php/example_api/user/id/1/format/json');
        curl_setopt($curl_handle, CURLOPT_RETURNTRANSFER, 1);
        curl_setopt($curl_handle, CURLOPT_POST, 1);
        curl_setopt($curl_handle, CURLOPT_POSTFIELDS, array(
            'name' => $new_name,
            'email' => $new_email
        ));

        //本行可选,如果你的RESTful API是开放的,则请删除该行
        curl_setopt($curl_handle, CURLOPT_USERPWD, $username . ':' . $password);

        $buffer = curl_exec($curl_handle);
        curl_close($curl_handle);

        $result = json_decode($buffer);

        if(isset($result->status) && $result->status == 'success')
        {
            echo 'User has been updated.';
        }

        else
        {
            echo 'Something has gone wrong';
        }
    }
用过PHP的cUrl的朋友应该知道,这里其实是使用cUrl对我们已经发布的RESTful地址进行访问,并提交相关要更新的参数。但是,强大的CodeIgniter为我们封装了更强大的cUrl类库cUrl library(http://codeigniter.com/wiki/Curl_library/),上面的代码可以简化如下:
function ci_curl($new_name, $new_email)
    {
        $username = 'admin';
        $password = '1234';
        $this->load->library('curl');
    $this->curl->create('http://localhost/restserver/index.php/example_api/user/id/1/format/json');
        //本行可选,如果你的RESTful API是开放的,则请删除该行        $this->curl->http_login($username, $password);
        $this->curl->post(array(
            'name' => $new_name,
            'email' => $new_email
        ));
        $result = json_decode($this->curl->execute());
        if(isset($result->status) && $result->status == 'success')
        {
            echo 'User has been updated.';
        }
        else
        {
            echo 'Something has gone wrong';
        }
    }
3)使用REST Client类库访问
第三种方法是可以使用开源的REST Client类库(http://github.com/philsturgeon/codeigniter-restclient)去访问REST,比如同样上面的代码,可以写成:
看,是不是更简单了!这里是示例说明了调用GET方法,并且说明返回的形式是JSON的,当然你也可以指定其他形式的返回结果,比如xml,php,csv等,比如:
同理,可以使用$this->rest->post(),$this->rest->put(),$this->rest->delete()等。
最后,我们学习下如何跟twitter的RESTful API打交道,使用RESTful Client library,只需要如下这样的编写简单代码即可:
这个是调用twitter的RESTful API去获得某个用户ID的资料,
这个代码段则是更新某个用户的状态。


