测试编译ffmpeg库
操作系统:Linux (window我还没试过哦)
1.创建一个新的Android Project 命名为FFmpegTest
目标平台最好选择与编译好的libffmpeg.so相同的平台,在FFmpegTest目录下创建一个jni目录。
2.下载ffmpeg源代码并放到jni目录下
下载地址:http://ffmpeg.org/download.html 这是0.8 “Love”版本的ffmpeg,如果你想获取最新版本的ffmpeg源代码可以通过Git或者SVN获取(具体问google)。
下载完后放到jni目录下的ffmpeg目录。
3.编译ffmpeg
3.1复制粘贴以下脚本代码,保存命名为 build_android.sh ,并放到ffmpeg目录下。
注意:这几行代码是需要修改的
NDK=~/Desktop/android/android-ndk-r5b
PLATFORM=$NDK/platforms/android-8/arch-arm/
PREBUILT=$NDK/toolchains/arm-linux-androideabi-4.4.3/prebuilt/linux-x86
根据你自己的情况指定NDK的各个目录,你也可以根据你项目的目标平台调整 PLATFORM 变量的值, SDK 2.2 对应的是android-8.
#!/bin/bash
######################################################
# Usage:
# put this script in top of FFmpeg source tree
# ./build_android
# It generates binary for following architectures:
# ARMv6
# ARMv6+VFP
# ARMv7+VFPv3-d16 (Tegra2)
# ARMv7+Neon (Cortex-A8)
# Customizing:
# 1. Feel free to change ./configure parameters for more features
# 2. To adapt other ARM variants
# set $CPU and $OPTIMIZE_CFLAGS
# call build_one
######################################################
NDK=/home/guokai/workspace/ffmpeg-test/android-ndk-r8/
PLATFORM=$NDK/platforms/android-14/arch-arm/
PREBUILT=$NDK/toolchains/arm-linux-androideabi-4.4.3/prebuilt/linux-x86/
function build_one
{
./configure --target-os=linux \
    --prefix=$PREFIX \
    --enable-cross-compile \
    --extra-libs="-lgcc" \
    --arch=arm \
    --cc=$PREBUILT/bin/arm-linux-androideabi-gcc \
    --cross-prefix=$PREBUILT/bin/arm-linux-androideabi- \
    --nm=$PREBUILT/bin/arm-linux-androideabi-nm \
    --sysroot=$PLATFORM \
    --extra-cflags=" -O3 -fpic -DANDROID -DHAVE_SYS_UIO_H=1 -Dipv6mr_interface=ipv6mr_ifindex -fasm -Wno-psabi -fno-short-enums -fno-strict-aliasing -finline-limit=300 $OPTIMIZE_CFLAGS " \
    --disable-shared \
    --enable-static \
    --extra-ldflags="-Wl,-rpath-link=$PLATFORM/usr/lib -L$PLATFORM/usr/lib -nostdlib -lc -lm -ldl -llog" \
    --disable-everything \
    --enable-demuxer=mov \
    --enable-demuxer=h264 \
    --disable-ffplay \
    --enable-protocol=file \
    --enable-avformat \
    --enable-avcodec \
    --enable-decoder=rawvideo \
    --enable-decoder=mjpeg \
    --enable-decoder=h263 \
    --enable-decoder=mpeg4 \
    --enable-decoder=h264 \
    --enable-parser=h264 \
    --disable-network \
    --enable-zlib \
    --disable-avfilter \
    --disable-avdevice \
    $ADDITIONAL_CONFIGURE_FLAG

make clean
make  -j4 install
$PREBUILT/bin/arm-linux-androideabi-ar d libavcodec/libavcodec.a inverse.o
$PREBUILT/bin/arm-linux-androideabi-ld -rpath-link=$PLATFORM/usr/lib -L$PLATFORM/usr/lib  -soname libffmpeg.so -shared -nostdlib  -z,noexecstack -Bsymbolic --whole-archive --no-undefined -o $PREFIX/libffmpeg.so libavcodec/libavcodec.a libavformat/libavformat.a libavutil/libavutil.a libswscale/libswscale.a -lc -lm -lz -ldl -llog  --warn-once  --dynamic-linker=/system/bin/linker $PREBUILT/lib/gcc/arm-linux-androideabi/4.4.3/libgcc.a
}

#arm v6
#CPU=armv6
#OPTIMIZE_CFLAGS="-marm -march=$CPU"
#PREFIX=./android/$CPU
#ADDITIONAL_CONFIGURE_FLAG=
#build_one

#arm v7vfpv3
CPU=armv7-a
OPTIMIZE_CFLAGS="-mfloat-abi=softfp -mfpu=vfpv3-d16 -marm -march=$CPU "
PREFIX=./android/$CPU
ADDITIONAL_CONFIGURE_FLAG=
build_one

#arm v7vfp
#CPU=armv7-a
#OPTIMIZE_CFLAGS="-mfloat-abi=softfp -mfpu=vfp -marm -march=$CPU "
#PREFIX=./android/$CPU-vfp
#ADDITIONAL_CONFIGURE_FLAG=
#build_one

#arm v7n
#CPU=armv7-a
#OPTIMIZE_CFLAGS="-mfloat-abi=softfp -mfpu=neon -marm -march=$CPU -mtune=cortex-a8"
#PREFIX=./android/$CPU
#ADDITIONAL_CONFIGURE_FLAG=--enable-neon
#build_one

#arm v6+vfp
#CPU=armv6
#OPTIMIZE_CFLAGS="-DCMP_HAVE_VFP -mfloat-abi=softfp -mfpu=vfp -marm -march=$CPU"
#PREFIX=./android/${CPU}_vfp
#ADDITIONAL_CONFIGURE_FLAG=
#build_one
为了提高编译速度此脚本放弃了ffmpeg的很多东西,你可以根据自己的需求改变脚本文件的配置,此外,你还可以编译多硬件平台的库文件,本例只编译 arm v7vfpv3,因为编译arm的库速度比较快~~╮(╯▽╰)╭ 请原谅 汤姆猫的懒惰。
3.2 确保 bash 脚本文件是可执行的. Linux系统使用终端进入项目jin目录下的ffmpeg目录,输入以下命令:
sudo chmod 755 build_android.sh ,这样就能确保脚本文件时可执行的啦~
3.3 使用终端执行脚本文件.
进入到 bash 脚本文件所在目录也就是jni/ffmpeg下,输入以下命令
./build_android.sh
执行脚本文件(应该是几分钟就编译完成了)。
注意:NDK-r6或者以上的版本如果无法编译通过,可以试试下面这个脚本文件
<span style="color:#333333;">#!/bin/bash
######################################################
# Usage:
# put this script in top of FFmpeg source tree
# ./build_android
#
# It generates binary for following architectures:
# ARMv6
# ARMv6+VFP
# ARMv7+VFPv3-d16 (Tegra2)
# ARMv7+Neon (Cortex-A8)
#
# Customizing:
# 1. Feel free to change ./configure parameters for more features
# 2. To adapt other ARM variants
# set $CPU and $OPTIMIZE_CFLAGS
# call build_one
######################################################
#change these three lines if you want to build using different vesion of Android ndk
#build_one is for ndk 5, and build_one_r6 is for ndk 6
NDK=~/ffmpeg/android-ndk-r6
PLATFORM=$NDK/platforms/android-8/arch-arm/
PREBUILT=$NDK/toolchains/arm-linux-androideabi-4.4.3/prebuilt/linux-x86
function build_one_r6
{
./configure \
    --disable-shared \
    --enable-static \
    --enable-gpl \
    --enable-version3 \
    --enable-nonfree \
    --disable-doc \
    --disable-ffmpeg \
    --disable-ffplay \
    --disable-ffprobe \
    --disable-ffserver \
    --disable-avdevice \
    --disable-avfilter \
    --disable-postproc \
    --enable-small \
    --cross-prefix=$PREBUILT/bin/arm-linux-androideabi- \
    --enable-cross-compile \
    --target-os=linux \
    --extra-cflags="-I$PLATFORM/usr/include" \
    --extra-ldflags="-L$PLATFORM/usr/lib -nostdlib" \
    --arch=arm \
    --disable-symver \
    --disable-debug \
    --disable-stripping \
    $ADDITIONAL_CONFIGURE_FLAG
sed -i 's/HAVE_LRINT 0/HAVE_LRINT 1/g' config.h
sed -i 's/HAVE_LRINTF 0/HAVE_LRINTF 1/g' config.h
sed -i 's/HAVE_ROUND 0/HAVE_ROUND 1/g' config.h
sed -i 's/HAVE_ROUNDF 0/HAVE_ROUNDF 1/g' config.h
sed -i 's/HAVE_TRUNC 0/HAVE_TRUNC 1/g' config.h
sed -i 's/HAVE_TRUNCF 0/HAVE_TRUNCF 1/g' config.h
make clean
make  -j4 install
$PREBUILT/bin/arm-linux-androideabi-ar d libavcodec/libavcodec.a inverse.o
$PREBUILT/bin/arm-linux-androideabi-ld -rpath-link=$PLATFORM/usr/lib -L$PLATFORM/usr/lib  -soname libffmpeg.so -shared -nostdlib  -z,noexecstack -Bsymbolic --whole-archive --no-undefined -o $PREFIX/libffmpeg.so libavcodec/libavcodec.a libavformat/libavformat.a libavutil/libavutil.a libswscale/libswscale.a -lc -lm -lz -ldl -llog  --warn-once  --dynamic-linker=/system/bin/linker $PREBUILT/lib/gcc/arm-linux-androideabi/4.4.3/libgcc.a
}
function build_one_r6_2
{
$PREBUILT/bin/arm-linux-androideabi-ar d libavcodec/libavcodec.a inverse.o
$PREBUILT/bin/arm-linux-androideabi-ld -rpath-link=$PLATFORM/usr/lib -L$PLATFORM/usr/lib  -soname libffmpeg.so -shared -nostdlib  -z,noexecstack -Bsymbolic --whole-archive --no-undefined -o $PREFIX/libffmpeg.so libavcodec/libavcodec.a libavformat/libavformat.a libavutil/libavutil.a libswscale/libswscale.a -lc -lm -lz -ldl -llog  --warn-once  --dynamic-linker=/system/bin/linker $PREBUILT/lib/gcc/arm-linux-androideabi/4.4.3/libgcc.a
}
#arm v6
#CPU=armv6
#OPTIMIZE_CFLAGS="-marm -march=$CPU"
#PREFIX=./android/$CPU
#ADDITIONAL_CONFIGURE_FLAG=
#build_one
#arm v7vfpv3
CPU=armv7-a
OPTIMIZE_CFLAGS="-mfloat-abi=softfp -mfpu=vfpv3-d16 -marm -march=$CPU "
PREFIX=./android/$CPU
ADDITIONAL_CONFIGURE_FLAG=
#build_one
build_one_r6
#arm v7vfp
#CPU=armv7-a
#OPTIMIZE_CFLAGS="-mfloat-abi=softfp -mfpu=vfp -marm -march=$CPU "
#PREFIX=./android/$CPU-vfp
#ADDITIONAL_CONFIGURE_FLAG=
#build_one
#arm v7n
#CPU=armv7-a
#OPTIMIZE_CFLAGS="-mfloat-abi=softfp -mfpu=neon -marm -march=$CPU -mtune=cortex-a8"
#PREFIX=./android/$CPU
#ADDITIONAL_CONFIGURE_FLAG=--enable-neon
#build_one
#arm v6+vfp
#CPU=armv6
#OPTIMIZE_CFLAGS="-DCMP_HAVE_VFP -mfloat-abi=softfp -mfpu=vfp -marm -march=$CPU"
#PREFIX=./android/${CPU}_vfp
#ADDITIONAL_CONFIGURE_FLAG=
#build_one</span>
网上说可能还需要在ffmpeg目录下创建 ./android/armv7-a/的目录结构.
4.完成编译
当脚本文件执行完毕,会在ffmpeg目录下生成一个android的文件夹,里面就包含了所有的编译成果。
5.将编译完成的.so或.a库,使用JNI规范集成到android应用中供java代码调用。
5.1下面的代码是调用ffmpeg库的jni层代码,可以在jni目录下创建一个ffmpeg-test-jni.c文件,将代码粘贴过去,文章末尾会提供 本例完整的工程项目的 下载链接。。
/**
this is the wrapper of the native functions
**/
/*android specific headers*/
#include <jni.h>
#include <android/log.h>
#include <android/bitmap.h>
/*standard library*/
#include <time.h>
#include <math.h>
#include <limits.h>
#include <stdio.h>
#include <stdlib.h>
#include <inttypes.h>
#include <unistd.h>
#include <assert.h>
/*ffmpeg headers*/
#include <libavutil/avstring.h>
#include <libavutil/pixdesc.h>
#include <libavutil/imgutils.h>
#include <libavutil/samplefmt.h>

#include <libavformat/avformat.h>

#include <libswscale/swscale.h>

#include <libavcodec/avcodec.h>
#include <libavcodec/opt.h>
#include <libavcodec/avfft.h>

/*for android logs*/
#define LOG_TAG "FFmpegTest"
#define LOG_LEVEL 10
#define LOGI(level, ...) if (level <= LOG_LEVEL) {__android_log_print(ANDROID_LOG_INFO, LOG_TAG, __VA_ARGS__);}
#define LOGE(level, ...) if (level <= LOG_LEVEL) {__android_log_print(ANDROID_LOG_ERROR, LOG_TAG, __VA_ARGS__);}

/**/
char *gFileName;	  //the file name of the video

AVFormatContext *gFormatCtx;
int gVideoStreamIndex;    //video stream index

AVCodecContext *gVideoCodecCtx;

static void get_video_info(char *prFilename);

/*parsing the video file, done by parse thread*/
static void get_video_info(char *prFilename) {
    AVCodec *lVideoCodec;
    int lError;
    /*some global variables initialization*/
    LOGI(10, "get video info starts!");
    /*register the codec*/
    extern AVCodec ff_h263_decoder;
    avcodec_register(&ff_h263_decoder);
    extern AVCodec ff_h264_decoder;
    avcodec_register(&ff_h264_decoder);
    extern AVCodec ff_mpeg4_decoder;
    avcodec_register(&ff_mpeg4_decoder);
    extern AVCodec ff_mjpeg_decoder;
    avcodec_register(&ff_mjpeg_decoder);
    /*register parsers*/
    //extern AVCodecParser ff_h264_parser;
    //av_register_codec_parser(&ff_h264_parser);
    //extern AVCodecParser ff_mpeg4video_parser;
    //av_register_codec_parser(&ff_mpeg4video_parser);
    /*register demux*/
    extern AVInputFormat ff_mov_demuxer;
    av_register_input_format(&ff_mov_demuxer);
    //extern AVInputFormat ff_h264_demuxer;
    //av_register_input_format(&ff_h264_demuxer);
    /*register the protocol*/
    extern URLProtocol ff_file_protocol;
    av_register_protocol2(&ff_file_protocol, sizeof(ff_file_protocol));

/*open the video file--根据文件名来初始化AVFormatContext*/
    if ((lError = av_open_input_file(&gFormatCtx, gFileName, NULL, 0, NULL)) !=0 ) {
        LOGE(1, "Error open video file: %d", lError);
        return;	//open file failed
    }

/*retrieve stream information--从AVFormatContext提取流信息*/
    if ((lError = av_find_stream_info(gFormatCtx)) < 0) {
        LOGE(1, "Error find stream information: %d", lError);
        return;
    }

/*find the video stream and its decoder--通过AVFormatContext找到文件的stream和编码类型*/
    gVideoStreamIndex = av_find_best_stream(gFormatCtx, AVMEDIA_TYPE_VIDEO, -1, -1, &lVideoCodec, 0);
    if (gVideoStreamIndex == AVERROR_STREAM_NOT_FOUND) {
        LOGE(1, "Error: cannot find a video stream");
        return;
    } else {
	LOGI(10, "video codec: %s", lVideoCodec->name);
    }
    if (gVideoStreamIndex == AVERROR_DECODER_NOT_FOUND) {
        LOGE(1, "Error: video stream found, but no decoder is found!");
        return;
    }

/*open the codec--从编码类型打开解码器*/
    gVideoCodecCtx = gFormatCtx->streams[gVideoStreamIndex]->codec;
    LOGI(10, "open codec: (%d, %d)", gVideoCodecCtx->height, gVideoCodecCtx->width);
#ifdef SELECTIVE_DECODING
    gVideoCodecCtx->allow_selective_decoding = 1;
#endif
    if (avcodec_open(gVideoCodecCtx, lVideoCodec) < 0) {/*用找的编码类别lVideoCodec类初始化AVCodecContext*/
	LOGE(1, "Error: cannot open the video codec!");
        return;
    }
    LOGI(10, "get video info ends");
}


JNIEXPORT void JNICALL Java_roman10_ffmpegTest_VideoBrowser_naClose(JNIEnv *pEnv, jobject pObj) {
    int l_mbH = (gVideoCodecCtx->height + 15) / 16;
    /*close the video codec*/
    avcodec_close(gVideoCodecCtx);
    /*close the video file*/
    av_close_input_file(gFormatCtx);
}

JNIEXPORT void JNICALL Java_roman10_ffmpegTest_VideoBrowser_naInit(JNIEnv *pEnv, jobject pObj, jstring pFileName) {
    int l_mbH, l_mbW;
    /*get the video file name*/
    gFileName = (char *)(*pEnv)->GetStringUTFChars(pEnv, pFileName, NULL);
    if (gFileName == NULL) {
        LOGE(1, "Error: cannot get the video file name!");
        return;
    }
    LOGI(10, "video file name is %s", gFileName);
    get_video_info(gFileName);
    LOGI(10, "initialization done");
}

JNIEXPORT jstring JNICALL Java_roman10_ffmpegTest_VideoBrowser_naGetVideoCodecName(JNIEnv *pEnv, jobject pObj) {
    char* lCodecName = gVideoCodecCtx->codec->name;
    return (*pEnv)->NewStringUTF(pEnv, lCodecName);
}

JNIEXPORT jstring JNICALL Java_roman10_ffmpegTest_VideoBrowser_naGetVideoFormatName(JNIEnv *pEnv, jobject pObj) {
    char* lFormatName = gFormatCtx->iformat->name;
    return (*pEnv)->NewStringUTF(pEnv, lFormatName);
}


JNIEXPORT jintArray JNICALL Java_roman10_ffmpegTest_VideoBrowser_naGetVideoResolution(JNIEnv *pEnv, jobject pObj) {
    jintArray lRes;
    lRes = (*pEnv)->NewIntArray(pEnv, 2);
    if (lRes == NULL) {
        LOGI(1, "cannot allocate memory for video size");
        return NULL;
    }
    jint lVideoRes[2];
    lVideoRes[0] = gVideoCodecCtx->width;
    lVideoRes[1] = gVideoCodecCtx->height;
    (*pEnv)->SetIntArrayRegion(pEnv, lRes, 0, 2, lVideoRes);
    return lRes;
}
如果你不熟悉java的JNI开发, 你可能需要先阅读JNI规范后才能看懂以上的代码。
5.2编译本地代码,将ffmpeg.so集成到自己的.so库
在jni目录下创建一个 Android.mk 文件,此文件是用于告诉NDK如何去编译这个项目的jni层代码
LOCAL_PATH := $(call my-dir)

#declare the prebuilt library

include $(CLEAR_VARS)

LOCAL_MODULE := ffmpeg-prebuilt

LOCAL_SRC_FILES := ffmpeg-0.8/android/armv7-a/libffmpeg.so

LOCAL_EXPORT_C_INCLUDES := ffmpeg-0.8/android/armv7-a/include

LOCAL_EXPORT_LDLIBS := ffmpeg-0.8/android/armv7-a/libffmpeg.so

LOCAL_PRELINK_MODULE := true # 该模块是否被启动就加载。该项设置依具体程序的特性而定。

include $(PREBUILT_SHARED_LIBRARY)

#the ffmpeg-test-jni library

include $(CLEAR_VARS)

LOCAL_ALLOW_UNDEFINED_SYMBOLS=false

LOCAL_MODULE := ffmpeg-test-jni  #当前模块的名称,也就是第一步中我们提到的LIBNAME。
				#注意这个需要加上lib前缀,但不需要加.so后缀,也就是说应该是libLIBNAME
LOCAL_SRC_FILES := ffmpeg-test-jni.c  # 包含的源文件

LOCAL_C_INCLUDES := $(LOCAL_PATH)/ffmpeg-0.8/android/armv7-a/include
						 #包含的头文件。这里是需要包含JNI的头文件。
LOCAL_SHARED_LIBRARY := ffmpeg-prebuilt # 当前模块需要依赖的共享库

LOCAL_LDLIBS    := -llog -ljnigraphics -lz -lm $(LOCAL_PATH)/ffmpeg-0.8/android/armv7-a/libffmpeg.so

include $(BUILD_SHARED_LIBRARY)
再在jni目录新建另一个新的文件命名为 Application.mk,代码如下:
# The ARMv7 is significanly faster due to the use of the hardware FPU


APP_ABI := armeabi-v7a


APP_PLATFORM := android-8
关于Android.mk 与 Application.mk的更多信息请参考 android NDK的官方文档 .
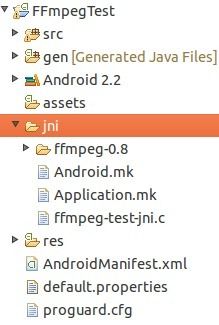
现在你的工程目录结构应该是酱紫的....
5.3 编写java native 方法调用 本地代码(Native Code)
要调用本地方法也就是.so库中的方法,需要先把.so加载到虚拟机中,以下是代码片段,后面会提供项目的下载链接
/*this part communicates with native code through jni (java native interface)*/


    //load the native library


    static {


        System.loadLibrary("ffmpeg");


        System.loadLibrary("ffmpeg-test-jni");


    }


    //declare the jni functions


    private static native void naInit(String _videoFileName);


    private static native int[] naGetVideoResolution();


    private static native String naGetVideoCodecName();


    private static native String naGetVideoFormatName();


    private static native void naClose();


    private void showVideoInfo(final File _file) {


        String videoFilename = _file.getAbsolutePath();


        naInit(videoFilename);


        int[] prVideoRes = naGetVideoResolution();


        String prVideoCodecName = naGetVideoCodecName();


        String prVideoFormatName = naGetVideoFormatName();


        naClose();


        String displayText = "Video: " + videoFilename + "\n";


        displayText += "Video Resolution: " + prVideoRes[0] + "x" + prVideoRes[1] + "\n";


        displayText += "Video Codec: " + prVideoCodecName + "\n";


        displayText += "Video Format: " + prVideoFormatName + "\n";


        text_titlebar_text.setText(displayText);


    }
这几个java 的native方法与上面实现的c 代码中的几个方法是一 一对应的,或者你可以先在命令行中cd 到工程的classes目录下使用javah工具生成这些java native方法对应的.h头文件,再新建一个.c文件将.h文件include进来再一 一去实现其中的函数。.h头文件并不是必须的...但生成.h文件比较规范.
5.4 编译集成ffmpeg 这一步在5.3之前做也可以...
Android.mk 、Application.mk、ffmpeg-test-jni.c、ffmpeg/android中的库文件都准备齐全后,
使用终端cd 到工程目录(FFmpegTest) 执行命令:
ndk-build
出现以上提示则表示编译通过了 ╮(╯▽╰)╭ 终于搞定了
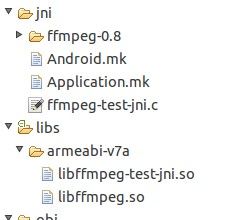
刷新工程目录后会生成一个libs文件夹,里面就包含了我们编译好的.so库
6.最后安装应用开始测试吧~
项目工程下载: http://download.csdn.net/detail/teisun/4276777
我的开发环境是ubuntu 10.04 和ndk-r5、ndk-r6、 ndk-r7都测试通过,window平台不敢保证可以 顺利编译哦。

