MAC OS X平台搭建STM32开发环境
本人用MAC主要是做开发用,其实MAC平台只要不是用来开发Windows或者是嵌入式的话,做其他任何开发都比较舒服,至少我认为比在windows上要舒服的多。但是坑爹的事情也有,就是如果做嵌入式开发就比较蛋疼了。没办法,蛋疼归蛋疼,该做的也还是要做的。
本人手头上有一块STM32F103VET6的开发板,如果在windows下,那么轻松愉快,装个KeilMDK或者IAR for ARM就搞定了。但是在Mac OS X以及Linux下,就要用Makefile来管理开发了,这些平台上可没有非常方便的IDE供我们来选择。
好了,废话不多说,下面就进入正题。
一、准备工作
至少要准备一下软件,XCode,arm-none-eabi-gcc以及J-Link for MAC。我用的软件版本如下:
XCode6.x (AppStore 直接安装就好了)
gcc-arm-none-eabi-4_8-2014q3-20140805-mac.tar (VeryARM上下载,各个平台都有)
JLink_MacOSX_V500k.pkg (https://www.segger.com/jlink-software.html 这个地方可以下载)
二、环境配置
好了,安装包都准备好了吧?先讲gcc-arm-none-eabixxx这个包解压到你自已方便的位置,并在.bash_profile中添加如下环境变量:
export PATH=$PATH:$(ARM-TOOLS-ROOT)/bin其中$(ARM-TOOLS-ROOT)代表工具链解压之后的根目录,请用绝对路径并且路径名不要包含空格。完成之后在shell上执行如下指令使得以上设置的环境变量有效:
$ source .bash_profile完成之后可以在shell中执行如下命令查看时候安装成功:
$ arm-none-eabi-gcc -v如果安装成功,此时会再shell中打印出一堆的gcc的版本信息,如果失败,应该会打印此命令找不到之类的信息,那么肯定是环境变量设置出错。
此时编译工具链已经安装完成,那么再将JLink驱动装上就好了,这个与一般的其他软件安装过程一样。如果安装成功,应该会在/usr/bin下面找到JLinkExe,JFlashSPI等等可执行文件的。
三、代码示例
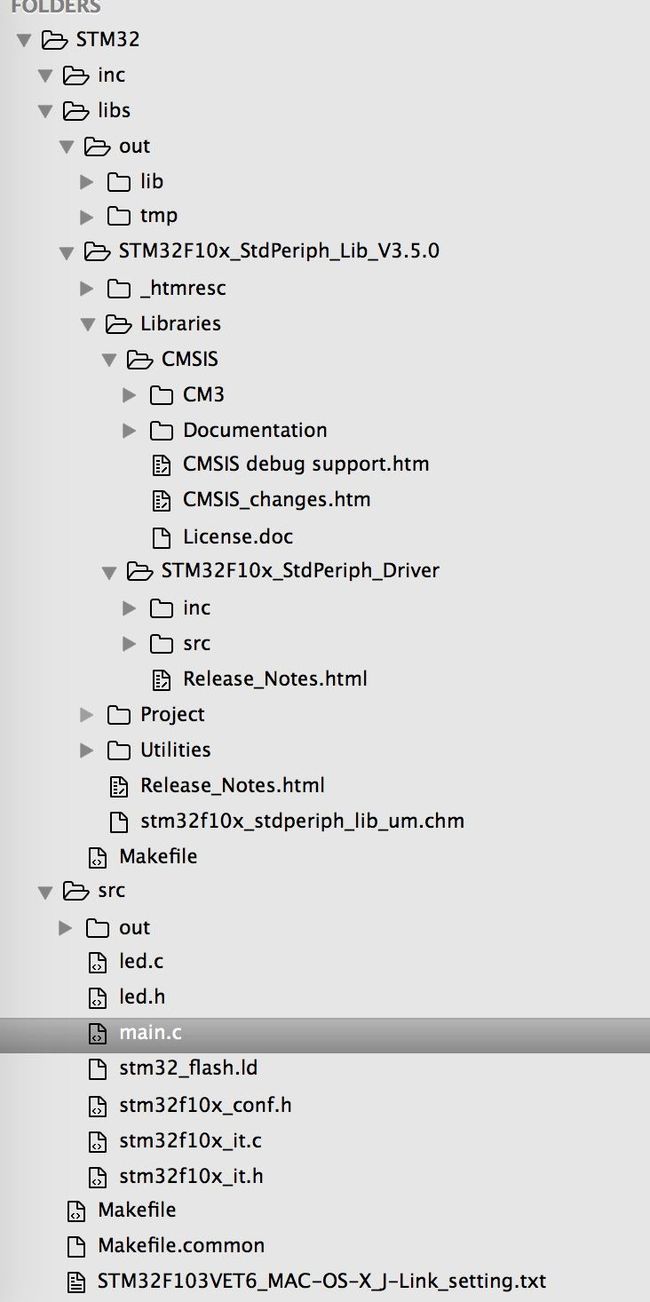
本人使用代码目录结构如下图:
这里主要贴一下Makefile,这些Makefile也是在网上参考了其他人并经过加工而成。主要的Makefile有三个,
Makefile.common这个是公共配置文件,STM32目录下得Makefile以及libs下得Makefile。
1、Makefile.common
# include Makefile

#This file is included in the general Makefile, the libs Makefile and the src Makefile
#Different optimize settings for library and source files can be realized by using arguments
#Compiler optimize settings:
# -O0 no optimize, reduce compilation time and make debugging produce the expected results (default).
# -O1 optimize, reduce code size and execution time, without much increase of compilation time.
# -O2 optimize, reduce code execution time compared to ‘O1’, increase of compilation time.
# -O3 optimize, turns on all optimizations, further increase of compilation time.
# -Os optimize for size, enables all ‘-O2’ optimizations that do not typically increase code size and other code size optimizations.
#Recommended optimize settings for release version: -O3
#Recommended optimize settings for debug version: -O0
#Valid parameters :
# OptLIB=0 --> optimize library files using the -O0 setting
# OptLIB=1 --> optimize library files using the -O1 setting
# OptLIB=2 --> optimize library files using the -O2 setting
# OptLIB=3 --> optimize library files using the -O3 setting
# OptLIB=s --> optimize library files using the -Os setting
# OptSRC=0 --> optimize source files using the -O0 setting
# OptSRC=1 --> optimize source files using the -O1 setting
# OptSRC=2 --> optimize source files using the -O2 setting
# OptSRC=3 --> optimize source files using the -O3 setting
# OptSRC=s --> optimize source files using the -Os setting
# all --> build all
# libs --> build libs only
# src --> build src only
# clean --> clean project
# tshow --> show optimize settings
#Example:
# make OptLIB=3 OptSRC=0 all tshow

#TOP=$(shell readlink -f "$(dir $(lastword $(MAKEFILE_LIST)))")
TOP			= /Users/zhj/Developer/STM32
PROGRAM		= stm32_project
LIBDIR		= $(TOP)/libs

#Adust the following line to the library in use
STMLIB		= $(LIBDIR)/STM32F10x_StdPeriph_Lib_V3.5.0/Libraries

#Adjust TypeOfMCU in use, see CMSIS file "stm32f10x.h"
#STM32F103RBT (128KB FLASH, 20KB RAM) --> STM32F10X_MD
#STM32F103RET (512KB FLASH, 64KB RAM) --> STM32F10X_HD
#STM32F103ZET (512KB FLASH, 64KB RAM) --> STM32F10X_HD
TypeOfMCU 	= STM32F10X_HD

# Tool chains settings.
TOOLCHAINS_PREFIX	=	arm-none-eabi
CC					=	$(TOOLCHAINS_PREFIX)-gcc
ld 					=	$(TOOLCHAINS_PREFIX)-ld -v
OBJCOPY 			=	$(TOOLCHAINS_PREFIX)-objcopy
AR 					=	$(TOOLCHAINS_PREFIX)-ar
GDB 				=	$(TOOLCHAINS_PREFIX)-gdb

INCLUDE	 =-I$(TOP)/inc
INCLUDE	+=-I$(STMLIB)/CMSIS/CM3/CoreSupport
INCLUDE	+=-I$(STMLIB)/CMSIS/CM3/DeviceSupport/ST/STM32F10x
INCLUDE	+=-I$(STMLIB)/STM32F10x_StdPeriph_Driver/inc

COMMONFLAGS		= -g -mcpu=cortex-m3 -mthumb
COMMONFLAGSlib	= $(COMMONFLAGS)
#Commands for general Makefile and src Makefile
ifeq ($(OptSRC),0)
	COMMONFLAGS	+=	-O0
	InfoTextSrc	 =	src (no optimize, -O0)
else ifeq ($(OptSRC),1)
	COMMONFLAGS +=	-O1
	InfoTextSrc  =	src (optimize time+ size+, -O1)
else ifeq ($(OptSRC),2)
	COMMONFLAGS +=	-O2
	InfoTextSrc  =	src (optimize time++ size+, -O2)
else ifeq ($(OptSRC),s)
	COMMONFLAGS +=	-Os
	InfoTextSrc  =	src (optimize size++, -Os)
else
	COMMONFLAGS	+=	-Os
	InfoTextSrc  = 	src (full optimize, -O3)
endif
CFLAGS  +=  $(COMMONFLAGS) -Wall -Werror $(INCLUDE)
CFLAGS  +=  -D$(TypeOfMCU)
CFLAGS  +=  -DUSE_STDPERIPH_DRIVER

#Commands for libs Makefile
ifeq ($(OptLIB),0)
	COMMONFLAGSlib	+=  -O0
	InfoTextLib		 =  libs (no optimize, -O0)
else ifeq ($(OptLIB),1)
	COMMONFLAGSlib	+=  -O1
	InfoTextLib		 =	libs (optimize time+ size+, -O1)
else ifeq ($(OptLIB),2)
	COMMONFLAGSlib  +=  -O2
	InfoTextLib		 =  libs (optimize time++ size+, -O2)
else ifeq ($(OptLIB),s)
	COMMONFLAGSlib	+=  -Os
	InfoTextLib		 =  libs (optimize size++, -Os)
else
	COMMONFLAGSlib	+=	-O3
	InfoTextLib		 =	libs (full optimize, -O3)
endif
CFLAGSlib += $(COMMONFLAGSlib) -Wall -Werror $(INCLUDE)
CFLAGSlib += -D$(TypeOfMCU)
CFLAGSlib += -DUSE_STDPERIPH_DRIVER
2、libs下的Makefile是用来编译STM32标准驱动库的,生成的中间文件在libs/out/tmp中,而最后成果在libs/out/lib中。请看具体内容:
# libs Makefile
include ../Makefile.common

INC       = -I$(TOP)/src
LIBS 	  = libstm32.a
OBJOUTDIR = $(LIBDIR)/out/tmp
LIBOUTDIR = $(LIBDIR)/out/lib

MY_C_SOURCES := $(wildcard $(STMLIB)/CMSIS/CM3/CoreSupport/*.c)
MY_C_SOURCES += $(wildcard $(STMLIB)/CMSIS/CM3/DeviceSupport/ST/STM32F10x/*.c)
MY_C_SOURCES += $(wildcard $(STMLIB)/STM32F10x_StdPeriph_Driver/src/*.c)

SOURCES := $(patsubst %.c, %.c, $(MY_C_SOURCES))

MY_S_SOURCES := $(STMLIB)/CMSIS/CM3/DeviceSupport/ST/STM32F10x/startup/gcc_ride7/startup_stm32f10x_hd.s
S_OBJS 		 := $(patsubst %.s, %.o, $(MY_S_SOURCES))

OBJS				:= $(patsubst %.c, %.o, $(SOURCES))
OBJSWITHOUTDIR 		:= $(patsubst %.c, $(OBJOUTDIR)/%.o, $(notdir $(SOURCES)))
OBJSWITHOUTDIR		+= $(OBJOUTDIR)/$(notdir $(S_OBJS))

all: $(LIBS)

$(LIBS):$(OBJS) $(S_OBJS)
	$(AR) cr $(LIBOUTDIR)/$@ $(OBJSWITHOUTDIR)

.PHONY: clean tshow

clean:
	rm -f $(LIBOUTDIR)/*.a
	rm -f $(OBJOUTDIR)/*.o

show:
	@echo $(MY_C_SOURCES)
	@echo
	@echo $(SOURCES)
	@echo
	@echo $(OBJS)
	@echo

tshow:
	@echo "#####################################################################################"
	@echo "################# optimize settings: $(InfoTextLib), $(InfoTextSrc)"
	@echo "#####################################################################################"

$(S_OBJS): $(MY_S_SOURCES)
	$(CC) $(CFLAGSlib) -c $< -o $(OBJOUTDIR)/$(notdir $@)

%.o:%.c
	$(CC) $(CFLAGSlib) $(INC) -c $< -o $(OBJOUTDIR)/$(notdir $@)
3、编译二进制可执行文件的Makefile,就在与Makefile.common同级的目录中。它编译的结果包括中间文件都在src/out目录中,这里的编译会用到libs下生成的libstm32.a文件。
# general Makefile

include Makefile.common

PROGRAM	  = stm32_project
LIBS 	  = libstm32.a
OBJOUTDIR = $(TOP)/src/out/tmp
BINOUTDIR = $(TOP)/src/out/bin
LIBOUTDIR = $(LIBDIR)/out/lib
INC 	  = -I$(TOP)/src

LDFLAGS=$(COMMONFLAGS) -fno-exceptions -ffunction-sections -fdata-sections \
	-L$(LIBOUTDIR) -Wl,--no-whole-archive -lstm32 \
	-nostartfiles -Wl,--gc-sections,-T$(TOP)/src/stm32_flash.ld

MY_C_SOURCES 		:= $(wildcard $(TOP)/src/*.c)
SOURCES 			:= $(patsubst %.c, %.c, $(MY_C_SOURCES))
OBJS				:= $(patsubst %.c, %.o, $(SOURCES))
OBJSWITHOUTDIR 		:= $(patsubst %.c, $(OBJOUTDIR)/%.o, $(notdir $(SOURCES)))

.PHONY: libs clean tshow  show
all: libs src

libs:
	$(MAKE) -C $@

src: $(OBJS)
	$(CC) -o $(BINOUTDIR)/$(PROGRAM).elf $(OBJSWITHOUTDIR) $(LDFLAGS)
	$(OBJCOPY) -O ihex $(BINOUTDIR)/$(PROGRAM).elf $(BINOUTDIR)/$(PROGRAM).hex
	$(OBJCOPY) -O binary $(BINOUTDIR)/$(PROGRAM).elf $(BINOUTDIR)/$(PROGRAM).bin
	arm-none-eabi-readelf -a $(BINOUTDIR)/$(PROGRAM).elf > $(BINOUTDIR)/$(PROGRAM).info_elf
	arm-none-eabi-size -d -B -t $(BINOUTDIR)/$(PROGRAM).elf > $(BINOUTDIR)/$(PROGRAM).info_size
	arm-none-eabi-objdump -S $(BINOUTDIR)/$(PROGRAM).elf > $(BINOUTDIR)/$(PROGRAM).info_code
	arm-none-eabi-nm -t d -S --size-sort -s $(BINOUTDIR)/$(PROGRAM).elf > $(BINOUTDIR)/$(PROGRAM).info_symbol

%.o:%.c
	$(CC) $(CFLAGS) $(INC) -c $< -o $(OBJOUTDIR)/$(notdir $@)

clean:
	$(MAKE) -C libs $@
	-rm -r $(OBJOUTDIR)/*.o
	@cd $(BINOUTDIR)
	-rm -f $(PROGRAM).elf $(PROGRAM).hex $(PROGRAM).bin $(PROGRAM).info_elf $(PROGRAM).info_size
	-rm -f $(PROGRAM).info_code
	-rm -f $(PROGRAM).info_symbol
	@cd ..

show:
	@echo $(MY_C_SOURCES)
	@echo
	@echo $(SOURCES)
	@echo
	@echo $(OBJS)
	@echo
	@echo $(OBJSWITHOUTDIR)

tshow:
	@echo "######################################################################################################"
	@echo "################# optimize settings: $(InfoTextLib), $(InfoTextSrc)"
	@echo "######################################################################################################"
4、当文件都配置妥当,那么就可以在STM32这一级目录中执行make指令,如果一起正常就会在src/out/bin下生成一个stm32_project.bin的文件,这个文件就是最终要烧录到开发板的二进制文件。
5、还要注意的是,注意程序在链接的时候需要一个链接脚本,这个脚本定义了链接过程中所有代码的定位问题。所以一定要注意其配置。这个文件在STM32标准驱动库中的Project/STM32F10x_StdPerihp_Template/TrueSTUDIO中每一EVAL目录中有示例,主要区别就是目标MCU的RAM/FLASH的大小。一定注意,我使用的STM32F103VET6是512KB flash/64KB RAM,其链接脚本(stm32_flash.ld)如下:
/*
*****************************************************************************
**
**  File        : stm32_flash.ld
**
**  Abstract    : Linker script for STM32F103ZE Device with
**                512KByte FLASH, 64KByte RAM
**
**                Set heap size, stack size and stack location according
**                to application requirements.
**
**                Set memory bank area and size if external memory is used.
**
**  Target      : STMicroelectronics STM32
**
**  Environment : Atollic TrueSTUDIO(R)
**
**  Distribution: The file is distributed “as is,” without any warranty
**                of any kind.
**
**  (c)Copyright Atollic AB.
**  You may use this file as-is or modify it according to the needs of your
**  project. Distribution of this file (unmodified or modified) is not
**  permitted. Atollic AB permit registered Atollic TrueSTUDIO(R) users the
**  rights to distribute the assembled, compiled & linked contents of this
**  file as part of an application binary file, provided that it is built
**  using the Atollic TrueSTUDIO(R) toolchain.
**
*****************************************************************************
*/

/* Entry Point */
ENTRY(Reset_Handler)

/* Highest address of the user mode stack */
_estack = 0x20010000;    /* end of 64K RAM */

/* Generate a link error if heap and stack don't fit into RAM */
_Min_Heap_Size = 0;      /* required amount of heap  */
_Min_Stack_Size = 0x200; /* required amount of stack */

/* Specify the memory areas */
MEMORY
{
  FLASH (rx)      : ORIGIN = 0x08000000, LENGTH = 512K
  RAM (xrw)       : ORIGIN = 0x20000000, LENGTH = 64K
  MEMORY_B1 (rx)  : ORIGIN = 0x60000000, LENGTH = 0K
}

/* Define output sections */
SECTIONS
{
  /* The startup code goes first into FLASH */
  .isr_vector :
  {
    . = ALIGN(4);
    KEEP(*(.isr_vector)) /* Startup code */
    . = ALIGN(4);
  } >FLASH

  /* The program code and other data goes into FLASH */
  .text :
  {
    . = ALIGN(4);
    *(.text)           /* .text sections (code) */
    *(.text*)          /* .text* sections (code) */
    *(.rodata)         /* .rodata sections (constants, strings, etc.) */
    *(.rodata*)        /* .rodata* sections (constants, strings, etc.) */
    *(.glue_7)         /* glue arm to thumb code */
    *(.glue_7t)        /* glue thumb to arm code */

    KEEP (*(.init))
    KEEP (*(.fini))

    . = ALIGN(4);
    _etext = .;        /* define a global symbols at end of code */
  } >FLASH


   .ARM.extab   : { *(.ARM.extab* .gnu.linkonce.armextab.*) } >FLASH
    .ARM : {
    __exidx_start = .;
      *(.ARM.exidx*)
      __exidx_end = .;
    } >FLASH

  .ARM.attributes : { *(.ARM.attributes) } > FLASH

  .preinit_array     :
  {
    PROVIDE_HIDDEN (__preinit_array_start = .);
    KEEP (*(.preinit_array*))
    PROVIDE_HIDDEN (__preinit_array_end = .);
  } >FLASH
  .init_array :
  {
    PROVIDE_HIDDEN (__init_array_start = .);
    KEEP (*(SORT(.init_array.*)))
    KEEP (*(.init_array*))
    PROVIDE_HIDDEN (__init_array_end = .);
  } >FLASH
  .fini_array :
  {
    PROVIDE_HIDDEN (__fini_array_start = .);
    KEEP (*(.fini_array*))
    KEEP (*(SORT(.fini_array.*)))
    PROVIDE_HIDDEN (__fini_array_end = .);
  } >FLASH

  /* used by the startup to initialize data */
  _sidata = .;

  /* Initialized data sections goes into RAM, load LMA copy after code */
  .data : AT ( _sidata )
  {
    . = ALIGN(4);
    _sdata = .;        /* create a global symbol at data start */
    *(.data)           /* .data sections */
    *(.data*)          /* .data* sections */

    . = ALIGN(4);
    _edata = .;        /* define a global symbol at data end */
  } >RAM

  /* Uninitialized data section */
  . = ALIGN(4);
  .bss :
  {
    /* This is used by the startup in order to initialize the .bss secion */
    _sbss = .;         /* define a global symbol at bss start */
    __bss_start__ = _sbss;
    *(.bss)
    *(.bss*)
    *(COMMON)

    . = ALIGN(4);
    _ebss = .;         /* define a global symbol at bss end */
    __bss_end__ = _ebss;
  } >RAM

  PROVIDE ( end = _ebss );
  PROVIDE ( _end = _ebss );

  /* User_heap_stack section, used to check that there is enough RAM left */
  ._user_heap_stack :
  {
    . = ALIGN(4);
    . = . + _Min_Heap_Size;
    . = . + _Min_Stack_Size;
    . = ALIGN(4);
  } >RAM

  /* MEMORY_bank1 section, code must be located here explicitly            */
  /* Example: extern int foo(void) __attribute__ ((section (".mb1text"))); */
  .memory_b1_text :
  {
    *(.mb1text)        /* .mb1text sections (code) */
    *(.mb1text*)       /* .mb1text* sections (code)  */
    *(.mb1rodata)      /* read-only data (constants) */
    *(.mb1rodata*)
  } >MEMORY_B1

  /* Remove information from the standard libraries */
  /DISCARD/ :
  {
    libc.a ( * )
    libm.a ( * )
    libgcc.a ( * )
  }
}
四、使用J-Link下载代码到MCU
好了,现在我们拥有一个可以烧录的stm32_project.bin文件。现在请讲J-LINK连接到你的MAC并且为开发供电。
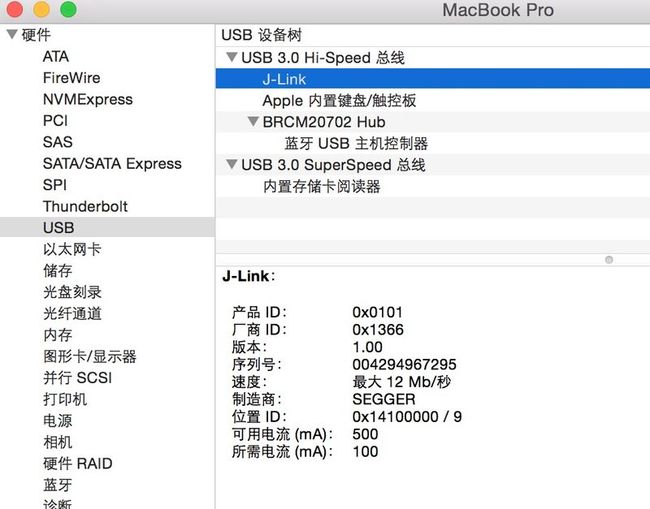
在如何J-LINK连接正常,那么系统信息中会显示J-Link设备。我的设备如下:
现在可以使用安装好的J-LINK驱动将bin文件下载到MCU得内置flash中。请先在shell中进入的工程根目录,并在shell执行如下命令:
$ JLinkExe
J-Link>
现在您可以在此命令行中执行相关命令来下载bin文件。首先要执行device这条指令用来指定您的目标MCU,我的是STM32F103VET6,所以如下:
J-Link > exec device=STM32F103VE是否成功会有消息提示,请仔细阅读。
在使用以上命令选择了目标MCU之后,就可以下载bin文件了,如下:
J-Link > loadbin src/out/bin/stm32_project.bin 0x08000000其中loadbin为命令,紧接着为文件名,再接着为目标MCU内置Flash的起始地址。这个地址具体的MCU不同会有所不通过,但应该与stm32_flash.ld中memory section中Flash描述的起始地址一样,及如下:
/* Specify the memory areas */
MEMORY
{
  FLASH (rx)      : ORIGIN = 0x08000000, LENGTH = 512K
  RAM (xrw)       : ORIGIN = 0x20000000, LENGTH = 64K
  MEMORY_B1 (rx)  : ORIGIN = 0x60000000, LENGTH = 0K
}
其中的 FLASH(rx) 中的ORIGIN就表示Flash的起始地址,上述命令中的地址应该与其保持一致。如果这条命令执行成功就会打印出OK等字样,并且会打印相关打印的时间信息等。
大功告成,如此一来,只要将MCU复位,就可以看到代码的执行效果了。
五、总结
本文主要介绍了Mac OS X下如何搭建STM32的开发环境。其实本文中的Makefile还是不太完善,因为每次执行make所有的文件都会重新编译,但是不影响功能,相关完善就不再发文,请知悉。文中内容均为原创,只有Makefile.common的部分内容摘录自网络,转载请注明出处,谢谢。

