使用phoneGap和Sencha Touch 2开发Android应用程序(三)
本文是“使用phoneGap和Sencha Touch 2开发Android应用程序”系列教程的第3章, 在这一章,我们会创建编辑笔记的视图,在这个视图上,用户能够创建,编辑以及删除笔记。
在这一章结束后,本应用程序将能够创建新的笔记,对已有的笔记进行编辑。下面我们开始创建编辑笔记视图。
在Sencha Touch中创建表单面板(Form Panel)
我们在NoteEditor.js文件中编写View的代码 , NoteEditor.js文件建立在view目录下:
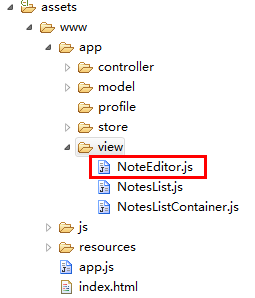
在NoteEditor.js文件中, 我们将定义一个空的NoteEditor类,如下所示:
Ext.define("NotesApp.view.NoteEditor", {
    extend: "Ext.form.Panel",
    requires: "Ext.form.FieldSet",
    alias: "widget.noteeditor",
    config:{
        scrollable:'vertical'
    },
    initialize: function () {

        this.callParent(arguments);

    }
});
该Note Editor 继承自Ext.form.Panel类。因为我们需要在视图中使用到一个FieldSet类的实例,所以需要声明requires配置参数来告诉加载器下载该类的源码。 同样的,我们使用scrollable配置参数来使面板的内容能够上下滚动。这样当form表单的高度超过移动设备的屏幕高度时,才不会出现布局混乱。
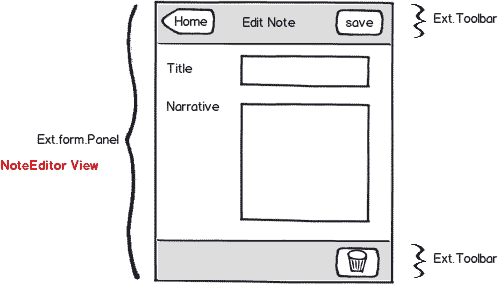
在继续完善NoteEditor的代码之前,我们先来回顾一下该视图的构成:
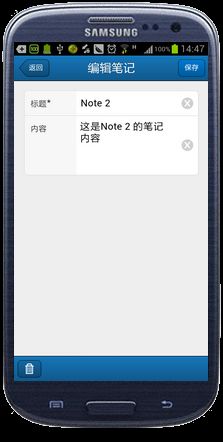
很容易发现,该视图由3部分组成,从上至下依次为一个包含了"返回"和“保存”按钮的顶部Toolbar,一个包含了“标题”textfield和“内容”textareafield的Fieldset,以及一个包含了“删除”按钮的底部Toolbar。
与编写Notes ListContainer类一样, 我们也使用 initialize()方法来定义Note Editor所包含的的组件:
Ext.define("NotesApp.view.NoteEditor", {
    extend: "Ext.form.Panel",
    requires: "Ext.form.FieldSet",
    alias: "widget.noteeditor",
    config:{
        scrollable:'vertical'
    },
    initialize: function () {


        this.callParent(arguments);


        var backButton = {
            xtype: "button",
            ui: "back",
            text: "返回"
        };


        var saveButton = {
            xtype: "button",
            ui: "action",
            text: "保存"
        };


        var topToolbar = {
            xtype: "toolbar",
            docked: "top",
            title: "编辑笔记",
            items: [
                backButton,
                { xtype: "spacer" },
                saveButton
            ]
        };


        var deleteButton = {
            xtype: "button",
            iconCls: "trash",
            iconMask: true,
            scope: this
        };


        var bottomToolbar = {
            xtype: "toolbar",
            docked: "bottom",
            items: [
                deleteButton
            ]
        };


        var noteTitleEditor = {
            xtype: 'textfield',
            name: 'title',
            label: '标题',
            required: true
        };


        var noteNarrativeEditor = {
            xtype: 'textareafield',
            name: 'narrative',
            label: '内容'
        };


        this.add([
            topToolbar,
            { xtype: "fieldset",
                items: [noteTitleEditor, noteNarrativeEditor]
            },
            bottomToolbar
        ]);
    }


});
initialize()方法首先会调用 callParent()方法,然后依次定义包含“返回”和“保存”按钮的顶部工具栏,和包含“删除”按钮的底部工具栏。
noteTitleEditor标题编辑器 和 noteNarrativeEditor内容编辑器被用来编辑笔记的标题和内容,它们分别是Ext.form.Text 和 Ext.form.TextArea组件的实例。
当所有的视图组件都定义之后,接下来的工作就是将它们添加到View视图上去。在这里我们使用了Ext.form.FieldSet组件来改善Form表单的外观,标题和内容编辑器都将放置在FieldSet中显示。
this.add([
    topToolbar,
    { xtype: "fieldset",
        items: [noteTitleEditor, noteNarrativeEditor]
    },
    bottomToolbar
]);
在Sencha Touch中显示View视图
在开始编写Note Editor的特性之前,我们先编写代码,让 Note List Container视图中 “新建”笔记按钮被按下时,该Note Editor视图显示出来。
在之前的章节中,我们为“新建”按钮创建过一个handler处理方法,当newNoteCommand 事件发生时,该方法会被调用。我们还需要将 onNewNoteCommand() 监听器添加到Notes Controller控制器中。这样我们就能使用该handler方法来激活Note Editor视图。
为了在控制器中激活Note Editor视图,我们首先需要得到这个视图的引用,所以我们定义了noteeditor 这个引用来达到目的。
Ext.define("NotesApp.controller.Notes", {

    extend: "Ext.app.Controller",
    config: {
        refs: {
            // We're going to lookup our views by xtype.
            notesListContainer: "noteslistcontainer",
            noteEditor: "noteeditor"
        },

   // Remainder of the controller’s code omitted for brevity.

});
之前已经说过,定义之后,框架会在控制器中为这个引用会自动创建getNoteEditor() 方法,使用这个方法,就能得到视图的引用并且在应用程序中激活视图。
接下来,我们对onNewNoteCommand() 方法进行改写:
onNewNoteCommand : function(){// 当 新增按钮点击时调用
 // alert("onNewNoteCommand");

 // 笔记创建时间及Id
 var now = new Date();
 var noteId = (now.getTime()).toString() + (this.getRandomInt(0,100)).toString();

 var newNote = Ext.create("NotesApp.model.Note",{
     id : noteId,
     dateCreated : now,
     title : "",
     narrative : ""
 });

 this.activateNoteEditor(newNote);
 }
这里创建了一个新的笔记,并且将它作为参数传给了activateNoteEditor() 方法。
在这里我们使用了getRamdomInt() 辅助方法来生成笔记的唯一id:
getRandomInt: function (min, max) {
    return Math.floor(Math.random() * (max - min + 1)) + min;
}
activateNoteEditor() 方法的作用是将新建的笔记加载到Note Editor视图中,并且激活视图:
	activateNoteEditor: function (record) {
    	var noteEditor = this.getNoteEditor();
	    noteEditor.setRecord(record); // load() is deprecated.
	    Ext.Viewport.animateActiveItem(noteEditor, this.slideLeftTransition);
	}
这里我们使用了Ext.form.Panel的setRecord()方法,来将一个Model类的实例加载到Form表单中,这个Model实例的各个属性将按照名称来匹配并填充到Form中去。(注:这里很容易理解,类似J2EE的编程方式,点击新增按钮跳转到新建笔记的页面中时,笔记的创建时间和id已经按照一定的规则生成完毕,新增页面只需要展示标题和内容这两个需要用户输入的表单元素)
该方法用到了slideLeftTransition变量,我们采用下面的代码来定义它:
slideLeftTransition: { type: 'slide', direction: 'left' }
使用这个transition变量会使得Note Editor视图以从右到左滑动的方式来显示出来。
至此为止,当点击新建按钮时,控制器所要做的工作(激活并展示Note Editor视图)就完成了,紧接着我们将在app.js中配置这个视图,以便应用程序能识别它。
使应用程序能够识别视图
在app.js文件中,在views配置项中添加新建视图:
views: ["NotesList", "NotesListContainer", "NoteEditor"]
接着在应用程序的launch 方法中实例化该视图:
Ext.application({
    name: "NotesApp",

    models: ["Note"],
    stores: ["Notes"],
    controllers: ["Notes"],
    views: ["NotesList", "NotesListContainer", "NoteEditor"],

    launch: function () {

        var notesListContainer = {
            xtype: "noteslistcontainer"
        };
        var noteEditor = {
            xtype: "noteeditor"
        };

        Ext.Viewport.add([notesListContainer,noteEditor]);
    }
});
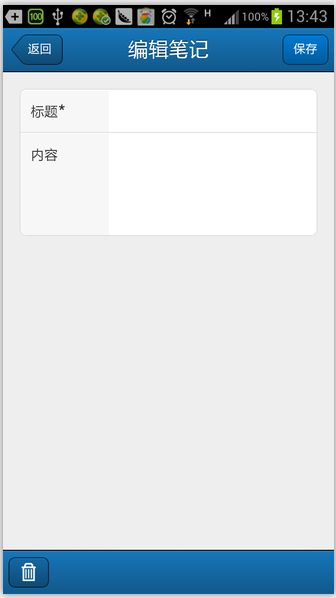
这时可以启动模拟器来看看运行效果。
单击新建按钮时将显示Note Editor视图:
如何在Sencha Touch 列表中编辑一条记录
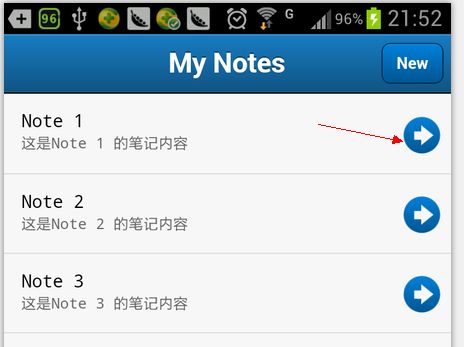
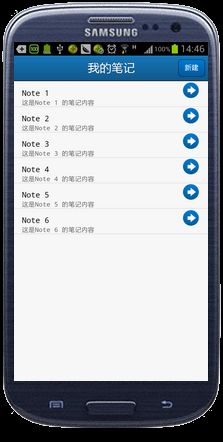
当单击笔记列表中某条记录右侧的disclose按钮图标时,同样需要激活到编辑视图中:
现在我们来重新编写控制器中的 onEditNoteCommand()方法实现这个功能:
	onEditNoteCommand : function(list,record){
		// 当 编辑按钮点击时调用
		// alert("onEditNoteCommand");
		this.activateNoteEditor(record);
	}
事实上实现这个功能非常简单,因为disclose时间将被选中的Note对象实例通过record参数传递给了handler,然后我们再次调用activateNoteEditor()来进入编辑笔记视图。(注,看看我们之前编写的NoteListContainer视图里面的代码):
		var notesList = {
			xtype:"noteslist",
			store:Ext.getStore("Notes"),
			listeners:{
				disclose:{
					fn:this.onNotesListDisclose,
					scope:this
				}
			}
		}
从这里我们可以看到,在noteList列表定义的时候,我们就为他添加了一个监听器,用来监听disclose动作,并把处理的权力交给了onNotesListDisclose 方法,
	onNotesListDisclose:function(list,record,target,index,evt,options){
		// alert("editNoteCommand");
		this.fireEvent("editNoteCommand",this,record);
	}
这个onNotesListDisclose 方法可以接收一系列跟列表相关的参数,在我们这里,只需要传递list对象和被选中的记录就好。
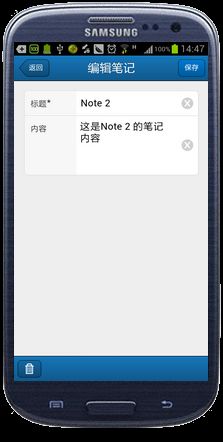
连接好手机,或者启动模拟器,就能看到选中记录的编辑视图了:
完成了笔记的新增和编辑,接下来我们实现保存的代码,在这之前,我们先理一下保存的思路。
使用Sencha Touch 的本地存储代理(LocalStorage Proxy)
首先,我们需要对之前章节采用的硬编码形式存储的笔记对象的代码进行改造。
Ext.define("NotesApp.store.Notes",{
	extend:"Ext.data.Store",
	config:{
		model:"NotesApp.model.Note",
		data:[
		      {title:"Note 1", narrative:"这是Note 1 的笔记内容"},
		      {title:"Note 2", narrative:"这是Note 2 的笔记内容"},
		      {title:"Note 3", narrative:"这是Note 3 的笔记内容"},
		      {title:"Note 4", narrative:"这是Note 4 的笔记内容"},
		      {title:"Note 5", narrative:"这是Note 5 的笔记内容"},
		      {title:"Note 6", narrative:"这是Note 6 的笔记内容"},
		],
		sorters:[{property:'dateCreated',direction:'DESC'}]
	}
});
我们使用LocalStorage Proxy的方式来将应用程序运行时添加的笔记缓存到设备上:
Ext.define("NotesApp.store.Notes",{
	extend:"Ext.data.Store",
	requires:"Ext.data.proxy.LocalStorage",
	config:{
		model:"NotesApp.model.Note",
		proxy : {
			type : "localstorage",
			id : "notes-app-store"
		},
		sorters:[{property:'dateCreated',direction:'DESC'}]
	}
});
LocalStorageProxy采用了 HTML5 的 localStorage API 来将Model对象数据 保存在客户端浏览器中。这个代理类可以存储一些相同的数据记录。这个代理类需要一个id配置参数,用来标识不同的本地数据对象。
这样我们就能够从本地数据库中保存和读取笔记了,现在我们回到视图和控制器来完善保存笔记的功能。
如何在Sencha Touch控制器中添加事件监听
在NoteEditor 视图类中,修改initialize() 方法中的saveButton组件定义:
   var saveButton = {
        xtype: "button",
        ui: "action",
        text: "保存",
        handler:this.onSaveButtonTap,
	scope:this
   }
通过handler配置参数定义了一个处理方法,当用户点击按钮时,该方法就会运行。另外还配置了scope参数值this来保证在本NoteEditor视图中运行该方法,即声明该方法的作用域只限于该视图。
接下来定义onSaveButtonTap() 方法:
    onSaveButtonTap:function(){
	//alert("save note");
	this.fireEvent("saveNoteCommand",this);
}
和之前编写的事件处理方法类似,我们通过给视图定义saveNoteCommand事件来捕获按钮点击的动作。
事实上,如果NoteEditor视图仅仅只是将这个saveNoteCommand事件传播(fireEvent)出去的话,控制器并不能够监听到这一事件。我们需要明确的告诉控制器事件是从哪里来的,所以我们需要给控制器的refs配置参数加上noteEditor视图。
   refs: {
        // We're going to lookup our views by xtype.
        notesListContainer: "noteslistcontainer",
        noteEditor: "noteeditor"
   }
然后,使用control配置参数来给saveNoteCommand这一事件映射一个对应的处理方法。
        control: {
            notesListContainer: {
                // The commands fired by the notes list container.
                newNoteCommand: "onNewNoteCommand",
                editNoteCommand: "onEditNoteCommand"
            },
            noteEditor: {
                // The commands fired by the note editor.
                saveNoteCommand: "onSaveNoteCommand"
            }

        }
最后,编写onSaveNoteCommand() 方法来处理保存动作:
	onSaveNoteCommand: function () {
       // console.log("onSaveNoteCommand");

        var noteEditor = this.getNoteEditor(); // 得到编辑视图
        var currentNote = noteEditor.getRecord();// 当前笔记
        var newValues = noteEditor.getValues();// 当前表单中所输入的笔记属性

        // 用表单数据来更新笔记
        currentNote.set("title", newValues.title);
        currentNote.set("narrative", newValues.narrative);

        var errors = currentNote.validate(); // 验证

        if (!errors.isValid()) {// 验证不通过,提示错误信息
            Ext.Msg.alert('警告!', errors.getByField("title")[0].getMessage(), Ext.emptyFn);
            currentNote.reject();
            return;
        }

        var notesStore = Ext.getStore("Notes");
	    // 通过id查找修改的笔记记录,并添加到本地数据库中
        if (null == notesStore.findRecord('id', currentNote.data.id)) {
            notesStore.add(currentNote);
        }

        notesStore.sync();// 数据库记录同步
		// 对同步后的记录重新排序
        notesStore.sort([{ property: 'dateCreated', direction: 'DESC'}]);

        this.activateNotesList();
    }
在onSaveNoteCommand() 方法中,首先需要得到被编辑笔记的引用和编辑表单的值:
var noteEditor = this.getNoteEditor();
var currentNote = noteEditor.getRecord();
var newValues = noteEditor.getValues();
然后,将新的属性值设置到笔记中:
currentNote.set("title", newValues.title);
currentNote.set("narrative", newValues.narrative);
Sencha Touch的数据模型验证
接下来是非常重要的一步,我们需要对表单数据进行验证。首先,对Model对象调用validate() 方法,然后对返回的errors对象调用isValid() 方法进行验证:
        var errors = currentNote.validate(); // 验证

        if (!errors.isValid()) {// 验证不通过,提示错误信息
            Ext.Msg.alert('警告!', errors.getByField("title")[0].getMessage(), Ext.emptyFn);
            currentNote.reject();
            return;
        }
Ext.data.Model类的validate() 方法会遍历运行所有定义在Model类中的验证器 (validations), 然后返回一个Ext.data.Errors类的实例对象,Errors实例对象包含了一组Ext.data.Error实例对象,在这组对象中,包含了每个验证的Model属性对应的一个Error实例 。
Ext.define("NotesApp.model.Note",{
	extend:"Ext.data.Model",
	config:{
		idProperty:"id",
		fields:[
		   {name:"id",type:"int"},
		   {name:"dateCreated",type:"date",dateFormat:"c"},
		   {name:"title",type:"string"},
		   {name:"narrative",type:"string"}
		],
		validations:[
		    {field:"id",type:"presence"},
		    {field:"dateCreated",type:"presence"},
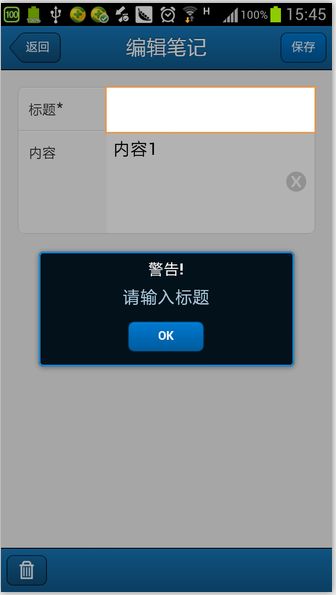
		    {field:"title",type:"presence",message:"请输入标题"}
		]
	}
});
我们的应用程序只给笔记的标题绑定了一个验证器。如果验证不通过,将在屏幕上弹出一个提示窗口,提示信息的内容就是在Model里验证器配置的message,然后,会调用model的 reject()方法,这个方法使得被修改的表单元素恢复成原始值。
使用本地数据库保存数据
在 onSaveNoteCommand()方法中, 如果表单元素验证通过,就需要把数据保存到设备的本地数据库中:
        var notesStore = Ext.getStore("Notes");
	    // 通过id查找修改的笔记记录,并添加到本地数据库中
        if (null == notesStore.findRecord('id', currentNote.data.id)) {
            notesStore.add(currentNote);
        }
因为我们对新增和编辑使用了同一个视图,所以在保存之前,我们需要通过findRecrod()方法来查找本地数据库中是否存在这条记录,如果不存在,就把该笔记添加到本地数据库中。
Store对象的sync() 用来同步数据,在本地数据库中执行新增,编辑或者删除操作。
本地数据更新之后,重新对数据进行排序处理:
notesStore.sort([{ property: 'dateCreated', direction: 'DESC'}]);
返回主视图
在onSaveNoteCommand ()方法的最后,调用了activateNotesList() 方法,和activateNoteEditor()方法类似,这个方法使得应用程序跳转到主视图,即列表视图:
activateNotesList: function () {
    Ext.Viewport.animateActiveItem(this.getNotesListContainer(), this.slideRightTransition);
}
返回主视图时,这回我们使用定义的一个右滑:
slideRightTransition: { type: 'slide', direction: 'right' }
再次运行应用程序,保存笔记:
总结
在这一章,我们完成了本应用程序的一些新功能,比如创建新的笔记,编辑已有的笔记等。
我们学习了如何使用Sencha Touch的表单组件来编辑应用程序中的数据,以及在应用程序运行时,如何使用本地存储代理的实例来把数据缓存到本地设备。还学习了如何验证Sencha Touch的数据模型,如何将数据同步存储到本地数据库中,以及在数据验证失败时恢复数据改变。
另外,我们还学习了在拥有多个视图的应用程序中,如何创建不同视图切换时的滑动效果。
到此为止,我们的应用程序还缺少删除笔记的功能。我们将在下一章添加该功能,同时,我们将在下一章对笔记列表进行修改,让列表能够按照日期来分组显示。
未完待续!
下载链接
源代码已发布到迅雷快传:http://kuai.xunlei.com/d/KLBGTSXIGTJA
原文出自: http://miamicoder.com/2012/how-to-create-a-sencha-touch-2-app-part-3/
本教程快速链接
- 使用phoneGap和Sencha Touch 2开发Android应用程序(一)
- 使用phoneGap和Sencha Touch 2开发Android应用程序(二)
- 使用phoneGap和Sencha Touch 2开发Android应用程序(三)
- 使用phoneGap和Sencha Touch 2开发Android应用程序(四)
- 使用phoneGap和Sencha Touch 2开发Android应用程序(五)
