将在本地创建的Git仓库push到Git@OSC
本人小白一个,最近刚接触Git,发现挺好用的,而且OSC还提供了免费的托管仓库,打算把自己电脑上的代码和在公司无聊时写的代码给同步到OSC上,结果总是出现各种失败。网上搜索的解决方案大部分是先在Git@OSC上创建项目,然后再clone到本地,而我是想把已经在本地创建好的仓库直接push到Git@OSC上。摸索半天终于解决,分享一下我的方式。
实用范围:已经在本地通过 git init 命令创建了本地仓库,然后想把本地仓库push到Git@OSC上。不对Git的安装及使用进行详细说明,Git详细使用请参考http://git.oschina.net/progit/(我的所有操作是在linux上进行的,windows上通过msysgit应该也能完成 )
第一步:创建本地仓库用于push到远处仓库Git@OSC上,如果已经有本地仓库的可以忽略此步;
1.随意创建一个本地项目StudyGit,用于测试:
# mkdir -p StudyGit/src/com/study/lynn
# mkdir -p StudyGit/src/com/study/zeng
# cd ./StudyGit
# vim ReadMe.md
# cd ./StudyGit/src/com/study/lynn
# vim FirstActivity.java
# cd ./StudyGit/src/com/study/zeng
# vim SecondActivity.java
以上操作创建了一个目录结构如下的项目:(我是在root账号的家目录下创建了一个StudyGit项目)
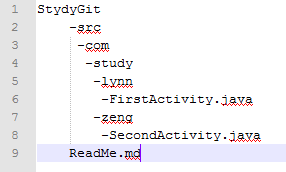
2.为StudyGit项目创建本地仓库,进入StudyGit项目根目录,在根目录下执行如下操作:
# git init //此时只是根据StudyGit项目目录结构做了部分初始工作,StudyGit项目的文件还没被最终及提交到本地仓库。

3.将StudyGit项目中的文件提交到本地仓库:
# git add src/
# git add ReadMe.md //将src目录下的文件和Readme.md文件加入暂存区
# git commit -a -m "初次提交" //此时本地仓库中已经保存有StudyGit项目的记录了,接下来可以将本地仓库中内容push到远程仓库了。

第二步:为当前用户(我的是root用户)创建ssh连接公钥,并将公钥添加在添加在个人的Git@OSC账号下,用于向远程服务器push时的验证
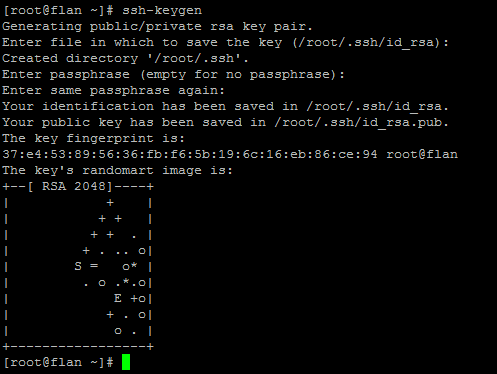
1.进入root的家目录(/root/.ssh)中会有一个 .ssh 的隐藏目录(安装Git后在每个账号的用户目录下都会有这个文件夹,如果是windors下的msysgit的话,一般在C:\Users\用户名\.ssh下),里面有两个文件 id_rsa 和 id_rsa.pub ,其中id_rsa.pub中的内容就是我们要的公钥;如果没有这两个文件,或者觉得不保险可以直接删了通过下面命令重新创建:
# ssh-keygen //执行该命令后,途中还需要按三次回车,后两次是输入密码,可以随便输两次要一致,为了方便可以不输入,直接回车;
2.进入id_rsa.pub文件,将其中全部内容复制添加在你个人Git@OSC账号下的公钥中保存(保存时需要输入你的账户密码);

3.验证下公钥是否添加成功:
#ssh -T [email protected] //中途会询问是否连接,输入yes回车,Welcome 表示已经连接成功

第三步:为StudyGit项目添加远程仓库,并将本地仓库中代码push到远程仓库:
1.在Git@OSC上创建一个StudyGit的项目仓库作为远程仓库使用,不一定要叫StudyGit其他名字应该也可以(没试过);
2.进入StudyGit的根目录,为本项目添加远程仓库(注意一定要进入到StudyGit项目的目录内,不一定要是根目录,子目录也可以):
# git remote add osc [email protected]:flan/StudyGit.git //1."osc"是远程仓库地址的别名(不是远程仓库上项目的名字)可以随便起,默认是origin;2. [email protected]:flan/StudyGit.git 注意冒号后面的“flan”,是osc为各个账号分配的路径,我的远程仓库路径是http://git.oschina.net/flan/StudyGit.git,所以冒号后是flan,不同账号会不同请注意更改;3.StudyGit.git 是刚刚在git.oschina.net上创建的远程仓库;
# git remote -v //可以查看添加的远程仓库

3.将本地仓库push到Git@OSC上的远程仓库:
# git push osc master //"osc" 是刚刚创建的远程仓库名,“master”是本地仓库的主干分支(目前也只有这一个分支,没有其他分支)

现在,已经完成将本地仓库push到Git@OSC上,如果对其中用到的git命令不明白的可以参看http://git.oschina.net/progit/ 。第一次写博客有什么错误欢迎指出!
当要push代码到git时,出现提示:
error:failed to push some refs to ...
Dealing with “non-fast-forward” errors
From time to time you may encounter this error while pushing:
- $ git push origin master
- To ../remote/
- ! [rejected] master -> master (non-fast forward)
- error: failed to push some refs to '../remote/'
Merge the remote changes before pushing again. See the 'non-fast forward'
section of 'git push --help' for details.
This error can be a bit overwhelming at first, do not fear. Simply put, git cannot make the change on the remote without losing commits, so it refuses the push. Usually this is caused by another user pushing to the same branch. You can remedy this by fetching and merging the remote branch, or using pull to perform both at once.
In other cases this error is a result of destructive changes made locally by using commands like git commit --amend or git rebase. While you can override the remote by adding --force to the push command, you should only do so if you are absolutely certain this is what you want to do. Force-pushes can cause issues for other users that have fetched the remote branch, and is considered bad practice. When in doubt, don’t force-push.

问题(Non-fast-forward)的出现原因在于:git仓库中已经有一部分代码,所以它不允许你直接把你的代码覆盖上去。于是你有2个选择方式:
1,强推,即利用强覆盖方式用你本地的代码替代git仓库内的内容
git push -f
2,先把git的东西fetch到你本地然后merge后再push
$ git fetch
$ git merge
这2句命令等价于- $ git pull
可是,这时候又出现了如下的问题:
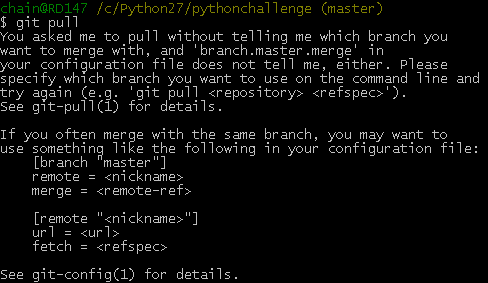
[branch "master"]
remote = origin
merge = refs/heads/master
这等于告诉git2件事:1,当你处于master branch, 默认的remote就是origin。
2,当你在master branch上使用git pull时,没有指定remote和branch,那么git就会采用默认的remote(也就是origin)来merge在master branch上所有的改变如果不想或者不会编辑config文件的话,可以在bush上输入如下命令行:
- $ git config branch.master.remote origin
- $ git config branch.master.merge refs/heads/master
之后再重新git pull下。最后git push你的代码吧。it works now~