Linux集群系统Heartbeat
1、理论部分
1.1、群集的分类
我们用到的集群系统主要就2种:
高可用(High Availability)HA集群, 使用Heartbeat实现;也会称为”双机热备”, “双机互备”, “双机”。
负载均衡群集(Load Balance Cluster),使用Linux Virtual Server(LVS)实现;
1.2、heartbeat的作用
通过heartbeat,可以将资源(IP以及服务等资源)从一台已经故障的计算机快速转移到另外一台正常运转的计算机上继续提供服务,一般称之为高可用服务。
1.3、heartbeat (Linux-HA)的工作原理
heartbeat最核心的包括两个部分,心跳监测部分和资源接管部分,心跳监测可以通过网络链路和串口进行,而且支持冗余链路,它们之间相互发送报文来告诉对方自己当前的状态,如果在指定的时间内未收到对方发送的报文,那么就认为对方失效,这时需启动资源接管模块来接管运行在对方主机上的资源或者服务。
1.4、heartbeat的相关术语
1)node(节点)- 运行heartbeat进程的一个独立主机,称为节点,节点是HA的核心组成部分。
- 节点有主次之分
- 有唯一的主机名
- 有属于自己的资源
- 主节点运行一个或多个应用服务,而备用节点一般处于监控状态。
2)resource(资源)- 资源是节点可以控制的实体,当故障发生时这些资源能够被其他节点接管。
- 磁盘分区、文件系统
- IP地址
- 应用程序服务
- NFS文件系统
3)event(事件)
- 节点系统故障
- 网络连接故障
- 应用故障
- ……
4)action(动作)
事件发生时HA的响应方式(由shell script控制)
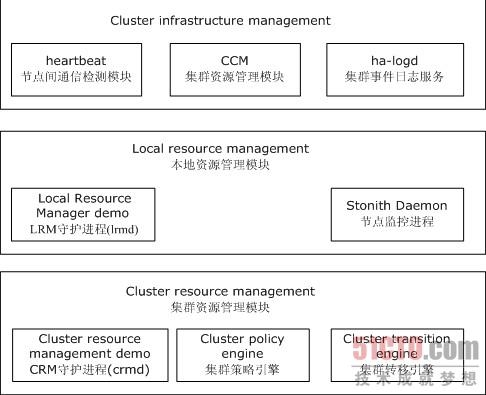
1.5、heartbeat的组成

beartbeat - 节点间通讯检测模块
ha-logd - 集群事件日志服务
CCM(Consensus Cluster Membership) - 集群成员一致管理模块
LRM(Local Resource Manager) - 本地资源管理模块
Stonith Daemon - 使出现问题的节点从群集环境中脱离
CRM(Cluster Resource Management) - 群集资源管理模块
Cluster policy engine - 集群策略引擎
Cluster transition engine - 集群转移引擎
2、实践部分
2.1、主机信息
HA1:
eth0
ipaddress=10.168.0.161
vip=10.168.0.160
gateway=10.168.0.1
eth1
ipaddress=10.0.0.1
hostname=HA1
HA2:
eth0
ipaddress=10.168.0.162
vip=10.168.0.160
gateway=10.168.0.161
eth1
ipaddress=10.0.0.2
hostname=HA2
client:
ipaddress=10.168.0.8
2.2、yum源安装
In HA1&HA2
|
1
2
3
|
yum -y install http://mirrors.opencas.cn/epel/6/i386/epel-release-6-8.noarch.rpm
yum -y install heartbeat* libnet nginx
yum -y install ntp
|
2.3、实验步骤
2.3.1、step1
In HA1
|
1
2
|
cd /usr/share/doc/heartbeat-3.0.4/
cp authkeys ha.cf haresources /etc/ha.d/
|
vim编辑/etc/ha.d/authkeys
把以下内容的注释去掉(删除#)或直接加入如下内容:
|
1
2
|
auth 3
3 md5 hello!
|
更改文件权限
|
1
|
chmod 600 /etc/ha.d/authkeys
|
vim编辑/etc/ha.d/haresources加入如下内容:
|
1
|
ha1 10.168.0.160/24/eth0 nginx
|
vim编辑/etc/ha.d/ha.cf,把以下内容的注释去掉(删除#)或直接加入如下内容:
|
1
2
3
4
5
6
7
8
9
10
11
12
13
14
15
|
debugfile /var/log/ha-debug
logfile /var/log/ha-log
logfacility local0
keeplive 2
deadtime 30
warntime 10
initdead 60
udpport 694
ucast eth1 10.0.0.2
auto_failback on
node HA1
node HA2
ping 10.168.0.1
#respawn hacluster /usr/libheartbeat/ipfail
respawn hacluster /usr/lib64/heartbeat/ipfail
|
注:
1)hostname带后缀的域名(HA1.cmdschool.org)会出报错。
2)x86与x64要分别使用14与15行
2.3.2、step2
In HA2
|
1
|
scp 10.168.0.161:/etc/ha.d/{authkeys,ha.cf,haresources} /etc/ha.d/
|
vim编辑/etc/ha.d/ha.cf,修改ucast参数:
|
1
|
ucast eth1 10.0.0.1
|
IP修改为对端主机的IP地址(10.0.0.1)
2.3.3、step3
启动服务并配置自启动
In HA1&HA2
|
1
2
3
4
|
/etc/init.d/nginx start
/etc/init.d/heartbeat start
chkconfig heartbeat on
chkconfig nginx on
|
2.3.4、step4
开放端口
In HA1&HA2
1)vim编辑/etc/sysconfig/iptables
|
1
2
|
-A INPUT -m state --state NEW -m tcp -p tcp --dport 80 -j ACCEPT
-A INPUT -m state --state NEW -m udp -p udp --dport 694 -j ACCEPT
|
2)重启防火墙
|
1
|
/etc/init.d/iptables restart
|
2.3.5、step5
调整时区并对时:
In HA1&HA2
|
1
2
|
cp /usr/share/zoneinfo/Asia/Shanghai /etc/localtime
ntpdate 0.centos.pool.ntp.org
|
2.3.6、step6
1)创建网站测试网站
In HA1
|
1
2
|
mkdir -p /var/www/www.cmdschool.org
echo HA1 > /var/www/www.cmdschool.org/index.html
|
In HA2
|
1
2
|
mkdir -p /var/www/www.cmdschool.org
echo HA2 > /var/www/www.cmdschool.org/index.html
|
2)检查配置文件
In HA1&HA2
|
1
|
grep include /etc/nginx/nginx.conf
|
应当包含如下语句:
|
1
|
include /etc/nginx/conf.d/*.conf;
|
3)增加配置文件
In HA1&HA2
vim编辑/etc/nginx/conf.d/www.cmdschool.org.conf
|
1
2
3
4
5
6
7
8
9
|
server {
listen 80;
server_name www.cmdschool.org;
location / {
root /var/www/www.cmdschool.org;
index index.html index.htm;
}
}
|
4)重启服务
In HA1&HA2
|
1
|
/etc/init.d/nginx restart
|
5)模拟dns并测试
In client
vim编辑/etc/hosts
|
1
|
10.168.0.161 www.cmdschool.org
|
修改www.cmdschool.org指向10.168.0.161,并做如下测试:
|
1
|
curl http://www.cmdschool.org
|
vim编辑/etc/hosts
|
1
|
10.168.0.162 www.cmdschool.org
|
修改www.cmdschool.org指向10.168.0.162,并做如下测试:
|
1
|
curl http://www.cmdschool.org
|
5)配置虚拟IP的模拟dns指向
vim编辑/etc/hosts
|
1
|
10.168.0.160 www.cmdschool.org
|
修改www.cmdschool.org指向10.168.0.160,并做如下测试:
|
1
|
curl http://www.cmdschool.org
|
2.3.7、step7
测试步骤
1)关闭或重启主节点heartbeat服务
In HA1
|
1
|
/etc/init.d/heartbeat restart
|
In client
|
1
|
curl http://www.cmdschool.org
|
注:服务无缝切换
2)关闭主节点网络
In HA1
|
1
|
ifdown eth0
|
In client
等待30秒后:
|
1
|
curl http://www.cmdschool.org
|
注:30秒接管
3)关闭主节点电源
In HA1
|
1
|
halt
|
In client
等待30秒后:
|
1
|
curl http://www.cmdschool.org
|
注:30秒接管
4)切断主节点的所有网络
In HA1
|
1
|
ifdown eth1
|
注:心跳线中断不会引起资源接管
|
1
|
ifdown eth0
|
In client
等待30秒后:
|
1
|
curl http://www.cmdschool.org
|
注:30秒接管
5)heartbeat守护进程意外结束
|
1
|
killall -9 heartbeat
|
注:30秒接管(包含内核模块watchdog不出现资源争用)
watchdog模块确认方法:
|
1
|
modinfo softdog
|
显示如下:
|
1
2
3
4
5
6
7
8
9
10
11
12
|
filename: /lib/modules/2.6.32-431.el6.x86_64/kernel/drivers/watchdog/softdog.ko
alias: char-major-10-130
license: GPL
description: Software Watchdog Device Driver
author: Alan Cox
srcversion: 47DC8C5D5D2AF6E6652F271
depends:
vermagic: 2.6.32-431.el6.x86_64 SMP mod_unload modversions
parm: soft_margin:Watchdog soft_margin in seconds. (0 < soft_margin < 65536, default=60) (int)
parm: nowayout:Watchdog cannot be stopped once started (default=0) (int)
parm: soft_noboot:Softdog action, set to 1 to ignore reboots, 0 to reboot (default depends on ONLY_TESTING) (int)
parm: soft_panic:Softdog action, set to 1 to panic, 0 to reboot (default=0) (int)
|
------------------------------------------------
参考资料:
http://www.linux-ha.org/
http://book.51cto.com/art/200912/168029.htm