cobbler装系统
全新PXE装系统---cobbler
Cobbler工作流程:
一、安装cobbler的前提准备条件及准备环境:
1、模板服务器(cobbler服务器)最好是在一个能上网的内网环境(如:您有一个路由器,路由器WAN口连接着公网,路由器LAN口连接着内网中的cobbler服务器及各种客户端主机,cobbler服务器及客户端主机都能通过dhcp获得私有地址来上网)。
2、此次试验在虚拟机vmware workstation9中操作,安装的虚拟机中安装的cobbler服务器为centos6.2 64位系统(建议安装此模板系统,稳定性及其他性能都很好),安装centos6.2 64位系统过程中,语言要选择英语,分区最好手动分(create custom layout,/boot―500M ,swap―1024M , /--20G),选择bisic server服务器版,最好不要选择图形安装模式(图形模式也行),包就选择chinese support(中文支持)。
安装的centos6.2 64位系统的虚拟机硬盘要大点(将来您可能拷贝多个系统镜像到cobbler服务器中,所以硬盘最好30G),网卡选择桥接,这样这个cobbler服务器就可以上网了,因为将来要下载源及各种包,所以连网是必须的。
3、此次我的cobbler服务器获得的IP地址是192.168.11.34,建议采用XmanagerEnterprise 4(该工具方便,简单,易于操作,不过是全英文的哦)来远程连接cobbler服务器。
4、在虚拟机上安装完centos6.2系统后,把selinux关闭,关闭方法:vi/etc/sysconfig/selinux ,把SELINUX=enforceing 改为SELINUX=disabled 。
把iptables防火墙关闭,关闭方法: service iptables stop , chkconfig iptables off ,最好在“setup”中关闭防火墙。
二、安装cobbler服务器的正式步骤:
1、加载Fedora的Epel源:
CentOS6 x86_64:
rpm -ivh http://dl.fedoraproject.org/pub/epel/6/x86_64/epel-release-6-8.noarch.rpm
(此http路径大家可以打开网页看看,里面有各种linux包)
2、用yum安装所需包:
yum -y install cman tftp-server dhcp cobbler pykickstart rsync httpdpython-ctypesxinetd debmirror cobbler-web
3、设置 'disable' 为 'no'
vi /etc/xinetd.d/tftp |
4、设置 'disable' 为 'no'
vi /etc/xinetd.d/rsync |
重启xinetd服务:service xinetd restart
设置xinetd服务在2345模式开启:chkconfig xinetdon
5、设置被安装的客户端系统的root密码:
openssl passwd -1 -salt 'random-phrase-here' '123456'--更改密码为123456(被安装系统密码)
6、修改cobbler主配置文件:
vi/etc/cobbler/settings
‘next_server: 127.0.0.1' 替换成'next_server:192.168.11.34 ' {注:此为DHCP服务地址,即cobbler服务器地址}
'server: 127.0.0.1' 替换成 'server: 192.168.11.34' {此为cobbler服务地址}
'manage_dhcp: 0' 替换成 'manage_dhcp: 1' {注:此为使cobbler管理dhcp也就是后面用于同步更新配置信息[cobbler sync]}
'manage_rsync: 0' 替换成 'manage_rsync: 1' {注:此为使cobbler管理rsync功能}
'manage_tftpd: 0' 替换成 'manage_tftpd: 1'
把第5步生成的加密秘钥拷贝到cobbler主配置文件中:


重启cobbler服务:servicecobblerd restart
设置cobbler服务在2345模式开启:chkconfigcobblerd on
7、修改cobbler的dhcp模板文件:
vi /etc/cobbler/dhcp.template |
ddns-update-style interim; allow booting; allow bootp; ignore client-updates; set vendorclass = option vendor-class-identifier; #需要修改192.168.11.0为自己网段 subnet 192.168.11.0 netmask 255.255.255.0 { #修改自己的路由 option routers 192.168.11.210; #域名服务器地址 option domain-name-servers 202.106.0.20; #子网掩码 option subnet-mask 255.255.255.0; #分配IP地址段 range dynamic-bootp 192.168.11.211 192.168.11.240; filename "/pxelinux.0"; default-lease-time 21600; max-lease-time 43200; next-server $next_server; } |
重启dhcp服务:servicedhcpd restart (您会发现不成功,是因为未能把cobbler的dhcp模板数据同步到dhcp主配置文件中,最后执行“cobbler sync”同步才成功)
设置dhcp服务在2345模式开启:chkconfig dhcpd on
8、重启httpd错误:
Starting httpd: Syntax error on line 10 of /etc/httpd/conf.d/cobbler.conf: Invalid command 'WSGIScriptAliasMatch', perhaps misspelled or defined by a module not included in the server configuration |
解决方法:
vi /etc/httpd/conf.d/wsgi.conf |
#LoadModule wsgi_module modules/mod_wsgi.so 去掉#号,使之成为:LoadModule wsgi_module modules/mod_wsgi.so。 |
重启http服务:servicehttpd restart
设置http服务在2345模式开启:chkconfig httpd on
9、用cobbler check检测时会发现以下错误:
comment 'dists' on /etc/debmirror.conf forproper debian support
comment 'arches' on /etc/debmirror.conf forproper debian support
解决办法:
注释/etc/debmirror.conf 下面两行
#@dists="sid";
@sections="main,main/debian-installer,contrib,non-free";
#@arches="i386";
10、配置cobbler-web环境:
(一):
vi/etc/cobbler/modules.conf
 修改认证方式为密码文件类型
执行命令:htdigest/etc/cobbler/users.digest "Cobbler"chen ---添加用户chen,提示输入2遍密码确认
访问web页面 https://192.168.11.34/cobbler_web ---使用刚才创建的用户登录(建议使用360浏览器)
(二):
web页面管理:
(1):在cobbler服务器上先挂载光盘镜像(以centos5.9-X86―64为例),执行命令:
mount /dev/cdrom/media/
(2):添加DVD源:
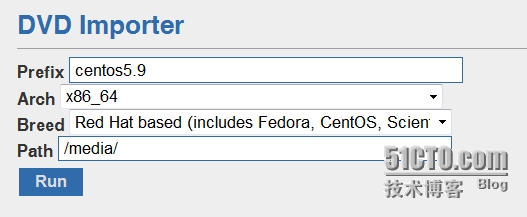
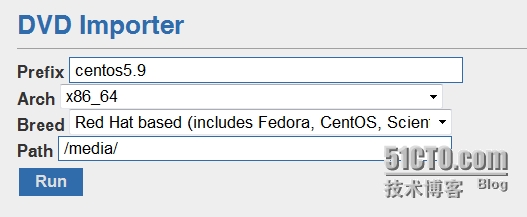
在cobbler-web中点击Import DVD,输入以下数据:

点击run,开始系统镜像的拷贝工作,镜像被拷贝到/var/www/cobbler/ks_mirror/下面,点击Events观察日志:

当state栏显示complete时,表明镜像拷贝完成。
另一种拷贝系统镜像的方法(不建议采用此方法,易出错)为:
cobblerimport --path=/media/ --name=centos5.9 --arch=x86_64
(3):镜像都拷贝完成后,在cobbler-web界面点击Distros可以看到所有的镜像。
11、kickstart文件:
所有的kickstart文件都放在以下路径下:/var/lib/cobbler/kickstarts/
该路径下有许多kickstart模板文件,最常用的是sample.ks文件,我们可以复制该模板文件生成centos5.ks(该kickstart文件适用于centos5.X的系统)、centos6.ks(该kickstart文件适用于centos6.X的系统)、rhel5.ks(该kickstart文件适用于RHEL5.X的系统)和rhel6.ks(该kickstart文件适用于RHEL6.X的系统),其实复制sample.ks文件生成的其他kickstart文件中需要改动的地方比较少,无非就是分区、时区、网络、包的选择等。
以下为详细步骤:
(1)cd/var/lib/cobbler/kickstarts/
(2) cp sample.kscentos5.ks ,cp sample.kscentos6.ks ,
cp sample.ksrhel5.ks, cp sample.ksrhel6.ks
(3)centos5.ks文件中的信息如下:
#platform=x86, AMD64, or Intel EM64T
# System authorization information
auth--useshadow--enablemd5
# System bootloader configuration
bootloader --location=mbr
# Partition clearing information
clearpart --all --initlabel
part /boot --fstype ext3 --size=1024--ondrive=sda
part swap --size=4096--ondrive=sda
part / --fstype ext3 --size=1--grow--ondrive=sda
# Use text mode install
text
# Firewall configuration
firewall --enabled
# Run the Setup Agent on first boot
firstboot --disable
# System keyboard
keyboard us
# System language
lang en_US
# Use network installation
network --bootproto=bootp--hostname=localhost.localdomain
url --url=$tree
# If any cobbler repo definitions were referenced inthe kickstart profile, include them here.
$yum_repo_stanza
# Network information
$SNIPPET('network_config')
# Reboot after installation
reboot
#Root password
rootpw --iscrypted $default_password_crypted
# SELinux configuration
selinux --disabled
# Do not configure the X Window System
skipx
# System timezone
timezone--utc Asia/Shanghai
# Install OS instead of upgrade
install
# Clear the Master Boot Record
zerombr yes
%pre
$SNIPPET('log_ks_pre')
$SNIPPET('kickstart_start')
$SNIPPET('pre_install_network_config')
# Enable installation monitoring
$SNIPPET('pre_anamon')
%packages
$SNIPPET('func_install_if_enabled')
$SNIPPET('puppet_install_if_enabled')
%post
$SNIPPET('log_ks_post')
# Start yum configuration
$yum_config_stanza
# End yum configuration
$SNIPPET('post_install_kernel_options')
$SNIPPET('post_install_network_config')
$SNIPPET('func_register_if_enabled')
$SNIPPET('puppet_register_if_enabled')
$SNIPPET('download_config_files')
$SNIPPET('koan_environment')
$SNIPPET('redhat_register')
$SNIPPET('cobbler_register')
# Enable post-install boot notification
$SNIPPET('post_anamon')
# Start final steps
$SNIPPET('kickstart_done')
# End final steps
(4)centos6.ks文件中的信息如下:
#platform=x86, AMD64, or Intel EM64T
# System authorization information
auth--useshadow--enablemd5
# System bootloader configuration
bootloader --location=mbr
# Partition clearing information
clearpart --all --initlabel
part /boot --fstype ext4 --size=1024--ondrive=sda
part swap --size=4096--ondrive=sda
part / --fstype ext4 --size=1--grow--ondrive=sda
# Use text mode install
text
# Firewall configuration
firewall --enabled
# Run the Setup Agent on first boot
firstboot --disable
# System keyboard
keyboard us
# System language
lang en_US
# Use network installation
network --bootproto=bootp--hostname=localhost.localdomain
url --url=$tree
# If any cobbler repo definitions were referenced inthe kickstart profile, include them here.
$yum_repo_stanza
# Network information
$SNIPPET('network_config')
# Reboot after installation
reboot
#Root password
rootpw --iscrypted $default_password_crypted
# SELinux configuration
selinux --disabled
# Do not configure the X Window System
skipx
# System timezone
timezone--utc Asia/Shanghai
# Install OS instead of upgrade
install
# Clear the Master Boot Record
zerombr yes
%pre
$SNIPPET('log_ks_pre')
$SNIPPET('kickstart_start')
$SNIPPET('pre_install_network_config')
# Enable installation monitoring
$SNIPPET('pre_anamon')
%packages
$SNIPPET('func_install_if_enabled')
$SNIPPET('puppet_install_if_enabled')
%post
$SNIPPET('log_ks_post')
# Start yum configuration
$yum_config_stanza
# End yum configuration
$SNIPPET('post_install_kernel_options')
$SNIPPET('post_install_network_config')
$SNIPPET('func_register_if_enabled')
$SNIPPET('puppet_register_if_enabled')
$SNIPPET('download_config_files')
$SNIPPET('koan_environment')
$SNIPPET('redhat_register')
$SNIPPET('cobbler_register')
# Enable post-install boot notification
$SNIPPET('post_anamon')
# Start final steps
$SNIPPET('kickstart_done')
# End final steps
(5)rhel5.ks文件中的信息如下:
#platform=x86, AMD64, or Intel EM64T
# System authorization information
auth--useshadow--enablemd5
# System bootloader configuration
bootloader --location=mbr
# Partition clearing information
clearpart --all --initlabel
part /boot --fstype ext3 --size=1024--ondrive=sda
part swap --size=4096--ondrive=sda
part / --fstype ext3 --size=1--grow--ondrive=sda
# Use text mode install
text
# Firewall configuration
firewall --enabled
# Run the Setup Agent on first boot
firstboot --disable
# System keyboard
keyboard us
# System language
key --skip
lang en_US
# Use network installation
network --bootproto=bootp--hostname=localhost.localdomain
url --url=$tree
# If any cobbler repo definitions were referenced inthe kickstart profile, include them here.
$yum_repo_stanza
# Network information
$SNIPPET('network_config')
# Reboot after installation
reboot
#Root password
rootpw --iscrypted $default_password_crypted
# SELinux configuration
selinux --disabled
# Do not configure the X Window System
skipx
# System timezone
timezone--utc Asia/Shanghai
# Install OS instead of upgrade
install
# Clear the Master Boot Record
zerombr yes
%pre
$SNIPPET('log_ks_pre')
$SNIPPET('kickstart_start')
$SNIPPET('pre_install_network_config')
# Enable installation monitoring
$SNIPPET('pre_anamon')
%packages
$SNIPPET('func_install_if_enabled')
$SNIPPET('puppet_install_if_enabled')
%post
$SNIPPET('log_ks_post')
# Start yum configuration
$yum_config_stanza
# End yum configuration
$SNIPPET('post_install_kernel_options')
$SNIPPET('post_install_network_config')
$SNIPPET('func_register_if_enabled')
$SNIPPET('puppet_register_if_enabled')
$SNIPPET('download_config_files')
$SNIPPET('koan_environment')
$SNIPPET('redhat_register')
$SNIPPET('cobbler_register')
# Enable post-install boot notification
$SNIPPET('post_anamon')
# Start final steps
$SNIPPET('kickstart_done')
# End final steps
(6)rhel6.ks文件中的信息如下:
#platform=x86, AMD64, or Intel EM64T
# System authorization information
auth--useshadow--enablemd5
# System bootloader configuration
bootloader --location=mbr
# Partition clearing information
clearpart --all --initlabel
part /boot --fstype ext4 --size=1024--ondrive=sda
part swap --size=4096--ondrive=sda
part / --fstype ext4 --size=1--grow--ondrive=sda
# Use text mode install
text
# Firewall configuration
firewall --enabled
# Run the Setup Agent on first boot
firstboot --disable
# System keyboard
keyboard us
# System language
key --skip
lang en_US
# Use network installation
network --bootproto=bootp--hostname=localhost.localdomain
url --url=$tree
# If any cobbler repo definitions were referenced inthe kickstart profile, include them here.
$yum_repo_stanza
# Network information
$SNIPPET('network_config')
# Reboot after installation
reboot
#Root password
rootpw --iscrypted $default_password_crypted
# SELinux configuration
selinux --disabled
# Do not configure the X Window System
skipx
# System timezone
timezone--utc Asia/Shanghai
# Install OS instead of upgrade
install
# Clear the Master Boot Record
zerombr yes
%pre
$SNIPPET('log_ks_pre')
$SNIPPET('kickstart_start')
$SNIPPET('pre_install_network_config')
# Enable installation monitoring
$SNIPPET('pre_anamon')
%packages
$SNIPPET('func_install_if_enabled')
$SNIPPET('puppet_install_if_enabled')
%post
$SNIPPET('log_ks_post')
# Start yum configuration
$yum_config_stanza
# End yum configuration
$SNIPPET('post_install_kernel_options')
$SNIPPET('post_install_network_config')
$SNIPPET('func_register_if_enabled')
$SNIPPET('puppet_register_if_enabled')
$SNIPPET('download_config_files')
$SNIPPET('koan_environment')
$SNIPPET('redhat_register')
$SNIPPET('cobbler_register')
# Enable post-install boot notification
$SNIPPET('post_anamon')
# Start final steps
$SNIPPET('kickstart_done')
# End final steps
(7)kickstart部分文件说明:
红色部分为我添加的和改动后的数据;
红色部分分区我手动分的:/boot 1024M,swap 4096M, /剩余所有空间,并且都分到第一块scsi硬盘上,具体的分区情况自己可以根据实际情况进行定制(详见“kickstart文件说明”这个word文档);
网络情况由dhcp分配IP,客户端分配到的主机名是localhost.localdomain;
时区是亚洲/上海;
红帽的kickstart文件中“key--skip”表明跳过安装序列号;
最后一项是清除主引导记录。
12、系统镜像与kickstart文件的链接:
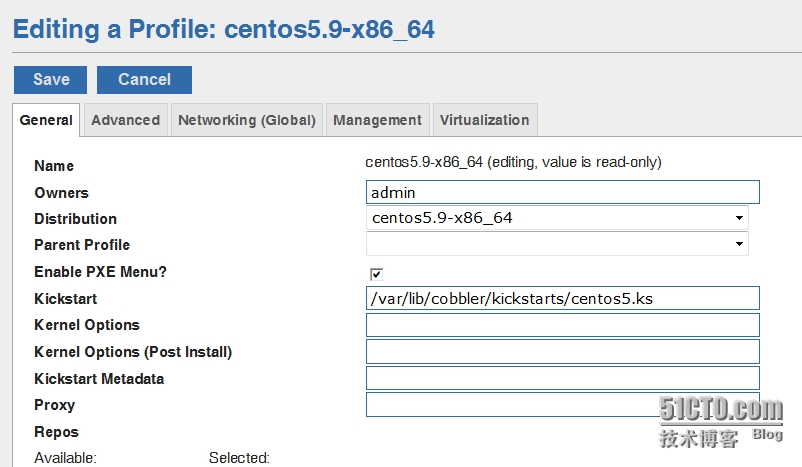
在cobbler-web的网页界面点击profiles:
然后点击centos5.9-X86―64的编辑单词“edit”

把kickstart路径改成以下路径(centos5.9的镜像对应的是centos5.ks文件):

最后点击save来保存,其他的系统镜像都是这样与其相对应的kickstart文件进行链接。
13、校验cobbler check出错:
Traceback (most recent call last): File "/usr/bin/cobbler", line 35, in ? sys.exit(app.main()) File "/usr/lib/python2.4/site-packages/cobbler/cli.py", line 558, in main rc = cli.run(sys.argv) File "/usr/lib/python2.4/site-packages/cobbler/cli.py", line 202, in run self.token = self.remote.login("", self.shared_secret) File "/usr/lib64/python2.4/xmlrpclib.py", line 1096, in __call__ return self.__send(self.__name, args) File "/usr/lib64/python2.4/xmlrpclib.py", line 1383, in __request verbose=self.__verbose File "/usr/lib64/python2.4/xmlrpclib.py", line 1147, in request return self._parse_response(h.getfile(), sock) File "/usr/lib64/python2.4/xmlrpclib.py", line 1286, in _parse_response return u.close() File "/usr/lib64/python2.4/xmlrpclib.py", line 744, in close raise Fault(**self._stack[0]) xmlrpclib.Fault: <Fault 1: "cobbler.cexceptions.CX:'login failed'"> |
解决方法:此为BUG,按下方操作执行即可:
service cobblerd restart
cobbler get-loaders(这个命令的意思是:下载引导操作系统的必须文件,前提是您的cobbler服务器必须能上公网)
出现“TASK COMPLETE”表明下载引导文件成功。
14、执行dhcp、http等的同步,由cobbler来管理(最后一步,很关键):
cobbler sync
出现“TASK COMPLETE”表明同步成功。
obbler服务器基本使用命令表
镜像导入 cobbler |
cobbler import --path=镜像路径 -- name=安装引导名 |
ks导入cobbler |
cobbler profile add --name=list名 --kickstart=路径 |
同步dhcp,httpd |
cobbler sync |
查看cobbler列表 |
cobbler list和cobbler report |
删除引导列表 |
cobbler distro remove --name=要删除的引导文件名 |
三、客户端主机通过网络装系统:
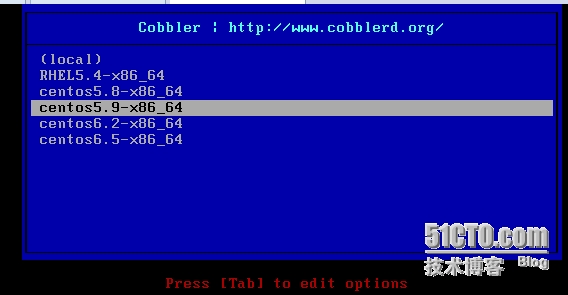
客户端主机从PXE启动(网卡启动),获得dhcp分配的地址后出现下面界面:

通过键盘上的上下键调到centos5.9-x86―64,按键盘上的enter键后就开始全自动换安装centos5.9的系统了。
四、结束语:
1、cobbler装系统还是比较方便和安全的,当你不选任何系统来安装(不动键盘上的上下键和enter键),默认20秒后就从本地硬盘启动,所以还是很安全的。
2、本人只研究出了通过网络自动安装centos,红帽,fedora系统,未能研究出通过网络安装ubuntu、dedian、SUSE和windows系统,ubuntu、dedian、和SUSE系统很少使用,并且难以配置,很复杂,windows系统受实际环境的影响(许多型号的服务器需要引导盘引导来装硬件驱动,才能装系统,所以通过网络装windows系统不切实际),所以现在最常用的是centos和红帽了,fedora和centos是一个样式,实际中很少有人使用fedora系统。
3、kickstart文件中内容大家可以根据自己的实际需要进行定制,在次我就不再做详细说明了,详见word文档“kickstart文件说明.doc”。
本文出自 “言海” 博客,谢绝转载!