Integrate NDOUtils 1.5 and Nagvis 1.8b2 with Nagios 3.5
安装ndoutils
1. tar zxf ndoutils-1.5.2.tar.gz
cd ndoutils-1.5.2/
./configure
make && make install
2. cp daemon-init /etc/init.d/ndo2db
chmod 755 /etc/init.d/ndo2db
chkconfig --add ndo2db
cp config/ndo2db.cfg-sample /usr/local/nagios/etc/ndo2db.cfg
cp config/ndomod.cfg-sample /usr/local/nagios/etc/ndomod.cfg
chown nagios.nagios /usr/local/nagios/etc/ndo*
chmod 664 /usr/local/nagios/etc/ndo*
3. yum -y install mysql-server
service mysqld start; chkconfig mysqld on
mysql -uroot
mysql> CREATE DATABASE nagios;
mysql> CREATE USER 'nagios'@'localhost' IDENTIFIED BY 'nagios';
mysql> GRANT ALL ON nagios.* TO 'nagios'@'localhost';
mysql> FLUSH PRIVILEGES;
mysql> quit
cd /root/nagios/ndoutils-1.5.2/db
mysql nagios < mysql.sql
4. vi /usr/local/nagios/etc/nagios.cfg
broker_module=/usr/local/nagios/bin/ndomod.o config_file=/usr/local/nagios/etc/ndomod.cfg
5. vi /usr/local/nagios/etc/ndo2db.cfg
db_user=nagios
db_pass=nagios
6. service ndo2db start
service nagios restart
7. to avoid error message in /var/log/messages like "ndo2db: Warning: queue send error, retrying..."
vi /etc/sysctl.conf
kernel.msgmax = 131072000
kernel.msgmnb = 131072000
kernel.msgmni = 65536000
8. reboot
安装Nagvis
1. yum -y install php php-gd php-gettext php-mbstring php-mysql php-pdo phpsqlite php-xml graphviz graphviz-gd graphviz-php rsync
2. tar zxf nagvis-1.8b2.tar.gz
cd nagvis-1.8b2
./install.sh
Do you want to use backend mklivestatus? [y]: n
Do you want to use backend ndo2db? [n]: y
Do you want to use backend ido2db? [n]: n
Do you want to use backend merlinmy? [n]: n
3. vi /usr/local/nagvis/etc/nagvis.ini.php
[backend_ndomy_1]
; hostname for NDO-db
dbhost="localhost"
; portname for NDO-db
dbport=3306
; database name for NDO-db
dbname="nagios"
; username for NDO-db
dbuser="nagios"
; password for NDO-db
dbpass="nagios"
; prefix for tables in NDO-db
dbprefix="nagios_"
; instance name for tables in NDO-db
dbinstancename="default"
4. service httpd restart
http://nagios-server/nagvis with admin:admin
5. Log in to the NagVis web interface, and click on Manage Maps under the Options menu: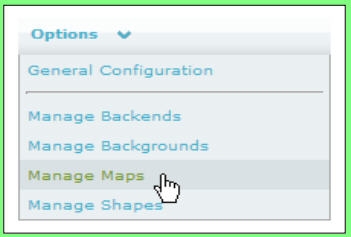
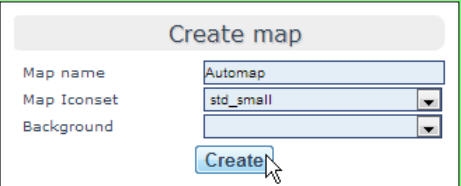
6. Under Create Map:
1. For Map name, enter the value automap.
2. For Map iconset, choose std_small.
3. Leave Background blank.
4. Click on Create.
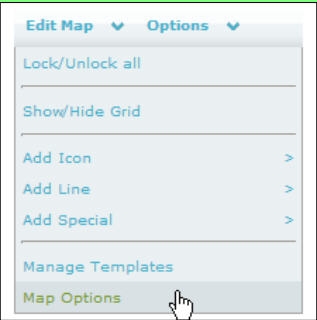
7. Click on Map Options under the Edit Map menu.
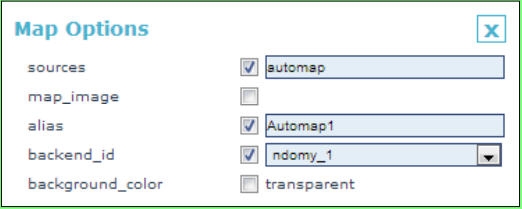
8. In the resulting dialog:
1. Check the sources checkbox, and change the value to automap.
2. Check the backend_id checkbox, and choose the value ndomy_1.
3. Scroll down to the bottom and click on Save.
9. With this done, the page should refresh and show you a map of your network, automaticall generated from your configuration, in a similar style to the Nagios Core web interface status map. You should also be able to hover over individual nodes to see their details.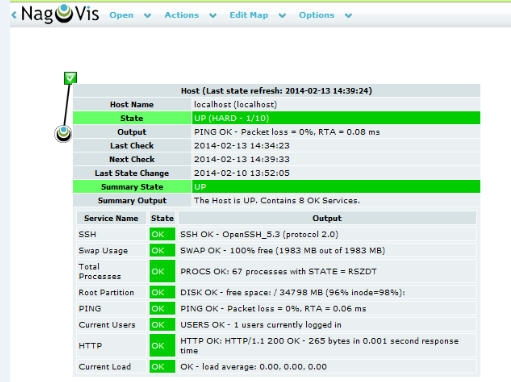
Including Nagvis on Nagios Core sidebar
1. vi /usr/local/nagios/share/side.php
under System section
<div class="navsectiontitle">System</div>
<li><a href="http://nagios-server/nagvis" target="<?php echo $link_target;?>">Nagvis Map</a></li>