分布式文件存储--MFS
分布式文件存储--MFS
今天给大家讲的是目前最比较流行的分布式文件存储--MFS。MooseFS呢是一个具有容错性的网络分布式文件系统。它把数据分散存放在多个物理服务器上,而呈现给用户的则是一个统一的资源。
它有好多比较好的特点比如:
下面给大家介绍下mfs的体系结构和工作原理:
任意数量的主机,可以通过mfsmount进程与管理服务器(接收和更改元数据)和数据服务器(改变实际文件数据)进行交流。

(官方网络示意图)


(读写原理图)
MFS的读数据过程1.client当需要一个数据时,首先向master server发起查询请求;
2.管理服务器检索自己的数据,获取到数据所在的可用数据服务器位置ip|port|chunkid;
3.管理服务器将数据服务器的地址发送给客户端;
4.客户端向具体的数据服务器发起数据获取请求;
5.数据服务器将数据发送给客户端;
MFS的写数据过程
1.当客户端有数据写需求时,首先向管理服务器提供文件元数据信息请求存储地址(元数据信息如:文件名|大小|份数等);
2.管理服务器根据写文件的元数据信息,到数据服务器创建新的数据块;
3.数据服务器返回创建成功的消息;
4.管理服务器将数据服务器的地址返回给客户端(chunkIP|port|chunkid);
5.客户端向数据服务器写数据;
6.数据服务器返回给客户端写成功的消息;
7.客户端将此次写完成结束信号和一些信息发送到管理服务器来更新文件的长度和最后修改时间
MFS的删除文件过程
1.客户端有删除操作时,首先向Master发送删除信息;
2.Master定位到相应元数据信息进行删除,并将chunk server上块的删除操作加入队列异步清理;
3.响应客户端删除成功的信号
MFS修改文件内容的过程
1.客户端有修改文件内容时,首先向Master发送操作信息;
2.Master申请新的块给.swp文件,
3.客户端关闭文件后,会向Master发送关闭信息;
4.Master会检测内容是否有更新,若有,则申请新的块存放更改后的文件,删除原有块和.swp文件块;
5.若无,则直接删除.swp文件块。
MFS重命名文件的过程
1.客户端重命名文件时,会向Master发送操作信息;
2.Master直接修改元数据信息中的文件名;返回重命名完成信息;
MFS遍历文件的过程
1.遍历文件不需要访问chunk server,当有客户端遍历请求时,向Master发送操作信息;
3.客户端接收到信息后显示
好了上面已经介绍的差不多了,下面咱们开始安装部署mfs。
一、环境介绍
192.168.1.10 master、metalogger
192.168.1.11 chunk server、client server
我这里为了方便我把master和metalogger放到了一块、但是实际生产环境中不要这样因为master本来就是单点,还有chunk server和client server也不应该放到一块。
二、安装步骤
master server 搭建
[root@localhost Desktop]#  useradd mfs -s /sbin/nologin
[root@localhost Desktop]# mv mfs-1.6.20-2.tar.gz /tmp
[root@localhost Desktop]# cd /tmp/
[root@localhost tmp]#  tar xf mfs-1.6.20-2.tar.gz
[root@localhost tmp]# cd mfs-1.6.20-2
[root@localhost mfs-1.6.20-2]#  ./configure --prefix=/usr/local/mfs --with-default-user=mfs --with-default-group=mfs --disable-mfschunkserver --disable-mfsmount
[root@localhost mfs-1.6.20-2]# cd /usr/local/mfs/etc/
[root@localhost etc]# ls
mfsexports.cfg.dist  mfsmaster.cfg.dist  mfsmetalogger.cfg.dist
[root@localhost etc]# cp mfsmaster.cfg.dist mfsmaster.cfg
[root@localhost etc]# cp mfsexports.cfg.dist mfsexports.cfg
[root@localhost etc]# cp /usr/local/mfs/var/mfs/metadata.mfs.empty /usr/local/mfs/var/mfs/metadata.mfs
[root@localhost etc]# /usr/local/mfs/sbin/mfsmaster start
working directory: /usr/local/mfs/var/mfs
lockfile created and locked
initializing mfsmaster modules ...
loading sessions ... file not found
if it is not fresh installation then you have to restart all active mounts !!!
exports file has been loaded
loading metadata ...
create new empty filesystemmetadata file has been loaded
no charts data file - initializing empty charts
master <-> metaloggers module: listen on *:9419
master <-> chunkservers module: listen on *:9420
main master server module: listen on *:9421
mfsmaster daemon initialized properly
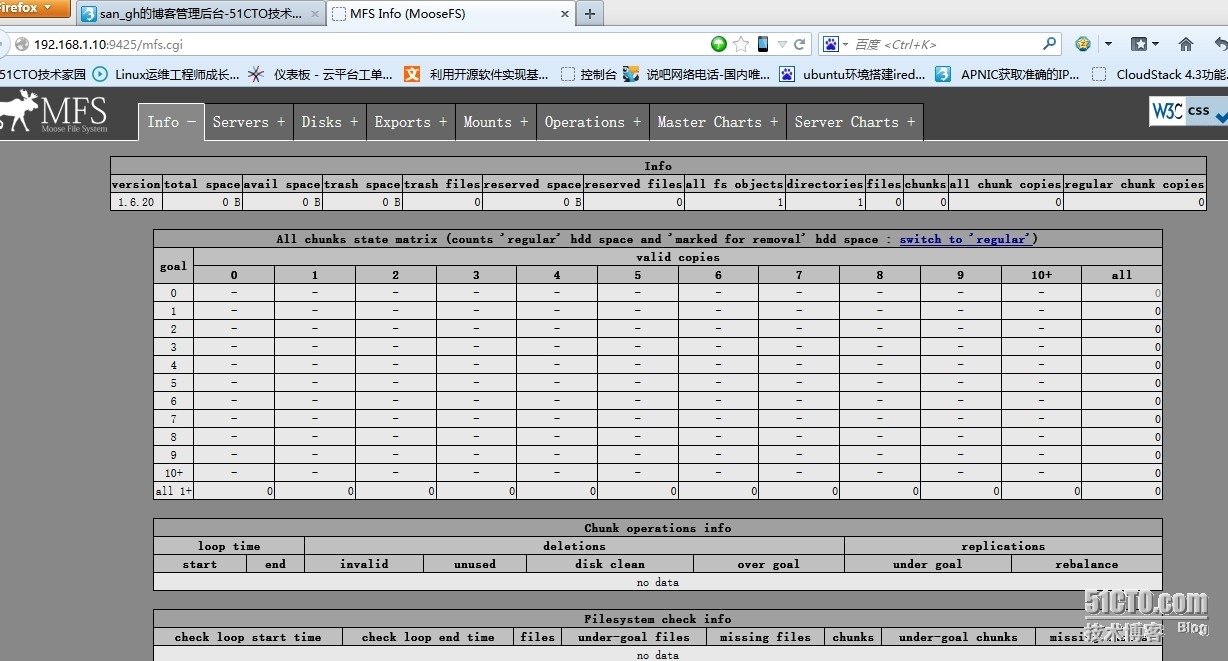
[root@localhost etc]#  /usr/local/mfs/sbin/mfscgiserv
starting simple cgi server (host: any , port: 9425 , rootpath:
/usr/local/mfs/share/mfscgi)
chunk server 搭建
[root@localhost]# useradd mfs -s /sbin/nologin
[root@localhost ]# cd /tmp/
[root@localhost tmp]# tar xf mfs-1.6.20-2.tar.gz
[root@localhost tmp]# cd mfs-1.6.20-2
[root@localhost mfs-1.6.20-2]# ./configure --prefix=/usr/local/mfs --with-default-user=mfs --with-default-group=mfs --disable-mfsmaster --disable-mfsmount
[root@localhost mfs-1.6.20-2]# make
[root@localhost mfs-1.6.20-2]# make install
[root@localhost mfs-1.6.20-2]# cd /usr/local/mfs/etc/
[root@localhost etc]# cp mfschunkserver.cfg.dist mfschunkserver.cfg
mfs使用空间配置
[root@localhost etc]# cp mfshdd.cfg.dist mfshdd.cfg
[root@localhost etc]# vim /usr/local/mfs/etc/mfschunkserver.cfg
MASTER_HOST = 192.168.1.10
[root@localhost etc]# mkdir /data
[root@localhost etc]# mount /dev/hda1 /data
[root@localhost etc]# chown -R mfs:mfs /data
[root@localhost etc]# vim mfshdd.cfg
/data
[root@localhost etc]# /usr/local/mfs/sbin/mfschunkserver start
working directory: /usr/local/mfs/var/mfs
lockfile created and locked
initializing mfschunkserver modules ...
hdd space manager: scanning folder /data/ ...
hdd space manager: scanning complete
hdd space manager: /data/: 0 chunks found
hdd space manager: scanning complete
main server module: listen on *:9422
no charts data file - initializing empty charts
mfschunkserver daemon initialized properly
metalogger server 搭建
[root@localhost ~]# useradd mfs -s /sbin/nologin
[root@localhost ~]# cd /tmp/
[root@localhost tmp]# tar xf mfs-1.6.20-2.tar.gz
[root@localhost tmp]# cd mfs-1.6.20-2
[root@localhost mfs-1.6.20-2]# ./configure --prefix=/usr/local/mfs --with-default-user=mfs --with-default-group=mfs --disable-mfschunkserver --disable-mfsmount
[root@localhost mfs-1.6.20-2]# make
[root@localhost mfs-1.6.20-2]# make install
[root@localhost mfs-1.6.20-2]# cd /usr/local/mfs/etc/
[root@localhost etc]# cp mfsmetalogger.cfg.dist mfsmetalogger.cfg
[root@localhost etc]# vim mfsmetalogger.cfg
MASTER_HOST = 192.168.1.10
[root@localhost etc]# /usr/local/mfs/sbin/mfsmetalogger start
working directory: /usr/local/mfs/var/mfs
lockfile created and locked
initializing mfsmetalogger modules ...
mfsmetalogger daemon initialized properly
client server搭建
[root@localhost ~]# yum install fuse fuse-libs fuse-devel
[root@localhost ~]# useradd mfs -s /sbin/nologin
[root@localhost ~]# cd /tmp/
[root@localhost tmp]# tar xf mfs-1.6.20-2.tar.gz
[root@localhost tmp]# cd mfs-1.6.20-2
[root@localhost mfs-1.6.20-2]# ./configure --prefix=/usr/local/mfs --with-default-user=mfs --with-default-group=mfs --disable-mfsmaster --disable-mfschunkserver
[root@localhost mfs-1.6.20-2]# make
[root@localhost mfs-1.6.20-2]# make install
[root@localhost mfs-1.6.20-2]# /usr/local/mfs/bin/mfsmount /mnt/mfs -H 192.168.1.10
mfsmaster accepted connection with parameters: read-write,restricted_ip ; root mapped to root:root
[root@localhost mfs-1.6.20-2]# /usr/local/mfs/bin/mfsmount -m /mnt/mfsmeta -H 192.168.1.10
mfsmaster accepted connection with parameters: read-write,restricted_ip
[root@localhost mfs-1.6.20-2]# df -h
Filesystem                              Size    Used    Avail   Use%    Mounted on
/dev/mapper/VolGroup00-LogVol00 8.6G    2.6G    5.6G    32%     /
/dev/vda1                               99M     12M     82M     13%     /boot
tmpfs                                   252M        0       252M    0%      /dev/shm
mfs#192.168.1.10:9421           22G         0           22G     0%      /mnt/mfs

三、MFS的高级特性
1.冗余goal设置
目标(goal),是指文件被拷贝的份数,设定了拷贝的份数后是可以通过mfsgetgoal 命令来证实的,也可以通过mfsrsetgoal 来改变设定。
/usr/local/mfs/bin/mfssetgoal 3 /mnt/mfs/test1
/usr/local/mfs/bin/mfsgetgoal /mnt/mfs/test1
/mnt/mfs/test1: 3
用mfsgetgoal �Cr 和mfssetgoal �Cr 同样的操作可以对整个树形目录递归操作,其等效于mfsrsetgoal命令。实际的拷贝份数可以通过mfscheckfile 和mfsfile info 命令来证实。
注意以下几种特殊情况:
一个不包含数据的零长度的文件,尽管没有设置为非零的目标(the non-zero “goal”),但用mfscheckfile 命令查询将返回一个空的结果;将文件填充内容后,其会根据设置的goal创建副本;这时再将文件清空,其副本依然作为空文件存在。
假如改变一个已经存在的文件的拷贝个数,那么文件的拷贝份数将会被扩大或者被删除,这个过程会有延时。可以通过mfscheckfile 命令来证实。
对一个目录设定“目标”,此目录下的新创建文件和子目录均会继承此目录的设定,但不会改变已经存在的文件及目录的拷贝份数。
可以通过mfsdirinfo来查看整个目录树的信息摘要。
2.垃圾回收站
一个删除文件能够存放在一个“ 垃圾箱”的时间就是一个隔离时间, 这个时间可以用mfsgettrashtime 命令来验证,也可以用mfssettrashtime 命令来设置。如:
/usr/local/mfs/bin/mfssettrashtime 64800 /mnt/mfs/test1
/usr/local/mfs/bin/mfsgettrashtime /mnt/mfs/test1
/mnt/mfs/test1: 64800
时间的单位是秒(有用的值有:1 小时是3600 秒,24 �C 86400 秒,1天 �C 604800 秒)。就像文件被存储的份数一样, 为一个目录设定存放时间是要被新创建的文件和目录所继承的。数字0 意味着一个文件被删除后, 将立即被彻底删除,在想回收是不可能的。
删除文件可以通过一个单独安装MFSMETA 文件系统。特别是它包含目录/ trash (包含任然可以被还原的被删除文件的信息)和/ trash/undel (用于获取文件)。只有管理员有权限访问MFSMETA(用户的uid 0,通常是root)。
/usr/local/mfs/bin/mfsmount -m /mnt/mfsmeta -H 192.168.0.1
被删文件的文件名在“垃圾箱”目录里还可见,文件名由一个八位十六进制的数i-node 和被删文件的文件名组成,在文件名和i-node 之间不是用“/”,而是用了“|”替代。如果一个文件名的长度超过操作系统的限制(通常是255 个字符),那么部分将被删除。通过从挂载点起全路径的文件名被删除的文件任然可以被读写。
移动这个文件到trash/undel 子目录下,将会使原始的文件恢复到正确的MooseFS 文件系统上路径下(如果路径没有改变)。如果在同一路径下有个新的同名文件,那么恢复不会成功。
从“垃圾箱”中删除文件结果是释放之前被它站用的空间(删除有延迟,数据被异步删除)。
在MFSMETA中还有另一个目录reserved,该目录内的是被删除但依然打开的文件。在用户关闭了这些被打开的文件后,reserved 目录中的文件将被删除,文件的数据也将被立即删除。在reserved 目录中文件的命名方法同trash 目录中的一样,但是不能有其他功能的操作。
3.快照snapshot
MooseFS 系统的另一个特征是利用mfsmakesnapshot 工具给文件或者是目录树做快照。
/usr/local/mfs/bin/mfsmakesnapshot source ... destination
Mfsmakesnapshot 是在一次执行中整合了一个或是一组文件的拷贝,而且任何修改这些文件的源文件都不会影响到源文件的快照, 就是说任何对源文件的操作,例如写入源文件,将不会修改副本(或反之亦然)。
也可以使用mfsappendchunks:
/usr/local/mfs/bin/mfsappendchunks destination-file source-file ...
当有多个源文件时,它们的快照被加入到同一个目标文件中(每个chunk 的最大量是chunk)。