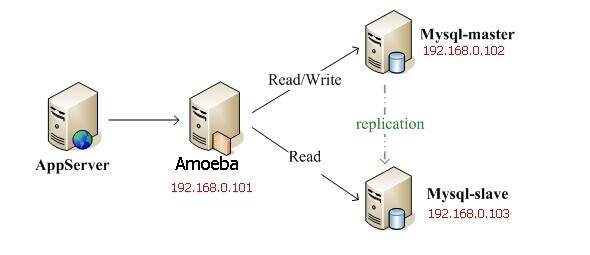
MySQL读写分离之 Amoeba实现
环境声明:

192.168.0.101 Amoeba
192.168.0.102 Mysql-master
192.168.0.103 Mysql-slave
环境前提1:已经建立主从关系的两台后端数据库
前提2:
主服务器授权
|
1
|
grant all on test.* to test@'192.168.0.101'
identified by '123456';
|
从服务器授权
|
1
|
grant select
on test.* to test@'192.168.0.101'
identified by '123456';
|
## 这里的test用户会在amoeba.xml 中进行配置来供客户端连接
安装jdk
|
1
2
3
4
5
6
|
yum -y install
glibc* glibc.i686
wget http://download.oracle.com/otn-pub/java/jdk/6u29-b11/jdk-6u29-linux-i586.bin?AuthParam=1388373434_ccd3a0704be0fed5ea5f8f96ccfeb9db
chmod
+x jdk-6u29-linux-i586.bin
./jdk-6u29-linux-i586.bin
mv
jdk1.6.0_29/ /application/
ln
-s /application/jdk1.6.0_29 /application/j2sdk
|
2. 配置java环境变量
|
1
2
3
4
5
6
7
|
cat
>> /etc/profile.d/java.sh << EOF
#for java
export
JAVA_HOME="/application/j2sdk"
export
CLASS_PATH="$JAVA_HOME/lib:$JAVA_HOME/jre/lib"
export
PATH=".:$JAVA_HOME/bin:$PATH"
#CATALINA_HOME="/usr/local/tomcat"
EOF
|
3.获取amoeba安装包
|
1
2
3
4
5
|
cd
/mnt/tools
wget http://cznic.dl.sourceforge.net/project/amoeba/Amoeba%20for%20mysql/3.x/amoeba-mysql-3.0.5-RC-distribution.zip
unzip amoeba-mysql-3.0.5-RC-distribution.zip
mv
amoeba-mysql-3.0.5-RC /application/
ln
-s /application/amoeba-mysql-3.0.5-RC /application/amoeba
|
4. 修改配置文件
Amoeba for MySQL的使用是很简单的,主要是通过xml文件来实现的。
1). 配置文件介绍:
(1) dbServers.xml Amoeba作为数据库代理层,它一定会和很多数据库保持通信,因此它必须知道由它代理的数据库如何连接,比如最基础的:主机IP、端口、Amoeba使用的用户名和密码等等。这些信息存储在$AMOEBA_HOME/conf/dbServers.xml中。
(2) rule.xml Amoeba为了完成数据切分提供了完善的切分规则配置,为了了解如何分片数据、如何将数据库返回的数据整合,它必须知道切分规则。与切分规则相关的信息存储在$AMOEBA_HOME/conf/rule.xml中。
(3) functionMap.xml 当我们书写SQL来操作数据库的时候,常常会用到很多不同的数据库函数,比如:UNIX_TIMESTAMP()、SYSDATE()等等。这些函数如何被Amoeba解析呢?$AMOEBA_HOME/conf/functionMap.xml描述了函数名和函数处理的关系。
(4) ruleFunctionMap.xml 对$AMOEBA_HOME/conf/rule.xml进行配置时,会用到一些我们自己定义的函数,比如我们需要对用户ID求HASH值来切分数据,这些函数在$AMOEBA_HOME/conf/ruleFunctionMap.xml中定义。
(5) access_list.conf Amoeba可以制定一些可访问以及拒绝访问的主机IP地址,这部分配置在$AMOEBA_HOME/conf/access_list.conf中。
(6) log4j.xml Amoeba允许用户配置输出日志级别以及方式,配置方法使用log4j的文件格式,文件是$AMOEBA_HOME/conf/log4j.xml。
(7)amoeba.xml 客户端连接Amoeba时所绑定的IP地址、端口、用户名和密码。及IP访问限制
其中,我们主要用到dbServer.xml 和 amoeba.xml 。
……
2)修改配置文件dbServer.xml
|
1
2
3
4
5
6
7
8
9
10
11
12
13
14
15
16
17
18
19
20
21
22
23
24
25
26
27
28
29
30
31
32
33
34
35
36
37
38
39
40
41
42
43
44
45
46
47
48
49
50
51
52
53
54
55
56
57
58
59
60
61
62
63
64
65
66
67
68
69
70
71
72
|
<?xml version="1.0"
encoding="gbk"?>
<!DOCTYPE amoeba:dbServers SYSTEM "dbserver.dtd">
<amoeba:dbServers xmlns:amoeba="http://amoeba.meidusa.com/">
<!--
Each dbServer needs to be configured into a Pool,
If you need to configure multiple dbServer with load balancing that can be simplified by the following configuration:
add attribute with name virtual = "true"
in
dbServer, but the configuration does not allow the element with name factoryConfig
such as 'multiPool'
dbServer
-->
<dbServer name="abstractServer"
abstractive="true">
<factoryConfig class="com.meidusa.amoeba.mysql.net.MysqlServerConnectionFactory">
<property name="connectionManager">${defaultManager}</property>
<property name="sendBufferSize">64</property>
<property name="receiveBufferSize">128</property>
<!-- mysql port -->
<!-- 连接代理数据库使用的端口 -->
<property name="port">3306</property>
<!-- mysql schema -->
<!-- 连接代理数据库使用的数据库 -->
<property name="schema">test</property>
<!-- mysql user -->
<!-- 连接代理数据库使用的用户名 -->
<property name="user">test</property>
<!-- 使用代理数据库使用的密码 -->
<property name="password">123456</property>
</factoryConfig>
<poolConfig class="com.meidusa.toolkit.common.poolable.PoolableObjectPool">
<property name="maxActive">500</property>
<property name="maxIdle">500</property>
<property name="minIdle">1</property>
<property name="minEvictableIdleTimeMillis">600000</property>
<property name="timeBetweenEvictionRunsMillis">600000</property>
<property name="testOnBorrow">true</property>
<property name="testOnReturn">true</property>
<property name="testWhileIdle">true</property>
</poolConfig>
</dbServer>
<dbServer name="server1"
parent="abstractServer">
<factoryConfig>
<!-- mysql ip -->
<!-- 后端节点1 -->
<property name="ipAddress">192.168.0.102</property>
</factoryConfig>
</dbServer>
<dbServer name="server2"
parent="abstractServer">
<factoryConfig>
<!-- mysql ip -->
<!-- 后端节点2 -->
<property name="ipAddress">192.168.0.103</property>
</factoryConfig>
</dbServer>
<dbServer name="multiPool"
virtual="true">
<poolConfig class="com.meidusa.amoeba.server.MultipleServerPool">
<!-- 三种代理算法 -->
<!-- Load balancing strategy: 1=ROUNDROBIN , 2=WEIGHTBASED , 3=HA-->
<property name="loadbalance">1</property>
<!-- 代理连接池后端服务器 -->
<!-- Separated by commas,such as: server1,server2,server1 -->
<property name="poolNames">server1,server2</property>
</poolConfig>
</dbServer>
</amoeba:dbServers>
|
3)修改配置文件amoeba.xml
|
1
2
3
4
5
6
7
8
9
10
11
12
13
14
15
16
17
18
19
20
21
22
23
24
25
26
27
28
29
30
31
32
33
34
35
36
37
38
39
40
41
42
43
44
45
46
47
48
49
50
51
52
53
54
55
56
57
58
59
60
61
62
63
64
65
66
67
68
69
70
71
72
73
74
75
76
77
78
79
80
81
82
83
84
85
86
87
88
89
90
91
92
93
|
<?xml version="1.0"
encoding="gbk"?>
<!DOCTYPE amoeba:configuration SYSTEM "amoeba.dtd">
<amoeba:configuration xmlns:amoeba="http://amoeba.meidusa.com/">
<proxy>
<!-- service class must implements com.meidusa.amoeba.service.Service -->
<service name="Amoeba for Mysql"
class="com.meidusa.amoeba.mysql.server.MySQLService">
<!-- port -->
<!-- 客户端连接端口,为了方便,也可以改为3306 -->
<property name="port">8066</property>
<!-- bind ipAddress -->
<!--
<property name="ipAddress">127.0.0.1</property>
-->
<property name="connectionFactory">
<bean class="com.meidusa.amoeba.mysql.net.MysqlClientConnectionFactory">
<property name="sendBufferSize">128</property>
<property name="receiveBufferSize">64</property>
</bean>
</property>
<property name="authenticateProvider">
<bean class="com.meidusa.amoeba.mysql.server.MysqlClientAuthenticator">
<property name="user">root</property>
<property name="password">123456</property>
<property name="filter">
<bean class="com.meidusa.toolkit.net.authenticate.server.IPAccessController">
<property name="ipFile">${amoeba.home}/conf/access_list.conf</property>
</bean>
</property>
</bean>
</property>
</service>
<runtime class="com.meidusa.amoeba.mysql.context.MysqlRuntimeContext">
<!-- proxy server client process thread size -->
<property name="executeThreadSize">128</property>
<!-- per connection cache prepared statement size -->
<property name="statementCacheSize">500</property>
<!-- default charset -->
<property name="serverCharset">utf8</property>
<!-- query timeout( default: 60 second , TimeUnit:second) -->
<property name="queryTimeout">60</property>
</runtime>
</proxy>
<!--
Each ConnectionManager will start as thread
manager responsible for
the Connection IO read
, Death Detection
-->
<connectionManagerList>
<connectionManager name="defaultManager"
class="com.meidusa.toolkit.net.MultiConnectionManagerWrapper">
<property name="subManagerClassName">com.meidusa.toolkit.net.AuthingableConnectionManager</property>
</connectionManager>
</connectionManagerList>
<!-- default using file
loader -->
<dbServerLoader class="com.meidusa.amoeba.context.DBServerConfigFileLoader">
<property name="configFile">${amoeba.home}/conf/dbServers.xml</property>
</dbServerLoader>
<!-- 定义读写分离部分 -->
<queryRouter class="com.meidusa.amoeba.mysql.parser.MysqlQueryRouter">
<property name="ruleLoader">
<bean class="com.meidusa.amoeba.route.TableRuleFileLoader">
<property name="ruleFile">${amoeba.home}/conf/rule.xml</property>
<property name="functionFile">${amoeba.home}/conf/ruleFunctionMap.xml</property>
</bean>
</property>
<property name="sqlFunctionFile">${amoeba.home}/conf/functionMap.xml</property>
<property name="LRUMapSize">1500</property>
<property name="defaultPool">multiPool</property>
<!-- 指定写数据库 -->
<property name="writePool">server1</property>
<!-- 指定读数据库 -->
<property name="readPool">server2</property>
<property name="needParse">true</property>
</queryRouter>
</amoeba:configuration>
|
5. 启动amoeba
|
1
|
/application/amoeba/bin/launcher
&
|
6. 检查启动结果
|
1
2
3
4
5
6
|
[root@shell logs]# netstat -lnt
Active Internet connections (only servers)
Proto Recv-Q Send-Q Local Address Foreign Address State
tcp 0 0 0.0.0.0:22 0.0.0.0:* LISTEN
tcp 0 0 :::22 :::* LISTEN
tcp 0 0 :::8066 :::* LISTEN
|
7.客户端连接测试
|
1
2
3
4
5
6
7
8
9
10
11
12
|
mysql -u test
-P 8066 -h 192.168.0.101 -p123456
mysql> select
host,user from mysql.user; #发现结果是从库的信息
+---------------+------+
| host | user |
+---------------+------+
| 127.0.0.1 | root |
| 192.168.0.101 | test
|
| ::1 | root |
| localhost | root |
| slave | root |
+---------------+------+
5 rows in
set
(0.01 sec)
|
此时进入数据库之后,进行其他增删改查等变量,查看响应mysql日志,查看执行过程,会发现,读写分离已经OK...