RHEL6.5x64下memcached安装和使用
RHEL6.5x64下memcached安装和使用
从网上下载libevent-2.0.21-stable.tar.gz 和memcached-1.4.5.tar.gz,然后运行
第一步:安装gcc编译器
[root@memcached ~]#yum -y isnatll gcc
第二步:安装libevent和memcached
[root@memcached srv]# tar zxvf libevent-2.0.21-stable.tar.gz
[root@memcachedsrv]# cd libevent-2.0.21-stable
[[email protected]]#./configure --prefix=/usr/local/libevent
[[email protected]]#make&& make install
[[email protected]]# cd /srv
[root@memcachedsrv]#tar zxvf memcached-1.4.5.tar.gz
[root@memcachedsrv]#cd memcached-1.4.5
[root@memcached memcached-1.4.5]#./configure--prefix=/usr/local/memcache --with-libevent=/usr/local/libevent
[[email protected]]#make &&make install
第三步:检查memcache的库文件
[[email protected]]# cd /usr/local/memcache/bin/
[root@memcachedbin]# ./memcached --help
若显示./memcached: error while loading shared libraries:libevent-2.0.so.5: cannot open shared object file: No such file or directory
解决这个问题需要把只需要做个软链接就可以了:
[root@memcached bin]# ln -s/usr/local/libevent/lib/* /usr/lib64/
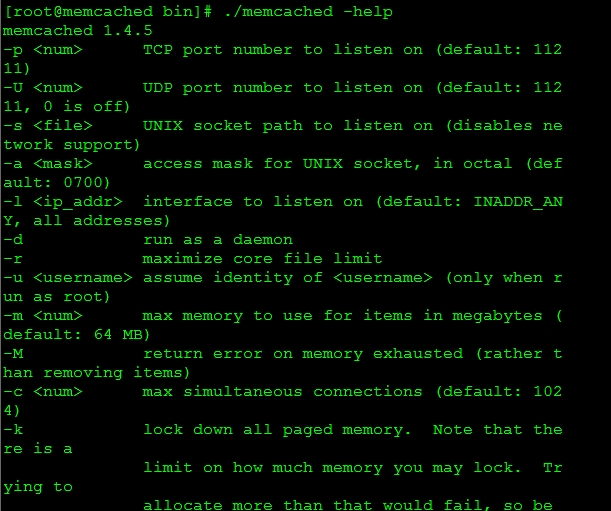
[root@memcachedbin]# ./memcached -help可以查看memche的帮助

第四步:启动memcache
[root@memcached~]# ln -s /usr/local/memcache/bin/* /usr/local/bin/
[root@memcached~]# memcached -d -m 1000 -u root -p12000 -c 1024 -l 10.0.0.2 -P/tmp/memcached.pid
-d :表示启动一个守护进程
-m 是分配给memcached使用的内存
-u 运行memcached的用户
-l 是memcached监听的ip
-p 是memcached监听的端口
-c memcache运行的最大并发连接数
-P 是设置memcache的pid文件
配置启动脚本
[root@memcached bin]#vi /root/restartmemcached.sh
#加入下面行
killall -9 memcached
sleep 1
/usr/local/bin/memcached -d -u root -m 4096-p 10001 -c 30000 -P /opt/memcached/pid/m10001.pid -v
/usr/local/bin/memcached -d -u root -m 4096-p 10002 -c 30000 -P /opt/memcached/pid/m10002.pid-v
/usr/local/bin/memcached -d -u root -m 4096-p 10003 -c 30000 -P /opt/memcached/pid/m10003.pid -v
/usr/local/bin/memcached -d -u root -m 4096-p 10004 -c 30000 -P -f 2.0 -L /opt/memcached/pid/m10004.pid -v
/usr/local/bin/memcached -d -u root -m 4096-p 10005 -c 30000 -P /opt/memcached/pid/m10005.pid -v
/usr/local/bin/memcached -d -u root -m 4096-p 10006 -c 30000 -P /opt/memcached/pid/m10006.pid -v
/usr/local/bin/memcached -d -u root -m 4096-p 10007 -c 30000 -P /opt/memcached/pid/m10007.pid-v
/usr/local/bin/memcached -d -u root -m 4096-p 10008 -c 30000 -P -f 2.0 -L /opt/memcached/pid/m10008.pid -v
/usr/local/bin/memcached -d -u root -m 4096-p 10009 -c 30000 -P /opt/memcached/pid/m10009.pid -v
/usr/local/bin/memcached -d -u root -m 4096-p 10101 -c 30000 -P /opt/memcached/pid/m10101.pid -v
/usr/local/bin/memcached -d -u root -m 4096-p 10102 -c 30000 -P /opt/memcached/pid/m10102.pid -v
/usr/local/bin/memcached -d -u root -m 4096-p 10103 -c 30000 -P -L /opt/memcached/pid/m10103.pid-v
/usr/local/bin/memcached -d -u root -m 4096-p 10104 -c 30000 -P /opt/memcached/pid/m10104.pid �Cv
运行脚本
. restartmemcached.sh
检查是否有启动
netstat -lntp
把脚本加入到随机启动:
#echo /root/ restartmemcached.sh>>/etc/rc.local
第五部:memcache的分布式部署和应用
(本部分涉及到编程,本人不会,参考别人文档)
基于PHP扩展的Memcache客户端实际上早已经实现,而且非常稳定。先解释一些名词,Memcache是danga.com的一个开源项目,可以类比于MySQL这样的服务,
而PHP扩展的Memcache实际上是连接Memcache的方式。
其次,进行PHP扩展的安装,官方地址是http://pecl.php.net/package/memcache
最后,启动Memcache服务,比如这样:

PHP的PECL扩展中的memcache实际上在2.0.0的版本中就已经实现多服务器支持,现在都已经2.2.5了。请看如下代码
$memcache = newMemcache;
$memcache->addServer('localhost',11213);
$memcache->addServer('localhost',11214);
$memcache->addServer('localhost',11215);
$memStats =$memcache->getExtendedStats();
print_r($memStats);
通过上例就已经实现Memcache的分布式部署,是不是非常简单。
分布式系统的良性运行
在Memcache的实际使用中,遇到的最严重的问题,就是在增减服务器的时候,会导致大范围的缓存丢失,从而可能会引导数据库的性能瓶颈,为了避免出现这种情况,
请先看Consistent hashing算法,中文的介绍可以参考这里,通过存取时选定服务器算法的改变,来实现。
修改PHP的Memcache扩展memcache.c的源代码中的
修改PHP的Memcache扩展memcache.c的源代码中的
"memcache.hash_strategy"= standard
为
"memcache.hash_strategy"= consistent
重新编译,这时候就是使用Consistent hashing算法来寻找服务器存取数据了。
有效测试数据表明,使用Consistent hashing可以极大的改善增删Memcache时缓存大范围丢失的情况。
NonConsistentHash:92% of lookups changed after adding a target to the existing 10
NonConsistentHash:90% of lookups changed after removing 1 of 10 targets
ConsistentHash: 6%of lookups changed after adding a target to the existing 10
ConsistentHash: 9%of lookups changed after removing 1 of 10 target