nginx的负载均衡,代理等功能全解析
Nginx的负载均衡:
(1)nginx的算法: upstream目前支持 4 种方式的分配
1)、轮询(默认)
每个请求按时间顺序逐一分配到不同的后端服务器,如果后端服务器down掉,能自动剔除。
2)、weight
指定轮询几率,weight和访问比率成正比,用于后端服务器性能不均的情况。
2)、ip_hash
每个请求按访问ip的hash结果分配,这样每个访客固定访问一个后端服务器,可以解决session的问题。
3)、fair(第三方)
按后端服务器的响应时间来分配请求,响应时间短的优先分配。
4)、url_hash(第三方)
配置:
http {
...省略
upstream myserver {                                                           # 定义负载均衡服务器
        server 172.16.18.3:80 weight=1;                                    #权重高的匹配到的次数多。
        server 172.16.19.192:80 weight=2;
}
server {
        listen 80;
        server_name node1;
        add_header X-Via $server_addr;
location / {
        root  /data/webapps/www/;
        index index.html index.htm;
        proxy_pass http://myserver;                                             #转发至负载均衡,有算法做匹配
        }
        location  /bbs {
        proxy_pass http://172.16.18.3;                                         #特殊请求转发到指定服务器
        }
        error_page 500 502 503 504 /50x.html;                                 #错误返回sorry页
        location = /50x.html {
        root /data/webapps/www/;
}
}
访问验证:
[root@node1 www]# curl http://172.16.18.1
<h1>node2.luo.com</h1>
[root@node1 www]# curl http://172.16.18.1
<h1>node3</h1>
[root@node1 www]# curl http://172.16.18.1
<h1>node2.luo.com</h1>
[root@node1 www]# curl http://172.16.18.1
<h1>node2.luo.com</h1>
[root@node1 www]# curl http://172.16.18.1
<h1>node3</h1>
依据权重返回各服务器的结果!负载均衡功能实现!
Nginx的反向代理:
nginx的反向代理最重要的就是配置server段。在server段中定义代理服务器即可
配置:
全局配置不动,在http段中的server段中配置如下
server {
listen 80;
server_name node1.aolens.com;
    add_header X-Via $server_addr;                #添加头部信息X-Via 为服务器地址        location  / {
    proxy_pass http://172.16.18.3;
    }
    error_page 500 502 503 504 /50x.html;
    location = /50x.html {
    root html;
    }
    }
全局代理
[root@node1 www]# curl http://node1.aolens.com
<h1>bbs server</h1>
局部代理
server {
listen 80;
server_name node1.aolens.com;
add_header X-Via $server_addr;
location / {
    root /data/webapps/www/;
    index index.html index.htm;
    }
    location = /bbs/ {
    proxy_pass http://172.16.18.3/;
    }
可以使用curl命令对配置好的服务进行请求,以验正其效果:
[root@node1 www]# curl -I http://172.16.18.1/bbs/
HTTP/1.1 200 OK
Server: nginx/1.6.1
Date: Mon, 22 Sep 2014 16:02:42 GMT
Content-Type: text/html
Content-Length: 20
Last-Modified: Mon, 22 Sep 2014 15:48:56 GMT
Connection: keep-alive
ETag: "542044e8-14"
X-Via: 172.16.18.1
Accept-Ranges: bytes
[root@node1 www]# curl http://node1.aolens.com/bbs/
<h1>bbs server</h1>
[root@node1 www]# curl http://node1.aolens.com
<h1>node1</h1>
代理功能实现。
nginx在实现反向代理功能时的最重要指令为proxy_pass,它能够将location定义的某URI代理至指定的上游服务器(组)上。如下面的示例中,location的/url将被替换为上游服务器上的/newurl。
location /url {
proxy_pass http://www.magedu.com:8080/newurl;
}
举例说明:
1,当proxy_pass后边跟的是http://node1.aolens.com;没有后边的url,请求到的路径便是转发路径+url
location /bbs {
proxy_pass http://172.16.18.3;
}
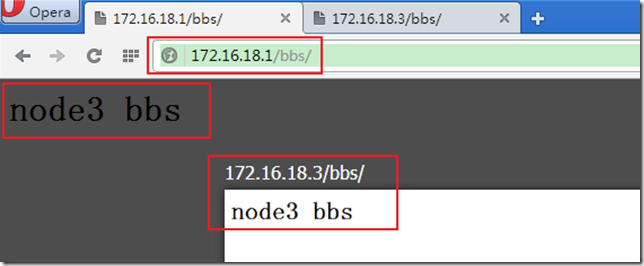
所以请求到的路径为172.16.18.3/bbs

2,当proxy_pass后边跟的是http://node1.aolens.com/;有后边的url,请求到的路径便是http://node1.aolens.com/,忽略location匹配的url.
location /bbs {
proxy_pass http://172.16.18.3/;
}
所以请求到的路径为172.16.18.3/
![clipboard[1] clipboard[1]](http://img1.51cto.com/attachment/201409/25/7021142_1411665826YjRv.png)
3,解释一下精确匹配应该注意的问题点
当location是精确匹配uri时,只有完全匹配到才会proxy_pass转发。
location = /bbs {
proxy_pass http://172.16.18.3;
}
大家想此时匹配到的是什么?是http://172.16.18.3/bbs吗?那么就错了,应为在访问/bbs时会默认加上/,所以访问的是/bbs/路径。精确无法匹配到,所以请求的路劲应该是:
http://127.0.0.1/bbs;也就是你本地的路径+/bbs。而无法匹配到,当然你前边还需要定义一个location / 访问的问本地路径。
![clipboard[2] clipboard[2]](http://img1.51cto.com/attachment/201409/25/7021142_1411666088XYSQ.png)
那么
location = /bbs/ {
proxy_pass http://172.16.18.3;
}
请求的路径则为:http://172.16.18.3/bbs/
![clipboard[3] clipboard[3]](http://img1.51cto.com/attachment/201409/25/7021142_1411666096BcaE.png)
当你请求的是/bbs/url;那么一定不可能匹配到此location。
4,正则匹配
正则匹配有~(区分大小写),~*(不区分大小写),location匹配url时,直接将匹配到的url添加在porxy_pass代理的路径下。
例如:
location {~|~*} {/bbs|/bbs/} {
proxy_pass http://172.16.18.3;
}
访问到的一定是http://172.16.18.3/bbs/;路径。此时不能为路径后添加url.否则会报错!
![clipboard[4] clipboard[4]](http://img1.51cto.com/attachment/201409/25/7021142_1411666107bOJK.png)
后续在url路径下的也全部属于此location匹配。路径为http://172.16.18.3/url;
![clipboard[5] clipboard[5]](http://img1.51cto.com/attachment/201409/25/7021142_14116661172CDT.png)
只要bbs出现在url中就可以被匹配到。将匹配的url添加到porxy_pass后。如下,
![clipboard[6] clipboard[6]](http://img1.51cto.com/attachment/201409/25/7021142_1411666133nTnN.png)
缓冲区设定:
| 语法: | proxy_buffering on | off; |
| 默认值: | proxy_buffering on; |
| 上下文: | http, server, location |
代理的时候,开启或关闭缓冲后端服务器的响应。
当开启缓冲时,nginx尽可能快地从被代理的服务器接收响应,再将它存入proxy_buffer_size和proxy_buffers指令设置的缓冲区中。如果响应无法整个纳入内存,那么其中一部分将存入磁盘上的临时文件。proxy_max_temp_file_size和proxy_temp_file_write_size指令可以控制临时文件的写入。
当关闭缓冲时,收到响应后,nginx立即将其同步传给客户端。nginx不会尝试从被代理的服务器读取整个请求,而是将proxy_buffer_size指令设定的大小作为一次读取的最大长度。
响应头“X-Accel-Buffering”传递“yes”或“no”可以动态地开启或关闭代理的缓冲功能。 这个能力可以通过proxy_ignore_headers指令关闭。
| 语法: | proxy_buffer_size size; |
| 默认值: | proxy_buffer_size 4k|8k; |
| 上下文: | http, server, location |
设置缓冲区的大小为size。nginx从被代理的服务器读取响应时,使用该缓冲区保存响应的开始部分。这部分通常包含着一个小小的响应头。该缓冲区大小默认等于proxy_buffers指令设置的一块缓冲区的大小,但它也可以被设置得更小。
缓存:
| 语法 | proxy_cache zone | off; |
| 默认值: | proxy_cache off; |
| 上下文: | http, server, location |
指定用于页面缓存的共享内存。同一块共享内存可以在多个地方使用。off参数可以屏蔽从上层配置继承的缓存功能。缓存将遵从upstream服务器的响应报文首部中关于缓存的设定,如 "Expires"、"Cache-Control: no-cache"、 "Cache-Control: max-age=XXX"、"private"和"no-store" 等,但nginx在缓存时不会考虑响应报文的"Vary"首部。为了确保私有信息不被缓存,所有关于用户的私有信息可以upstream上通过"no-cache" or "max-age=0"来实现,也可在nginx设定proxy_cache_key必须包含用户特有数据如$cookie_xxx的方式实现,但最后这种方式在公共缓存上使用可能会有风险。因此,在响应报文中含有以下首部或指定标志的报文将不会被缓存。
Set-Cookie
Cache-Control containing "no-cache", "no-store", "private", or a "max-age" with a non-numeric or 0 value
Expires with a time in the past
X-Accel-Expires: 0
| 语法: | proxy_cache_key string; |
| 默认值: | proxy_cache_key $scheme$proxy_host$request_uri; |
| 上下文: | http, server, location |
$uri设定在存储及检索缓存时用于“键”的字符串,可以使用变量为其值,但使用不当时有可能会为同一个内容缓存多次;另外,将用户私有信息用于键可以避免将用户的私有信息返回给其它用户;
定义如何生成缓存的键,比如
proxy_cache_key "$host$request_uri $cookie_user";
这条指令的默认值类似于下面字符串
proxy_cache_key $scheme$proxy_host$uri$is_args$args;
配置范例:
http {
    include mime.types;
    default_type application/octet-stream;
    sendfile on;
    keepalive_timeout 65;
      proxy_cache_path /data/nginx/cache levels=1:2 keys_zone=STATIC:10m  inactive=24h max_size=1g;

  server {
listen 80;
server_name node1;
    add_header X-Via $server_addr;
  location / {
    root     /data/webapps/www/;
    index index.html index.htm;
      proxy_pass http://www.magedu.com;
      proxy_set_header Host $host;
      proxy_cache STATIC;
      proxy_cache_valid 200 1d;
      proxy_cache_valid 301 302 10m;
      proxy_cache_vaild any 1m;
      proxy_cache_use_stale error timeout invalid_header updating http_500 http_502 http_503 http_504;

  } } }
缓存前请求速度
![clipboard[7] clipboard[7]](http://img1.51cto.com/attachment/201409/25/7021142_141166615155XI.png)
缓存后请求速度
![clipboard[8] clipboard[8]](http://img1.51cto.com/attachment/201409/25/7021142_1411666162awjv.png)
查看缓存目录会发现多了一个文件,这就是缓存文件
![clipboard[9] clipboard[9]](http://img1.51cto.com/attachment/201409/25/7021142_1411666165QxlN.png)
Nginx压缩:
对文本文件依靠nginx自己的压缩算法对文本文件进行压缩,有助于缓解带宽压力。
配置:http段
    gzip on;
    gzip_http_version 1.0;
    gzip_comp_level 2;                                          #压缩等级
    gzip_types text/plain text/css application/x-javascript text/xml applicati on/xml application/xml+rss text/javascript application/javascript application/json;                 #压缩数据类型
    gzip_disable msie6;                                        #以“用户代理”禁用gzip的响应请求头字段匹配任何指定的正则表达式。
未压缩前大小:577KB
![clipboard[10] clipboard[10]](http://img1.51cto.com/attachment/201409/25/7021142_1411666188s9lO.png)
压缩后大小为:50.4KB
![clipboard[11] clipboard[11]](http://img1.51cto.com/attachment/201409/25/7021142_14116662213d5L.png)
![clipboard[12] clipboard[12]](http://img1.51cto.com/attachment/201409/25/7021142_14116662370IHY.png)
Nginx限速配置 :
nginx的限速功能通过limit_zone、limit_conn和limit_rate指令进行配置。首先需要在http上下文配置一个limit_zone,然后在需要的地方使用limit_conn和limit_rate 进行限速设置。
| 语法: | limit_conn zone number; |
| 默认值: | 无 |
| 上下文: | http, server, location |
指定一块已经设定的共享内存空间,以及每个给定键值的最大连接数。当连接数超过最大连接数时,服务器将会返回 503 (Service Temporarily Unavailable) 错误。比如,如下配置
limit_conn_zone $binary_remote_addr zone=addr:10m;
server {
    location /download/ {
        limit_conn addr 1;
        limit_rate 50k;        #限速
    }
表示,同一 IP 同一时间只允许有一个连接。
limit_rate 50k; 对每个连接限速50k. 注意,这里是对连接限速,而不是对IP限速。如果一个IP允许三个并发连接,那么这个IP就是限速为limit_rate×3,在设置的时候要根据自己的需要做设置调整,要不然会达不到自己希望的目的。
Nginx对URL的跳转:
url跳转是指在访问特定的url时跳转到指定的页面。
server {
        listen 80;
        server_name node1;
        add_header X-Via $server_addr;
    location / {
        root /data/webapps/www;
        index index.html;
    location /bbs {
        rewrite /bbs/  /proxy/index.html break;
        proxy_pass http://172.16.18.1;
        }
        }
当你访问http://172.16.18.1/bbs;时会自动跳转到http://172.16.18.1/proxy; 可以看到请求到的状态码是304 Not Modified
![clipboard[13] clipboard[13]](http://img1.51cto.com/attachment/201409/25/7021142_1411666279lXII.png)
Nginx配置虚拟主机:
1,基于域名的访问:
http {
  server {
  listen 80;
  server_name www.aolens.com;
root /data/webapps/www;  index index.html;
  }
  server {
  listen 80;
  server_name web.aolens.com;
root /data/webapps/web;  index index.html;
  }
  }
![clipboard[14] clipboard[14]](http://img1.51cto.com/attachment/201409/25/7021142_1411666425wJt4.png)
2,基于端口的访问:
http {
server {
listen 80;
server_name www.aolens.com;
root /data/webapps/www;
index index.html;
}
server {
listen 8080;
server_name web.aolens.com;
root /data/webapps/web;
index index.html;
}  }
![clipboard[15] clipboard[15]](http://img1.51cto.com/attachment/201409/25/7021142_1411666860gGmo.png)
3,基于IP访问
http {
server {
listen 172.16.18.1:80;
server_name www.aolens.com;
root /data/webapps/www;
index index.html;
}
server {
listen:172.16.18.5:80;
server_name web.aolens.com;
root /data/webapps/web;
index index.html;
}  }
4,还可以基于端口IP来访问
http{
server {
  listen 172.16.18.3:80;
  server_name www.aolens.com;
  location / {
  root /usr/share/nginx/a;
  index index.html index.htm;
  }
server {
        listen 172.16.18.6:8080;
        server_name web.aolens.com;
        root /usr/share/nginx/b;
        index index.html index.htm;
}
}
[root@node3 conf.d]# curl http://172.16.18.3
  <h1>aaaaaaa</h1>
  [root@node3 conf.d]# curl http://172.16.18.6
  curl: (7) couldn't connect to host
  [root@node3 conf.d]# curl http://172.16.18.6:8080
  <h1>bbbbbbb</h1>
Nginx基于用户认证:
| 语法: | auth_basic string | off; |
| 默认值: | auth_basic off; |
| 上下文: | http, server, location, limit_except |
开启使用“HTTP基本认证”协议的用户名密码验证。 指定的参数被用作域。 参数off可以取消继承自上一个配置等级 auth_basic 指令的影响。
| 语法: | auth_basic string | off; |
| 默认值: | auth_basic off; |
| 上下文: | http, server, location, limit_except |
配置案例:
server {
  listen 80;
  server_name node1;
  add_header X-Via $server_addr;
  location / {
  auth_basic "Restricted";
  auth_basic_user_file /etc/nginx/.htpasswd;
  root /data/webapps/www;
  index index.html;
  location /bbs {
  rewrite /bbs /proxy/index.html break;
  proxy_pass http://172.16.18.1;
  }}
[root@node1 conf]# htpasswd -cm /etc/nginx/.htpasswd aolens                 为用户创建密码文件
  New password:
  Re-type new password:
  Adding password for user aolens
![clipboard[16] clipboard[16]](http://img1.51cto.com/attachment/201409/26/7021142_1411690345XRmI.png)
Nginx状态监控:
显示nginx的状态信息,没有http那么详细。简单一提
location /nginx_status {
stub_status on;
access_log off;
}
![clipboard[17] clipboard[17]](http://img1.51cto.com/attachment/201409/26/7021142_14116903472PTi.png)