Red Hat 5.5安装oracle 10G
一.学习的东西越多,越需要整理,于是就有诞生了该博客。作为第一篇博客,必须是oracle了,因为我要做DBA。废话不多说,搞起。
二.准备工作:10201_database_linux32.zip.
libXp-1.0.0-8.1.el5.i386.rpm(该包在镜像里有)
三.按照公司的需求,做的配置:
1.调整内核参数和安装rpm包:
root登录,在X-Windows下执行xhost + (设置Xserver访问权限)
echo 400000000 > /proc/sys/kernel/shmmax
source /etc/profile
rpm -ivh libXp-1.0.0-8.1.el5.i386.rpm
2.创建DBA组和Oracle用户:
groupadd dba
useradd oracle �Cg dba
passwd oracle
mkdir �Cp /home/oracle/product/1020
chown oracle.dba /home/oracle/product/1020
mkdir -p /home/oracle/tmp
chown oracle.dba /home/oracle/tmp
3.登录oracle,设置oracle环境变量 (以后变量在/etc/profile也要添加)
登陆oracle使用命令:su - oracle
vi .bash_profile
export ORACLE_BASE=/home/oracle
export ORACLE_HOME=/home/oracle/product/1020
export ORACLE_SID=orcl
export LD_LIBRARY_PATH=/lib:/usr/lib:$ORACLE_HOME/lib
export PATH=$PATH:$ORACLE_HOME/bin
export TMPDIR=/home/oracle/tmp
export NLS_LANG=AMERICAN_AMERICA.UTF8
export LANG=en_us.utf8
4.把10201_database_linux32.zip复制到/home/oracle目录中,并解压。(以下操作因为需要图形化操作,需在服务器端执行)
复制时使用命令: cp 10201_database_linux32.zip /home/oracle
解压时使用命令: unzip 10201_database_linux32.zip
登录oracle:su �C oracle
cd database
[oracle@localhost database]$ ./runInstaller
Starting Oracle Universal Installer...
Checking installer requirements...
Checking operating system version: must be redhat-3, SuSE-9, redhat-4, UnitedLinux-1.0, asianux-1 or asianux-2
Failed <<<<
Exiting Oracle Universal Installer, log for this session can be found at /tmp/OraInstall2014-11-21_12-31-14AM/installActions2014-11-21_12-31-14AM.log
出错了:oracle只支持AS4以下的系统,修改配置文件如下即可
vi /etc/redhat-release
Red Hat Enterprise Linux Server release 4 (Tikanga)
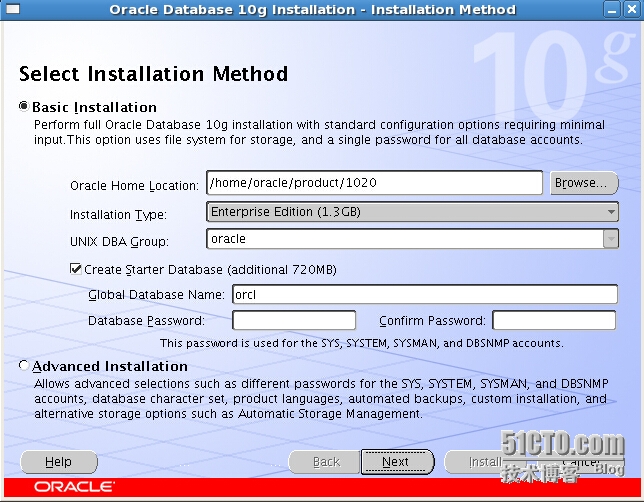
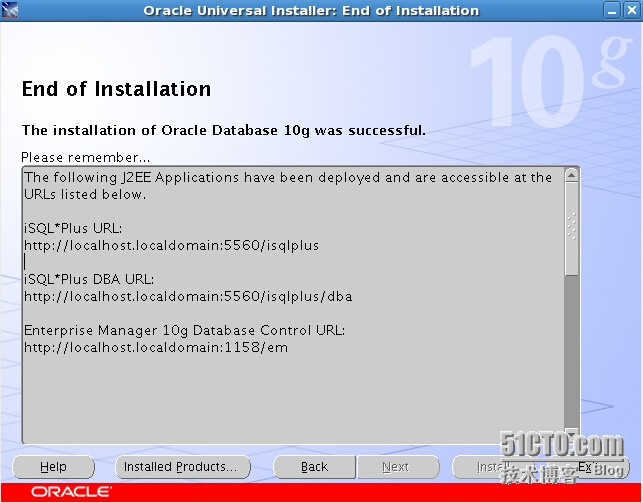
5.继续安装即可成功。安装比较简单,内核也没优化,后续还会有更详细的oracle安装记录。


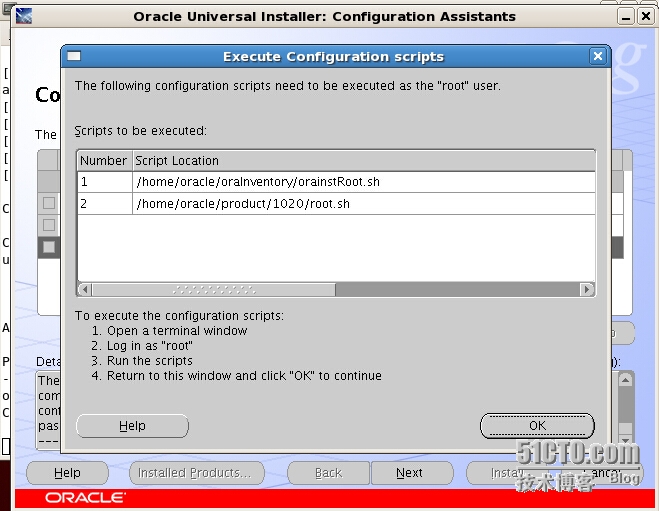
这一步需要用root用户执行该脚本:
[root@localhost oracle]# /home/oracle/oraInventory/orainstRoot.sh
Changing permissions of /home/oracle/oraInventory to 770.
Changing groupname of /home/oracle/oraInventory to oracle.
The execution of the script is complete
[root@localhost oracle]# /home/oracle/product/1020/root.sh
Running Oracle10 root.sh script...
The following environment variables are set as:
ORACLE_OWNER= oracle
ORACLE_HOME= /home/oracle/product/1020
Enter the full pathname of the local bin directory: [/usr/local/bin]:
Copying dbhome to /usr/local/bin ...
Copying oraenv to /usr/local/bin ...
Copying coraenv to /usr/local/bin ...
Creating /etc/oratab file...
Entries will be added to the /etc/oratab file as needed by
Database Configuration Assistant when a database is created
Finished running generic part of root.sh script.
Now product-specific root actions will be performed.

四.下面是我第一次安装出现的错误:
如果有这个错误,就是libXp-1.0.0-8.1.el5.i386.rpm包没安装。
[oracle@localhost database]$ ./runInstaller
Starting Oracle Universal Installer...
Checking installer requirements...
Checking operating system version: must be redhat-3, SuSE-9, redhat-4, UnitedLinux-1.0, asianux-1 or asianux-2
Passed
All installer requirements met.
Preparing to launch Oracle Universal Installer from /tmp/OraInstall2014-11-21_12-31-50AM. Please wait ...[oracle@localhost database]$ Exception in thread "main" java.lang.UnsatisfiedLinkError: /tmp/OraInstall2014-11-21_12-31-50AM/jre/1.4.2/lib/i386/libawt.so: libXp.so.6: cannot open shared object file: No such file or directory
at java.lang.ClassLoader$NativeLibrary.load(Native Method)
at java.lang.ClassLoader.loadLibrary0(Unknown Source)
at java.lang.ClassLoader.loadLibrary(Unknown Source)
at java.lang.Runtime.loadLibrary0(Unknown Source)
at java.lang.System.loadLibrary(Unknown Source)
at sun.security.action.LoadLibraryAction.run(Unknown Source)
at java.security.AccessController.doPrivileged(Native Method)
at sun.awt.NativeLibLoader.loadLibraries(Unknown Source)
at sun.awt.DebugHelper.<clinit>(Unknown Source)
at java.awt.Component.<clinit>(Unknown Source)
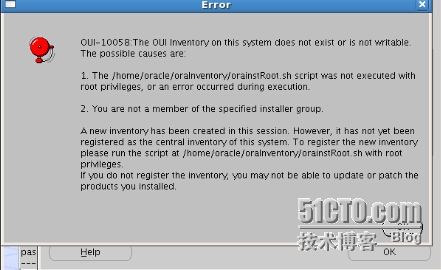
2.如果有下面问题,用root用户执行安装过程中出现的两个脚本。
/home/oracle/oraInventory/orainstRoot.sh
/home/oracle/product/1020/root.sh
