linux主机上编译安装rpcapd实现wireshark远程抓包功能
使用wireshark在远程linux系统抓包
简介
由于在做分布式HLR时,需要一边测试,一边抓取信令消息,而现在分布式HLR的系统都是采用linux,抓包可以使用tcpdump工具,不过感觉不是很方便。正好,之前的测试的同事,已经实现了使用笔记本上的wireshark远程抓包,而我以前对此没有做过了解,不是很懂,抽空在网上查了查资料,大概屡清楚了实现方法。实现远程抓包,主要借助winpacp这个软件中的rpcapd工具,这里就对在linux下的rpcapd工具的安装,使用和windows下的wireshark使用做简要介绍。
rpcapd原理非常简单:其是 Remote Packet Capture Daemon的缩写,这是winpacp软件附带的一个工具。它可以实现在本地linux系统下打开一个端口,接收监控端发送来的命令,来捕获本地的数据包,并通过网络传给监控端,这样wireshark就可以实现远程抓包。
测试环境:使用了和分布式HLR抓包时一样的环境,windows主机一台为真实宿主机,安装wireshark软件,linux主机两台,使用centos6.4 (DHLR使用的是RHEL6.5,这都没有关系,使用其他发行版本的linux也是一样的)为虚拟机实现,linux需要安装rpcapd工具,宿主机和虚拟机之间使用网络连接使用网卡的桥接模式,两台虚拟机之间的网卡使用自定义方式,连接到同一个vmnet。这样windows主机通过桥接的网卡连接到虚拟机1,然后抓取两台虚拟机之间的数据包即完成了远程抓包。
安装rpcapd
在centos自带的yum源中没找到和rpcapd相关的pacp的软件包,而且winpcap软件本来就是用于windows平台的程序,因此如果想在linux下使用远程抓包,就只能找到其源代码包来安装了。我们可以到http://www.winpcap.org/install/bin/WpcapSrc_4_1_3.zip这里下载最新的winpcap源代码包,到http://www.winpcap.org/docs/docs_412/html/group__remote.html这里查看相关的安装和使用的文档说明。
安装步骤:
将WpcapSrc压缩文件复制到任意目录下,通常放在/root目录下,然后使用unzip解压缩
[root@base ~]# unzip -a WpcapSrc_4_1_3.zip
Archive: WpcapSrc_4_1_3.zip
creating: winpcap/
inflating: winpcap/build_wpdpack.bat [text]
inflating: winpcap/build_wpdpack.txt [text]
…………………………
inflating: winpcap/wpcap/Win32-Extensions/Win32-Extensions.h [text]
可以发现在/root目录下会生成winpcap目录
[root@base ~]# ll /root/
total 89616
-rw-------. 1 root root 1013 Apr 13 2014 anaconda-ks.cfg
-rw-r--r--. 1 root root 19546 Apr 13 2014 install.log
-rw-r--r--. 1 root root 4670 Apr 13 2014 install.log.syslog
drwxr-xr-x. 9 root root 4096 Feb 28 2013 winpcap
-rwxr-xr-x. 1 root root 3833073 Nov 9 21:04 WpcapSrc_4_1_2.zip
-rwxr-xr-x. 1 root root 3834716 Nov 9 22:29 WpcapSrc_4_1_3.zip
进入到/root/winpcap/wpcap/libpcap/这个目录,给目录下的configure文件添加执行权限
[root@base libpcap]#cd /root/winpcap/wpcap/libpcap/
[root@base libpcap]# ll configure
-rw-r--r--. 1 root root 300261 Feb 28 2013 configure
[root@base libpcap]# chmod +x configure
[root@base libpcap]# ll configure
-rwxr-xr-x. 1 root root 300261 Feb 28 2013 configure
运行./configure来进行编译前检查及准备工作,并检查执行的结果中是否有错误
[root@base libpcap]# ./configure --prefix=/usr/local/winpcap --sysconfdir=/etc/winpcap
checking build system type... x86_64-unknown-linux-gnu
checking host system type... x86_64-unknown-linux-gnu
checking target system type... x86_64-unknown-linux-gnu
checking for gcc... gcc
…………..
config.status: creating Makefile
config.status: creating pcap-filter.manmisc
config.status: creating pcap-linktype.manmisc
config.status: creating pcap-savefile.manfile
config.status: creating pcap.3pcap
config.status: creating pcap_compile.3pcap
config.status: creating pcap_datalink.3pcap
config.status: creating pcap_dump_open.3pcap
config.status: creating pcap_list_datalinks.3pcap
config.status: creating pcap_open_dead.3pcap
config.status: creating pcap_open_offline.3pcap
config.status: creating config.h
运行make开始编译winpcap软件包并检查编译的输出中是否有错误
[root@base libpcap]# make
gcc -O2 -fPIC -I. -DHAVE_CONFIG_H -D_U_="__attribute__((unused))" -DHAVE_REMOTE -c ./pcap-linux.c
gcc -O2 -fPIC -I. -DHAVE_CONFIG_H -D_U_="__attribute__((unused))" -DHAVE_REMOTE -c ./pcap-usb-linux.c
gcc -O2 -fPIC -I. -DHAVE_CONFIG_H -D_U_="__attribute__((unused))" -DHAVE_REMOTE -c ./fad-getad.c
sed -e 's/.*/static const char pcap_version_string[] = "libpcap version &";/' ./VERSION > version.h
gcc -O2 -fPIC -I. -DHAVE_CONFIG_H -D_U_="__attribute__((unused))" -DHAVE_REMOTE -c ./pcap.c
gcc -O2 -fPIC -I. -DHAVE_CONFIG_H -D_U_="__attribute__((unused))" -DHAVE_REMOTE -c ./inet.c
gcc -O2 -fPIC -I. -DHAVE_CONFIG_H -D_U_="__attribute__((unused))" -DHAVE_REMOTE -c ./gencode.c
gcc -O2 -fPIC -I. -DHAVE_CONFIG_H -D_U_="__attribute__((unused))" -DHAVE_REMOTE -c ./optimize.c
gcc -O2 -fPIC -I. -DHAVE_CONFIG_H -D_U_="__attribute__((unused))" -DHAVE_REMOTE -c ./nametoaddr.c
gcc -O2 -fPIC -I. -DHAVE_CONFIG_H -D_U_="__attribute__((unused))" -DHAVE_REMOTE -c ./etherent.c
gcc -O2 -fPIC -I. -DHAVE_CONFIG_H -D_U_="__attribute__((unused))" -DHAVE_REMOTE -c ./savefile.c
rm -f bpf_filter.c
ln -s ./bpf/net/bpf_filter.c bpf_filter.c
gcc -O2 -fPIC -I. -DHAVE_CONFIG_H -D_U_="__attribute__((unused))" -DHAVE_REMOTE -c bpf_filter.c
gcc -O2 -fPIC -I. -DHAVE_CONFIG_H -D_U_="__attribute__((unused))" -DHAVE_REMOTE -c ./bpf_image.c
gcc -O2 -fPIC -I. -DHAVE_CONFIG_H -D_U_="__attribute__((unused))" -DHAVE_REMOTE -c ./bpf_dump.c
gcc -O2 -fPIC -I. -DHAVE_CONFIG_H -D_U_="__attribute__((unused))" -DHAVE_REMOTE -c scanner.c
gcc -O2 -fPIC -I. -DHAVE_CONFIG_H -D_U_="__attribute__((unused))" -DHAVE_REMOTE -Dyylval=pcap_lval -c grammar.c
sed -e 's/.*/char pcap_version[] = "&";/' ./VERSION > version.c
gcc -O2 -fPIC -I. -DHAVE_CONFIG_H -D_U_="__attribute__((unused))" -DHAVE_REMOTE -c version.c
gcc -O2 -fPIC -I. -DHAVE_CONFIG_H -D_U_="__attribute__((unused))" -DHAVE_REMOTE -c ./pcap-new.c
gcc -O2 -fPIC -I. -DHAVE_CONFIG_H -D_U_="__attribute__((unused))" -DHAVE_REMOTE -c ./pcap-remote.c
gcc -O2 -fPIC -I. -DHAVE_CONFIG_H -D_U_="__attribute__((unused))" -DHAVE_REMOTE -c ./sockutils.c
ar rc libpcap.a pcap-linux.o pcap-usb-linux.o fad-getad.o pcap.o inet.o gencode.o optimize.o nametoaddr.o etherent.o savefile.o bpf_filter.o bpf_image.o bpf_dump.o scanner.o grammar.o version.o pcap-new.o pcap-remote.o sockutils.o
ranlib libpcap.a
sed -e 's|@includedir[@]|/usr/local/winpcap/include|g' \
-e 's|@libdir[@]|/usr/local/winpcap/lib|g' \
-e 's|@DEPLIBS[@]||g' \
pcap-config.in >pcap-config.tmp
mv pcap-config.tmp pcap-config
chmod a+x pcap-config
进入到/root/winpcap/wpcap/libpcap/rpcapd/目录中,还需要使用make对rpcapd进行编译,编译后,该目录下就会生成rpcapd可执行文件,这就是实现远程抓包的程序,而且在编译winpcap时已经自动启用远程抓包的功能
[root@base libpcap]# cd /root/winpcap/wpcap/libpcap/rpcapd/
[root@base rpcapd]# make
gcc -pthread -DHAVE_REMOTE -DHAVE_SNPRINTF -I../ -c rpcapd.c
gcc -pthread -DHAVE_REMOTE -DHAVE_SNPRINTF -I../ -c daemon.c
daemon.c: In function ?.aemon_AuthUserPwd?.
daemon.c:684: warning: cast to pointer from integer of different size
gcc -pthread -DHAVE_REMOTE -DHAVE_SNPRINTF -I../ -c utils.c
gcc -pthread -DHAVE_REMOTE -DHAVE_SNPRINTF -I../ -c fileconf.c
gcc -pthread -DHAVE_REMOTE -DHAVE_SNPRINTF -I../ -c ../pcap-remote.c
gcc -pthread -DHAVE_REMOTE -DHAVE_SNPRINTF -I../ -c ../sockutils.c
gcc -pthread -DHAVE_REMOTE -DHAVE_SNPRINTF -I../ -c ../pcap-new.c
gcc -pthread -DHAVE_REMOTE -DHAVE_SNPRINTF -I../ -o rpcapd rpcapd.o daemon.o utils.o fileconf.o pcap-remote.o sockutils.o pcap-new.o -L../ -lpcap �Clcrypt
[root@base rpcapd]# ll rpcapd
-rwxr-xr-x. 1 root root 274673 Nov 9 23:19 rpcapd
将rpcapd程序的路径加入到环境变量PATH中
[root@base rpcapd]# export PATH=$PATH:/root/winpcap/wpcap/libpcap/rpcapd
[root@base rpcapd]#echo “export PATH=$PATH:/root/winpcap/wpcap/libpcap/rpcapd” >> /etc/profile
Rpcapd的使用
使用rpcapd �Ch可以查看命令的使用方法
[root@base rpcapd]# rpcapd -h
USAGE:
rpcapd [-b <address>] [-p <port>] [-6] [-l <host_list>] [-a <host,port>]
[-n] [-v] [-d] [-s <file>] [-f <file>]
-b<address>: the address to bind to (either numeric or literal).
Default: it binds to all local IPv4 addresses
-p<port>: the port to bind to. Default: it binds to port 2002
-4: use only IPv4 (default both IPv4 and IPv6 waiting sockets are used)
-l<host_list>: a file that keeps the list of the hosts which are allowed
to connect to this server (if more than one, list them one per line).
We suggest to use literal names (instead of numeric ones) in order to
avoid problems with different address families
-n: permit NULL authentication (usually used with '-l')
-a <host,port>: run in active mode when connecting to 'host' on port 'port'
In case 'port' is omitted, the default port (2003) is used
-v: run in active mode only (default: if '-a' is specified, it accepts
passive connections as well
-d: run in daemon mode (UNIX only) or as a service (Win32 only)
Warning (Win32): this switch is provided automatically when the service
is started from the control panel
-s <file>: save the current configuration to file
-f <file>: load the current configuration from file; all the switches
specified from the command line are ignored
-h: print this help screen
-b 指定rpcapd进程监听的IP地址,从别的本机地址进入的到rpcapd的请求,其是不会给予响应的。如果省略该选项,就表示rpcapd监听所有的本地ipv4的地址
-p 指定rpcapd进程监听的端口,默认是2002,可以省略。
-l 指定一个地址列表,允许哪些地址可以访问rpcapd进程
-n 不启用认证功能,任何主机都可以访问rpcapd进程
-d 以守护进程方式运行
通常只要使用rpcapd �Cn �Cd 即可启用进程
[root@base rpcapd]# rpcapd -n �Cd
另外还需要在远端的wireshark上稍作配置,即可开始远程抓包
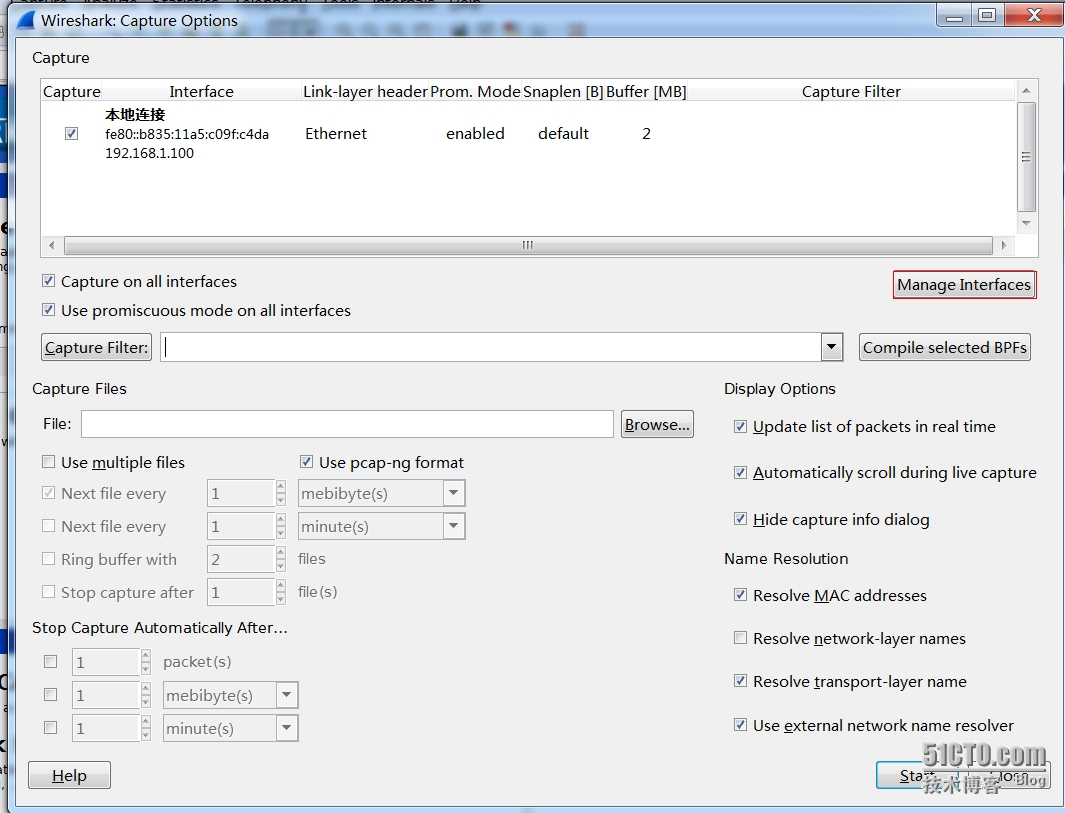
如图所示,选择Options选项

点击Manage Interfaces选项

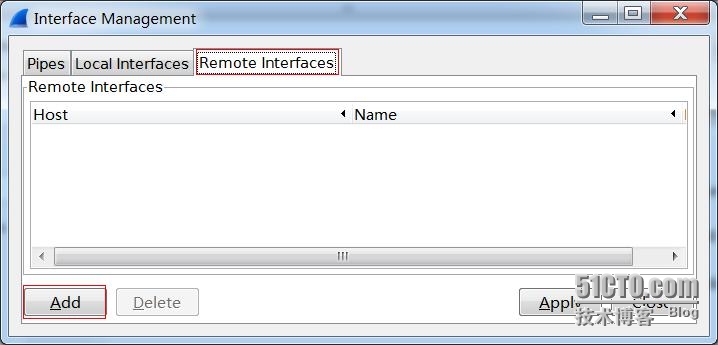
选择Remote Interfaces和Add选项

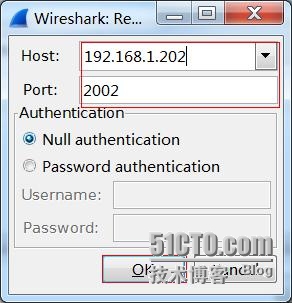
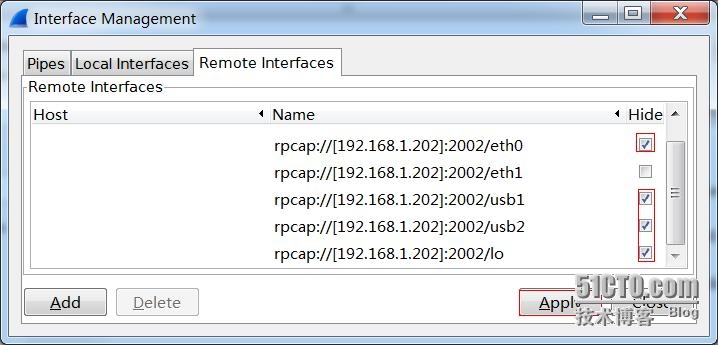
输入rpcapd端的ip地址和端口,点击OK,然后就会显示出远程所能监听的端口

最后选择屏蔽掉不抓包的端口,点击Apply即完成了远程抓包的设置。

然后我用icmp包来测试,远程抓包是成功的


至此,远程抓包就完成了,有一点需要注意,抓包过程可能会受到iptables的影响,在实验环境下,我将iptables都清空了,所以没有问题,在实际环境时,需要根据实际情况,放通tcp的2002端口即可。抓包结束后可以使用如下命令来结束rpcapd进程:
#killall -15 rpcapd