利用heartbeat的ldirectord实现ipvs的高可用集群构建
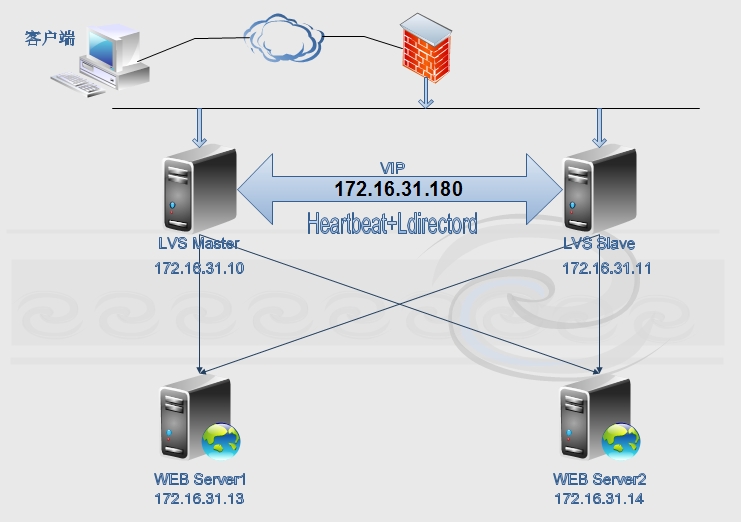
网络规划:
两台LVS server:(两台LVS也可以为用户提供错误页面)
node1:172.16.31.10
node2:172.16.31.11
VIP:172.16.31.180
ipvs规则内包含2台Real Server:(后面的RS指的就是后端的web服务器)
rs1:172.16.31.13
rs2:172.16.31.14
我们还需要错误页面提供者:我们选择LVS作为sorry server,所有的real server不可用时就指向这个sorry server。
一.配置HA集群前提:
1、节点之间时间必须同步;
建议使用ntp协议进行;
2、节点之间必须要通过主机名互相通信;
建议使用hosts文件;
通信中使用的名字必须与其节点为上“uname -n”命令展示出的名字保持一致;
3、如果是2个节点,需要仲裁设备;
4、节点之间彼此root用户能基于ssh密钥方式进行通信;
HA节点之间传递公钥:node1和node2配置,实现ssh无密钥通信
[root@node1 ~]# ssh-keygen -t  rsa  -P""
[root@node1 ~]# ssh-copy-id -i .ssh/id_rsa.pub root@node2
[root@node2 ~]# ssh-keygen -t rsa -P""
[root@node2 ~]# ssh-copy-id -i .ssh/id_rsa.pub root@node1
四个节点的hosts文件相同:
[root@node1 ~]# cat /etc/hosts
127.0.0.1  localhost localhost.localdomain localhost4 localhost4.localdomain4
::1        localhost localhost.localdomain localhost6 localhost6.localdomain6
172.16.0.1 server.magelinux.com server
172.16.31.10 node1.stu31.com node1
172.16.31.11 node2.stu31.com node2
172.16.31.13 rs1.stu31.com   rs1
172.16.31.14 rs2.stu31.com   rs2
HA节点间实现无密钥通信:测试时间一致
[root@node1 ~]# date;ssh node2 'date'
Sun Jan 4 17:57:51 CST 2015
Sun Jan 4 17:57:50 CST 2015
二.安装heartbeat
1.在LVS高可用集群安装heartbeat:
获取heartbeat程序包组:
[root@node1 heartbeat2]# ls
heartbeat-2.1.4-12.el6.x86_64.rpm
heartbeat-gui-2.1.4-12.el6.x86_64.rpm
heartbeat-stonith-2.1.4-12.el6.x86_64.rpm
heartbeat-ldirectord-2.1.4-12.el6.x86_64.rpm
heartbeat-pils-2.1.4-12.el6.x86_64.rpm
安装程序包组:
node1和node2都需要安装;
前提条件需要安装如下依赖包:
[root@node1 heartbeat2]# yum install -ynet-snmp-libs libnet PyXML
3.安装heartbeat套件程序:
[root@node1 heartbeat2]# rpm -ivh heartbeat-2.1.4-12.el6.x86_64.rpm heartbeat-stonith-2.1.4-12.el6.x86_64.rpm heartbeat-pils-2.1.4-12.el6.x86_64.rpm heartbeat-gui-
2.1.4-12.el6.x86_64.rpm heartbeat-ldirectord-2.1.4-12.el6.x86_64.rpm
error: Failed dependencies:
       ipvsadm is needed by heartbeat-ldirectord-2.1.4-12.el6.x86_64
       perl(Mail::Send) is needed by heartbeat-ldirectord-2.1.4-12.el6.x86_64
有依赖关系,解决依赖关系:node1和node2都安装
# yum -y install ipvsadm perl-MailTools perl-TimeDate
再次安装:
# rpm -ivh heartbeat-2.1.4-12.el6.x86_64.rpm heartbeat-stonith-2.1.4-12.el6.x86_64.rpm heartbeat-pils-2.1.4-12.el6.x86_64.rpm heartbeat-gui-2.1.4-12.el6.x86_64.rpm
heartbeat-ldirectord-2.1.4-12.el6.x86_64.rpm
Preparing...                ###########################################[100%]
  1:heartbeat-pils        ########################################### [ 20%]
  2:heartbeat-stonith     ########################################### [ 40%]
  3:heartbeat             ########################################### [ 60%]
  4:heartbeat-gui         ########################################### [ 80%]
  5:heartbeat-ldirectord  ########################################### [100%]
安装完成!
查看ldirectord生成的文件:
[root@node1 heartbeat2]# rpm -ql heartbeat-ldirectord
/etc/ha.d/resource.d/ldirectord
/etc/init.d/ldirectord
/etc/logrotate.d/ldirectord
/usr/sbin/ldirectord
/usr/share/doc/heartbeat-ldirectord-2.1.4
/usr/share/doc/heartbeat-ldirectord-2.1.4/COPYING
/usr/share/doc/heartbeat-ldirectord-2.1.4/README
/usr/share/doc/heartbeat-ldirectord-2.1.4/ldirectord.cf
/usr/share/man/man8/ldirectord.8.gz
存在模版配置文件。
ldirectord会自动检查后端Real Server的健康状态,实现按需添加或删除RS,还能定义sorry server;无需ipvsadm在LVS Server上定义,而是通过编辑ldirectord的配置文件来生成ipvs规则,因此,定义集群服务,添加RS都在配置文件中指定,而无须手动指向ipvsadm命令。
不用启动ipvs.
三.heartbeat配置:
1.系统日志记录heartbeat日志
[root@node1 ha.d]# vim /etc/rsyslog.conf
#添加如下行:
local0.*                                               /var/log/heartbeat.log
拷贝一份到node2:
[root@node1 ha.d]# scp /etc/rsyslog.confnode2:/etc/rsyslog.conf
2.拷贝配置文件模版到/etc/ha.d目录
[root@node1 ha.d]# cd /usr/share/doc/heartbeat-2.1.4/
[root@node1 heartbeat-2.1.4]# cp authkeysha.cf /etc/ha.d/
主配置文件:
[root@node1 ha.d]# grep -v ^#  /etc/ha.d/ha.cf
logfacility     local0
mcast eth0 225.231.123.31 694 1 0
auto_failback on
node   node1.stu31.com
node   node2.stu31.com
ping 172.16.0.1
crm on
认证文件:
[root@node1 ha.d]# vim authkeys
auth 2
2    sha1   password
权限必须是600或者400:
[root@node1 ha.d]# chmod 600 authkeys
将主配置文件和认证文件拷贝到node2
[root@node1 ha.d]# scp authkeys ha.cf node2:/etc/ha.d/
authkeys                                      100%  675    0.7KB/s   00:00
ha.cf                                        100%   10KB  10.4KB/s  00:00
[root@node1 ha.d]#
四.配置RS Server:即WEB服务器
1.提供了一个脚本:
[root@rs1 ~]# cat rs.sh
#!/bin/bash
vip=172.16.31.180
interface="lo:0"
case $1 in
start)
       echo 2 > /proc/sys/net/ipv4/conf/all/arp_announce
       echo 2 > /proc/sys/net/ipv4/conf/lo/arp_announce
       echo 1 > /proc/sys/net/ipv4/conf/lo/arp_ignore
       echo 1 > /proc/sys/net/ipv4/conf/all/arp_ignore

       ifconfig $interface $vip broadcast $vip netmask 255.255.255.255  up
       route add -host $vip dev $interface
       ;;
stop)
       echo 0 > /proc/sys/net/ipv4/conf/all/arp_announce
       echo 0 > /proc/sys/net/ipv4/conf/lo/arp_announce
       echo 0 > /proc/sys/net/ipv4/conf/lo/arp_ignore
       echo 0 > /proc/sys/net/ipv4/conf/all/arp_ignore

       ifconfig $interface  down
       ;;
status)
       if ficonfig lo:0 |grep $vip &>/dev/null; then
                echo "ipvs isrunning."
       else
                echo "ipvs isstopped."
       fi
       ;;
*)
       echo "Usage 'basename $0 start|stop|status"
       exit 1
       ;;
esac
在两台RS 上执行启动。
保证RS能提供WEB服务:
[root@rs1 ~]# echo "rs1.stu31.com" > /var/www/html/index.html
[root@rs2 ~]# echo "rs2.stu31.com" > /var/www/html/index.html
启动httpd服务测试:
[root@rs1 ~]# service httpd start
Starting httpd:                                           [  OK  ]
[root@rs1 ~]# curl http://172.16.31.13
rs1.stu31.com
[root@rs2 ~]# service httpd start
Starting httpd:                                           [  OK  ]
[root@rs2 ~]# curl http://172.16.31.14
rs2.stu31.com
测试完成后就将httpd服务停止,关闭自启动:
# service httpd stop
# chkconfig httpd off
RS就设置好了。
五.下面开始配置LVS的高可用集群:
1.手动配置好lvs-dr负载均衡集群:
[root@node1 ~]# ifconfig eth0:0 172.16.31.180 broadcast 172.16.31.180 netmask 255.255.255.255 up
[root@node1 ~]# route add -host 172.16.31.180 dev eth0:0
[root@node1 ~]# ipvsadm -C
[root@node1 ~]# ipvsadm -A -t 172.16.31.180:80 -s rr
[root@node1 ~]# ipvsadm -a -t 172.16.31.180:80 -r 172.16.31.13 -g
[root@node1 ~]# ipvsadm -a -t 172.16.31.180:80 -r 172.16.31.14 -g
[root@node1 ~]# ipvsadm -L -n
IP Virtual Server version 1.2.1 (size=4096)
Prot LocalAddress:Port Scheduler Flags
 -> RemoteAddress:Port          Forward Weight ActiveConn InActConn
TCP 172.16.31.180:80 rr
 -> 172.16.31.13:80             Route   1      0         0
 -> 172.16.31.14:80             Route   1      0         0
2.访问测试:
[root@nfs ~]# curl http://172.16.31.180
rs2.stu31.com
[root@nfs ~]# curl http://172.16.31.180
rs1.stu31.com
负载均衡实现了:
[root@node1 ~]# ipvsadm -L -n
IP Virtual Server version 1.2.1 (size=4096)
Prot LocalAddress:Port Scheduler Flags
 -> RemoteAddress:Port          Forward Weight ActiveConn InActConn
TCP 172.16.31.180:80 rr
 -> 172.16.31.13:80             Route   1      0         1
 -> 172.16.31.14:80             Route   1      0         1
在节点上清除配置的规则:
[root@node1 ~]# ipvsadm -C
[root@node1 ~]# route del -host 172.16.31.180
[root@node1 ~]# ifconfig eth0:0 down
第二个LVS Server也同样测试一遍,测试成功后清除配置的规则。
3.在LVS上设置错误页面:配置LVS为sorry server,为用户提供错误提示页
[root@node1 ~]# echo "sorry page fromlvs1" > /var/www/html/index.html
[root@node2 ~]# echo "sorry page fromlvs2" > /var/www/html/index.html
启动web服务测试错误页面正常:
[root@node1 ha.d]# service httpd start
Starting httpd:                                           [  OK  ]
[root@node1 ha.d]# curl http://172.16.31.10
sorry page from lvs1
[root@node2 ~]# service httpd start
Starting httpd:                                           [  OK  ]
[root@node2 ~]# curl http://172.16.31.11
sorry page from lvs2
4.将LVS的两个节点配置为HA集群:
拷贝ldirectord软件安装后的配置文件模版:
[root@node1 ~]# cd  /usr/share/doc/heartbeat-ldirectord-2.1.4/
[root@node1 heartbeat-ldirectord-2.1.4]# ls
COPYING ldirectord.cf  README
[root@node1 heartbeat-ldirectord-2.1.4]# cp  ldirectord.cf /etc/ha.d
[root@node1 ha.d]# grep -v ^#  /etc/ha.d/ldirectord.cf
#检测超时
checktimeout=3
#检测间隔
checkinterval=1
#重新载入客户机
autoreload=yes
#real server 宕机后从lvs列表中删除,恢复后自动添加进列表
quiescent=yes
#监听VIP地址80端口
virtual=172.16.31.180:80
       #真正服务器的IP地址和端口,路由模式
       real=172.16.31.13:80 gate
       real=172.16.31.14:80 gate
       #如果RS节点都宕机,则回切到本地环回口地址
       fallback=127.0.0.1:80 gate
       #服务是http
       service=http
       #保存在RS的web根目录并且可以访问,通过它来判断RS是否存活
       request=".health.html"
       #网页内容
       receive="OK"
       #调度算法
       scheduler=rr
       #persistent=600
       #netmask=255.255.255.255
       #检测协议
       protocol=tcp
       #检测类型
       checktype=negotiate
       #检测端口
       checkport=80
我们需要指定这个健康检查页面,在后端RS server上配置:
[root@rs1 ~]# echo "OK" > /var/www/html/.health.html
[root@rs2 ~]# echo "OK" > /var/www/html/.health.html
复制一份ldirectord.cf配置文件到node2:
[root@node1 ha.d]# scp ldirectord.cf node2:/etc/ha.d/
ldirectord.cf                                 100% 7553     7.4KB/s  00:00
启动heartbeat服务:
[root@node1 ha.d]# service heartbeat start;ssh node2 'service heartbeat start'
Starting High-Availability services:
Done.

Starting High-Availability services:
Done.
查看监听端口:
[root@node1 ha.d]# ss -tunl |grep 5560
tcp   LISTEN     0      10                     *:5560                  *:*
六.资源配置
需要对heartbeat图形界面登录用户授权加密:node2也需要设置密码。
[root@node1 ~]# echo oracle |passwd --stdin  hacluster
Changing password for user hacluster.
passwd: all authentication tokens updatedsuccessfully.
进入图形化配置端配置资源:
输入如下指令:需要桌面支持。
#hb_gui &
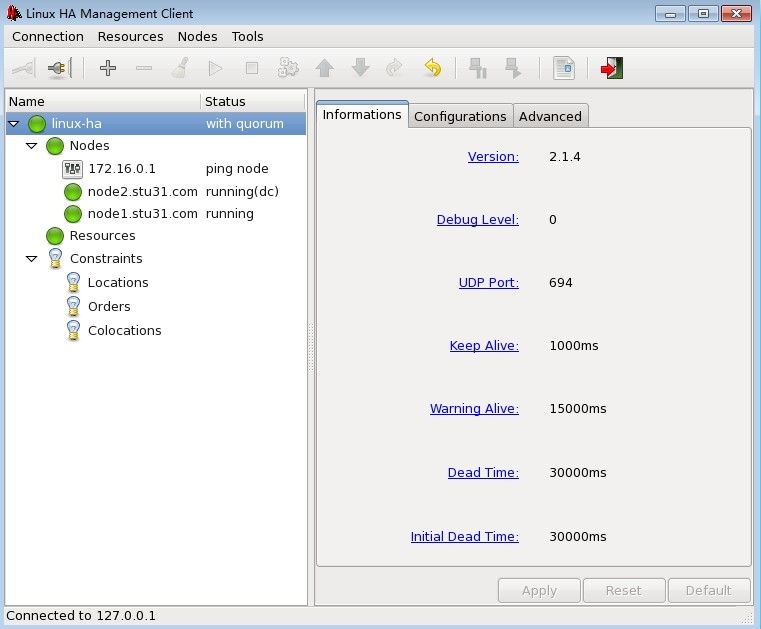
配置集群资源组:新建资源组
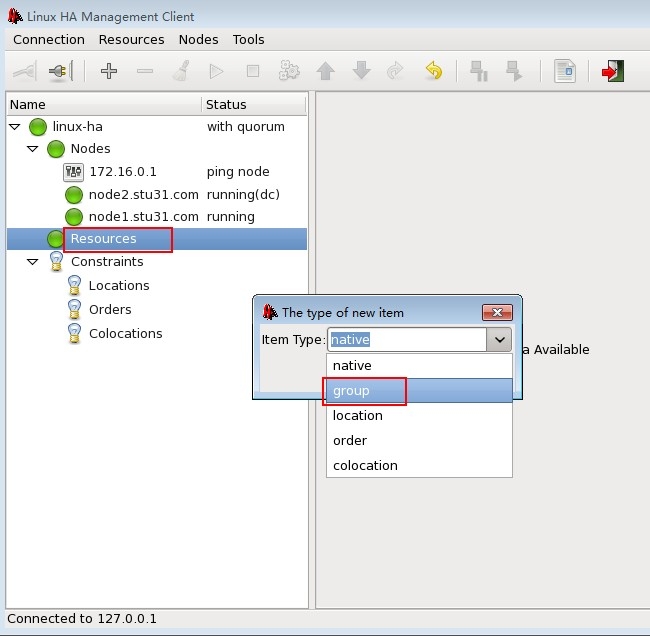
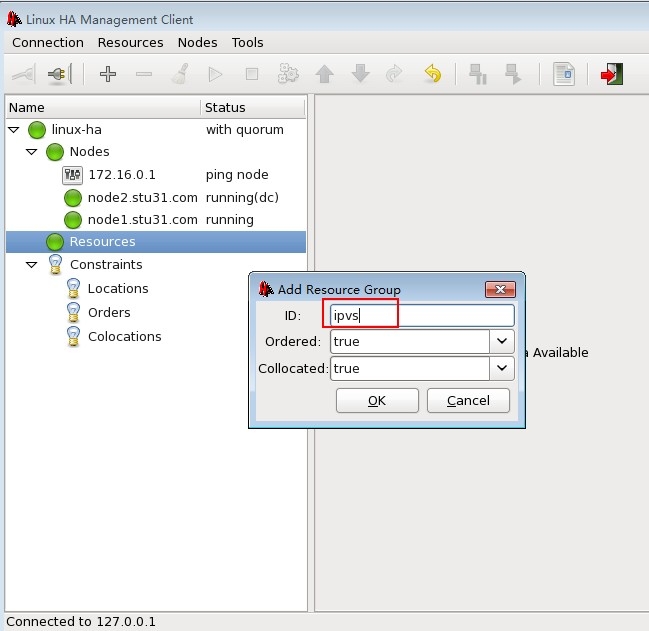
新建资源,VIP的定义:
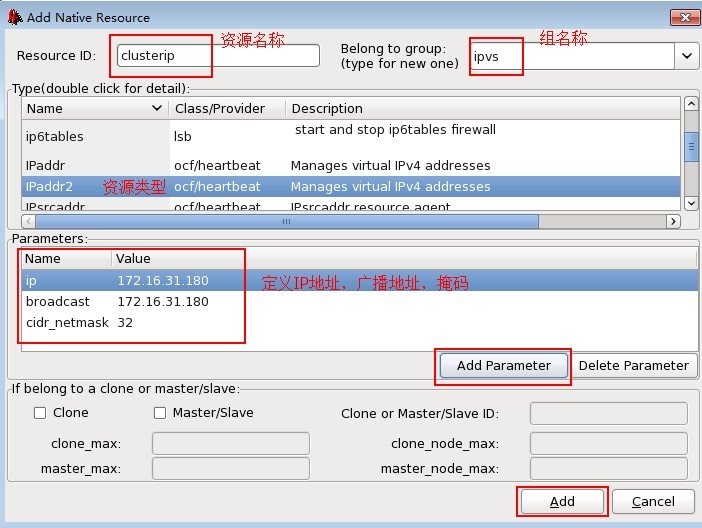
添加新资源:
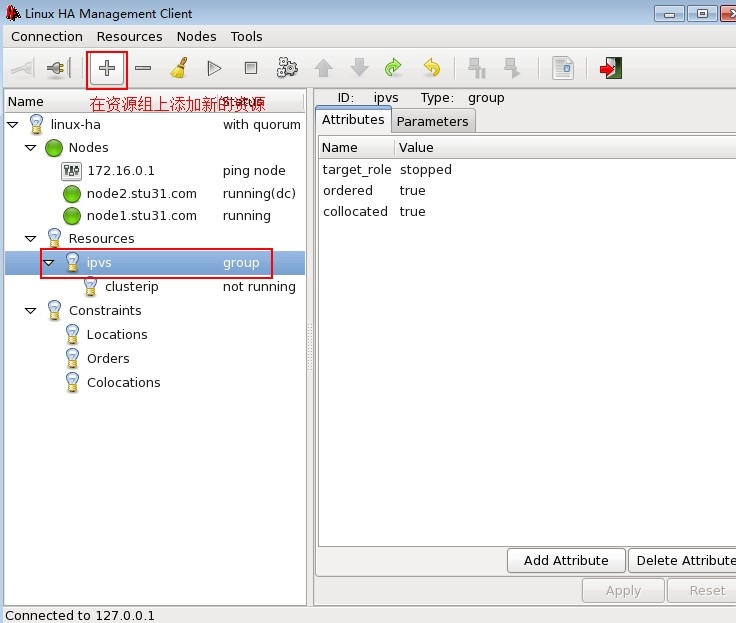

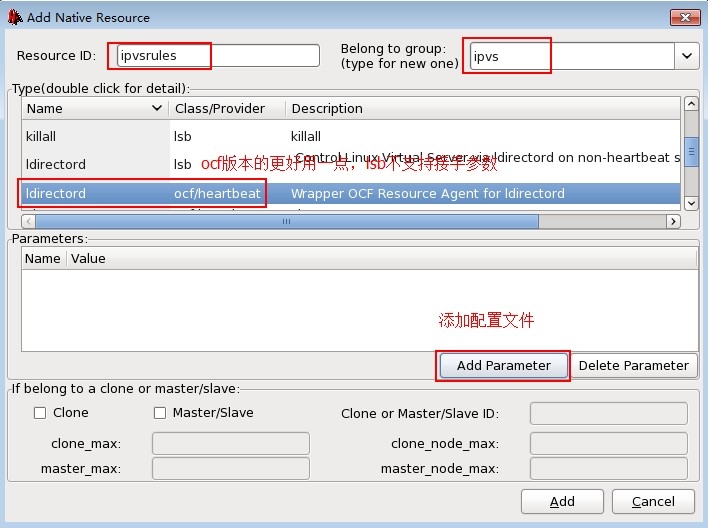
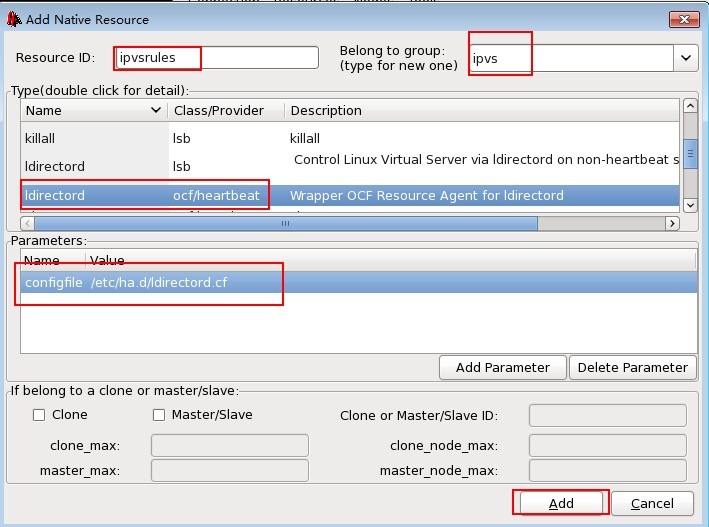
新建一个ipvs规则的资源:
注意ldirecotord.cf这个配置文件在哪个目录:
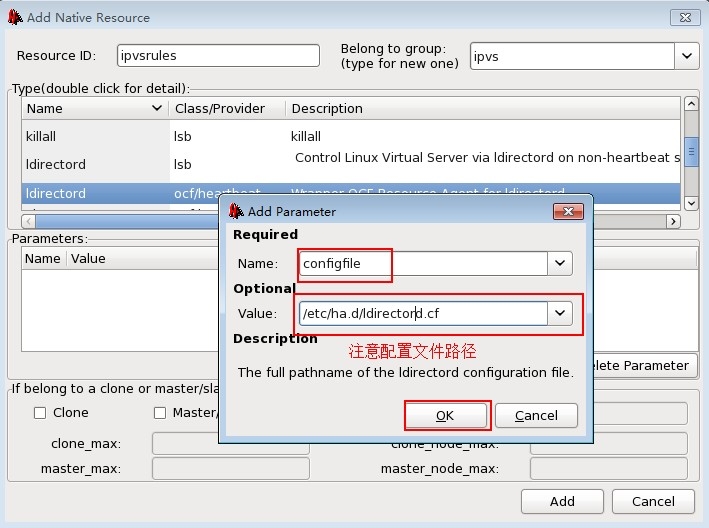
添加完成后就add:
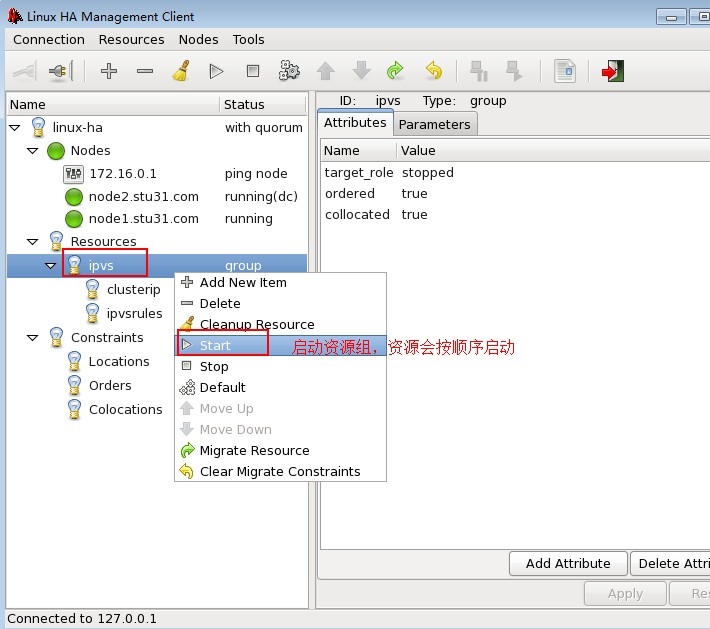
定义完成后就启动资源组ipvs:
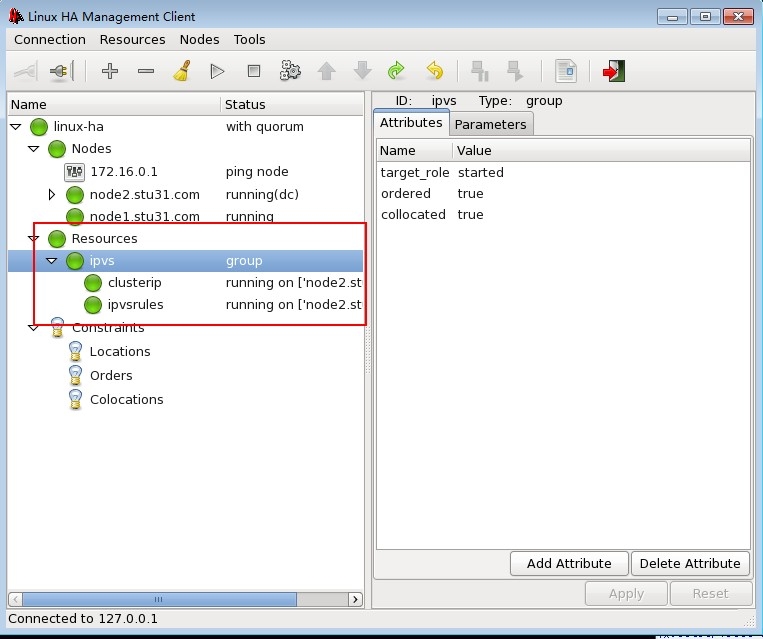
现在资源启动于node2:
七.测试集群
我们去客户端请求两次:
[root@nfs ~]# curl http://172.16.31.180
rs2.stu31.com
[root@nfs ~]# curl http://172.16.31.180
rs1.stu31.com
到node2上查看负载均衡状态信息:
[root@node2 ~]# ipvsadm -L -n
IP Virtual Server version 1.2.1 (size=4096)
Prot LocalAddress:Port Scheduler Flags
 -> RemoteAddress:Port          Forward Weight ActiveConn InActConn
TCP 172.16.31.180:80 rr
 -> 172.16.31.13:80             Route   1      0         1
 -> 172.16.31.14:80             Route   1      0         1
我们将后端两台RS服务器的web健康监测页面改名后查看效果:
[root@rs1 ~]# cd /var/www/html/
[root@rs1 html]# mv .health.html a.html
[root@rs2 ~]# cd /var/www/html/
[root@rs2 html]# mv .health.html a.html
使用客户端访问:
[root@nfs ~]# curl http://172.16.31.180
sorry page from lvs2
集群判断后端的RS都宕机了,就决定启用错误页面的web服务器,返回错误信息给用户。
在节点2上查看负载均衡状态信息:
[root@node2 ~]# ipvsadm -L -n
IP Virtual Server version 1.2.1 (size=4096)
Prot LocalAddress:Port Scheduler Flags
 -> RemoteAddress:Port          Forward Weight ActiveConn InActConn
TCP 172.16.31.180:80 rr
 -> 127.0.0.1:80                Local   1      0         1
 -> 172.16.31.13:80             Route   0      0         0
 -> 172.16.31.14:80             Route   0      0         0
将错误的RS服务器权重设置为0,将本地httpd服务的权重设为1.
我们再复原:
[root@rs1 html]# mv a.html .health.html
[root@rs2 html]# mv a.html .health.html
访问测试:
[root@nfs ~]# curl http://172.16.31.180
rs2.stu31.com
[root@nfs ~]# curl http://172.16.31.180
rs1.stu31.com
查看负载均衡状态信息:
[root@node2 ~]# ipvsadm -L -n
IP Virtual Server version 1.2.1 (size=4096)
Prot LocalAddress:Port Scheduler Flags
 -> RemoteAddress:Port          Forward Weight ActiveConn InActConn
TCP 172.16.31.180:80 rr
 -> 172.16.31.13:80             Route   1      0         1
 -> 172.16.31.14:80             Route   1      0         1
测试成功。
进行节点切换测试:
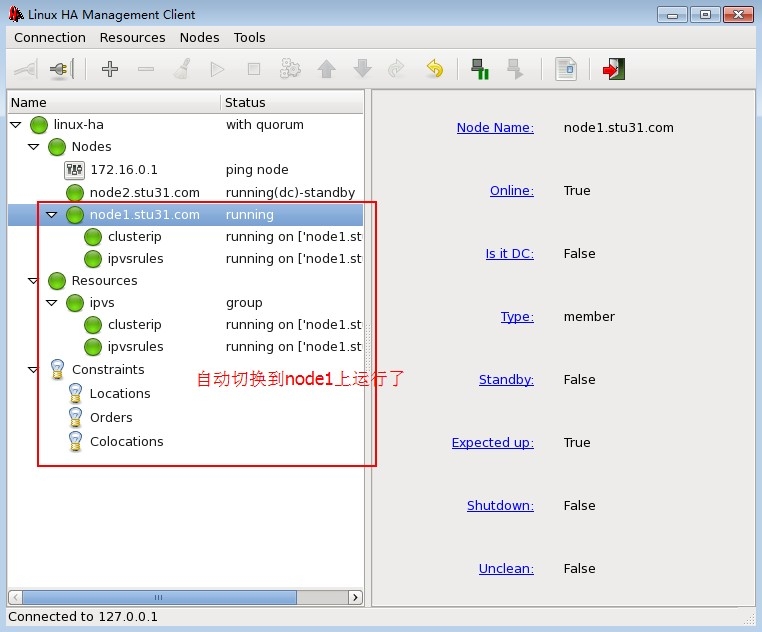
将节点2设置为standby,备用节点。
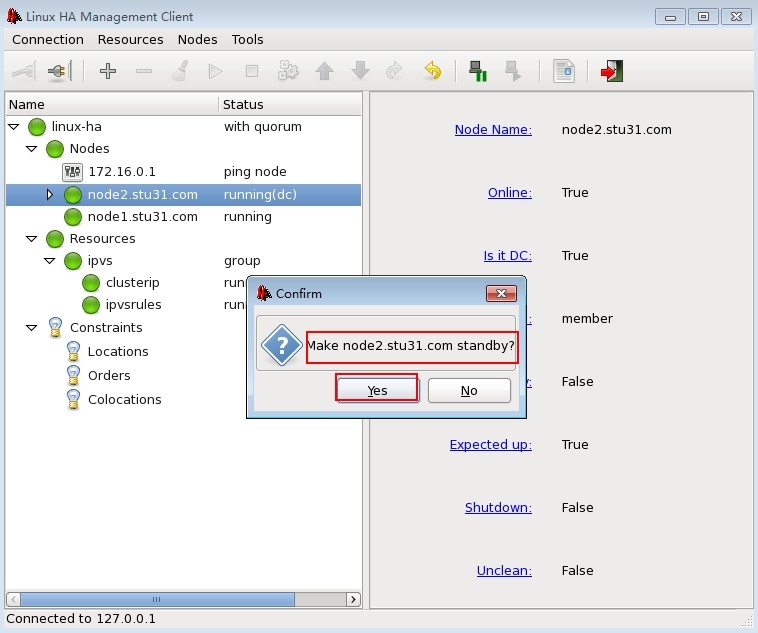
点击yes后,主节点就到node1启动了:
进行访问测试:
[root@nfs ~]# curl http://172.16.31.180
rs2.stu31.com
[root@nfs ~]# curl http://172.16.31.180
rs1.stu31.com
到节点1查看负载均衡状态:
[root@node1 ~]# ipvsadm -L -n
IP Virtual Server version 1.2.1 (size=4096)
Prot LocalAddress:Port Scheduler Flags
 -> RemoteAddress:Port          Forward Weight ActiveConn InActConn
TCP 172.16.31.180:80 rr
 -> 172.16.31.13:80             Route   1      0         1
 -> 172.16.31.14:80             Route   1      0         1
至此,使用heartbeat的ldirectord组件构建ipvs负载均衡集群的高可用性集群就搭建完毕,可以实现集群对后端RS的监控。