kickstart无人值守tftp+dhcp+nfs
kickstart <--- 无人值守
1. 安装源
2. dhcpd 服务
3. 数据共享服务 ( nfs , ftp , http )
4. tftp
5. 无人值守脚本
===============================
基础知识
主机启动定义步骤
选择启动过程 --> bios 选择
\---> floopy, hard disk, cdrom, usb, network
network ---> ethernet card
\----> boot rom --> 支持 pxe 启动 --> 远程网络安装
2. 安装源
$CDROM
\--> Server <- 公共安装包
\--> Cluster <- 集群套装
\--> ClusterStorage <- 集群存储套装
\--> VT <- 虚拟机 ( 淘汰产品 )
-----------把上述目录连同子目录复制到某个固定位置----------------
$CDROM
\---> isolinux
\--> isolinux.cfg ( 等同 安装启动脚本定义配置 )
配置启动参数
\--> *.msg <- 启动时候菜单描述
\--> vmlinuz 内核
\--> initrd.img 驱动
label linux <- 标签命名
kernel vmlinuz <- 安装专用内核
append initrd=initrd.img <- 虚拟 SISC 驱动
label text <- 标签命名
kernel vmlinuz
append initrd=initrd.img text <- text ( 内核启动参数 )
$CDROM
\---> images
\--> diskboot.img <- USB 启动镜像
\--> boot.iso <- cdrom
dd if=diskboot.img of=/dev/sdb <- usb disk
-------------------------------------------------------
dhcpd 配置
软件包 dhcp
cp /usr/share/doc/dhcp-3.0.5/dhcpd.conf.sample /etc/dhcpd.conf
next-server 10.1.1.8; <- 安装服务器在那里,提供 tftp 服务
##############################
ddns-update-style interim;
ignore client-updates;
subnet 10.1.1.0 netmask 255.255.255.0 {
option routers 10.1.1.1;
option subnet-mask 255.255.255.0;
option nis-domain "cluster.com";
option domain-name "cluster.com";
option domain-name-servers 10.1.1.1;
option time-offset 8000;
option ntp-servers 10.1.1.1;
option netbios-name-servers 10.1.1.1;
allow bootp;
allow booting;
next-server 10.1.1.8; <-告诉客户机获取ip后,需要指向的TFTP服务器
filename "/pxelinux.0"; <- 指定从 tftp 下载的文件名
range dynamic-bootp 10.1.1.100 10.1.1.120;
default-lease-time 21600;
max-lease-time 43200;
host myclient {
hardware ethernet 00:0c:29:7c:40:dd;
fixed-address 10.1.1.154;
}
}
##############################
tftp 配置
yum install -y tftp-server
vi /etc/xinetd.d/tftp
service tftp
{
socket_type = dgram
protocol = udp
wait = yes
user = root
server = /usr/sbin/in.tftpd
server_args = -t -s -v /tftpboot #tftp服务器共享目录 -c 默认不允许上传非共享目录中的文件,所以加上参数c就可以上传
disable = no # no 为开启服务
per_source = 11
cps = 100 2
flags = IPv4
}
#### /tftpboot 系统目录并且包含了 filename --> pxelinux.0
cp /tftpboot/linux-install/pxelinux.0 /tftpboot/
mkdir /tftpboot/pxelinux.cfg
cp /share/rhel_source/isolinux/* /tftpboot/
mv /tftpboot/isolinux.cfg /tftpboot/pxelinux.cfg/default
chmod 777 -R /tftpboot/
修改default 文件
default linux
prompt 1
timeout 6 #客户机获取ip后寻找服务器的时间
display boot.msg
F1 boot.msg
F2 options.msg
F3 general.msg
F4 param.msg
F5 rescue.msg
label linux
kernel vmlinuz
append initrd=initrd.img ks=nfs:192.168.233.129:/tftpboot/ks.cfg
default label 这2个选项默认相同
service xinetd restart
--->pxelinux.0 文件 --> pxe 启动网卡驱动
测试tftp服务器
客户机 tftp 10.1.1.1
tftp>get 下载 put 上传
##############################
nfs 服务
可以直接mount /dev/cdrom /mnt
vim /etc/exports
/mnt/ 10.1.1.0/255.255.255.0(ro) #共享出系统安装源
/tftpboot/ 10.1.1.0/255.255.255.0(ro) #共享出ks.cfg
service nfs start/restart
一般是将安装源文件拷贝到本地目录然后 将此目录共享出来,一般ks.cfg也一并放入里面
注意:
(1)客户端测试:首先检查网络是否ping通服务器,showmount -e 服务器ip地址
(2)服务器:portmap和nfs服务是否都启动
iptables是否关闭
在服务器端使用rpcinfo检查:rpcinfo –p server_ip
100000 2 tcp 111 portmapper
100000 2 udp 111 portmapper
##############################
无人值守脚本
yum install -y system-config-kickstart
建立本地的 yum 源
1. 首先本地具有安装源
example : /share/rhel_source
2. 配置 /etc/yum.repos.d/rhel-debuginfo.repo (指定安装源)
[Cluster]
name=Red Hat Enterprise
#baseurl=ftp://10.1.1.1/Cluster
baseurl=file:///share/rhel_souece/Cluster
enabled=1
gpgcheck=0
[ClusterStorage]
name=Red Hat Enterprise ClusterStorage
#baseurl=ftp://10.1.1.1/ClusterStorage
baseurl=file:///share/rhel_souece/ClusterStorage
enabled=1
gpgcheck=0
[base]
name=Red Hat Enterprise Server
#baseurl=ftp://10.1.1.1/Server
baseurl=file:///share/rhel_souece/Server
enabled=1
gpgcheck=0
[VT]
name=Red Hat Enterprise Linux $releasever - $basearch - VT
#baseurl=ftp://10.1.1.1/VT
baseurl=file:///share/rhel_souece/VT
enabled=1
gpgcheck=0
完成后清除缓存
yum clean all
测试
yum list
能够发现有 base 数据包
#############################
终端执行system-config-kickstart 进行图形化安装
配置完后
\- 建立脚本, 并学习编译 postscript
\-> 把自己的 IP 地址与主机名添加到 /etc/hosts
定义一个永久的主机名字
定义永久的 IP 地址
保存信息 /root/ks.cfg
cp /root/ks.cfg /tftpboot/ks.cfg
要执行启动当前脚本必须修改 /tftpboot/pxelinux.cfg/default
跳过安装时候的序列号信息
vi /share/rhel_source/ks.cfg
auth --useshadow --enablemd5
key --skip <- 忽略序列号输入
############################
最后重启服务
service iptables stop
srevice dhcpd restart
service xinetd restart
service nfs restart
进行自动安装时出现的错误
1.无法找到tftp
一直显示tftp......
虚拟机实验中无法获取dhcp,无法找到tftp,将虚拟机默认的dhcp服务器关闭,网络连接模式改为“桥接“
2.提示boot:符号停止不前
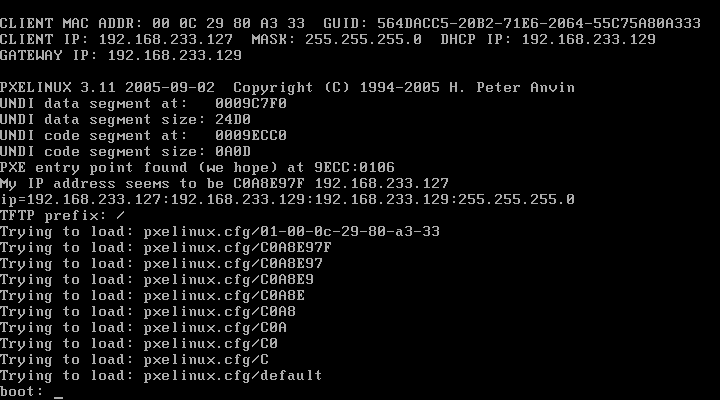
/tftp/pxelinux.cdf/default 文件问题,直接采用模板isolinux.cfg pxelinux.cfg复制
只修改需要修改的地方
3.客户机启动过程中,出现错误提示如下:
That directory dose not seem to contain a red hat Enterpricse Linux Server installation tree.
nfs挂载安装源问题,默认是拷贝到系统中某个文件下 ,再挂载出来,但是没有成功,所以直接mount /dev/cdrom /mnt 然后将/mnt挂载出来