LAMP(扩展)解决单台服务器上限
首先说下试验需求
目前有单台的LAMP,但是网站需求量增大单台已经无法满足需求了,所以我们需要在增加一台服务器来提高网站需求量:
试验拓扑图如下:
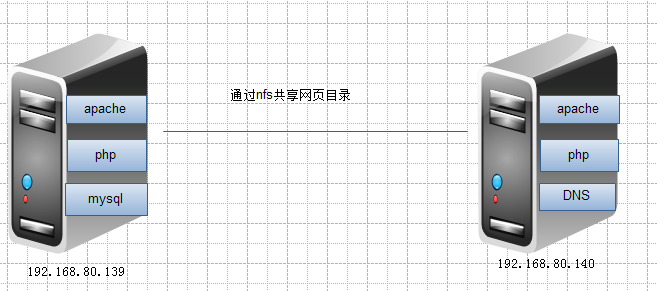
注:应为没有公网解析,所以就将DNS服务器做在了新增机器上,这里使用的是两台RHEL5.8的虚拟机,本机IP是192.168.80.1
实施步骤:
配置yum,安装好编译环境,selinux关闭
1、配置DNS解析:
1)首先卸载本机的DNS,这里安装bind97的
- # yum -y remove bind-utils bind-libs
- # yum -y install bind97 bind97-utils bind97-libs
- # vim /etc/named.conf
- ……
- options {
- listen-on port 53 { any; };
- directory "/var/named";
- dump-file "/var/named/data/cache_dump.db";
- statistics-file "/var/named/data/named_stats.txt";
- memstatistics-file "/var/named/data/named_mem_stats.txt";
- allow-query { any; };
- recursion yes;
- };
- ……
- # vim /etc/named.rfc1912.zones
- zone "peace.com" IN {
- type master;
- file "peace.com.zone";
- };
- zone "168.192.in-addr.arpa" IN {
- type master;
- file "192.168.zone";
- };
- # vim /var/named/peace.com.zone
- $TTL 600
- $ORIGIN peace.com.
- @ IN SOA ns.peace.com. admin.peace.com. (
- 2012071501
- 1H
- 10M
- 7D
- 3H )
- IN NS ns
- ns IN A 192.168.80.139
- ns IN A 192.168.80.140
- www IN A 192.168.80.139
- www IN A 192.168.80.140
- # vim /var/named/192.168.zone
- $TTL 600
- @ IN SOA ns.peace.com. admin.peace.com. (
- 2012071501
- 1H
- 10M
- 7D
- 3H )
- IN NS ns.peace.com.
- 80.139 IN PTR ns.peace.com.
- 80.140 IN PTR ns.peace.com.
- 80.139 IN PTR www.peace.com.
- 80.140 IN PTR www.peace.com.
2)修改权限
- # cd /var/named/
- # chown .named peace.com.zone 192.168.zone
- # chmod 644 peace.com.zone 192.168.zone
3)启动服务,指定DNS服务器
- # service named restart
- # vim /etc/resolv.conf
- nameserver 192.168.80.140
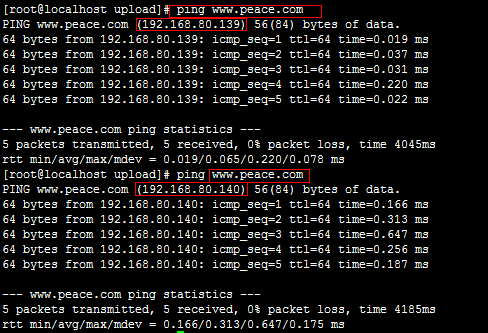
4)通过ping 查看是否有dns轮询:
2、192.168.80.139服务器架构
LAMP的编译就不介绍了,这里直接开始安装论坛
1)先设置mysql的密码
# mysqladmin -u root password 'redhat'
2)修改http配置文件,这里使用的虚拟主机的方式
- # vim /etc/httpd/httpd.conf,修改如下内容
- # DocumentRoot "/usr/local/apache/htdocs"
- Include /etc/httpd/extra/httpd-vhosts.conf
- # vim /etc/httpd/extra/httpd-vhosts.conf
- <VirtualHost *:80>
- DocumentRoot "/web/discuz"
- ServerName www.peace.com
- ErrorLog "logs/www.peace.com-error_log"
- CustomLog "logs/www.peace.com-access_log" common
- <Directory "/web/discuz">
- Options none
- AllowOverride none
- Require all granted
- </Directory>
- </VirtualHost>
- # vim /etc/php.ini
- short_open_tag = On
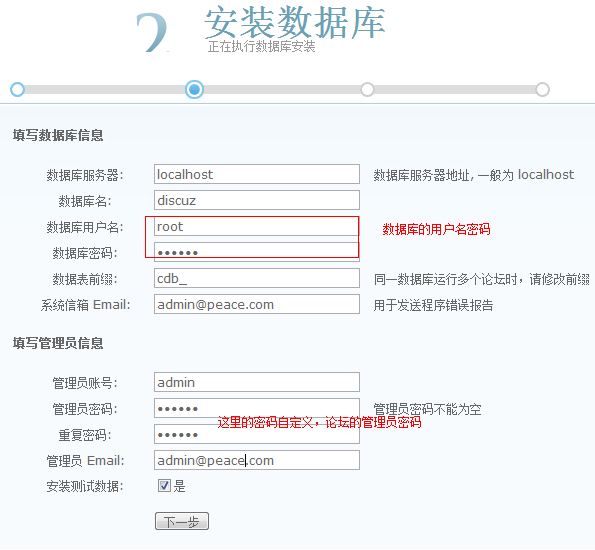
3)论坛架设
- # mkdir /web/discuz -p
- # unzip Discuz_7.2_FULL_SC_UTF8.zip -d /web/discuz/
- # cd /web/discuz/upload/
- # chown -R daemon config.inc.php attachments/ forumdata/ uc_client/data/cache/
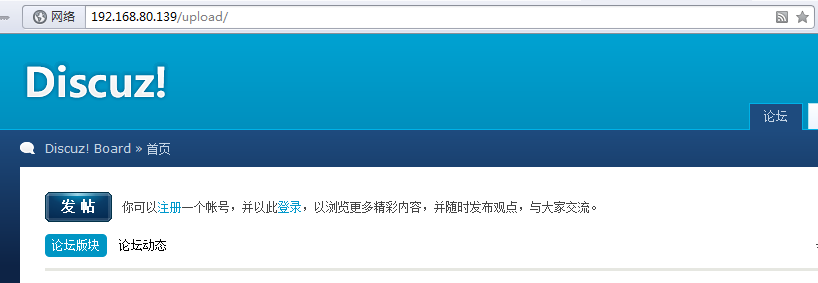
重启服务,浏览器输入http://192.168.80.139/upload/install按步骤安装即可
# service httpd restart
论坛已经架构好了
3、192.168.80.140服务器架构
1)配置apache
(1)安装环境,编译安装
- # yum -y install pcre-devel
- # tar xf apr-1.4.6.tar.bz2
- # cd apr-1.4.6
- # ./configure --prefix=/usr/local/apr
- # make && make install
- # tar xf apr-util-1.4.1.tar.bz2
- # cd apr-util-1.4.1
- # ./configure --prefix=/usr/local/apr-util --with-apr=/usr/local/apr
- # make && make install
- # tar xf httpd-2.4.2.tar.bz2
- # cd httpd-2.4.2
- # ./configure --prefix=/usr/local/apache --sysconfdir=/etc/httpd --enable-so --enable-ssl --enable-cgi -enable-rewrite --with-zlib --with-pcre --with-apr=/usr/local/apr --with-apr-util=/usr/local/apr-util
- # make && make install
(2)修改配置文件添加如下内容
# vim /etc/httpd/httpd.conf
ServerRoot "/usr/local/apache"
Pidfile "/var/run/httpd.pid
(3)添加启动脚本
- #!/bin/bash
- #
- # httpd Startup script for the Apache HTTP Server
- #
- # chkconfig: - 85 15
- # description: Apache is a World Wide Web server. It is used to serve \
- # HTML files and CGI.
- # processname: httpd
- # config: /etc/httpd/conf/httpd.conf
- # config: /etc/sysconfig/httpd
- # pidfile: /var/run/httpd.pid
- # Source function library.
- . /etc/rc.d/init.d/functions
- if [ -f /etc/sysconfig/httpd ]; then
- . /etc/sysconfig/httpd
- fi
- # Start httpd in the C locale by default.
- HTTPD_LANG=${HTTPD_LANG-"C"}
- # This will prevent initlog from swallowing up a pass-phrase prompt if
- # mod_ssl needs a pass-phrase from the user.
- INITLOG_ARGS=""
- # Set HTTPD=/usr/sbin/httpd.worker in /etc/sysconfig/httpd to use a server
- # with the thread-based "worker" MPM; BE WARNED that some modules may not
- # work correctly with a thread-based MPM; notably PHP will refuse to start.
- # Path to the apachectl script, server binary, and short-form for messages.
- apachectl=/usr/local/apache/bin/apachectl
- httpd=${HTTPD-/usr/local/apache/bin/httpd}
- prog=httpd
- pidfile=${PIDFILE-/var/run/httpd.pid}
- lockfile=${LOCKFILE-/var/lock/subsys/httpd}
- RETVAL=0
- start() {
- echo -n $"Starting $prog: "
- LANG=$HTTPD_LANG daemon --pidfile=${pidfile} $httpd $OPTIONS
- RETVAL=$?
- echo
- [ $RETVAL = 0 ] && touch ${lockfile}
- return $RETVAL
- }
- stop() {
- echo -n $"Stopping $prog: "
- killproc -p ${pidfile} -d 10 $httpd
- RETVAL=$?
- echo
- [ $RETVAL = 0 ] && rm -f ${lockfile} ${pidfile}
- }
- reload() {
- echo -n $"Reloading $prog: "
- if ! LANG=$HTTPD_LANG $httpd $OPTIONS -t >&/dev/null; then
- RETVAL=$?
- echo $"not reloading due to configuration syntax error"
- failure $"not reloading $httpd due to configuration syntax error"
- else
- killproc -p ${pidfile} $httpd -HUP
- RETVAL=$?
- fi
- echo
- }
- # See how we were called.
- case "$1" in
- start)
- start
- ;;
- stop)
- stop
- ;;
- status)
- status -p ${pidfile} $httpd
- RETVAL=$?
- ;;
- restart)
- stop
- start
- ;;
- condrestart)
- if [ -f ${pidfile} ] ; then
- stop
- start
- fi
- ;;
- reload)
- reload
- ;;
- graceful|help|configtest|fullstatus)
- $apachectl $@
- RETVAL=$?
- ;;
- *)
- echo $"Usage: $prog {start|stop|restart|condrestart|reload|status|fullstatus|graceful|help|configtest}"
- exit 1
- esac
- exit $RETVAL
(4)添加权限,启动服务
# chmod +x /etc/rc.d/init.d/httpd
# chkconfig --add httpd
# service httpd restart

2)安装mysql,注意的是这里装好以后不需启动,因为php编译需要mysql,所以这里的mysql只是为了安装php的
- # groupadd -r mysql
- # useradd -g mysql -r -s /sbin/nologin -M -d /mydata/data mysql
- # mkdir -p /mydata/data
- # chown -R mysql.mysql /mydata/data/
- # tar xf mysql-5.5.24-linux2.6-i686.tar.gz -C /usr/local/
- # cd /usr/local/
- # ln -s mysql-5.5.24-linux2.6-i686/ mysql
- # cd mysql
- # chown -R mysql.mysql .
- # scripts/mysql_install_db --user=mysql --datadir=/mydata/data
- # chown -R root .
- # cp support-files/my-large.cnf /etc/my.cnf
- # vim /etc/my.cnf
- thread_concurrency = 2
- datadir = /mydata/data
- # vim /etc/ld.so.conf,添加如下内容
- /usr/local/mysql/bin
- # ldconfig
3)安装php-5.4.4
(1)安装依赖关系库
# yum -y groupinstall "X Software Development"
让编译的php支持mcrypt扩展,安装以下软件包,这里本机已经安装了,但是版本较低,所以升级安装
libmcrypt-2.5.7-5.el5.i386.rpm
libmcrypt-devel-2.5.7-5.el5.i386.rpm
# rpm -Uvh libmcrypt-*
(2)编译安装
- # tar xf php-5.4.4.tar.bz2
- # cd php-5.4.4
- # ./configure --prefix=/usr/local/php --with-mysql=/usr/local/mysql --with-openssl --with-mysqli=/usr/local/mysql/bin/mysql_config --enable-mbstring --with-freetype-dir --with-jpeg-dir --with-png-dir --with-zlib --with-libxml-dir=/usr --enable-xml --with-apxs2=/usr/local/apache/bin/apxs --with-mcrypt --with-config-file-path=/etc --with-config-file-scan-dir=/etc/php.d --with-bz2
- # make && make install
(3)复制php配置文件
# cp php.ini-production /etc/php.ini
(4)修改http配置文件,使其支持php
- # vim /etc/httpd/httpd.conf
- ……
- AddType application/x-httpd-php .php
- AddType application/x-httpd-php-source .phps
- ……
- <IfModule dir_module>
- DirectoryIndex index.php index.html
- </IfModule>
- ……
- # service httpd restart
- 添加测试页面
- # cat /usr/local/apache/htdocs/index.php
- <?php
- phpinfo();
- ?>
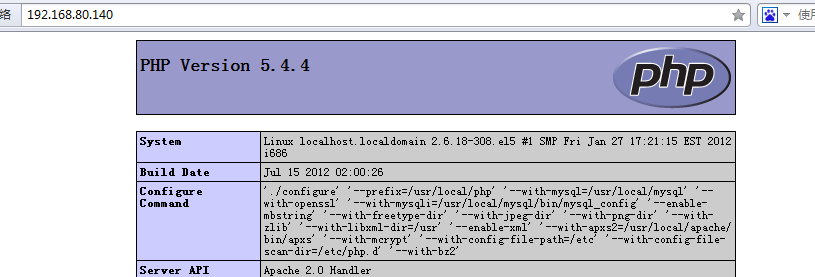
(5)测试访问查看apache和php整合是否成功:
4、139和140两台整合
1)192.168.80.139配置:
(1)将网站目录通过nfs共享出来
- # vim /etc/exports
- /web/discuz 192.168.80.0/24(rw,no_root_squash)
- # service nfs restart
(2)配置mysql数据库,允许从其他机器登录
- mysql> GRANT ALL ON discuz.* TO root@'%.%.%.%' IDENTIFIED BY 'redhat';
- mysql> FLUSH PRIVILEGES;
2)192.168.80.140配置:
(1)测试与mysql连接是否成功:
- # cat /usr/local/apache/htdocs/index.php
- <?php
- $link=mysql_connect('192.168.80.139','root','redhat');
- if ($link)
- echo "Sucess!!";
- else
- echo "Failuser!!";
- mysql_close();
- ?>
访问ok

(2)把网页文件挂载过来
- # mkdir /web/discuz -p
- # mount -t nfs 192.168.80.139:/web/discuz /web/discuz/
(3)修改http配置文件
- # vim /etc/httpd/httpd.conf
- # DocumentRoot "/usr/local/apache/htdocs"
- Include /etc/httpd/extra/httpd-vhosts.conf
- # vim /etc/httpd/extra/httpd-vhosts.conf
- <VirtualHost *:80>
- DocumentRoot "/web/discuz"
- ServerName www.peace.com
- ErrorLog "logs/www.peace.com-error_log"
- CustomLog "logs/www.peace.com-access_log" common
- <Directory "/web/discuz">
- Options none
- AllowOverride none
- Require all granted
- </Directory>
- </VirtualHost>
- # vim /etc/php.ini
- short_open_tag = On
- # service httpd restart
访问下已经有论坛了

(4)修改网页配置文件,指定Mysql数据库
- # vim /web/discuz/upload/config.inc.php
- $dbhost = '192.168.80.139';
- define('UC_DBHOST', '192.168.80.139');
- define('UC_IP', '192.168.80.139');
3)验证
访问
http://192.168.80.140/upload/和http://192.168.80.139/upload/都没有问题,之后使用域名验证

在两台上面都执行:
# tailf /usr/local/apache/logs/www.peace.com-access_log,动态监控日志,通过不同浏览器访问发现都有日志记录

