Android系统默认Home应用程序(Launcher)的启动过程源代码分析(5)
Step 19. PackageManagerService.queryIntentActivities
这个函数定义在frameworks/base/services/java/com/android/server/PackageManagerService.java文件中:
- class PackageManagerService extends IPackageManager.Stub {
- ......
- public List<ResolveInfo> queryIntentActivities(Intent intent,
- String resolvedType, int flags) {
- ......
- synchronized (mPackages) {
- String pkgName = intent.getPackage();
- if (pkgName == null) {
- return (List<ResolveInfo>)mActivities.queryIntent(intent,
- resolvedType, flags);
- }
- ......
- }
- ......
- }
- ......
- }
回忆前面一篇文章Android应用程序安装过程源代码分析,系统在前面的Step 8中启动PackageManagerService时,会把系统中的应用程序都解析一遍,然后把解析得到的Activity都保存在mActivities变量中,这里通过这个mActivities变量的queryIntent函数返回符合条件intent的Activity,这里要返回的便是Action类型为Intent.ACTION_MAIN,并且Category类型为Intent.CATEGORY_LAUNCHER的Activity了。
回到Step 18中的 LoaderTask.loadAllAppsByBatch函数中,从queryIntentActivities函数调用处返回所要求的Activity后,便调用函数tryGetCallbacks(oldCallbacks)得到一个返CallBack接口,这个接口是由Launcher类实现的,接着调用这个接口的.bindAllApplications函数来进一步操作。注意,这里又是通过消息来处理加载应用程序的操作的。
Step 20. Launcher.bindAllApplications
这个函数定义在packages/apps/Launcher2/src/com/android/launcher2/Launcher.java文件中:
- public final class Launcher extends Activity
- implements View.OnClickListener, OnLongClickListener, LauncherModel.Callbacks, AllAppsView.Watcher {
- ......
- private AllAppsView mAllAppsGrid;
- ......
- public void bindAllApplications(ArrayList<ApplicationInfo> apps) {
- mAllAppsGrid.setApps(apps);
- }
- ......
- }
这里的mAllAppsGrid是一个AllAppsView类型的变量,它的实际类型一般就是AllApps2D了。
Step 21. AllApps2D.setApps
这个函数定义在packages/apps/Launcher2/src/com/android/launcher2/AllApps2D.java文件中:
- public class AllApps2D
- extends RelativeLayout
- implements AllAppsView,
- AdapterView.OnItemClickListener,
- AdapterView.OnItemLongClickListener,
- View.OnKeyListener,
- DragSource {
- ......
- public void setApps(ArrayList<ApplicationInfo> list) {
- mAllAppsList.clear();
- addApps(list);
- }
- public void addApps(ArrayList<ApplicationInfo> list) {
- final int N = list.size();
- for (int i=0; i<N; i++) {
- final ApplicationInfo item = list.get(i);
- int index = Collections.binarySearch(mAllAppsList, item,
- LauncherModel.APP_NAME_COMPARATOR);
- if (index < 0) {
- index = -(index+1);
- }
- mAllAppsList.add(index, item);
- }
- mAppsAdapter.notifyDataSetChanged();
- }
- ......
- }
函数setApps首先清空mAllAppsList列表,然后调用addApps函数来为上一步得到的每一个应用程序创建一个ApplicationInfo实例了,有了这些ApplicationInfo实例之后,就可以在桌面上展示系统中所有的应用程序了。
到了这里,系统默认的Home应用程序Launcher就把PackageManagerService中的应用程序加载进来了,当我们在屏幕上点击下面这个图标时,就会把刚才加载好的应用程序以图标的形式展示出来了:

点击这个按钮时,便会响应Launcher.onClick函数:
- public final class Launcher extends Activity
- implements View.OnClickListener, OnLongClickListener, LauncherModel.Callbacks, AllAppsView.Watcher {
- ......
- public void onClick(View v) {
- Object tag = v.getTag();
- if (tag instanceof ShortcutInfo) {
- ......
- } else if (tag instanceof FolderInfo) {
- ......
- } else if (v == mHandleView) {
- if (isAllAppsVisible()) {
- ......
- } else {
- showAllApps(true);
- }
- }
- }
- ......
- }
接着就会调用showAllApps函数显示应用程序图标:
- public final class Launcher extends Activity
- implements View.OnClickListener, OnLongClickListener, LauncherModel.Callbacks, AllAppsView.Watcher {
- ......
- void showAllApps(boolean animated) {
- mAllAppsGrid.zoom(1.0f, animated);
- ((View) mAllAppsGrid).setFocusable(true);
- ((View) mAllAppsGrid).requestFocus();
- // TODO: fade these two too
- mDeleteZone.setVisibility(View.GONE);
- }
- ......
- }
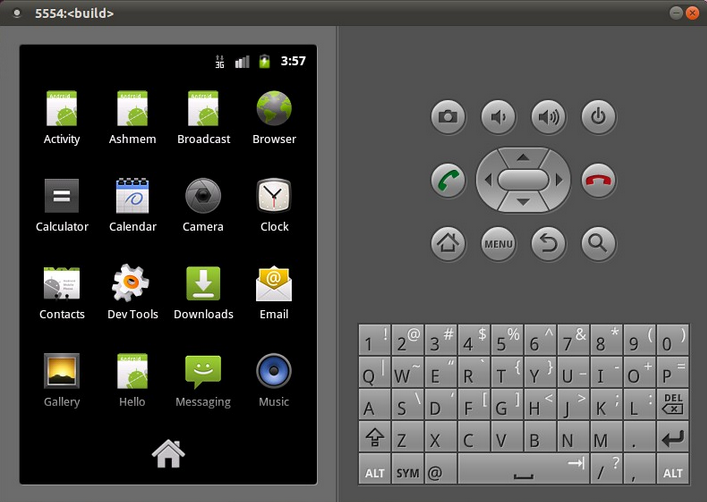
这样我们就可以看到系统中的应用程序了:

当点击上面的这些应用程序图标时,便会响应AllApps2D.onItemClick函数:
- public class AllApps2D
- extends RelativeLayout
- implements AllAppsView,
- AdapterView.OnItemClickListener,
- AdapterView.OnItemLongClickListener,
- View.OnKeyListener,
- DragSource {
- ......
- public void onItemClick(AdapterView parent, View v, int position, long id) {
- ApplicationInfo app = (ApplicationInfo) parent.getItemAtPosition(position);
- mLauncher.startActivitySafely(app.intent, app);
- }
- ......
- }<span style="font-family:Arial, Verdana, sans-serif;"><span style="white-space: normal;">
- </span></span>
这里的成员变量mLauncher的类型为Launcher,于是就调用Launcher.startActivitySafely函数来启动应用程序了,这个过程具体可以参考Android应用程序启动过程源代码分析一文。