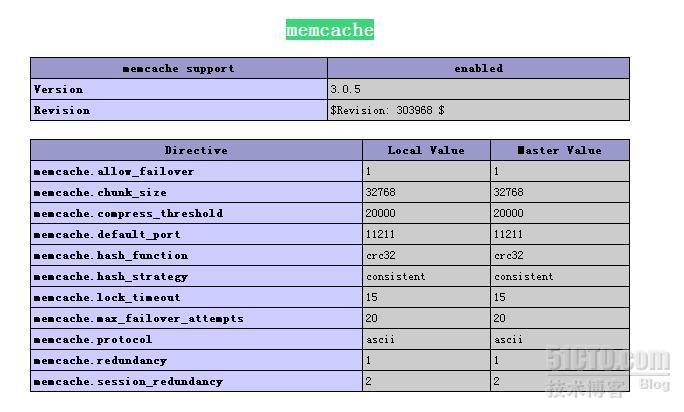
Linux下的Memcache安装
Memcached 是高效、快速的分布式内存对象缓存系统,主要用于加速 WEB 动态应用程序,memcache是C/S架构;Linux下安装memcache需要安装服务器端和客户端;
一、安装服务器端
http://memcached.org/下载,目前最新版本是memcached-1.4.5.tar.gz;memcached 用到了 libevent ,这个库用于Socket的处理;
官网:http://www.monkey.org/~provos/libevent/
下载:http://www.monkey.org/~provos/libevent-1.3.tar.gz
注意的是:.先安装libevent,安装时需指定一个安装路径,即./configure –prefix=/usr;然后make;然后make install;再安装memcached,配置时需要指定libevent的安装路径即./configure –with-libevent=/usr;然后make;然后make install;
1、安装libevent
[root@localhost ~]# tar -zxvf libevent-1.3.tar.gz -C ../software/
[root@localhost ~]# cd ../software/libevent-1.3/
[root@localhost ~]# ./configure --prefix=/usr
[root@localhost ~]# make
[root@localhost ~]# make install
[root@localhost ~]# ls -al /usr/lib |grep libevent
lrwxrwxrwx 1 root root 22 Dec 13 21:15 libevent-1.1a.so.1 -> libevent-1.1a.so.1.0.2
-rwxr-xr-x 1 root root 31736 Jul 13 2006 libevent-1.1a.so.1.0.2
lrwxrwxrwx 1 root root 21 Dec 20 09:59 libevent-1.3.so.1 -> libevent-1.3.so.1.0.3
-rwxr-xr-x 1 root root 260084 Dec 20 09:59 libevent-1.3.so.1.0.3
-rw-r--r-- 1 root root 331260 Dec 20 09:59 libevent.a
-rwxr-xr-x 1 root root 805 Dec 20 09:59 libevent.la
lrwxrwxrwx 1 root root 21 Dec 20 09:59 libevent.so -> libevent-1.3.so.1.0.3
2、安装memcached
[root@localhost ~]# cd memcached-1.4.5/
[root@localhost ~]# ./configure -with-libevent=/usr
[root@localhost ~]# make
[root@localhost ~]# make install
安装完成后会把memcached放到 /usr/local/bin/memcached
[root@localhost ~]# cd /usr/local/bin/
[root@localhost bin]# ls
iperf memcached unrar
3、运行 memcached 守护程序
[root@localhost bin]# /usr/local/bin/memcached -d -m 10 -u root -l 192.168.250.111 -p 11211 -c 256 -P /tmp/memcached.pid
-d选项是启动一个守护进程,
-m是分配给Memcache使用的内存数量,单位是MB,我这里是10MB,
-u是运行Memcache的用户,我这里是root,
-l设置监听的 IP 地址,如果是本机的话,通常可以不设置此参数,我这里指定了服务器的IP地址192.168.250.111,
-p是设置Memcache监听的端口,我这里设置了11211,最好是1024以上的端口,
-c选项是最大运行的并发连接数,默认是1024,我这里设置了256,按照你服务器的负载量来设定,
-P是设置保存Memcache的pid文件,我这里是保存在 /tmp/memcached.pid,
[root@localhost softpacket]# netstat -anlpt |grep 11211
tcp 0 0 192.168.250.111:11211 0.0.0.0:* LISTEN 11129/memcached
4、如果要结束Memcache进程,执行:
# kill `cat /tmp/memcached.pid`
二、安装客户端
PHP 如何作为 memcached 客户端?有两种方法可以使 PHP 作为 memcached 客户端,调用 memcached 的服务进行对象存取操作。 第一种,PHP 有一个叫做 memcache 的扩展,Linux 下编译时需要带上 –enable-memcache[=DIR] 选项,Window 下则在 php.ini 中去掉 php_memcache.dll 前边的注释符,使其可用。 除此之外,还有一种方法,可以避开扩展、重新编译所带来的麻烦,那就是直接使用 php-memcached-client。缺点是这中方法的应用效率比起扩展稍差; 本文选用第一种方式;
在http://pecl.php.net/package/memcache 选择相应想要下载的memcache版本,我们下载的是memcache-3.0.5.tgz
1、安装php扩展
[root@localhost softpacket]# tar -zxvf memcache-3.0.5.tgz -C ../software/
[root@localhost software]# cd memcache-3.0.5/
[root@localhost memcache-3.0.5]# ls
config9.m4 memcache_ascii_protocol.c memcache.php memcache_session.c
config.m4 memcache_binary_protocol.c memcache_pool.c memcache_standard_hash.c
config.w32 memcache.c memcache_pool.h php_memcache.h
CREDITS memcache_consistent_hash.c memcache_queue.c README
example.php memcache.dsp memcache_queue.h
[root@localhost memcache-3.0.5]# /usr/local/php5/bin/phpize
Configuring for:
PHP Api Version: 20041225
Zend Module Api No: 20060613
Zend Extension Api No: 220060519
[root@localhost memcache-3.0.5]# ./configure --enable-memcache --with-php-config=/usr/local/php5/bin/php-config --with-zlib-dir
[root@localhost memcache-3.0.5]#make
[root@localhost memcache-3.0.5]#make install
根据提示会吧扩展模块安装到
/usr/local/php5/lib/php/extensions/no-debug-non-zts-20060613 下面 。由于我们在php.ini中设定了extension的路径,我们把模块拷贝到相应的目录;
2、编辑php.ini 添加memcache的扩展模块
extension=memcache.so
3、重启apache

<?php
$memcache = new Memcache;
$memcache->connect('127.0.0.1', 11211) or die ("Could not connect");
$version = $memcache->getVersion();
echo "Server's version: ".$version."\n";
$tmp_object = new stdClass;
$tmp_object->str_attr = 'test';
$tmp_object->int_attr = 123;
$memcache->set('key', $tmp_object, false, 10) or die ("Failed to save data at the server");
echo "Store data in the cache (data will expire in 10 seconds)\n";
$get_result = $memcache->get('key');
echo "Data from the cache:\n";
var_dump($get_result);
?>
4、Memcache环境测试
新建一个mem.php的文档输入;
<?php
$memcache = new Memcache;
$memcache->connect('127.0.0.1', 11211) or die ("Could not connect");
$version = $memcache->getVersion();
echo "Server's version: ".$version."\n";
$tmp_object = new stdClass;
$tmp_object->str_attr = 'test';
$tmp_object->int_attr = 123;
$memcache->set('key', $tmp_object, false, 10) or die ("Failed to save data at the server");
echo "Store data in the cache (data will expire in 10 seconds)\n";
$get_result = $memcache->get('key');
echo "Data from the cache:\n";
var_dump($get_result);
?>
输出如下:
Server's version: 1.4.5 Store data in the cache (data will expire in 10 seconds) Data from the cache: object(stdClass)#3 (2) { ["str_attr"]=> string(4) "test" ["int_attr"]=> int(123) }
表明成功了
如果是:
Warning: Memcache::connect() [memcache.connect]: Can't connect to 127.0.0.1:11211, Connection refused (111) in /usr/local/apache/htdocs/mem.php on line 3
Could not connect
查看一下memcached的配置
参考资料:
http://www.ccvita.com/257.html