路由器交换机远程登录配置实验
一实验目的
学习如何配置路由器的gatway、Console、vty、enable password
学习如何配置交换机的vlan1 gatway、Console、vty、enable password
学习如何安装telnet
学习如何远程登录交换机路由器
二实验步骤

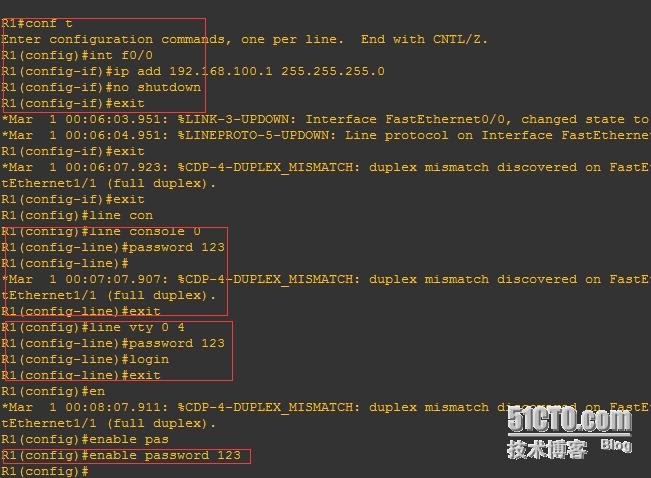
路 由 配 置

R1路由器配置IP、子网掩码、
R1(config)#int f0/0 //进入F0/0接口
R1(config-if)#ip add 192.168.100.1 255.255.255.0 //配置IP和默认网关
R1(config-if)#no shutdown // 激活接口
R1(config-if)#exit //退出
Console密码
R1(config)#line console 0 //进入console o 口
R1(config-line)#password 123 //设置密码123
R1(config-line)#exit //退出
虚拟终端开启数和密码
R1(config)#line vty 0 4 //进入虚拟类型终端设置连接数(0是1个、0_ 2 是2个、 0_ 3是3个、0_4是4个)
R1(config-line)#password 123 //设置VTY的密码123
R1(config-line)#login //开启激活
R1(config-line)#exit //退出
R1(config)#enable password 123 //给特权模式设置进入密码123
R1(config)#
交换机配置


S1#conf t //进入特权模式
S1(config)#int vlan 1 //进入vlan 1口
S1(config-if)#ip add 192.168.100.2 255.255.255.0 //配置IP
S1(config-if)#no shutdown //激活接口
S1(config-if)#exit
S1(config)#line console 0 //进入console 0口
S1(config-line)#password 123 //设置密码123
S1(config-line)#exit //退出
S1(config)#
S1(config)#
S1(config)#line vty 0 4 //进入虚拟类型终端设置连接数(0是1个、0_ 2 是2个、 0_ 3是3个、0_4是4个)
S1(config-line)#password 123 //配置IP
S1(config-line)#login //激活
S1(config-line)#exit //退出
S1(config)#
S1(config-if)#ip default-gateway 192.168.100.1 //配置交换机的网关(不在同一网段的时候要用)
S1(config)#enable password 123 //特权模式设置密码123
安装telnet

远程登陆交换机路由器

这里192.168.100.1是路由器的 192.168.100.2是交换机的


三注意事项
此处当出现远程连接出现(connect refuse或者在端口 23: 连接失败)一般有2种情况。
1 GNS3的兼容性个出现了问题只能重新打开GNS3程序重新配置
2 telnet的服务默认没有打开

本文出自 “疯狂的斯图卡” 博客,转载请与作者联系!